Errors when mounting an Azure file share
This article provides possible causes and solutions for errors that cause the mounting of an Azure file share to fail.
Symptoms
You deploy a Kubernetes resource such as a Deployment or a StatefulSet, in an Azure Kubernetes Service (AKS) environment. The deployment will create a pod that mounts a PersistentVolumeClaim (PVC) referencing an Azure file share.
However, the pod stays in the ContainerCreating status. When you run the kubectl describe pods command, you might see one of the following errors in the command output, which causes the mounting operation to fail:
Refer to the following output as an example:
MountVolume.MountDevice failed for volume "\<pv-fileshare-name>"
rpc error: code = Internal desc =
volume(\<storage-account's-resource-group>#\<storage-account-name>#\<pv/fileshare-name>#) > mount "//\<storage-account-name>.file.core.windows.net/\<pv-fileshare-name>" on "/var/lib/kubelet/plugins/kubernetes.io/csi/pv/\<pv-fileshare-name>/globalmount" failed with
mount failed: exit status 32
Mounting command: mount
Mounting arguments: -t cifs -o dir_mode=0777,file_mode=0777,uid=0,gid=0,mfsymlinks,cache=strict,actimeo=30,\<masked> //\<storage-account-name>.file.core.windows.net/\<pv-name> /var/lib/kubelet/plugins/kubernetes.io/csi/pv/\<pv-name>/globalmount
Output: mount error(\<error-id>): \<error-description>
Refer to the mount.cifs(8) manual page (e.g. man mount.cifs) and kernel log messages (dmesg)
Note
- If the storage account is publicly accessible, the hostname displayed in the output will be <storage-account-name>.file.core.windows.net.
- If the storage account is configured privately with a private link, endpoint, or DNS zone, the hostname will be <storage-account-name>.privatelink.file.core.windows.net.
Before troubleshooting
According to the message in the output, as shown in the following example, identify the storage account and file share—the values will be used in later troubleshooting steps.
mount "//<storage-account-name>.file.core.windows.net/<pv-fileshare-name>"
See the following sections for possible causes and solutions.
Mount error(2): No such file or directory
This error indicates that there's no connectivity between the AKS cluster and the storage account.
Initial troubleshooting
Azure File relies on SMB protocol (port 445). Make sure that port 445 and/or the IP address of the storage account aren't blocked.
To check the IP address of the storage account, run a Domain Name System (DNS) command like nslookup, dig, or host. For example:
nslookup <storage-account-name>.file.core.windows.net
To check if there's connectivity between the AKS cluster and the storage account, get inside the node or pod and run the following nc or telnet command:
nc -v -w 2 <storage-account-name>.file.core.windows.net 445
telnet <storage-account-name>.file.core.windows.net 445
Possible causes for mount error(2)
- Cause 1: File share doesn't exist
- Cause 2: NSG blocks traffic between AKS and storage account
- Cause 3: Virtual Appliance blocks traffic between AKS and storage account
- Cause 4: FIPS enabled node pool is used
Note
- Cause 1, 2, and 4 apply to public and private storage account scenarios.
- Cause 3 applies to the public scenario only.
Cause 1: File share doesn't exist
To check if the file share exists, follow these steps:
Search Storage accounts in the Azure portal and access your storage account.
Select File shares under Data storage in the storage account and check if the associated PersistentVolumeClaim in the yaml file of the pod, deployment, or statefulset exists in File shares.
Solution: Ensure file share exists
To resolve this issue, make sure that the file share that's associated with the PV/PVC exists.
Cause 2: Network Security Group blocks traffic between AKS and storage account
Check the output of the nc or telnet command mentioned in the Initial troubleshooting section. If a timeout is displayed, check the Network Security Group (NSG) and make sure that the IP address of the storage account isn't blocked.
To check if the NSG blocks the IP address of the storage account, follow these steps:
In the Azure portal, go to Network Watcher and select NSG diagnostic.
Fill the fields by using the following values:
- Protocol: Any
- Direction: Outbound
- Source type: IPv4 address/CIDR
- IPv4 address/CIDR: The IP address of an instance that's associated with the AKS node
- Destination IP address: The IP address of the storage account
- Destination port: 445
Select the Check button and check the Traffic status.
The Traffic status can be Allowed or Denied. The Denied status means that the NSG is blocking the traffic between the AKS cluster and storage account. If the status is Denied, the NSG name will be shown.
Solution: Allow connectivity between AKS and storage account
To resolve this issue, perform changes accordingly at the NSG level to allow the connectivity between the AKS cluster and the storage account on port 445.
Cause 3: Virtual Appliance blocks traffic between AKS and storage account
If you're using a Virtual Appliance (usually a firewall) to control outbound traffic of the AKS cluster (for example, the Virtual Appliance has a route table applied at the AKS cluster's subnet, and the route table has routes that send traffic towards the Virtual Appliance), the Virtual Appliance may block traffic between the AKS cluster and the storage account.
To isolate the issue, add a route in the route table for the IP address of the storage account to send the traffic towards the Internet.
To confirm which route table controls the traffic of the AKS cluster, follow these steps:
- Go to the AKS cluster in the Azure portal and select Properties > Infrastructure resource group.
- Access the virtual machine scale set (VMSS) or a VM in an availability set if you're using such VM set type.
- Select Virtual network/subnet > Subnets and identify the subnet of the AKS cluster. On the right side, you'll see the route table.
To add the route in the route table, follow the steps in Create a route and fill in the following fields:
- Address prefix: <storage-account's-public-IP>/32
- Next hop type:Internet
This route will send all traffic between the AKS cluster and storage account through the public Internet.
After you add the route, test the connectivity by using the nc or telnet command and perform the mounting operation again.
Solution: Ensure Virtual Appliance allows traffic between AKS and storage account
If the mounting operation succeeds, we recommend that you consult your networking team to make sure that the Virtual Appliance can allow traffic between the AKS cluster and storage account on port 445.
Cause 4: FIPS enabled node pool is used
If you use a Federal Information Processing Standard (FIPS) enabled node pool, the mounting operation will fail because the FIPS disables some authentication modules, which prevents the mounting of a CIFS share. This behavior is expected and not specific to AKS.
To resolve the issue, use one of the following solutions:
Solution 1: Schedule pods on nodes in a non-FIPS node pool
FIPS is disabled by default on AKS node pools and can be enabled only during the node pool creation by using the --enable-fips-image parameter.
To resolve the error, you can schedule the pods on nodes in a non-FIPS node pool.
Solution 2: Create a pod that can be scheduled on a FIPS-enabled node
To create a pod that can be scheduled on a FIPS-enabled node, follow these steps:
Use the Azure File CSI driver to create a custom StorageClass that uses NFS protocol.
Refer to the following YAML file as an example:
kind: StorageClass
apiVersion: storage.k8s.io/v1
metadata:
  name: azurefile-sc-fips
provisioner: file.csi.azure.com
reclaimPolicy: Delete
volumeBindingMode: Immediate
allowVolumeExpansion: true
parameters:
  skuName: Premium_LRS
  protocol: nfs
The SKU is set to Premium_LRS in the YAML file because Premium SKU is required for NFS. For more information, see Dynamic Provision.
Because of Premium SKU, the minimum size of the file share is 100GB. For more information, see Create a storage class.
Create a PVC that references the custom StorageClass azurefile-sc-fips.
Refer to the following YAML file as an example:
apiVersion: v1
kind: PersistentVolumeClaim
metadata:
  name: azurefile-pvc-fips
spec:
  accessModes:
    - ReadWriteMany
  storageClassName: azurefile-sc-fips
  resources:
    requests:
      storage: 100Gi
Create a pod that mounts the PVC azurefile-pvc-fips.
Refer to the following YAML file as an example:
kind: Pod
apiVersion: v1
metadata:
  name: azurefile-pod-fips
spec:
  containers:
  - name: azurefile-pod-fips
    image: mcr.microsoft.com/oss/nginx/nginx:1.15.5-alpine
    resources:
      requests:
        cpu: 100m
        memory: 128Mi
      limits:
        cpu: 250m
        memory: 256Mi
    volumeMounts:
    - mountPath: "/mnt/azure"
      name: volume
  volumes:
    - name: volume
      persistentVolumeClaim:
        claimName: azurefile-pvc-fips
Mount error(13): Permission denied
Here are possible causes for this error:
- Cause 1: Kubernetes secret doesn't reference the correct storage account name or key
- Cause 2: AKS's VNET and subnet aren't allowed for the storage account
- Cause 3: Connectivity is via a private link but nodes and the private endpoint are in different VNETs
- Cause 4: Storage account is set to require encryption that the client doesn't support
- Cause 5: Minimum encryption requirement for a storage account isn't met
- Cause 6: Security profile is used without the NTLM v2 authentication enabled
Note
- Cause 1 applies to public and private scenarios.
- Cause 2 applies to the public scenario only.
- Cause 3 applies to the private scenario only.
- Cause 4 applies to public and private scenarios.
- Cause 5 applies to public and private scenarios.
- Cause 6 applies to public and private scenarios.
Cause 1: Kubernetes secret doesn't reference correct storage account name or key
If the file share is created dynamically, a Kubernetes secret resource is automatically created with the name "azure-storage-account-<storage-account-name>-secret".
If the file share is created manually, the Kubernetes secret resource should be created manually.
Regardless of the creation method, if the storage account name or the key that's referenced in the Kubernetes secret mismatches the actual value, the mounting operation will fail with the "Permission denied" error.
Possible causes for mismatch
If the Kubernetes secret is created manually, a typo may occur during the creation.
If a "Rotate key" operation is performed at the storage account level, the changes won't reflect at the Kubernetes secret level. This will lead to a mismatch between the key value at the storage account level and the value at the Kubernetes secret level.
If a "Rotate key" operation happens, an operation with the name "Regenerate Storage Account Keys" will be displayed in the Activity log of the storage account. Be aware of the 90 days retention period for Activity log.
Verify mismatch
To verify the mismatch, follow these steps:
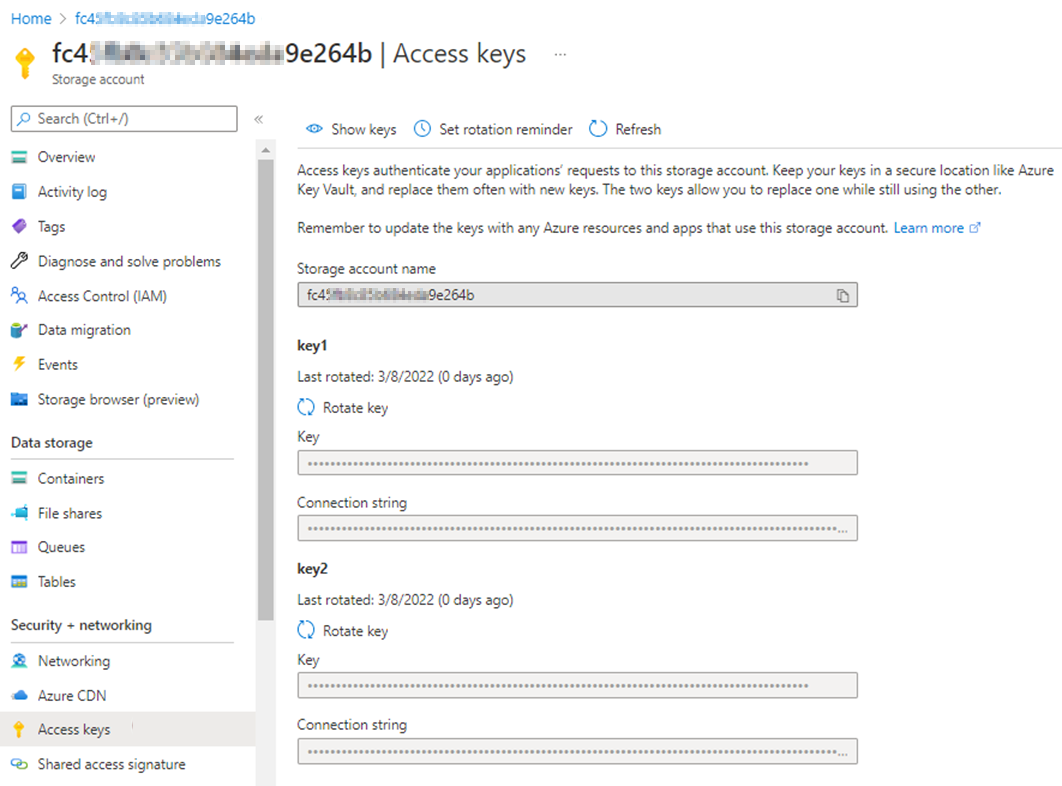
Search and access the storage account in the Azure portal. Select Access keys > Show keys in the storage account. You'll see the storage account name and associated keys.
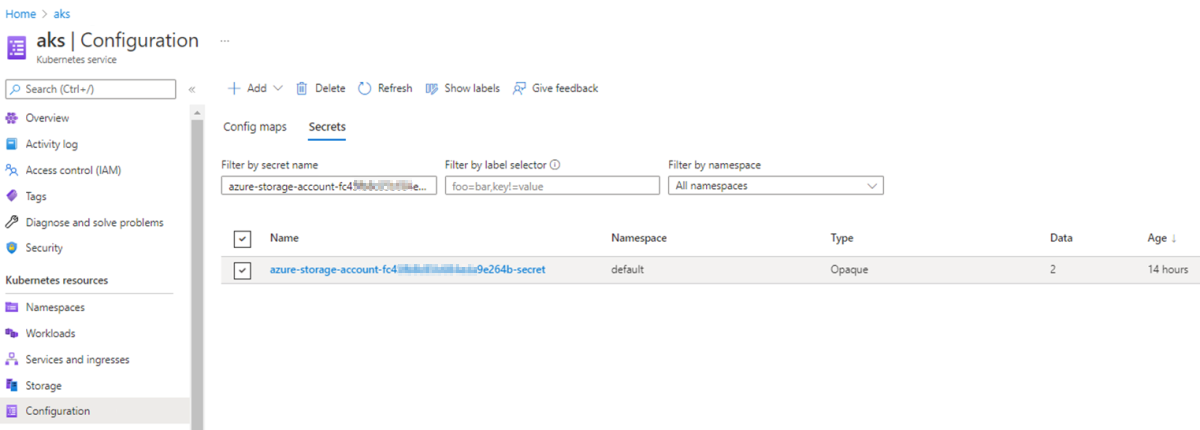
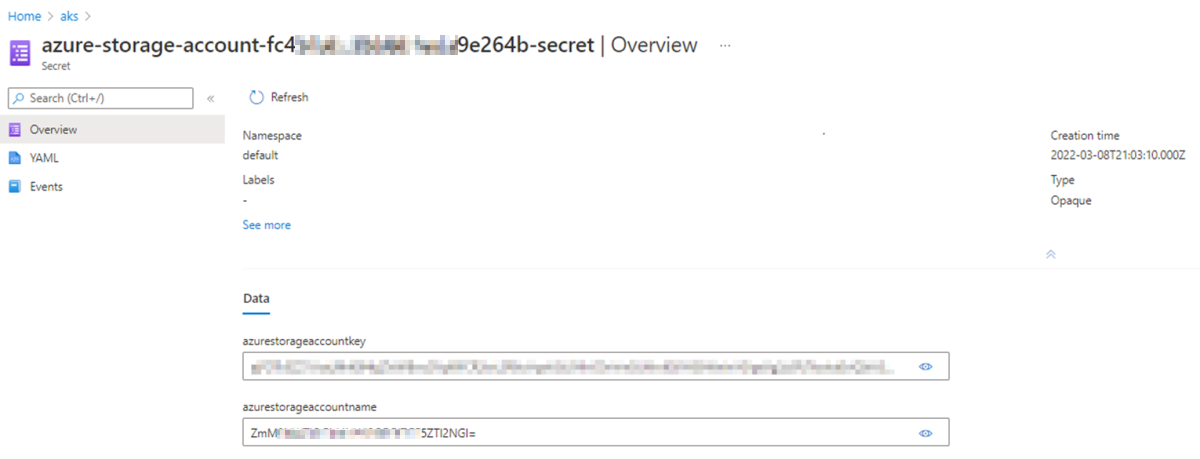
Go to the AKS cluster, select Configuration > Secrets, and then search and access the associated secret.
Select Show (the eye icon) and compare the values of the storage account name and associated key with the values in Step 1.
Before you select Show, the values of the storage account name and associated key are encoded into base64 strings. After you select Show, the values are decoded.
If you don't have access to the AKS cluster in the Azure portal, perform Step 2 at the kubectl level:
Get the YAML file of the Kubernetes secret, and then run the following command to get the values of the storage account name and the key from the output:
kubectl get secret <secret-name> -n <secret-namespace> -o <yaml-file-name>Use the
echocommand to decode the values of the storage account name and the key and compare them with the values at the storage account level.Here's an example to decode the storage account name:
echo -n '<storage account name>' | base64 --decode ;echo
Solution: Adjust the Kubernetes secret and re-create the pods
If the value of the storage account name or key in the Kubernetes secret doesn't match the value in Access keys in the storage account, adjust the Kubernetes secret at the Kubernetes secret level by running the following command:
kubectl edit secret <secret-name> -n <secret-namespace>
The value of the storage account name or the key added in the Kubernetes secret configuration should be a base64 encoded value. To obtain the encoded value, use the echo command.
Here's an example to encode the storage account name:
echo -n '<storage account name>'| base64 | tr -d '\n' ; echo
For more information, see Managing Secrets using kubectl.
After the Kubernetes secret azure-storage-account-<storage-account-name>-secret has the right values, re-create the pods. Otherwise, those pods will continue to use the old values that aren't valid anymore.
Cause 2: AKS's VNET and subnet aren't allowed for storage account
If the storage account's network is limited to selected networks, but the VNET and subnet of the AKS cluster aren't added to selected networks, the mounting operation will fail with the "Permission denied" error.
Solution: Allow AKS's VNET and subnet for storage account
Identify the node that hosts the faulty pod by running the following command:
kubectl get pod <pod-name> -n <namespace> -o wideCheck the node from the command output:

Go to the AKS cluster in the Azure portal, select Properties > Infrastructure resource group, access the VMSS associated with the node, and then check Virtual network/subnet to identify the VNET and subnet.

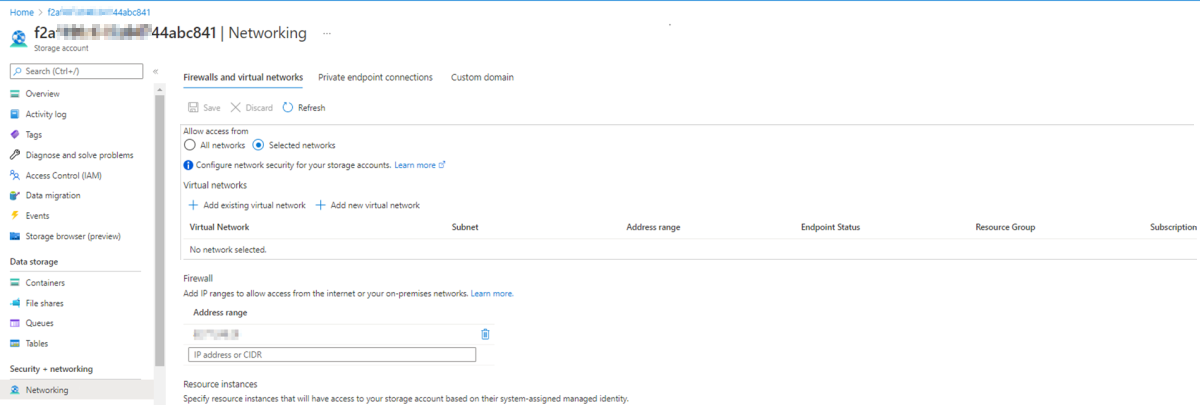
Access the storage account in the Azure portal. Select Networking. If Allow access from is set to Selected networks, check if the VNET and subnet of the AKS cluster are added.
If the VNET and subnet of the AKS cluster aren't added, select Add existing virtual network. On the Add networks page, type the VNET and subnet of the AKS cluster, and then select Add > Save.
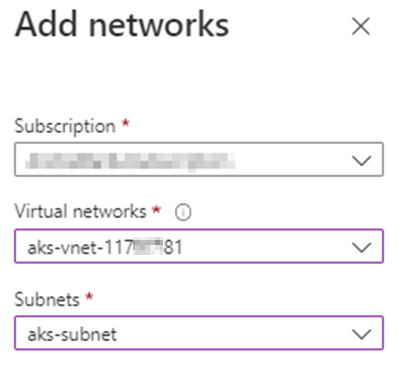
It may take a few moments for the changes to take effect. After the VNET and subnet are added, check if the pod status changes from ContainerCreating to Running.

Cause 3: Connectivity is via private link but nodes and private endpoint are in different VNETs
When the AKS cluster and storage account are connected via a private link, an approved private endpoint connection is used.
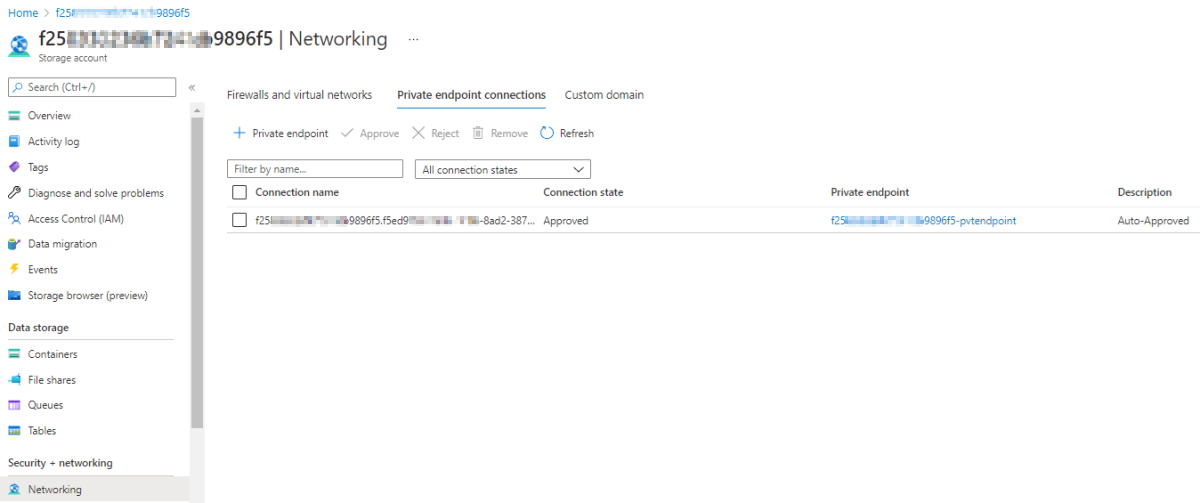
In this scenario, if the private endpoint and AKS node are in the same VNET, you'll be able to mount an Azure file share.
If the private endpoint and your AKS cluster are in different VNETs, the mounting operation will fail with the "Permission denied" error.
Solution: Create virtual network link for VNET of AKS cluster at private DNS zone
Get inside the node and check if the fully qualified domain name (FQDN) is resolved via a public or private IP address. To do this, run the following command:
nslookup <storage-account-name>.privatelink.file.core.windows.net
If the FQDN is resolved via a public IP address (see the following screenshot), create a virtual network link for the VNET of the AKS cluster at the private DNS zone ("privatelink.file.core.windows.net") level. Note that a virtual network link is already automatically created for the VNET of the storage account's private endpoint.

To create the virtual network link, follow these steps:
Access the Private DNS zone and select Virtual network links > Add.
Fill in the fields and select the VNET of the AKS cluster for Virtual networks. For how to identify the VNET of the AKS cluster, see the Solution: Allow AKS's VNET and subnet for storage account section.
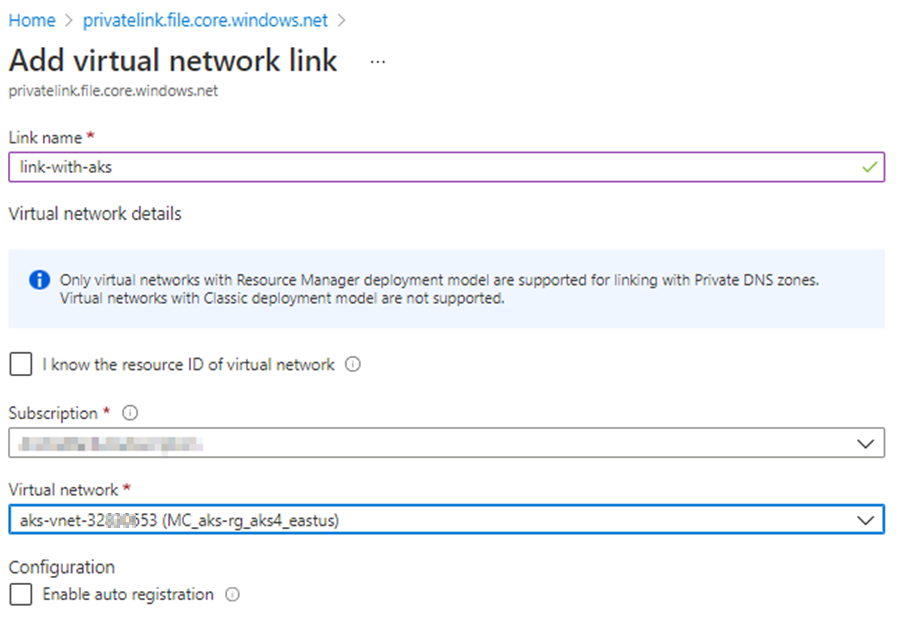
Select OK.
After the virtual network link is added, the FQDN should be resolved via a private IP address, and the mounting operation should succeed. See the following screenshot for an example:

Cause 4: Storage account is set to require encryption that the client doesn't support
Azure Files Security Settings contain a number of options for controlling the security and encryption settings on storage accounts. Restricting allowed methods and algorithms can prevent clients from connecting.
AKS versions earlier than 1.25 are based on Ubuntu 18.04 LTS, which uses the Linux 5.4 kernel and only supports the AES-128-CCM and AES-128-GCM encryption algorithms. The Maximum security profile, or a Custom profile that disables AES-128-GCM, will cause share mapping failures.
AKS versions 1.25 and later versions are based on Ubuntu 22.04, which uses the Linux 5.15 kernel and has support for AES-256-GCM.
Solution: Allow AES-128-GCM encryption algorithm to be used
Enable the AES-128-GCM algorithm by using the Maximum compatibility profile or a Custom profile that enables AES-128-GCM. For more information, see Azure Files Security Settings.
Cause 5: Minimum encryption requirement for a storage account isn't met
Solution: Enable AES-128-GCM encryption algorithm for all storage accounts
To successfully mount or access a file share, the AES-128-GCM encryption algorithm should be enabled for all storage accounts.
If you want to use the AES-256-GCM encryption only, do the following:
Linux
Use the following script to check if the client supports AES-256-GCM and enforce it only if it does:
cifsConfPath="/etc/modprobe.d/cifs.conf"
echo "$(date) before change ${cifsConfPath}:"
cat ${cifsConfPath}

# Check if 'require_gcm_256' is already present in the configuration file
if ! grep -q "require_gcm_256" "${cifsConfPath}"; then

    # Load the CIFS module
    modprobe cifs

    # Set the parameter at runtime
    echo 1 > /sys/module/cifs/parameters/require_gcm_256

    # Persist the configuration
    echo "options cifs require_gcm_256=1" >> "${cifsConfPath}"

    echo "$(date) after changing ${cifsConfPath}:"
    cat "${cifsConfPath}"
else
    echo "require_gcm_256 is already set in ${cifsConfPath}"
fi
You can also use a Kubernetes DaemonSet to enforce AES-256 on every node. See the following example:
Windows
Use the Set-SmbClientConfiguration PowerShell command to specify the encryption ciphers used by the SMB client and the preferred encryption type without user confirmation:
Set-SmbClientConfiguration -EncryptionCiphers "AES_256_GCM" -Confirm:$false
Note
The EncryptionCiphers parameter is available beginning with the 2022-06 Cumulative Update for Windows Server version 21H2 for x64-based systems (KB5014665) and the Cumulative Update for Windows 11, version 22H2 (KB5014668).
Cause 6: Security profile is used without the NTLM v2 authentication enabled
When you use the Maximum security profile or a Custom security profile without the NTLM v2 authentication mechanism enabled, the mounting operation will fail with the "Mount error(13): Permission denied" error.
Solution: Enable the NTLM v2 authentication or use the "Maximum compatibility" profile
To mount it properly in AKS, you have to enable the NTLM v2 authentication mechanism for the Custom security profile or use the Maximum compatibility security profile.
More information
If you experience some other mount errors, see Troubleshoot Azure Files problems in Linux.
Contact us for help
If you have questions or need help, create a support request, or ask Azure community support. You can also submit product feedback to Azure feedback community.


