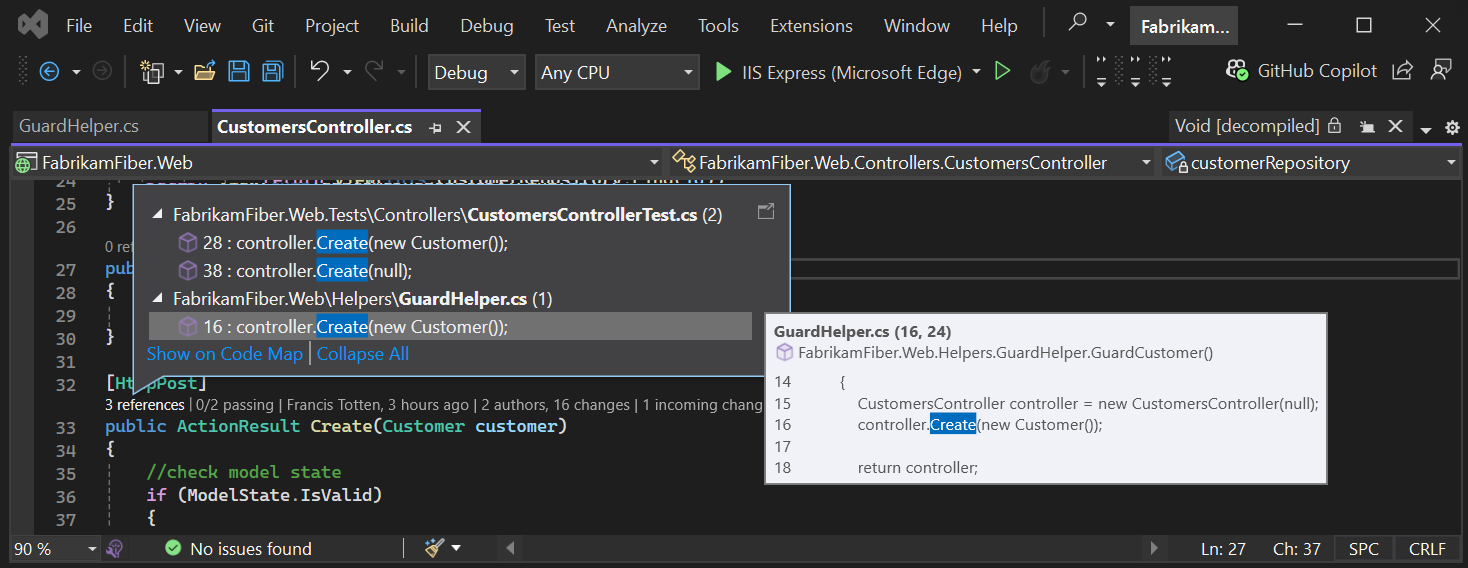
Find code changes and other history with CodeLens
Visual Studio CodeLens helps you stay focused on your work while you find out what happened to your code - all without leaving the Interactive Development Environment (IDE) code editor. You can find references to a piece of code, changes to your code, linked bugs, Azure DevOps work items, code reviews, and unit tests.
Note
CodeLens is available in the Community edition of Visual Studio, but the source control indicators aren't available in this edition.
CodeLens can show you both where and how the individual parts of your code are used in your solution:
View details about user's code changes, and use the right-click Send email to <user> option to contact users without leaving the code editor:

To choose the indicators that you want to see, or to turn CodeLens off and on, go to Tools > Options > Text Editor > All Languages > CodeLens.
Keyboard shortcuts in Visual Studio 2022
Many of the operations described in the following sections are available by using keyboard shortcuts in the Visual Studio code editor window.
To use the keyboard to select indicators, select and hold the Alt key to display the related number keys, then select the number on the keyboard that corresponds to the desired indicator:

Note
To select the reviews indicator, select Alt while using the left arrow and right arrow key to browse.
Find references to your code
You can find references in C# or Visual Basic code.
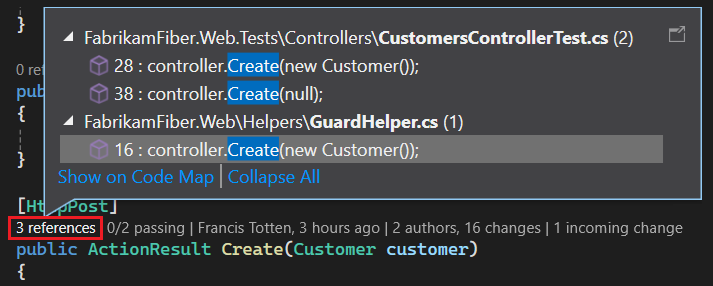
In the code editor, select the references indicator or use the Alt+2 keyboard shortcut:
Note
If the indicator shows 0 references, you don't have any references from your C# or Visual Basic code. However, there might be references in other project items such as .xaml and .aspx files.
To view the referencing code, hover over the reference in the list.

To open the file that contains the reference, double-click the reference.
Create a code map
To see relationships between the code and its references, you can create a code map. In the Code Map toolbar, expand the Show Related dropdown menu and select Find All References:
Find changes in your code
Inspect your code's history to find out what happened to your code. Or, review changes before they're merged into your code so you can better understand how changes in other branches might affect your code.
You need:
Visual Studio Enterprise or Visual Studio Professional
Git or Azure DevOps Server (formerly Team Foundation Server) or Team Foundation Version Control (TFVC)
For C# (.cs) or Visual Basic (.vb) code stored with TFVC or Git, CodeLens details are visible at the class and method levels (code element-level indicators) within the file:

For file types other than .cs or .vb, the Show file level Codelens indicator option lets you view CodeLens details for the entire file. The file-level indicators are displayed at the bottom of the file in the code editor:

Code element-level indicators
Code element-level indicators let you see who changed your code and what changes they made. Code element-level indicators are available for C# and Visual Basic code.
You can also view change history when you use TFVC or Azure DevOps Services:
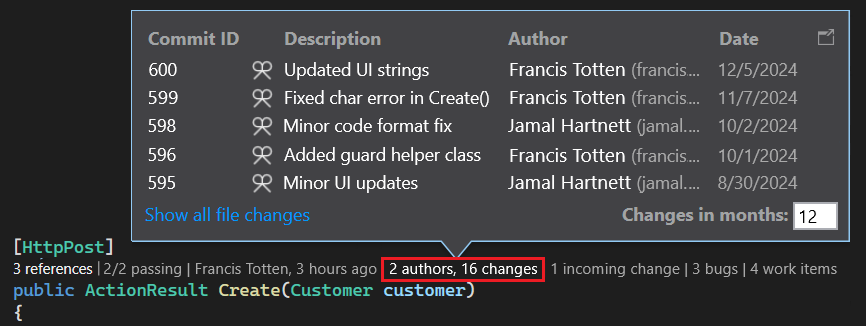
The default time period is the last 12 months (one year).
To see a detailed history of all the changes, including those changes from more than a year ago, select Show all file changes, which opens a History window. From the History window, you can view all your files that are in a Git repository, and select the code element-level changes indicator for more details:

File-level indicators
You can also find changes for an entire file with file-level indicators at the bottom of the window in the code editor.
Note
File-level indicators aren't available for C# and Visual Basic files.
To get more details about a change, right-click the item. Depending on whether you're using TFVC or Git, there are options to compare the versions of the file, view details and track the changeset, get the selected version of the file, and email the author of that change. Some of the details appear in Team Explorer when enabled; otherwise, the details appear in the Git Changes pane. You might also see the details on the horizontal scrollbar at the bottom of the code editor.
The indicators show who changed your code over time, which can help you find patterns in your team's changes and assess their impact:

Starting in Visual Studio 2022 version 17.12 Preview 2, you can show or hide file-level indicators on the code editor horizontal scrollbar with the Tools > Options > Text Editor > Advanced > Show file level CodeLens indicator option. This option updates visibility for file types that implement the file-level CodeLens control in the bottom editor scrollbar, such as XAML, HTML, and CSS. The option doesn't affect files that contain inline CodeLens (C# and VB).
Find changes in your current branch
Your team might have multiple branches, such as a main branch and a child development branch, to reduce the risk of breaking stable code.
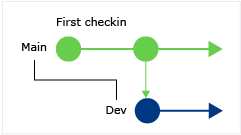
You can discover how many contributors changed your code and how many changes were made in the main branch by selecting the Alt+0 keyboard shortcut
Find when your code was branched
To find when your code was branched, browse to your code in the child branch. Then, select the changes indicator (or select Alt+0):

Find incoming changes from other branches
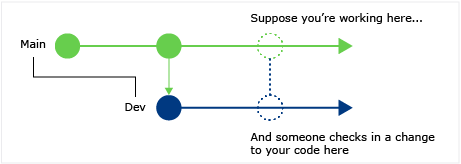
You can view incoming changes and you don't need to leave your current branch to review a change.
Find when changes got merged
You can see when changes got merged, so you can determine which changes are included in your branch.

Compare an incoming change with your local version
To compare an incoming change with your local version, double-click the changeset or select Shift + F10.
Branch icons
The icon in the Branch column indicates how the branch is related to the branch you're working in.
| Icon | The change came from |
|---|---|
| The current branch | |
| The parent branch | |
| A child branch | |
| A peer branch | |
| A branch further away than a parent, child, or peer | |
| A merge from the parent branch to a child branch | |
| A merge from a child branch to the parent branch | |
| A merge from an unrelated branch (baseless merge) |
Linked work items
Find linked work items by selecting the work items indicator or use the Alt+8 keyboard shortcut.
Linked code reviews
Find linked code reviews by selecting the reviews indicator. To use the keyboard, hold down the Alt key and then select Left Arrow or Right Arrow to browse the indicator options.
Linked bugs
Find linked bugs by selecting the bugs indicator or use the Alt + 7 keyboard shortcut.
Contact the owner of an item
Find the author of an item by selecting the authors indicator or use the Alt + 5 keyboard shortcut.
You can also open the shortcut menu for an item to see the contact options. (If you have Teams installed, you have other communication options available to you.)
Associated unit tests
You can discover unit tests that exist for your C# or Visual Basic code without opening Test Explorer.
Go to some application code with associated unit test code.
As needed, build your application to load the CodeLens test indicators.
Review the tests for the code use the Alt + 3 keyboard shortcut.
If you see the Warning icon
 , the tests haven't run yet, so run them.
To review a test's definition, double-click the test item in the CodeLens indicator window and open the code file in the editor.
To review the test's results, choose the test status Failed or Passed indicator (
 or
or  ) or use the Alt+1 keyboard shortcut.
To see how many contributors changed this test, who changed this test, or how many changes were made to this test, find your code's history and linked items.
Q & A
Q: How do I turn CodeLens off or on or choose which indicators to see?
A: You can turn indicators off or on, except for the references indicator. Go to Tools > Options > Text Editor > All Languages > CodeLens.
When the indicators are turned on, you can also open the CodeLens options from the indicators. And, you can turn CodeLens file-level indicators on and off by using the chevron icons at the bottom of the editor window.
Q: Where is CodeLens?
A: CodeLens appears in C# and Visual Basic code at the method, class, indexer, and property level. CodeLens appears at the file level for all other types of files.
Make sure CodeLens is turned on. Go to Tools > Options > Text Editor > All Languages > CodeLens.
Azure DevOps-related indicators appear only when work items are linked to the code and when you have permissions to open linked work items. Confirm that you have team member permissions.
Unit test indicators don't appear when application code doesn't have unit tests. Test status indicators appear automatically in test projects. If you know that your application code has unit tests, but the test indicators don't appear, try building the solution (Ctrl + Shift + B).
Tip
CodeLens is available in Visual Studio Community edition, however, the source control indicators are not available in this edition.
Q: Why don't I see the work item details for a commit?
A: This scenario might happen because CodeLens can't find the work items in Azure Boards. Check that you're connected to the project that has those work items, and that you have permissions to see those work items. Work item details might also not show if the commit description has incorrect information about the work item IDs in Azure Boards.
Q: How do I change the font and color for CodeLens?
A: Go to Tools > Options > Environment > Fonts and Colors.
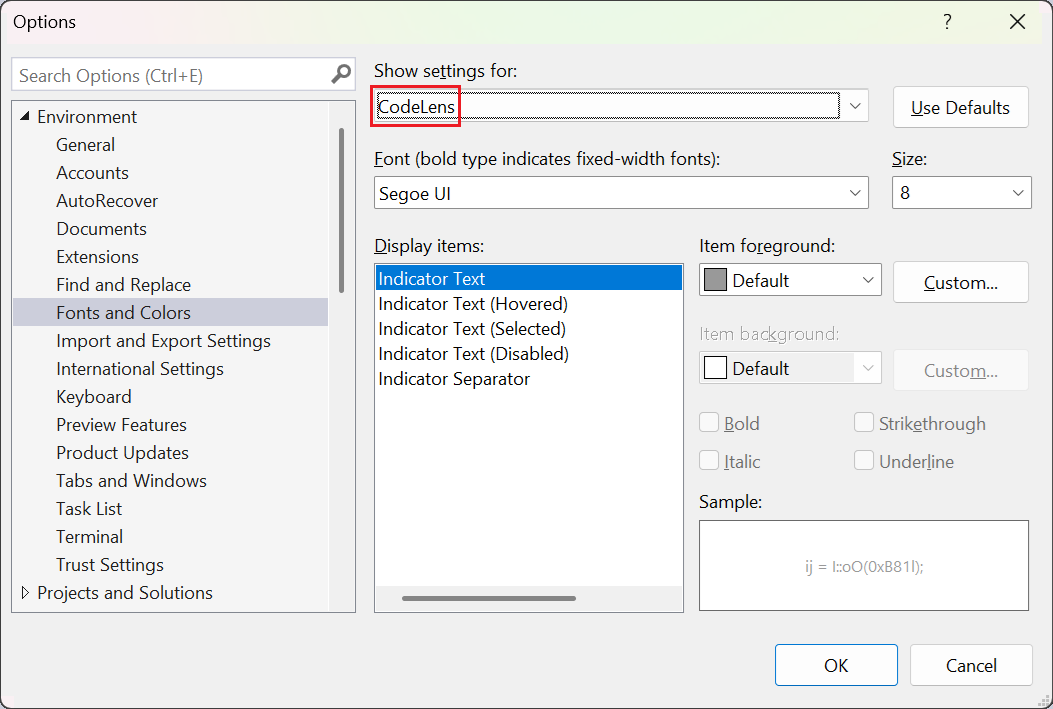
To use the keyboard:
Select Alt + T + O to open the Options dialog.
Select the Up Arrow or Down Arrow to go to the Environment node, then select the Left Arrow to expand the node.
Select the Down Arrow to go to Fonts and Colors.
Select Tab to go to the Show settings for list, and then select the Down Arrow to select CodeLens.
Q: Can I move the CodeLens heads-up display?
A: Yes, choose the Dock icon  to dock CodeLens as a window.
Q: How do I refresh the indicators?
A: The refresh process is different depending on the indicator:
References: This indicator updates automatically when the code changes. If the References indicator is docked as a separate window, refresh the indicator by selecting Refresh.
Team: Refresh these indicators by selecting Refresh CodeLens Team Indicators from the right-click menu.
Test: Find unit tests for your code to refresh the Test indicator.
Q: What's "Local Version"?
A: The Local Version arrow points at the most recent changeset in your local version of a file. When the server has more recent changesets, they appear before or after the Local Version arrow, depending on the order used to sort the changesets.
Q: My CodeLens test indicators no longer appear in my file when I first open my solution. How can I load them?
A: Rebuild your project to get CodeLens test indicators to load in your file. To improve performance, Visual Studio no longer fetches source information for test indicators when code files are loaded. Test indicators are loaded after a build, or when you navigate to a test by double-clicking on it in Test Explorer.
Related content
Visual Studio CodeLens helps you stay focused on your work while you find out what happened to your code - all without leaving the Interactive Development Environment (IDE) code editor. You can find references to a piece of code, changes to your code, linked bugs, code reviews, and unit tests.
Note
CodeLens is available in the Community edition of Visual Studio, but the source control indicators aren't available in this edition.
CodeLens can show you both where and how the individual parts of your code are used in your solution.

Contact your team about changes to your code without leaving the editor:
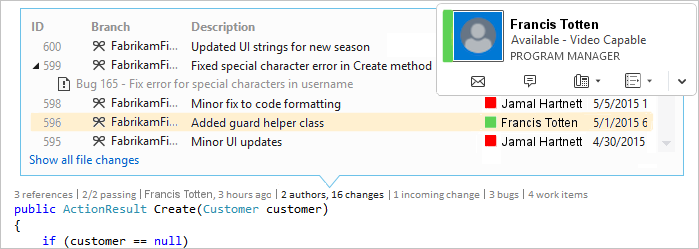
To choose the indicators that you want to see, or to turn CodeLens off and on, go to Tools > Options > Text Editor > All Languages > CodeLens.
Keyboard shortcuts in Visual Studio 2019
Many of the operations described in the following sections are available by using keyboard shortcuts in the Visual Studio code editor window.
To use the keyboard to select indicators, select and hold the Alt key to display the related number keys, then select the number on the keyboard that corresponds to the desired indicator:

Note
To select the reviews indicator, select Alt while using the Left Arrow and Right Arrow key to browse.
Find references to your code in Visual Studio
You can find references in C# or Visual Basic code.
In the code editor, select the references indicator or use the Alt + 2 keyboard shortcut:

Note
If the indicator shows 0 references, you don't have any references from your C# or Visual Basic code. However, there might be references in other project items such as .xaml and .aspx files.
To view the referencing code, hover over the reference in the list.

To open the file that contains the reference, double-click the reference.
Code maps
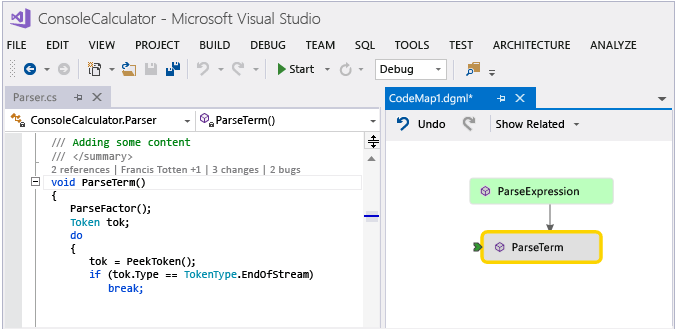
To see relationships between the code and its references, create a code map. In the code map shortcut menu, select Show All References.
Find changes in your code
Inspect your code's history to find out what happened to your code. Or, review changes before they're merged into your code so you can better understand how changes in other branches might affect your code.
You need:
Visual Studio Enterprise or Visual Studio Professional
Git or Azure DevOps Server (formerly Team Foundation Server) or Team Foundation Version Control (TFVC)
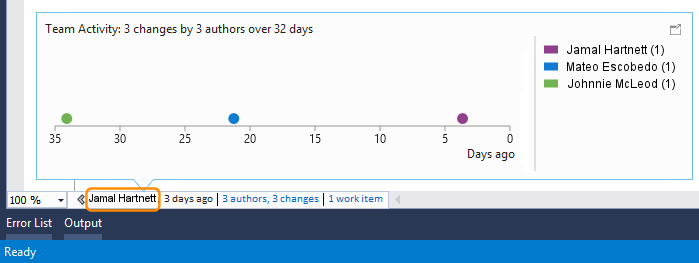
For C# or Visual Basic code stored with TFVC or Git, you get CodeLens details at the class and method levels (code element-level indicators).
For file types other than .cs or .vb, you get CodeLens details for the entire file in one place at the bottom of the window (file-level indicators):
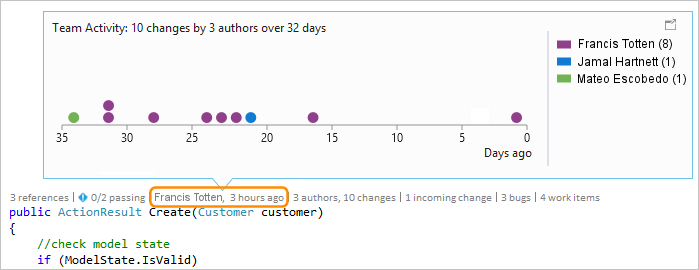
Code element-level indicators
Code element-level indicators let you see who changed your code and what changes they made. Code element-level indicators are available for C# and Visual Basic code.
You can also view change history when you use TFVC or Azure DevOps Services:

The default time period is the last 12 months (one year).
To see a detailed history of all the changes, including those changes from more than a year ago, select Show all file changes:
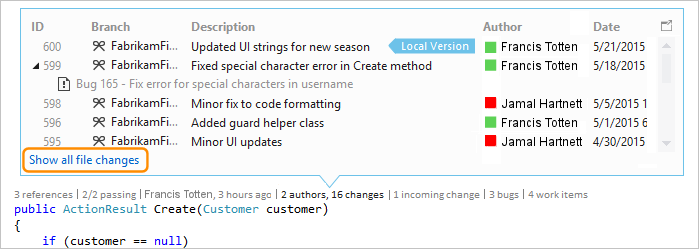
The History window opens:
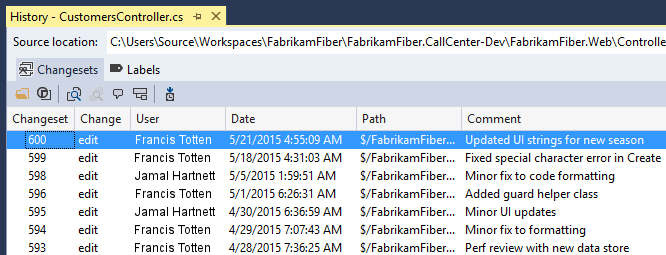
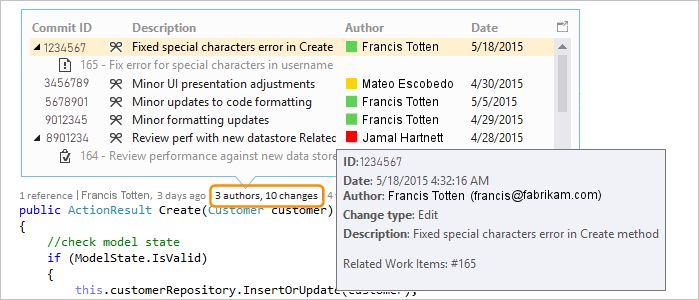
When your files are in a Git repository and you choose the code element-level changes indicator, the History window shows the details for the repository commits:
File-level indicators
Find changes for an entire file with file-level indicators at the bottom of the window in the code editor:

Note
File-level indicators aren't available for C# and Visual Basic files.
To get more details about a change, right-click the item. Depending on whether you're using TFVC or Git, there are options to compare the versions of the file, view details and track the changeset, get the selected version of the file, and email the author of the change. Some of the details appear in Team Explorer in Visual Studio 2019 version 16.7 and earlier. In Visual Studio 2019 version 16.8 and later, the details appear in the Git Changes pane.
The indicators show who changed your code over time, which can help you find patterns in your team's changes and assess their impact.

Find changes in your current branch
Your team might have multiple branches, such as a main branch and a child development branch, to reduce the risk of breaking stable code.

You can discover how many contributors changed your code and how many changes were made in the main branch by pressing Alt+6:

Find when your code was branched
To find when your code was branched, navigate to your code in the child branch. Then, select the changes indicator (or press Alt+6):

Find incoming changes from other branches

You can view incoming changes. In the following screenshot, a bug fix was made in the dev branch:

You can review the change without leaving your current branch (main):

Find when changes got merged
You can see when changes got merged, so you can determine which changes are included in your branch:

For example, your code in the main branch now has the bug fix from the dev branch:

Compare incoming change with local version
Compare an incoming change with your local version by selecting Shift+F10, or by double-clicking the changeset.

Branch icons
The icon in the Branch column indicates how the branch is related to the branch you're working in.
| Icon | The change came from |
|---|---|
| The current branch | |
| The parent branch | |
| A child branch | |
| A peer branch | |
| A branch further away than a parent, child, or peer | |
| A merge from the parent branch to a child branch | |
| A merge from a child branch to the parent branch | |
| A merge from an unrelated branch (baseless merge) |
Linked work items in Visual Studio 2019
Find linked work items by selecting the work items indicator or use the Alt+8 keyboard shortcut:

Linked code reviews in Visual Studio 2019
Find linked code reviews by selecting the reviews indicator. To use the keyboard, hold the Alt key and select the Left Arrow or Right Arrow to browse the indicator options.

Linked bugs in Visual Studio 2019
Find linked bugs by selecting the bugs indicator or use the Alt+7 keyboard shortcut:

Contact the owner of an item in Visual Studio 2019
Find the author of an item by selecting the authors indicator or use the Alt+5 keyboard shortcut:

Open the shortcut menu for an item to see the contact options. If you have Teams installed, you might see options similar to the following screenshot:

Associated unit tests in Visual Studio 2019
You can discover unit tests that exist for your C# or Visual Basic code without opening Test Explorer.
Go to some application code with associated unit test code.
As needed, build your application to load the CodeLens test indicators.
Review the tests for the code by selecting the Alt+3 keyboard shortcut:

If you see the Warning icon
 , the tests haven't run yet, so run them.
To review a test's definition, double-click the test item in the CodeLens indicator window and open the code file in the editor:

To review the test's results, choose the test status Failed or Passed indicator (
 or
or  ) or use the Alt + 1 keyboard shortcut:
To see how many contributors changed the test, who changed this test, or how many changes were made to this test, find your code's history and linked items.
Q & A for CodeLens in Visual Studio 2019
Q: How do I turn CodeLens off or on or choose which indicators to see?
A: You can turn indicators off or on, except for the references indicator. Go to Tools > Options > Text Editor > All Languages > CodeLens.
When the indicators are turned on, you can also open the CodeLens options from the indicators.

Turn CodeLens file-level indicators on and off using the chevron icons at the bottom of the editor window.

Q: Where is CodeLens?
A: CodeLens appears in C# and Visual Basic code at the method, class, indexer, and property level. CodeLens appears at the file level for all other types of files.
Make sure CodeLens is turned on. Go to Tools > Options > Text Editor > All Languages > CodeLens.
DevOps-related indicators appear only when work items are linked to the code and when you have permissions to open linked work items. Confirm that you have team member permissions.
Unit test indicators don't appear when application code doesn't have unit tests. Test status indicators appear automatically in test projects. If you know that your application code has unit tests, but the test indicators don't appear, try building the solution (Ctrl+Shift+B).
Tip
CodeLens is available in Visual Studio Community edition, however, the source control indicators are not available in this edition.
Q: Why don't I see the work item details for a commit?
A: This scenario might happen because CodeLens can't find the work items in Azure Boards. Check that you're connected to the project that has those work items, and that you have permissions to see those work items. Work item details might also not show if the commit description has incorrect information about the work item IDs in Azure Boards.
Q: How do I change the font and color for CodeLens?
A: Go to Tools > Options > Environment > Fonts and Colors.

To use the keyboard:
Select Alt + T + O to open the Options dialog.
Select the Up Arrow or Down Arrow to go to the Environment node, then select the Left Arrow to expand the node.
Select the Down Arrow to go to Fonts and Colors.
Select Tab to go to the Show settings for list, and then select the Down Arrow to select CodeLens.
Q: Can I move the CodeLens heads-up display?
A: Yes, choose the Dock icon  to dock CodeLens as a window.

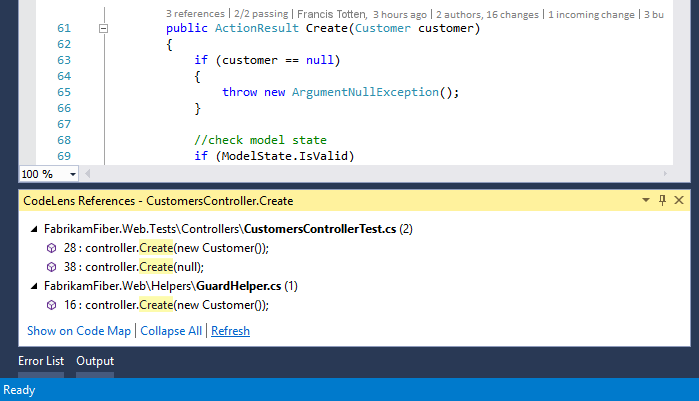
Q: How do I refresh the indicators?
A: The refresh process is different depending on the indicator:
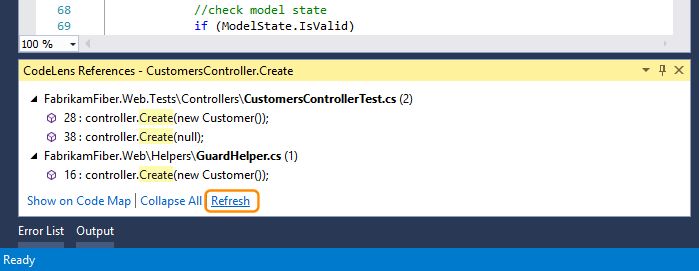
References: This indicator updates automatically when the code changes. If the References indicator is docked as a separate window, refresh the indicator by selecting Refresh:
Team: Refresh these indicators by selecting Refresh CodeLens Team Indicators from the right-click menu:

Test: Find unit tests for your code to refresh the Test indicator.
Q: What's "Local Version"?
A: The Local Version arrow points at the most recent changeset in your local version of a file. When the server has more recent changesets, they appear before or after the Local Version arrow, depending on the order used to sort the changesets.
Q: My CodeLens test indicators no longer appear in my file when I first open my solution. How can I load them?
A: Rebuild your project to get CodeLens test indicators to load in your file. To improve performance, Visual Studio no longer fetches source information for test indicators when code files are loaded. Test indicators are loaded after a build, or when you navigate to a test by double-clicking on it in Test Explorer.
