Add, block, or remove a Viva Engage user
As a verified or network admin, you can add, block, or remove Viva Engage users, and define what fields to include in their profiles.
To get to the Viva Engage admin center to manage users:
In Microsoft 365, go to Admin > Viva Engage.
Or, in Viva Engage, select the Viva Engage settings icon
 , and then select Edit Network Admin settings.
Invite users to Viva Engage
Use this procedure only to invite employees with a company email to Viva Engage.
- If you enforce Microsoft 365 identity in your network, Microsoft 365 users with a Viva Engage license are created as pending users in Viva Engage.
- If you don't enforce Microsoft 365 identity, users must select the Viva Engage tile from Microsoft 365 or sign in to Viva Engage to join the network.
- If you invite a user to a group who has no Viva Engage license, that user is suspended in Viva Engages and removed from the group member list. They don't receive announcement emails.
If your Viva Engage network is in Native Mode, you must perform this action in the Microsoft Entra user Management Portal.
If your Viva Engage network is not in Native Mode, follow these steps:
In Viva Engage, from the settings, select Edit Network admin Settings. This selection opens the Yammer admin center.
In the Yammer admin center, select Users > Invite Users.
Enter individual email addresses, and then select Invite.
Additionally, you can select Import an address book and import a CSV file exported from an email application, such as Outlook or Apple Mail. The CSV file should include a single email address on each line.
Note
If your organization uses more than one internet domain for email addresses and you want to add users from other domains to your network, consider performing a Viva Engage network consolidation. For more information, go to Network migration: Consolidate multiple Viva Engage networks.
Manage pending users
A pending user is someone who was invited to a Viva Engage network but hasn't ever signed in. Pending users can be added to communities and receive announcement notification emails from community admins. As in all Office products, pending users are visible in the community member list.
To stop receiving announcements from a particular community, users can sign in to Viva Engage and leave the community. Or, they can follow the unsubscribe link in the email to unsubscribe from all Viva Engage emails.
Invite guests
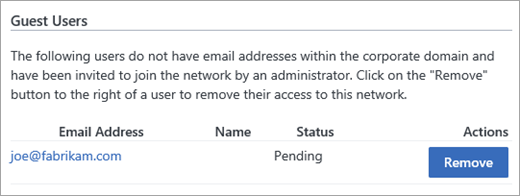
Invite external contacts with email addresses outside of your domain (for example, consultants, contractors, or partners). Guest email domains aren't added to the list of authorized domains for your network.
In Viva Engage, select the settings icon, and select Edit Network admin Settings to go to the Yammer admin center.
In the Yammer admin center, select Users > Invite Guests.
Enter individual email addresses. Active and pending guests are listed on this page.

As with other users, guest names and profiles remain blank until they accept their invitations and complete registration. Guest accounts can be deleted anytime, but their contributions to the network remain.
For more information about guests, see External Messaging FAQ.
Remove users
You can deactivate or permanently remove active users, pending users, and guests.
If your Viva Engage network is in Native Mode, only use the Remove Users page in the Admin portal to process a data subject request for GDPR. Before you proceed, review GDPR requests or GDPR requests for all of Office 365. To remove a user from your Viva Engage Network, go to the Microsoft Entra user Management Portal.
If your Viva Engage network is not in Native Mode, follow these steps:
In Viva Engage, select the settings icon, and select Edit Network admin Settings to go to the Yammer admin center.
In the Yammer admin center, select Users > Remove Users.
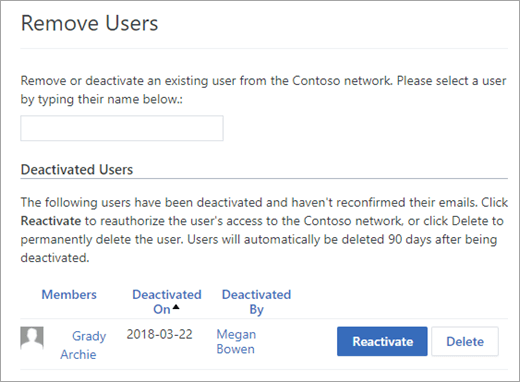
Enter an existing user's name.
Select an action to take:
Deactivate this user:
If the user has Microsoft Entra credentials, first use this action to deactivate the user, and then follow the instructions in Block users.
If the user has no Microsoft Entra credentials, deactivation blocks the user from signing in until the user verifies their email address again. Without access to their verified email account, they can't sign back in to Viva Engage. User profile information, messages, and file uploads remain for 90 days.
Note
Even though deactivated users are visible for 90 days, their accounts can only be reactivated up to 30 days after deactivation. After 90 days, the account is permanently deleted.
Permanently remove this user and keep messages: Removes the user and retains the messages and content they posted.
Permanently remove this user and messages: Removes the user and all the messages they posted. This can't be reversed.
Erase this user. Wipe their name and personal information, but leave their messages. (Can't be undone after 14 days): Deactivates the user for 14 days to give the admin time to evaluate files and messages before the user is permanently deleted.
All deletion options delete the following data:
- Who the person is following, what conversations and articles they're following, and who's following them
- Bookmarks, language preferences, notification settings, and account activity
- User's profile
- Group memberships
- Org chart
- The list of networks they were a member of
The first three deletion options preserve the user's name in Viva Engage stored data and list deactivated users on the Remove Users page, from which you can reactivate or delete a user. Only the Erase this user option removes the user's name.

Block users
A user with a blocked email address can't join your Viva Engage network unless an admin unblocks the address.
If your Viva Engage network is in Native Mode, you must block users from the Microsoft Entra user Management Portal.
If your Viva Engage network is not in Native Mode, block users using one of the following options:
Block the user in the Yammer admin center:
In Viva Engage, select the settings icon, and select Edit Network admin Settings to go to the Yammer admin center.
In the Yammer admin center, select Users > Block Users.
Enter the email address of the user to block. If you enter multiple email addresses, separate them with commas or line breaks.
If the user you select is in a suspended state in Viva Engage, blocking that email address puts the user in a deleted state.
Tip
Because Viva Engage is most effective when every post comes from an individual user, you might consider blocking group email addresses.
Block the user by removing their license and service plan, and removing the Viva Engage tile from Office 365:
- In the Microsoft 365 admin center, remove the Viva Engage license for the user. For steps, see Turn off Viva Engage access for Microsoft 365 users and Manage Viva Engage licenses in Microsoft 365.