Step 2: Install Client on the test system(s)
After you install the Windows Hardware Lab Kit (Windows HLK) on the test server, you are ready to add test systems to the environment. You must install the Windows HLK Client software on each test system. The Windows HLK Client software is stored on the Windows HLK test server. Please review the Test System prerequisites prior to install to ensure successful client installation.
If you are testing software, be sure to install the product on the test system first, and then install the Windows HLK Client software. Note: Having Secure Boot enabled on a test computer can cause the HLK Client installation to fail. Additionally, there are a set of HLK tests which require Secure Boot to be disabled in order to run properly. Please see System Testing with Secure Boot for the complete list of tests.
Warning
Changing the computer name of the test system after the Windows HLK Client software has been installed is unsupported.
To install the Windows HLK Client on x86/x64 test systems for all HLK releases and on ARM64 test systems for HLK releases Windows 24H2 or later
On the test system, browse to the following location:
\\<ControllerName>\HLKInstall\Client\Setup.cmd.
(Replace <ControllerName> with the name of the test server.)If the following software is not already installed, it is installed during this step:
- .NET Framework 4 (Client Profile and Extended)
- Application Verifier
- Windows Driver Test Framework (WDTF)
- Windows Performance Toolkit (WPT).
If the test system has a Server Core installation, then you should install the HLK client using the silent install option:
\\<HLKController>\HLKInstall\Client\Setup.cmd /qn ICFAGREE=YesThe Windows Hardware Lab Kit Client Setup wizard appears. To start the wizard, choose Next.
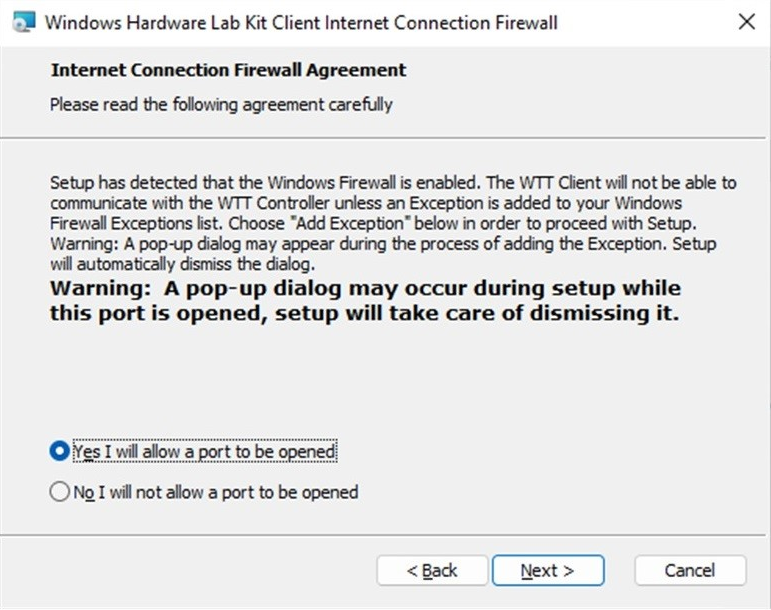
On the Internet Connection Firewall Agreement page, select Yes I will allow a port to be opened, and then choose Next.
Note
If the Internet Connection Firewall Agreement page doesn't appear, either Windows Firewall isn't installed, or another software firewall or hardware firewall is installed on the computer. If another firewall is installed, you must manually open TCP port 1771 to proceed with installation. Refer to the instructions that came with your firewall product to manually open a TCP port. If you continue without opening port 1771, the installation may fail or the Client software might not function properly.
- On ARM64 architectures only the Emulation Architecture page appears, select the correct architecture to run emulation tests under and then choose Next.

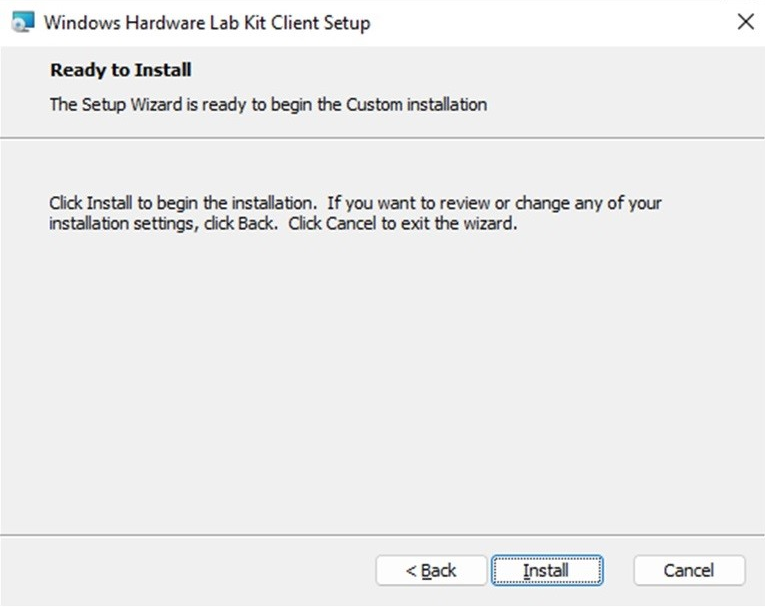
- When the Ready to Install page appears, select Install.

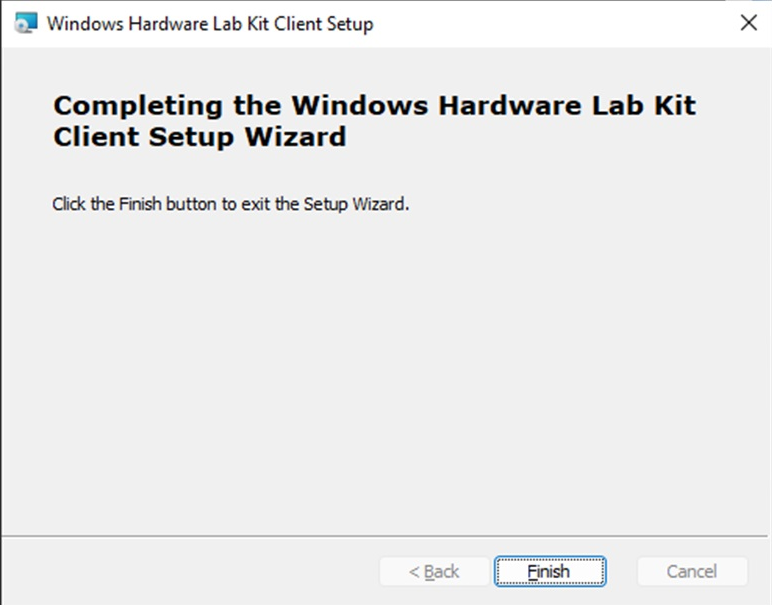
Click Finish to exit the wizard.
Tip
When installation completes, confirm its success by going to the Control Panel and choosing Uninstall a program. Windows Hardware Lab Kit Client should appear in the program list.
- Repeat steps 1-5 for each test system.
To install the Windows HLK Client on Arm64 test systems on HLK releases before Windows 24H2
Testing for Arm64 Desktop requires the client systems to be set up differently than x86/x64, using a different install path. There are 3 distinct test modes for Arm64: Native mode, x86 on Arm64 mode, and x64 on Arm64 mode.
To create a complete submission package:
- Test each mode supported by the scenario area under test in a separate project.
- Create a separate package for each project.
- Merge the packages to create a single submission package.
Testing can be done with dedicated machines for each mode, or a single machine used to test all modes. Note that using a single machine requires the HLK client to be uninstalled and reinstalled to change modes before testing the next one using the directions below.
| Mode | Test Scenario Area | Min OS |
|---|---|---|
| Native | All | Windows 10, version 1709 Windows Server 2019 |
| x86 on Arm64 | System Bitlocker Camera Graphics Print/Scan TPM Wireless Lan |
Windows 10, version 1709 Windows Server 2019 |
| x64 on Arm64 | System Graphics |
Windows 11 |
Warning
If you are testing software, be sure to install the product on the test system first, and then install the HLK Client software.
Note
It is recommended that the client system is on A/C (plugged in) and that the Power Options are set to Never for Put the computer to sleep settings.
To install the Windows HLK Client
Enable test signing
On the test system, enable test signing by running the following from a command prompt with administrator privileges and rebooting:
bcdedit /set testsigning onEnable test client to access the install share on the test controller
On the test system, run net use to access the controller install share
net use \\<HLKController>\hlkinstall\coresystemclient /u:(user on controller)Install HLK test Client In Native Mode:
On the test system, run the following from a command prompt with administrator privileges -- do not run in a PowerShell environment:
\\<controllername>\HLKInstall\CoreSystemClient\InstallWTTClient ICFAGREE:1In x86 on Arm64 Mode:
On the test system, run the following from a command prompt with administrator privileges -- do not run in a PowerShell environment:
\\<controllername>\HLKInstall\CoreSystemClient\InstallWTTClient ICFAGREE:1 UseEmulationForTestContent

HLK for Windows 11 syntax:
\\<controllername>\HLKInstall\CoreSystemClient\InstallWTTClient ICFAGREE:1 UseX86EmulationForTestContent
In x64 on Arm64 Mode:
On the test system, run the following from a command prompt with administrator privileges -- do not run in a PowerShell environment:
\\<controllername>\HLKInstall\CoreSystemClient\InstallWTTClient ICFAGREE:1 UseX64EmulationForTestContent(Replace
ControllerNamewith the name of the test server.)
Warning
For Secure Boot ARM64 Testing, avoid rebooting machine immediately after HLK Client setup; see For Secure Boot ARM64 Testing below.
Note
The HLK client install script must be run from a network path, and cannot be run from the mapped drive letter.
Note
The following errors when InstallWTTClient is executed can be safely ignored: '[SC] OpenService FAILED 1060:' and 'ERROR: The process “Wex.Service.exe” not found.'
Note
When using the ARM64 MSI client installer supported on Windows 24H2 and later, the emulation architecture can be set from the command line.
Default/X64 emulation mode:
\\<HLKController>\HLKInstall\Client\Setup.cmd /qn ICFAGREE=Yes

X86 emulation mode:
\\<HLKController>\HLKInstall\Client\Setup.cmd /qn ICFAGREE=Yes EMULATIONARCHITECTURE=x86
Note
InstallWTTClient will open a firewall port to communicate with the HLK Controller. If another firewall is installed, you may need to manually open TCP port 1771 to proceed with installation. Refer to the instructions that came with your firewall product to manually open a TCP port. If you continue without opening port 1771, the installation may fail or the Client software might not function properly.
For example, if you specify net use \\<HLKController>\hlkinstall /u:(user on controller), you must still run the install file using the full network path, for example \\<HLKController>\hlkinstall\CoreSystemClient\InstallWttClient.cmd.
Do not run G:\CoreSystemClient\InstallWttClient.cmd (if drive G: was previously mapped to \\<HLKController>\hlkinstall.
Tip
When installation completes, HLKSvc.exe should be in the list of running processes. Note that there will not be an entry for the HLK Client in Add/Remove programs.
- Repeat install steps for each test system.
Tip
When the HLK Client is reinstalled on the same system, the system may not initialize to the ready state when a reset is invoked. If this occurs:
- Start HLK Manager
- From the 'Explorers' menu option select the 'Job Monitor' item.
- Navigate to the machine.
- Right click on the system and select the 'View Errors' context menu option.
- If and only if there is a message that the public key does not match the public key of the resource stored in the DB, right-click on the system and select the 'Change Status..Unsafe' context menu option.
- Verify that the machine goes into the ready state.
For Secure Boot ARM64 Testing
For Secure Boot ARM64 Testing, avoid rebooting the machine immediately after HLK Client setup. Instead, follow these steps:
After the HLK Client setup completes, clear all Secure Boot variables
Open an elevated command prompt and set the following registries:
reg add HKLM\System\CurrentControlSet\Services\iospy\StartOverride /v 0 /t REG_DWORD /d 3 /f
reg add HKLM\System\CurrentControlSet\Services\MSDMFilt\StartOverride /v 0 /t REG_DWORD /d 3 /f
Secure Boot ARM64 Troubleshooting
If you have rebooted the machine and are seeing an Automatic Repair screen like below, follow these steps to recover:

Boot into the BIOS and disable Secure Boot.
Boot into Windows and run the following commands in an elevated command prompt:
reg add HKLM\System\CurrentControlSet\Services\iospy\StartOverride /v 0 /t REG_DWORD /d 3 /f
reg add HKLM\System\CurrentControlSet\Services\MSDMFilt\StartOverride /v 0 /t REG_DWORD /d 3 /f
Reboot the machine and enable Secure Boot in the BIOS.