Development guide for Virtualization-based security (VBS) Enclaves
This development guide describes how to build, sign, and debug a basic VBS enclave.
Prerequisites
To get started with VBS Enclaves, you need to meet the following requirements:
- View and satisfy device requirements in the VBS Enclaves overview.
- View and satisfy development prerequisites in the VBS Enclaves overview.
- It's recommended to install the Desktop development with C++ workload through the Visual Studio installer. It will install all the necessary tools including the Windows Software Development Kit (SDK).
- Download the sample code from GitHub. It demonstrates the life cycle of a VBS enclave including how to make function calls into the enclave.
- Every enclave must have a host app. The sample code contains a Visual Studio Solution with two projects – the enclave host and the test enclave.
Getting started
After satisfying the prerequisites above, you should be able to open the solution file from the VbsEnclave sample in Visual Studio and compile it. It creates a test application along with the corresponding enclave. However, you can't run your application successfully until the enclave is signed with a valid certificate.
This guide details how to build a basic VBS enclave on your development machine. The steps to building a VBS enclave are:
- Write a VBS enclave DLL and a corresponding host application
- Compile the DLL and host
- Sign the VBS enclave DLL
- Debug the VBS enclave
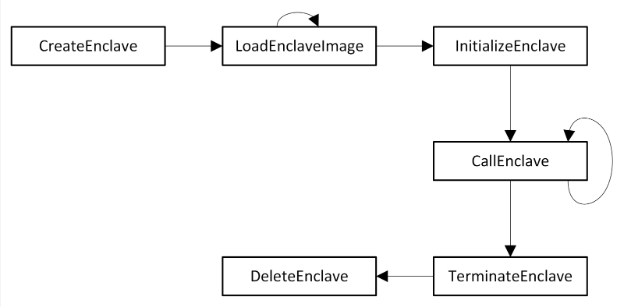
Let’s start by understanding an enclave’s lifecycle. The enclave APIs are called in the following order:
Step 1: Writing VBS enclaves
Let's examine the sample code and understand how to write an application that employs a VBS enclave.
Writing the enclave Host
Remember that a VBS enclave DLL is simply a DLL, and so it requires a host application. The host application is nothing but a standard Windows application. To employ VBS enclaves, the host must use Windows enclave APIs from the enclaveapi.h header. Including windows.h in your host application will provide access to these APIs.
Writing the DLL to load into a test enclave
Refer to sample code in the Test enclave project to follow along with the steps below.
In our enclave Sample, we create a simple enclave which XORs the input with 0xDADAF00D and returns the result. Let’s break down how we do that:
Start by including
winenclave.h. In the sample code, refer toSamples/VbsEnclave/Test enclave/precomp.h:#include <winenclave.h>winenclave.his the central include file for VBS enclaves and itself includeswindows.h,ntenclv.h,winenclaveapi.h.Every DLL loaded in an enclave requires a configuration. This configuration is defined using a global
constvariable named__enclave_configof type IMAGE_ENCLAVE_CONFIG. In the sample code, refer toSamples/VbsEnclave/Test enclave/enclave.c:const IMAGE_ENCLAVE_CONFIG __enclave_config = { sizeof(IMAGE_ENCLAVE_CONFIG), IMAGE_ENCLAVE_MINIMUM_CONFIG_SIZE, IMAGE_ENCLAVE_POLICY_DEBUGGABLE, // DO NOT SHIP DEBUGGABLE ENCLAVES TO PRODUCTION 0, 0, 0, { 0xFE, 0xFE }, // family id { 0x01, 0x01 }, // image id 0, // version 0, // SVN 0x10000000, // size 16, // number of threads IMAGE_ENCLAVE_FLAG_PRIMARY_IMAGE };Note
There can be only one primary image per enclave. If you load multiple primary images, the one loaded first is treated as primary and the rest are treated as dependencies. In this sample, there are no dependencies other than the enclave platform DLLs.
The
DllMain()function is mandatory and defines the entry point into the enclave. It's called duringInitializeEnclave(). In the sample code, refer toSamples/VbsEnclave/Test enclave/enclave.c.BOOL DllMain( _In_ HINSTANCE hinstDLL, _In_ DWORD dwReason, _In_ LPVOID lpvReserved ) { UNREFERENCED_PARAMETER(hinstDLL); UNREFERENCED_PARAMETER(lpvReserved); if (dwReason == DLL_PROCESS_ATTACH) { InitialCookie = 0xDADAF00D; } return TRUE; }Any functions inside the enclave that are called from the host application must be exported and be of type LPENCLAVE_ROUTINE. The function signature looks like this:
void* CALLBACK enclaveFunctionName(_In_ void* Context)In the sample code, refer to
Samples/VbsEnclave/Test enclave/enclave.c.void* CALLBACK CallEnclaveTest( _In_ void* Context ) { WCHAR String[32]; swprintf_s(String, ARRAYSIZE(String), L"%s\n", L"CallEnclaveTest started"); OutputDebugStringW(String); return (void*)((ULONG_PTR)(Context) ^ InitialCookie); }Note
Only the functions exported by the primary enclave image can be accessed from the host application.
You can then export the function using a
.DEFfile. In the sample code, refer toSamples/VbsEnclave/Test enclave/vbsenclave.def. For more information, refer to Exporting from a DLL Using DEF Files.
And that’s how you write a basic VBS enclave DLL.
Step 2: Compiling VBS enclaves
Now that we’ve written our VBS enclave DLL, let’s compile it.
Compiling the enclave host
Compiling the host app is the same as compiling any Windows application, but with the addition of onecore.lib to the list of dependencies while linking.
Compiling the test enclave DLL
Before we can build the test enclave DLL, some changes to the compiler and linker configurations are required:
The MSVC linker provides an
/ENCLAVEflag which picks up the enclave configuration details. The/ENCLAVEflag is incompatible with incremental linking, so we need to set/INCREMENTAL:NO.[Debug config only]
/EDITANDCONTINUEis incompatible with/INCREMENTAL:NO, so we use/Ziinstead of/ZIfor Debug Information Format in the compiler.[Debug config only] The Basic Runtime Checks configuration needs to be set to Default. Runtime error checks are not supported in VBS enclaves.
An enclave DLL's digital signature must be checked at load time and requires setting the
/INTEGRITYCHECKflag in the linker.Enclave DLLs must be instrumented for Control Flow Guard (CFG), for which we use the
/GUARD:MIXEDflag in the linker.Enclaves have their own versions of platform, startup, runtime and UCRT libs. To ensure that we don't link the non-enclave versions, use the
/NODEFAULTLIBflag. Subsequently, add the correct libs underAdditionalDependencies. In the sample code, these libraries are encapsulated under the VBS_Enclave_Dependencies macro. The following are the VBS enclave libraries:libcmt.libandlibvcruntime.lib- Found in theenclavefolder with the Visual C++ build tools, see C runtime (CRT) and C++ standard library (STL) .lib files.vertdll.libandbcrypt.lib- Found in theumfolder with the Windows SDK libraries.ucrt.lib- Found in theucrt_enclavefolder with the Windows SDK libraries.
Note
No other platform libraries are supported within VBS enclaves.
In summary, the following changes are required:
Compiler (Debug config only):
- Debug Information Format:
/Zi - Basic Runtime Checks:
Default
Linker:
/ENCLAVE/NODEFAULTLIBS+AdditionalDependencies/INCREMENTAL:NO/INTEGRITYCHECK/GUARD:MIXED
You can now compile the enclave DLL.
Securing with VEIID
VEIID (the VBS Enclave Import ID binding utility) is a tool in the Windows SDK that updates the import tables inside a VBS enclave with known IDs for platform DLLs. This improves the security of VBS enclaves by preventing a malicious (signed) DLL with the same name as one of the platform DLLs from being loaded.
In the sample code, this is done automatically as a post-build event.
Note
It is strongly recommended to avoid using your own non-primary DLLs apart from the platform DLLs. Instead, keep all your code within the enclave DLL itself.
Step 3: Signing VBS enclave DLLs
VBS enclaves must be signed to be successfully loaded. The signature on an enclave contains information about the enclave author. This is used to derive the Author ID for an enclave. You can test-sign your enclave before you sign it for production.
Test Signing – Local
Each enclave signing certificate requires at least 3 EKUs:
Code Signing EKU -
1.3.6.1.5.5.7.3.3Enclave EKU -
1.3.6.1.4.1.311.76.57.1.15Author EKU - The EKU is of the form
1.3.6.1.4.1.311.97.X.Y.Z, whereXis greater than999.For testing, you can choose to use any Author EKU that matches this pattern. For production, an Author EKU will be provided as part of the production certificate (more details on production signing are below).
Example:
1.3.6.1.4.1.311.97.814040577.346743379.4783502.105532346
If you want to sign your enclave DLL while developing it, enable test signing. With test signing enabled, you can create a certificate containing these three EKUs and sign your enclave with it. You can use the New-SelfSignedCertificate cmdlet to create a certificate. Note that Enclave DLLs must be page hash signed.
Note
Once you have a certificate, you can automate the signing process in the post-build event.
New-SelfSignedCertificate -CertStoreLocation Cert:\\CurrentUser\\My -DnsName "MyTestEnclaveCert" -KeyUsage DigitalSignature -KeySpec Signature -KeyLength 2048 -KeyAlgorithm RSA -HashAlgorithm SHA256 -TextExtension "2.5.29.37={text}1.3.6.1.5.5.7.3.3,1.3.6.1.4.1.311.76.57.1.15,1.3.6.1.4.1.311.97.814040577.346743379.4783502.105532346"
signtool sign /ph /fd SHA256 /n "MyTestEnclaveCert" vbsenclave.dll
With your enclave DLL signed, you can now load it in an environment that has test signing enabled.
Production Signing – Trusted Signing (formerly Azure Code Signing)
Production signing for enclaves is provided through the VBS enclave certificate profile in Trusted Signing. For details on how to use Trusted Signing, please see the documentation.
Trusted Signing also allows you to sign your enclave at the command line. This outputs a ready-to-run, signed enclave when you build your enclave in Visual Studio.
Step 4: Debugging VBS enclaves
Typically, an enclave’s memory is hidden from debuggers and is protected from VTL0. However, if you wish to debug your VBS enclave DLL, you can build them to be debugged during development. Enclaves are a VTL1 user-mode process, and therefore can be debugged with a user-mode debugger.
To make your enclave debuggable:
- The enclave DLL image configuration needs to allow debugging – This is done by setting the IMAGE_ENCLAVE_POLICY_DEBUGGABLE flag in IMAGE_ENCLAVE_CONFIG.
- Debugging needs to be allowed during enclave creation – This is done by setting the ENCLAVE_VBS_FLAG_DEBUG flag in the ENCLAVE_CREATE_VBS_INFO structure passed to the CreateEnclave call.
To debug your enclave:
- Attach the user-mode debugger to the enclave host process.
- Reload the enclave symbols after the host process has loaded the enclave image in memory.
- Set breakpoints on the functions inside the enclave. The debugger breaks into it on an enclave call.
You can also break on the user-mode breakpoints for CreateEnclave, InitializeEnclave, etc. which further step into the corresponding code in ntdll.dll.
Note
Never use debuggable enclaves in production environments.
With that, you can now build and deploy your first VBS enclave. If you have any questions, please reach out to Windows developer support.