Point-to-Site VPN in Azure Virtual Networks
The capability to VPN from individual machines (Point-to-Site VPN) into Windows Azure Virtual Networks is in preview mode at the moment, but is already generating a lot of excitement. It replaces the older Azure Connect technology which also provided Point-to-Site connectivity, but which used a relay based mechanism that was slow, and which forced you to install an agent on your laptop/workstation. It is also of great interest because the Point-to-Site technology utilizes SSTP (secure socket tunneling protocol) and thus is able to work through firewalls and NAT devices.
The steps for configuring a Point-to-Site VPN are already well documented here. The official documentation should be read carefully as that is the definitive source of information. However, as well documented as it is, I like to see a walkthrough of the configuration steps with screenshots and actual addresses/values etc. as that is a very useful when one is playing with a new feature for the first time. I did not see anything relevant so decided to take screenshots of my own set up. Hopefully, folks will find it useful to see a full walkthrough.
Planning
There are three areas of planning needed before starting to configure the VNet, viz.
- Address space for the VNet and the subnets
- One or more DNS servers
- Address space on the client side
Address space for VNet
I chose 10.1.0.0/16 as the overall address space for the VNet from which to carve out the subnets. A small subnet dedicated to DNS was carved as 10.1.1.0/29 which provides three usable addresses 10.1.1.4 through 10.1.1.6 – to be discussed a bit more, below. Two subnets, 10.1.2.0/24 and 10.1.3.0/24 were carved out for locating my application related VM’s. Finally, a subnet for the VPN Gateway was again carved out as 10.1.4.0/29. These are shown in the screenshot, below. Note that the subnet for Gateway gets added automatically by the Portal UI when you click on the link labeled as “add gateway subnet”.

DNS Servers for VNet
I intend to deploy several Cloud Services in the VNet, and therefore need to deploy my own DNS server for name resolution across the Cloud Service boundary. There is an interesting conundrum though – I have not even created the VM that will eventually be configured as a DNS server; and yet, the Portal UI forces me to specify the DNS Server’s IP address right away while configuring the VNet itself. Actually, to be accurate, a recent change in the behavior of VNet now does permit specifying the DNS server later on when the VNet is already fully configured and is in use. But this new feature is still not available through the Azure Portal UI; you have to add the DNS server information using Powershell. Thus, for now, I continue to use a trick that is described, next.
Specify a subnet for DNS as 10.1.1.0/29 as shown in the screenshot, above. In theory, this subnet will have 32 – 29 = 3 bits to use toward the available addresses, which amounts to 2^3 = 8 possibilities. But, 000 and 111 are always reserved (for whole subnet and broadcast), and it is my understanding that Azure further reserves 001, 010, and 011. Thus, the addresses that are really available are those corresponding to 100, 101 and 110 (i.e. 10.1.1.4, 10.1.1.5, and 10.1.1.6). Eventually, when I do create a VM and add it to this subnet, it would be quite safe to assume that this VM will get assigned the IP address 10.1.1.4. Thus, having created a subnet for DNS like this, I can specify my DNS server during the VNet configuration even though the DNS server machine does not even exist, yet.
Address space on the Client side
In order to set up the VPN to this VNet, you have to specify the range of IP addresses that your client machines will be located in; i.e. the address space of your laptop, workstations etc. This address space must be a private address space and must not overlap with the address space of the VNet (in the present walkthrough the 10.1.0.0/16). At home, I have a router-plus-NAT combo device which also dispenses DHCP addresses in the range 192.168.1.0/24. Thus, this is the address space I picked for VPN clients.
Configure Virtual Network
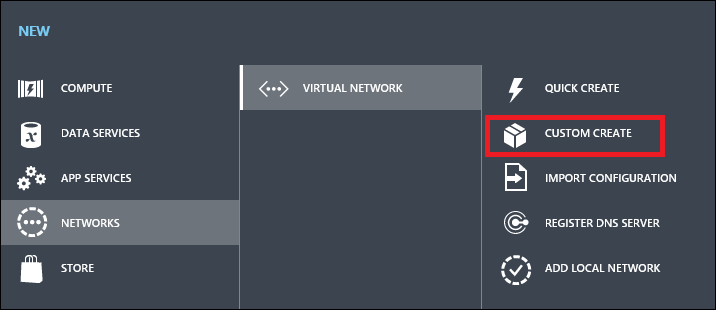
At this point we have all the information needed to configure the VNet. In the portal UI, navigate to the section where new Network items can be created and choose “Custom Create.”
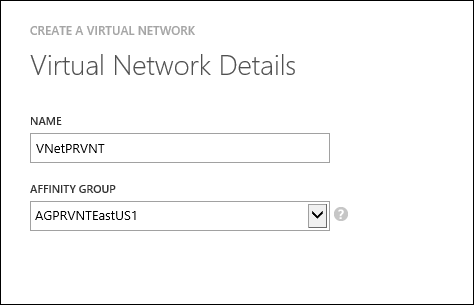
Specify the name of the VNet and the name of an Affinity group.
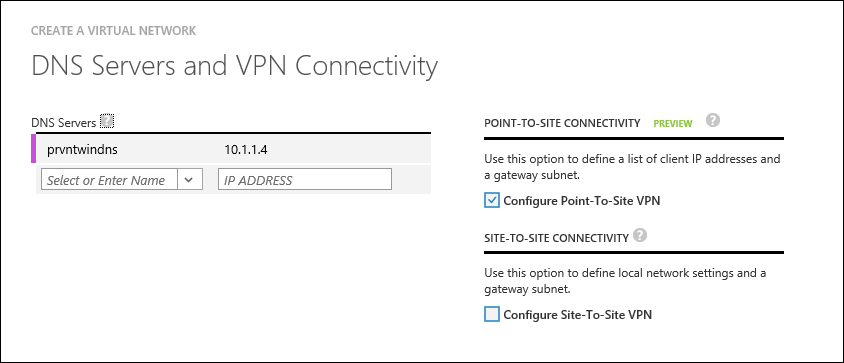
On the DNS Server and VPN Connectivity page, specify the DNS IP address as 10.1.1.4 (as discussed, above) and give it some suitable name. Also, select the checkbox for Point-to-Site VPN Connectivity.
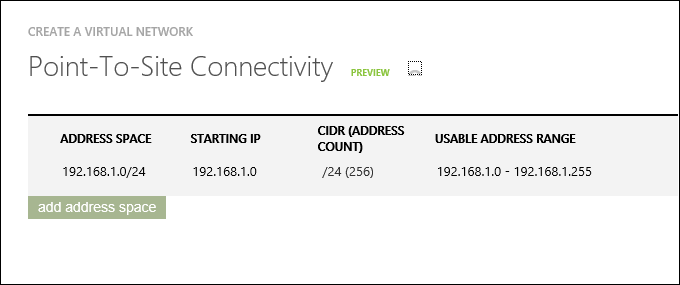
Next, we need to specify the client side address space on the Point-to-Site Connectivity page. Use the 192.168.1.0/24 as discussed, above.
Next, on the Virtual Network Address space page, enter the Address space as 10.1.0.0/16 and then specify the various Subnets as planned, before. Finally, click on the link for “add gateway subnet” to add the Gateway subnet as 10.1.4.0/29.

Click through to the end and save the Virtual Network.
Create VPN Gateway
Click the link for the newly create VNet and navigate to the dashboard page. It should look like the following:
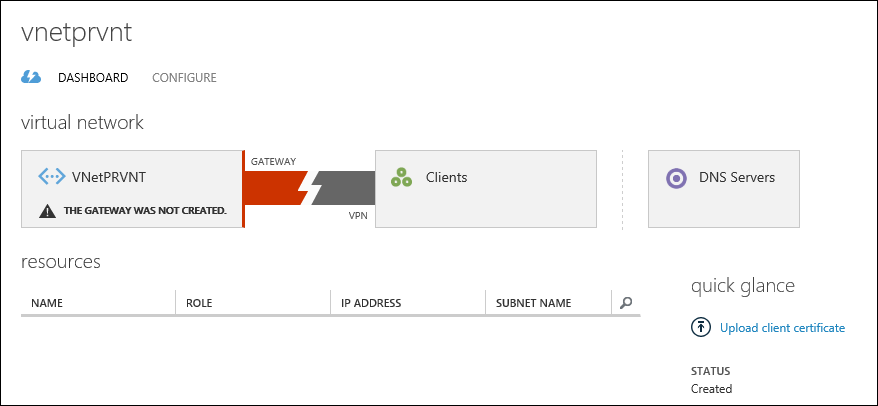
At the bottom of the screen, click on the Create gateway icon to start provisioning the Gateway VM’s in the Virtual Network.

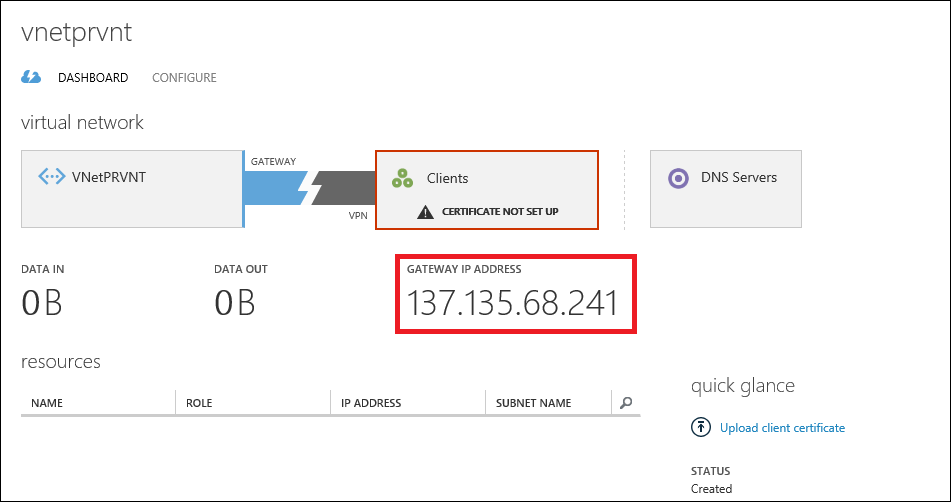
This will take some time as the gateway VM’s are provisioned and configured. Once this step completes, the Gateway IP address will be displayed on the page and VPN connectivity page will look as below.
Create and upload Certificates
Certificates are used to authenticate the VPN clients. Read more about it at this link, and this link for Management certificates, in general. Using makecert utility, generate a Root certificate as shown, below. Specify a suitable name for the Root certificate.
makecert -sky exchange -r -n "CN=PRMgmtRootCert" -pe -a sha1 -len 2048 -ss My "PRMgmtRootCert.cer"
This command will create and then install a certificate in the Certificate store on your current machine. Also, a “.cer” file (without the private key) corresponding to this certificate will be put in the current file folder from where the makecert command was run. The “.cer” certificate file needs to be uploaded to the Virtual Network. It is also recommended that you export the Root certificate along with its private key (i.e. the “.pfx” file) from the Certificate store and keep it somewhere safe so that if necessary this root certificate can be installed on some other machine.
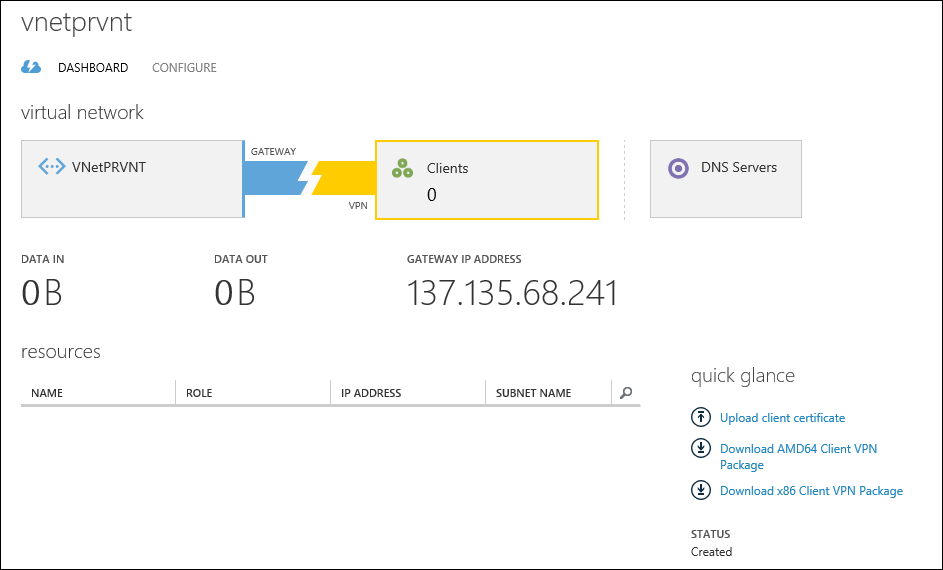
To upload the “.cer” file for the Root certificate just generated, click on the “Upload client certificate” link shown in the screenshot above and supply the path to the certificate. Once the Root certificate has been uploaded, the icons on the VNet dashboard will change to look as below:
Using the Root certificate, generate one or more client certificates and distribute to your team members. These client certificates will be used in the authentication process during the VPN session.
makecert.exe -n "CN=PRMgmtClientCert1" -pe -sky exchange -m 96 -ss My -in "PRMgmtRootCert" -is my -a sha1
Download and install the VPN package
The Virtual Network is now fully configured. In order to initiate a VPN session, you need to download and install a VPN package on your client machine. Depending upon whether your client machine is a 32 bit machine or 64 bit, pick the appropriate download link from the page shown above. An executable file will be downloaded which will be named after your VNet (in my case it was named as “vnetprvnt.exe”). Execute this VPN package on the client machine to configure the VPN settings on the local machine. Note that this VPN package is not an agent, even though it appears as if you are installing something on your local machine. Instead, the package is just a tool to configure the built-in RRAS features of your Windows Operating System.
Once the package is run successfully, your client machine is ready to VPN into the VNet. An icon should show up in the network area of your machine, as shown below for my Windows Server 2012 machine.
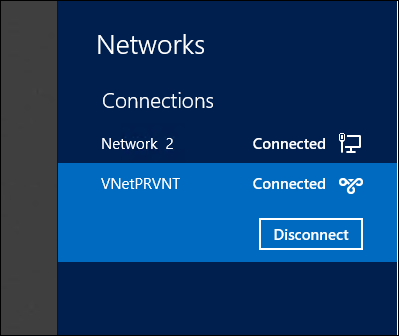
Click on the icon to start the connection; you may have to pick the client certificate that is chained to the Root certificate uploaded to VNet. Then, to verify that VPN connectivity is working, go to a command prompt and run ipconfig /all.
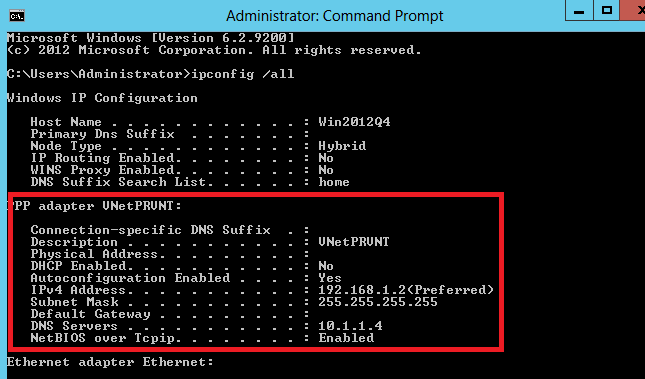
You now have a Point-to-Site VPN to Virtual Network working.
Comments
Anonymous
July 15, 2013
Good one... do u have any idea on site to site VPn to Azure? If so pls share. Thanks, Thamilarasi Thamilarasi.n@hotmail.comAnonymous
July 28, 2013
Fantastic ! Explains well and Step by Step !Anonymous
October 07, 2013
I have installed and configured Point to site network. what should I do next. Not able to take mstsc of VMs from their private IPs..Anonymous
November 19, 2013
No support for Mac OS Client :-( Any Ideas?Anonymous
February 05, 2014
Super helpful, thank you very much for the write-up.Anonymous
April 05, 2014
Excellent!! useful configuration stepsAnonymous
April 22, 2014
Awesome, THE best walkthrough on the web! Thanks for putting this together.Anonymous
May 03, 2014
I followed instruction and have local computer with 198 address and VM (with VS2013) that is part of Virtual Network with IP 10.1.2.1 on subnet 10.1.2.0/24. But I cannot connect from my local computer to this VM, cannot ping it, cannot RDP to it, etc. Are there additional steps needed for this?Anonymous
September 03, 2014
I followed the steps and I was able to setup the environment and connect to it.Anonymous
December 12, 2014
Nice article! Thanks for sharing. =) Got some VPN reviews on www.bestvpnservicemag.com/.../vpn-p2p-torrent. Is there a need to follow all these steps though? thanks!Anonymous
March 04, 2015
hi this is very useful. I want to know how many clients(IP required) connected to the active VPN. Is this possible? then how can i check it?Anonymous
March 11, 2015
Can I use my Organization's root certificate for this purpose?Anonymous
April 14, 2015
Seriously, I've been all over Google and cannot find how to connect from a Mac. This is extremely frustrating. I've used azure forever and had no issues, why is this feature Windows exclusive?Anonymous
April 15, 2015
Always must need this service. <a href="goghost.net/">vpn tutorial</a>Anonymous
April 15, 2015
Always must need this service. http://goghost.net/Anonymous
June 22, 2015
I create the certificate in visual studio but it does not put the certificate in my certificate store. I have tried it like 3x's. c:Program Files (x86)Windows Kits8.1binx64>makecert -sky exchange -r -n "CN =FireHostRootCert" -pe -a sha1 -len 2048 -ss My "FireHostRootCert.cer" SucceededAnonymous
June 23, 2015
Melissa - double click the file firehostrootcert.cer (it will be in your c:program files (x86)windows kits8.1binx64 folder) I like to put these in my root ca folder but not necessary.Anonymous
July 20, 2015
Great thanks, i tired it and it worked like a charm. till now i have tried Cisco and windows server :) any idea if they support other VPN devices? i tried Micronet, SonicWall and Alcatel, but can't seem to get them to connect.Anonymous
August 09, 2015
I'm still getting an error: A certificate could not be found that can be used with this Extensible Authentication Protocol. (Error 798) Anyone else run into this?Anonymous
August 10, 2015
I cleaned up everything from my other failed attempts and followed you to the letter. Thanks a ton :)Anonymous
October 13, 2015
Ummm... what about those people whom have macs? Currently Point to Site is useless for many of my clients whom now-days run macsAnonymous
October 13, 2015
why is it so difficult to get an answer to a simple VPN question? What should I do to get this VPN client working on a mac?Anonymous
November 23, 2015
I follow the steps. But I can't connect. Something with the trust with a certificate. Code 0x800b0109 by the Client. All certificates are trusted in the certmgr.msc on the machine. I uploaded all certs in Azure. Why this cert stuff Fails? I followed every step.Anonymous
December 15, 2015
Already I have set up my VPN How I do now to share a directory of the client and the server can see it?Anonymous
December 15, 2015
The comment has been removedAnonymous
January 23, 2016
The comment has been removed