Come riconoscere le finalità con criteri di entità personalizzati
Speech SDK dei servizi di Azure AI offre una funzionalità integrata per il riconoscimento finalità con criteri di ricerca di linguaggio semplici. Una finalità è un'operazione che l'utente vuole eseguire: chiudere una finestra, contrassegnare una casella di controllo, inserire testo e così via.
In questa guida si usa il Servizio cognitivo di Azure per la voce SDK per sviluppare un'applicazione console che deriva le finalità dalle espressioni vocali pronunciate tramite il microfono del dispositivo. Scopri come:
- Creare un progetto di Visual Studio che fa riferimento al pacchetto Speech SDK NuGet
- Creare una configurazione di riconoscimento vocale e ricevere un sistema di riconoscimento delle finalità
- Aggiungere finalità e criteri tramite l'API Servizio cognitivo di Azure per la voce SDK
- Aggiungere entità personalizzate tramite l'API Servizio cognitivo di Azure per la voce SDK
- Usare riconoscimento asincrono continuo basato su eventi
Quando usare i criteri di ricerca
Usare i criteri di ricerca se:
- Si è interessati solo alla corrispondenza rigorosa con quanto detto dall’utente. La corrispondenza di questi criteri è più rigorosa rispetto alla comprensione del linguaggio di conversazione (CLU).
- Non si ha accesso a un modello CLU, ma si ricercano comunque le finalità.
Per ulteriori informazioni, consultare la panoramica sui criteri di ricerca.
Prerequisiti
Prima di iniziare questa guida, è necessario disporre dei seguenti elementi:
- Una risorsa dei Servizi di Azure AI o una risorsa Unified Speech
- Visual Studio 2019 (qualsiasi edizione).
Creare un progetto
Creare un nuovo progetto di applicazione console C# in Visual Studio 2019 e installare lo Speech SDK.
Iniziare con un codice boilerplate
Aprire Program.cs e aggiungere codice che funga da scheletro del progetto.
using System;
using System.Threading.Tasks;
using Microsoft.CognitiveServices.Speech;
using Microsoft.CognitiveServices.Speech.Intent;

namespace helloworld
{
    class Program
    {
        static void Main(string[] args)
        {
            IntentPatternMatchingWithMicrophoneAsync().Wait();
        }

        private static async Task IntentPatternMatchingWithMicrophoneAsync()
        {
            var config = SpeechConfig.FromSubscription("YOUR_SUBSCRIPTION_KEY", "YOUR_SUBSCRIPTION_REGION");
        }
    }
}
Creare una configurazione di Voce
Prima di poter inizializzare un oggetto IntentRecognizer, è necessario creare una configurazione che usi la chiave e l'area di Azure per la risorsa di stima di Servizi di Azure AI.
- Sostituire
"YOUR_SUBSCRIPTION_KEY"con la chiave di stima dei Servizi di Azure AI. - Sostituire
"YOUR_SUBSCRIPTION_REGION"con l'area delle risorse dei Servizi di Azure AI.
Questo esempio usa il metodo FromSubscription() per creare SpeechConfig. Per un elenco completo dei metodi disponibili, vedere Classe SpeechConfig.
Inizializzare un oggetto IntentRecognizer
Quindi, creare un oggetto IntentRecognizer. Inserire questo codice immediatamente sotto la configurazione di Voce.
using (var recognizer = new IntentRecognizer(config))
{

}
Aggiungere alcune finalità
È necessario associare alcuni modelli a un oggetto PatternMatchingModel e applicarli a IntentRecognizer.
Si inizierà creando un oggetto PatternMatchingModel e aggiungendo alcune finalità.
Nota
È possibile aggiungere più modelli a un oggetto PatternMatchingIntent.
Inserire questo codice all'interno del blocco using:
// Creates a Pattern Matching model and adds specific intents from your model. The
// Id is used to identify this model from others in the collection.
var model = new PatternMatchingModel("YourPatternMatchingModelId");

// Creates a pattern that uses groups of optional words. "[Go | Take me]" will match either "Go", "Take me", or "".
var patternWithOptionalWords = "[Go | Take me] to [floor|level] {floorName}";

// Creates a pattern that uses an optional entity and group that could be used to tie commands together.
var patternWithOptionalEntity = "Go to parking [{parkingLevel}]";

// You can also have multiple entities of the same name in a single pattern by adding appending a unique identifier
// to distinguish between the instances. For example:
var patternWithTwoOfTheSameEntity = "Go to floor {floorName:1} [and then go to floor {floorName:2}]";
// NOTE: Both floorName:1 and floorName:2 are tied to the same list of entries. The identifier can be a string
//       and is separated from the entity name by a ':'

// Creates the pattern matching intents and adds them to the model
model.Intents.Add(new PatternMatchingIntent("ChangeFloors", patternWithOptionalWords, patternWithOptionalEntity, patternWithTwoOfTheSameEntity));
model.Intents.Add(new PatternMatchingIntent("DoorControl", "{action} the doors", "{action} doors", "{action} the door", "{action} door"));
Aggiungere alcune entità personalizzate
Per sfruttare al meglio il matcher dei criteri, è possibile personalizzare le entità. Faremo di "floorName" un elenco dei piani disponibili. Renderemo anche "parkingLevel" un'entità intera.
Inserire questo codice sotto le finalità:
// Creates the "floorName" entity and set it to type list.
// Adds acceptable values. NOTE the default entity type is Any and so we do not need
// to declare the "action" entity.
model.Entities.Add(PatternMatchingEntity.CreateListEntity("floorName", EntityMatchMode.Strict, "ground floor", "lobby", "1st", "first", "one", "1", "2nd", "second", "two", "2"));

// Creates the "parkingLevel" entity as a pre-built integer
model.Entities.Add(PatternMatchingEntity.CreateIntegerEntity("parkingLevel"));
Applicare il modello a Recognizer
È ora necessario applicare il modello all'oggetto IntentRecognizer. È possibile usare più modelli contemporaneamente in modo che l'API prenda una raccolta di modelli.
Inserire questo codice sotto le entità:
var modelCollection = new LanguageUnderstandingModelCollection();
modelCollection.Add(model);

recognizer.ApplyLanguageModels(modelCollection);
Riconoscere una finalità
Dall'oggetto IntentRecognizer chiamare il metodo RecognizeOnceAsync(). Questo metodo chiede al Servizio cognitivo di Azure per la voce di riconoscere la voce in una singola frase e di interrompere il riconoscimento vocale dopo che la frase è stata identificata.
Inserire questo codice dopo l'applicazione dei modelli linguistici:
Console.WriteLine("Say something...");

var result = await recognizer.RecognizeOnceAsync();
Visualizzare i risultati (o gli errori) del riconoscimento
Quando il risultato del riconoscimento viene restituito dal Servizio cognitivo per la voce, verrà stampato.
Inserire questo codice sotto var result = await recognizer.RecognizeOnceAsync();:
if (result.Reason == ResultReason.RecognizedIntent)
{
    Console.WriteLine($"RECOGNIZED: Text={result.Text}");
    Console.WriteLine($"       Intent Id={result.IntentId}.");

    var entities = result.Entities;
    switch (result.IntentId)
    {
        case "ChangeFloors":
            if (entities.TryGetValue("floorName", out string floorName))
            {
                Console.WriteLine($"       FloorName={floorName}");
            }

            if (entities.TryGetValue("floorName:1", out floorName))
            {
                Console.WriteLine($"     FloorName:1={floorName}");
            }

            if (entities.TryGetValue("floorName:2", out floorName))
            {
                Console.WriteLine($"     FloorName:2={floorName}");
            }

            if (entities.TryGetValue("parkingLevel", out string parkingLevel))
            {
                Console.WriteLine($"    ParkingLevel={parkingLevel}");
            }

            break;

        case "DoorControl":
            if (entities.TryGetValue("action", out string action))
            {
                Console.WriteLine($"          Action={action}");
            }
            break;
    }
}
else if (result.Reason == ResultReason.RecognizedSpeech)
{
    Console.WriteLine($"RECOGNIZED: Text={result.Text}");
    Console.WriteLine($"    Intent not recognized.");
}
else if (result.Reason == ResultReason.NoMatch)
{
    Console.WriteLine($"NOMATCH: Speech could not be recognized.");
}
else if (result.Reason == ResultReason.Canceled)
{
    var cancellation = CancellationDetails.FromResult(result);
    Console.WriteLine($"CANCELED: Reason={cancellation.Reason}");

    if (cancellation.Reason == CancellationReason.Error)
    {
        Console.WriteLine($"CANCELED: ErrorCode={cancellation.ErrorCode}");
        Console.WriteLine($"CANCELED: ErrorDetails={cancellation.ErrorDetails}");
        Console.WriteLine($"CANCELED: Did you set the speech resource key and region values?");
    }
}
Controllare il codice
A questo punto il codice dovrà avere questo aspetto:
using System;
using System.Threading.Tasks;
using Microsoft.CognitiveServices.Speech;
using Microsoft.CognitiveServices.Speech.Intent;

namespace helloworld
{
    class Program
    {
        static void Main(string[] args)
        {
            IntentPatternMatchingWithMicrophoneAsync().Wait();
        }

        private static async Task IntentPatternMatchingWithMicrophoneAsync()
        {
            var config = SpeechConfig.FromSubscription("YOUR_SUBSCRIPTION_KEY", "YOUR_SUBSCRIPTION_REGION");

            using (var recognizer = new IntentRecognizer(config))
            {
                // Creates a Pattern Matching model and adds specific intents from your model. The
                // Id is used to identify this model from others in the collection.
                var model = new PatternMatchingModel("YourPatternMatchingModelId");

                // Creates a pattern that uses groups of optional words. "[Go | Take me]" will match either "Go", "Take me", or "".
                var patternWithOptionalWords = "[Go | Take me] to [floor|level] {floorName}";

                // Creates a pattern that uses an optional entity and group that could be used to tie commands together.
                var patternWithOptionalEntity = "Go to parking [{parkingLevel}]";

                // You can also have multiple entities of the same name in a single pattern by adding appending a unique identifier
                // to distinguish between the instances. For example:
                var patternWithTwoOfTheSameEntity = "Go to floor {floorName:1} [and then go to floor {floorName:2}]";
                // NOTE: Both floorName:1 and floorName:2 are tied to the same list of entries. The identifier can be a string
                //       and is separated from the entity name by a ':'

                // Adds some intents to look for specific patterns.
                model.Intents.Add(new PatternMatchingIntent("ChangeFloors", patternWithOptionalWords, patternWithOptionalEntity, patternWithTwoOfTheSameEntity));
                model.Intents.Add(new PatternMatchingIntent("DoorControl", "{action} the doors", "{action} doors", "{action} the door", "{action} door"));

                // Creates the "floorName" entity and set it to type list.
                // Adds acceptable values. NOTE the default entity type is Any and so we do not need
                // to declare the "action" entity.
                model.Entities.Add(PatternMatchingEntity.CreateListEntity("floorName", EntityMatchMode.Strict, "ground floor", "lobby", "1st", "first", "one", "1", "2nd", "second", "two", "2"));

                // Creates the "parkingLevel" entity as a pre-built integer
                model.Entities.Add(PatternMatchingEntity.CreateIntegerEntity("parkingLevel"));

                var modelCollection = new LanguageUnderstandingModelCollection();
                modelCollection.Add(model);

                recognizer.ApplyLanguageModels(modelCollection);

                Console.WriteLine("Say something...");

                var result = await recognizer.RecognizeOnceAsync();

                if (result.Reason == ResultReason.RecognizedIntent)
                {
                    Console.WriteLine($"RECOGNIZED: Text={result.Text}");
                    Console.WriteLine($"       Intent Id={result.IntentId}.");

                    var entities = result.Entities;
                    switch (result.IntentId)
                    {
                        case "ChangeFloors":
                            if (entities.TryGetValue("floorName", out string floorName))
                            {
                                Console.WriteLine($"       FloorName={floorName}");
                            }

                            if (entities.TryGetValue("floorName:1", out floorName))
                            {
                                Console.WriteLine($"     FloorName:1={floorName}");
                            }

                            if (entities.TryGetValue("floorName:2", out floorName))
                            {
                                Console.WriteLine($"     FloorName:2={floorName}");
                            }

                            if (entities.TryGetValue("parkingLevel", out string parkingLevel))
                            {
                                Console.WriteLine($"    ParkingLevel={parkingLevel}");
                            }

                            break;

                        case "DoorControl":
                            if (entities.TryGetValue("action", out string action))
                            {
                                Console.WriteLine($"          Action={action}");
                            }
                            break;
                    }
                }
                else if (result.Reason == ResultReason.RecognizedSpeech)
                {
                    Console.WriteLine($"RECOGNIZED: Text={result.Text}");
                    Console.WriteLine($"    Intent not recognized.");
                }
                else if (result.Reason == ResultReason.NoMatch)
                {
                    Console.WriteLine($"NOMATCH: Speech could not be recognized.");
                }
                else if (result.Reason == ResultReason.Canceled)
                {
                    var cancellation = CancellationDetails.FromResult(result);
                    Console.WriteLine($"CANCELED: Reason={cancellation.Reason}");

                    if (cancellation.Reason == CancellationReason.Error)
                    {
                        Console.WriteLine($"CANCELED: ErrorCode={cancellation.ErrorCode}");
                        Console.WriteLine($"CANCELED: ErrorDetails={cancellation.ErrorDetails}");
                        Console.WriteLine($"CANCELED: Did you set the speech resource key and region values?");
                    }
                }
            }
        }
    }
}
Compilare ed eseguire l'app
A questo punto è possibile compilare l'app e testare il riconoscimento vocale con il servizio Voce.
- Compilare il codice: dalla barra dei menu di Visual Studio scegliere Compila>Compila soluzione.
- Avviare l'app: dalla barra dei menu scegliere Debug>Avvia debug o premere F5.
- Avvia riconoscimento: richiederà che si dica qualcosa. La lingua predefinita è l'italiano. La voce viene inviata al servizio Voce, trascritta come testo e visualizzata nella console.
Ad esempio, se si pronuncia la frase "Portami al 2° piano", questo dovrebbe essere l'output:
Say something...
RECOGNIZED: Text=Take me to floor 2.
       Intent Id=ChangeFloors.
       FloorName=2
Come altro esempio, se si pronuncia la frase "Portami al 7° piano", questo dovrebbe essere l'output:
Say something...
RECOGNIZED: Text=Take me to floor 7.
    Intent not recognized.
Nessuna finalità riconosciuta perché 7 non era presente nell'elenco di valori validi per floorName.
Creare un progetto
Creare un nuovo progetto di applicazione console C++ in Visual Studio 2019 e installare lo Speech SDK.
Iniziare con un codice boilerplate
Aprire helloworld.cpp e aggiungere codice che funga da scheletro del progetto.
#include <iostream>
#include <speechapi_cxx.h>

using namespace Microsoft::CognitiveServices::Speech;
using namespace Microsoft::CognitiveServices::Speech::Intent;

int main()
{
    std::cout << "Hello World!\n";

    auto config = SpeechConfig::FromSubscription("YOUR_SUBSCRIPTION_KEY", "YOUR_SUBSCRIPTION_REGION");
}
Creare una configurazione di Voce
Prima di poter inizializzare un oggetto IntentRecognizer, è necessario creare una configurazione che usi la chiave e l'area di Azure per la risorsa di stima di Servizi di Azure AI.
- Sostituire
"YOUR_SUBSCRIPTION_KEY"con la chiave di stima dei Servizi di Azure AI. - Sostituire
"YOUR_SUBSCRIPTION_REGION"con l'area delle risorse dei Servizi di Azure AI.
Questo esempio usa il metodo FromSubscription() per creare SpeechConfig. Per un elenco completo dei metodi disponibili, vedere Classe SpeechConfig.
Inizializzare un oggetto IntentRecognizer
Quindi, creare un oggetto IntentRecognizer. Inserire questo codice immediatamente sotto la configurazione di Voce.
auto intentRecognizer = IntentRecognizer::FromConfig(config);
Aggiungere alcune finalità
È necessario associare alcuni modelli a un oggetto PatternMatchingModel e applicarli a IntentRecognizer.
Si inizierà creando un oggetto PatternMatchingModel e aggiungendo alcune finalità. PatternMatchingIntent è uno struct, quindi si userà solo la sintassi in linea.
Nota
È possibile aggiungere più modelli a un oggetto PatternMatchingIntent.
auto model = PatternMatchingModel::FromId("myNewModel");

model->Intents.push_back({"Take me to floor {floorName}.", "Go to floor {floorName}."} , "ChangeFloors");
model->Intents.push_back({"{action} the door."}, "OpenCloseDoor");
Aggiungere alcune entità personalizzate
Per sfruttare al meglio il matcher dei criteri, è possibile personalizzare le entità. Faremo di "floorName" un elenco dei piani disponibili.
model->Entities.push_back({ "floorName" , Intent::EntityType::List, Intent::EntityMatchMode::Strict, {"one", "1", "two", "2", "lobby", "ground floor"} });
Applicare il modello a Recognizer
È ora necessario applicare il modello all'oggetto IntentRecognizer. È possibile usare più modelli contemporaneamente in modo che l'API prenda una raccolta di modelli.
std::vector<std::shared_ptr<LanguageUnderstandingModel>> collection;

collection.push_back(model);
intentRecognizer->ApplyLanguageModels(collection);
Riconoscere una finalità
Dall'oggetto IntentRecognizer chiamare il metodo RecognizeOnceAsync(). Questo metodo chiede al Servizio cognitivo per la voce di riconoscere la voce in una singola frase e di interrompere il riconoscimento vocale dopo che la frase è stata identificata. Per semplicità, attendere il completamento della funzionalità restituita.
Inserire questo codice sotto le finalità:
std::cout << "Say something ..." << std::endl;
auto result = intentRecognizer->RecognizeOnceAsync().get();
Visualizzare i risultati (o gli errori) del riconoscimento
Quando il risultato del riconoscimento viene restituito dal Servizio cognitivo per la voce, verrà stampato.
Inserire questo codice sotto auto result = intentRecognizer->RecognizeOnceAsync().get();:
switch (result->Reason)
{
case ResultReason::RecognizedSpeech:
        std::cout << "RECOGNIZED: Text = " << result->Text.c_str() << std::endl;
        std::cout << "NO INTENT RECOGNIZED!" << std::endl;
        break;
case ResultReason::RecognizedIntent:
    std::cout << "RECOGNIZED: Text = " << result->Text.c_str() << std::endl;
    std::cout << "  Intent Id = " << result->IntentId.c_str() << std::endl;
    auto entities = result->GetEntities();
    if (entities.find("floorName") != entities.end())
    {
        std::cout << "  Floor name: = " << entities["floorName"].c_str() << std::endl;
    }

    if (entities.find("action") != entities.end())
    {
        std::cout << "  Action: = " << entities["action"].c_str() << std::endl;
    }

    break;
case ResultReason::NoMatch:
{
    auto noMatch = NoMatchDetails::FromResult(result);
    switch (noMatch->Reason)
    {
    case NoMatchReason::NotRecognized:
        std::cout << "NOMATCH: Speech was detected, but not recognized." << std::endl;
        break;
    case NoMatchReason::InitialSilenceTimeout:
        std::cout << "NOMATCH: The start of the audio stream contains only silence, and the service timed out waiting for speech." << std::endl;
        break;
    case NoMatchReason::InitialBabbleTimeout:
        std::cout << "NOMATCH: The start of the audio stream contains only noise, and the service timed out waiting for speech." << std::endl;
        break;
    case NoMatchReason::KeywordNotRecognized:
        std::cout << "NOMATCH: Keyword not recognized" << std::endl;
        break;
    }
    break;
}
case ResultReason::Canceled:
{
    auto cancellation = CancellationDetails::FromResult(result);

    if (!cancellation->ErrorDetails.empty())
    {
        std::cout << "CANCELED: ErrorDetails=" << cancellation->ErrorDetails.c_str() << std::endl;
        std::cout << "CANCELED: Did you set the speech resource key and region values?" << std::endl;
    }
}
default:
    break;
}
Controllare il codice
A questo punto il codice dovrà avere questo aspetto:
#include <iostream>
#include <speechapi_cxx.h>

using namespace Microsoft::CognitiveServices::Speech;
using namespace Microsoft::CognitiveServices::Speech::Intent;

int main()
{
    auto config = SpeechConfig::FromSubscription("YOUR_SUBSCRIPTION_KEY", "YOUR_SUBSCRIPTION_REGION");
    auto intentRecognizer = IntentRecognizer::FromConfig(config);

    auto model = PatternMatchingModel::FromId("myNewModel");

    model->Intents.push_back({"Take me to floor {floorName}.", "Go to floor {floorName}."} , "ChangeFloors");
    model->Intents.push_back({"{action} the door."}, "OpenCloseDoor");

    model->Entities.push_back({ "floorName" , Intent::EntityType::List, Intent::EntityMatchMode::Strict, {"one", "1", "two", "2", "lobby", "ground floor"} });

    std::vector<std::shared_ptr<LanguageUnderstandingModel>> collection;

    collection.push_back(model);
    intentRecognizer->ApplyLanguageModels(collection);

    std::cout << "Say something ..." << std::endl;

    auto result = intentRecognizer->RecognizeOnceAsync().get();

    switch (result->Reason)
    {
    case ResultReason::RecognizedSpeech:
        std::cout << "RECOGNIZED: Text = " << result->Text.c_str() << std::endl;
        std::cout << "NO INTENT RECOGNIZED!" << std::endl;
        break;
    case ResultReason::RecognizedIntent:
        std::cout << "RECOGNIZED: Text = " << result->Text.c_str() << std::endl;
        std::cout << "  Intent Id = " << result->IntentId.c_str() << std::endl;
        auto entities = result->GetEntities();
        if (entities.find("floorName") != entities.end())
        {
            std::cout << "  Floor name: = " << entities["floorName"].c_str() << std::endl;
        }

        if (entities.find("action") != entities.end())
        {
            std::cout << "  Action: = " << entities["action"].c_str() << std::endl;
        }

        break;
    case ResultReason::NoMatch:
    {
        auto noMatch = NoMatchDetails::FromResult(result);
        switch (noMatch->Reason)
        {
        case NoMatchReason::NotRecognized:
            std::cout << "NOMATCH: Speech was detected, but not recognized." << std::endl;
            break;
        case NoMatchReason::InitialSilenceTimeout:
            std::cout << "NOMATCH: The start of the audio stream contains only silence, and the service timed out waiting for speech." << std::endl;
            break;
        case NoMatchReason::InitialBabbleTimeout:
            std::cout << "NOMATCH: The start of the audio stream contains only noise, and the service timed out waiting for speech." << std::endl;
            break;
        case NoMatchReason::KeywordNotRecognized:
            std::cout << "NOMATCH: Keyword not recognized." << std::endl;
            break;
        }
        break;
    }
    case ResultReason::Canceled:
    {
        auto cancellation = CancellationDetails::FromResult(result);

        if (!cancellation->ErrorDetails.empty())
        {
            std::cout << "CANCELED: ErrorDetails=" << cancellation->ErrorDetails.c_str() << std::endl;
            std::cout << "CANCELED: Did you set the speech resource key and region values?" << std::endl;
        }
    }
    default:
        break;
    }
}
Compilare ed eseguire l'app
A questo punto è possibile compilare l'app e testare il riconoscimento vocale con il servizio Voce.
- Compilare il codice: dalla barra dei menu di Visual Studio scegliere Compila>Compila soluzione.
- Avviare l'app: dalla barra dei menu scegliere Debug>Avvia debug o premere F5.
- Avvia riconoscimento: richiederà che si dica qualcosa. La lingua predefinita è l'italiano. La voce viene inviata al servizio Voce, trascritta come testo e visualizzata nella console.
Ad esempio, se si pronuncia la frase "Portami al 2° piano", questo dovrebbe essere l'output:
Say something ...
RECOGNIZED: Text = Take me to floor 2.
  Intent Id = ChangeFloors
  Floor name: = 2
Come altro esempio, se si pronuncia la frase "Portami al 7° piano", questo dovrebbe essere l'output:
Say something ...
RECOGNIZED: Text = Take me to floor 7.
NO INTENT RECOGNIZED!
L'ID finalità è vuoto perché 7 non era presente nell'elenco.
documentazione di riferimento | Esempi aggiuntivi in GitHub
In questa guida introduttiva, si installerà lo Speech SDK per Java.
Requisiti di piattaforma
Scegliere l'ambiente di destinazione:
Speech SDK per Java è compatibile con Windows, Linux e macOS.
In Windows, è necessario usare l'architettura di destinazione a 64 bit. È necessario Windows 10 o versioni successive.
Installare Microsoft Visual C++ Redistributable per Visual Studio 2015, 2017, 2019 e 2022 per la piattaforma. La prima installazione di questo pacchetto potrebbe richiedere un riavvio.
Speech SDK per Java non supporta Windows su ARM64.
Installare un Development Kit di Java, come Azul Zulu OpenJDK. Microsoft Build di OpenJDK o il proprio JDK di scelta dovrebbero funzionare allo stesso modo.
Installare Speech SDK per Java
Alcune delle istruzioni usano una versione specifica dell'SDK, ad esempio 1.24.2. Per controllare la versione più recente, effettuare una ricerca sul repository GitHub.
Scegliere l'ambiente di destinazione:
Questa guida spiega come installare Speech SDK per Java sul Runtime Java.
Sistemi operativi supportati
Il pacchetto Speech SDK di Java è disponibile per i seguenti sistemi operativi:
- Windows: solo a 64 bit.
- Mac: macOS X versione 10.14 o successive.
- Linux: consultare l'elenco di distribuzioni e architetture di destinazione Linux supportate.
Seguire questa procedura per installare Speech SDK per Java usando Apache Maven:
Installare Apache Maven.
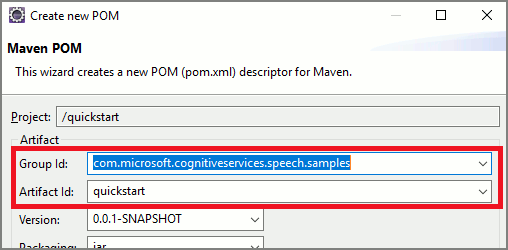
Aprire un prompt dei comandi dove si vuole il nuovo progetto e creare un nuovo file pom.xml.
Copiare il seguente contenuto XML in pom.xml:
<project xmlns="http://maven.apache.org/POM/4.0.0" xmlns:xsi="http://www.w3.org/2001/XMLSchema-instance" xsi:schemaLocation="http://maven.apache.org/POM/4.0.0 http://maven.apache.org/xsd/maven-4.0.0.xsd">
    <modelVersion>4.0.0</modelVersion>
    <groupId>com.microsoft.cognitiveservices.speech.samples</groupId>
    <artifactId>quickstart-eclipse</artifactId>
    <version>1.0.0-SNAPSHOT</version>
    <build>
        <sourceDirectory>src</sourceDirectory>
        <plugins>
        <plugin>
            <artifactId>maven-compiler-plugin</artifactId>
            <version>3.7.0</version>
            <configuration>
            <source>1.8</source>
            <target>1.8</target>
            </configuration>
        </plugin>
        </plugins>
    </build>
    <dependencies>
        <dependency>
        <groupId>com.microsoft.cognitiveservices.speech</groupId>
        <artifactId>client-sdk</artifactId>
        <version>1.40.0</version>
        </dependency>
    </dependencies>
</project>
Eseguire il seguente comando Maven per installare Speech SDK e le relative dipendenze.
mvn clean dependency:copy-dependencies
Iniziare con un codice boilerplate
Aprire
Main.javadalla directory src.Sostituire il contenuto del file con quanto segue:
import java.util.ArrayList;
import java.util.Dictionary;
import java.util.concurrent.ExecutionException;


import com.microsoft.cognitiveservices.speech.*;
import com.microsoft.cognitiveservices.speech.intent.*;

public class Main {
    public static void main(String[] args) throws InterruptedException, ExecutionException {
        IntentPatternMatchingWithMicrophone();
    }

    public static void IntentPatternMatchingWithMicrophone() throws InterruptedException, ExecutionException {
        SpeechConfig config = SpeechConfig.fromSubscription("YOUR_SUBSCRIPTION_KEY", "YOUR_SUBSCRIPTION_REGION");
    }
}
Creare una configurazione di Voce
Prima di poter inizializzare un oggetto IntentRecognizer, è necessario creare una configurazione che usi la chiave e l'area di Azure per la risorsa di stima di Servizi di Azure AI.
- Sostituire
"YOUR_SUBSCRIPTION_KEY"con la chiave di stima dei Servizi di Azure AI. - Sostituire
"YOUR_SUBSCRIPTION_REGION"con l'area delle risorse dei Servizi di Azure AI.
Questo esempio usa il metodo fromSubscription() per creare SpeechConfig. Per un elenco completo dei metodi disponibili, vedere Classe SpeechConfig.
Inizializzare un oggetto IntentRecognizer
Quindi, creare un oggetto IntentRecognizer. Inserire questo codice immediatamente sotto la configurazione di Voce. Questa operazione viene eseguita in un tentativo in modo da sfruttare l'interfaccia autoclosable.
try (IntentRecognizer recognizer = new IntentRecognizer(config)) {

}
Aggiungere alcune finalità
È necessario associare alcuni modelli a un oggetto PatternMatchingModel e applicarli a IntentRecognizer.
Si inizierà creando un oggetto PatternMatchingModel e aggiungendo alcune finalità.
Nota
È possibile aggiungere più modelli a un oggetto PatternMatchingIntent.
Inserire questo codice all'interno del blocco try:
// Creates a Pattern Matching model and adds specific intents from your model. The
// Id is used to identify this model from others in the collection.
PatternMatchingModel model = new PatternMatchingModel("YourPatternMatchingModelId");

// Creates a pattern that uses groups of optional words. "[Go | Take me]" will match either "Go", "Take me", or "".
String patternWithOptionalWords = "[Go | Take me] to [floor|level] {floorName}";

// Creates a pattern that uses an optional entity and group that could be used to tie commands together.
String patternWithOptionalEntity = "Go to parking [{parkingLevel}]";

// You can also have multiple entities of the same name in a single pattern by adding appending a unique identifier
// to distinguish between the instances. For example:
String patternWithTwoOfTheSameEntity = "Go to floor {floorName:1} [and then go to floor {floorName:2}]";
// NOTE: Both floorName:1 and floorName:2 are tied to the same list of entries. The identifier can be a string
//       and is separated from the entity name by a ':'

// Creates the pattern matching intents and adds them to the model
model.getIntents().put(new PatternMatchingIntent("ChangeFloors", patternWithOptionalWords, patternWithOptionalEntity, patternWithTwoOfTheSameEntity));
model.getIntents().put(new PatternMatchingIntent("DoorControl", "{action} the doors", "{action} doors", "{action} the door", "{action} door"));
Aggiungere alcune entità personalizzate
Per sfruttare al meglio il matcher dei criteri, è possibile personalizzare le entità. Faremo di "floorName" un elenco dei piani disponibili. Renderemo anche "parkingLevel" un'entità intera.
Inserire questo codice sotto le finalità:
// Creates the "floorName" entity and set it to type list.
// Adds acceptable values. NOTE the default entity type is Any and so we do not need
// to declare the "action" entity.
model.getEntities().put(PatternMatchingEntity.CreateListEntity("floorName", PatternMatchingEntity.EntityMatchMode.Strict, "ground floor", "lobby", "1st", "first", "one", "1", "2nd", "second", "two", "2"));

// Creates the "parkingLevel" entity as a pre-built integer
model.getEntities().put(PatternMatchingEntity.CreateIntegerEntity("parkingLevel"));
Applicare il modello a Recognizer
È ora necessario applicare il modello all'oggetto IntentRecognizer. È possibile usare più modelli contemporaneamente in modo che l'API prenda una raccolta di modelli.
Inserire questo codice sotto le entità:
ArrayList<LanguageUnderstandingModel> modelCollection = new ArrayList<LanguageUnderstandingModel>();
modelCollection.add(model);

recognizer.applyLanguageModels(modelCollection);
Riconoscere una finalità
Dall'oggetto IntentRecognizer chiamare il metodo RecognizeOnceAsync(). Questo metodo chiede al Servizio cognitivo di Azure per la voce di riconoscere la voce in una singola frase e di interrompere il riconoscimento vocale dopo che la frase è stata identificata.
Inserire questo codice dopo l'applicazione dei modelli linguistici:
System.out.println("Say something...");

IntentRecognitionResult result = recognizer.recognizeOnceAsync().get();
Visualizzare i risultati (o gli errori) del riconoscimento
Quando il risultato del riconoscimento viene restituito dal Servizio cognitivo per la voce, verrà stampato.
Inserire questo codice sotto IntentRecognitionResult result = recognizer.recognizeOnceAsync.get();:
if (result.getReason() == ResultReason.RecognizedSpeech) {
    System.out.println("RECOGNIZED: Text= " + result.getText());
    System.out.println(String.format("%17s", "Intent not recognized."));
}
else if (result.getReason() == ResultReason.RecognizedIntent)
{
    System.out.println("RECOGNIZED: Text= " + result.getText());
    System.out.println(String.format("%17s %s", "Intent Id=", result.getIntentId() + "."));
    Dictionary<String, String> entities = result.getEntities();

    switch (result.getIntentId())
    {
        case "ChangeFloors":
            if (entities.get("floorName") != null) {
                System.out.println(String.format("%17s %s", "FloorName=", entities.get("floorName")));
            }
            if (entities.get("floorName:1") != null) {
                System.out.println(String.format("%17s %s", "FloorName:1=", entities.get("floorName:1")));
            }
            if (entities.get("floorName:2") != null) {
                System.out.println(String.format("%17s %s", "FloorName:2=", entities.get("floorName:2")));
            }
            if (entities.get("parkingLevel") != null) {
                System.out.println(String.format("%17s %s", "ParkingLevel=", entities.get("parkingLevel")));
            }
            break;
        case "DoorControl":
            if (entities.get("action") != null) {
                System.out.println(String.format("%17s %s", "Action=", entities.get("action")));
            }
            break;
    }
}
else if (result.getReason() == ResultReason.NoMatch) {
    System.out.println("NOMATCH: Speech could not be recognized.");
}
else if (result.getReason() == ResultReason.Canceled) {
    CancellationDetails cancellation = CancellationDetails.fromResult(result);
    System.out.println("CANCELED: Reason=" + cancellation.getReason());

    if (cancellation.getReason() == CancellationReason.Error)
    {
        System.out.println("CANCELED: ErrorCode=" + cancellation.getErrorCode());
        System.out.println("CANCELED: ErrorDetails=" + cancellation.getErrorDetails());
        System.out.println("CANCELED: Did you update the subscription info?");
    }
}
Controllare il codice
A questo punto il codice dovrà avere questo aspetto:
package quickstart;
import java.util.ArrayList;
import java.util.concurrent.ExecutionException;
import java.util.Dictionary;

import com.microsoft.cognitiveservices.speech.*;
import com.microsoft.cognitiveservices.speech.intent.*;

public class Main {
    public static void main(String[] args) throws InterruptedException, ExecutionException {
        IntentPatternMatchingWithMicrophone();
    }

    public static void IntentPatternMatchingWithMicrophone() throws InterruptedException, ExecutionException {
        SpeechConfig config = SpeechConfig.fromSubscription("YOUR_SUBSCRIPTION_KEY", "YOUR_SUBSCRIPTION_REGION");
        try (IntentRecognizer recognizer = new IntentRecognizer(config)) {
            // Creates a Pattern Matching model and adds specific intents from your model. The
            // Id is used to identify this model from others in the collection.
            PatternMatchingModel model = new PatternMatchingModel("YourPatternMatchingModelId");

            // Creates a pattern that uses groups of optional words. "[Go | Take me]" will match either "Go", "Take me", or "".
            String patternWithOptionalWords = "[Go | Take me] to [floor|level] {floorName}";

            // Creates a pattern that uses an optional entity and group that could be used to tie commands together.
            String patternWithOptionalEntity = "Go to parking [{parkingLevel}]";

            // You can also have multiple entities of the same name in a single pattern by adding appending a unique identifier
            // to distinguish between the instances. For example:
            String patternWithTwoOfTheSameEntity = "Go to floor {floorName:1} [and then go to floor {floorName:2}]";
            // NOTE: Both floorName:1 and floorName:2 are tied to the same list of entries. The identifier can be a string
            // and is separated from the entity name by a ':'

            // Creates the pattern matching intents and adds them to the model
            model.getIntents().put(new PatternMatchingIntent("ChangeFloors", patternWithOptionalWords, patternWithOptionalEntity, patternWithTwoOfTheSameEntity));
            model.getIntents().put(new PatternMatchingIntent("DoorControl", "{action} the doors", "{action} doors", "{action} the door", "{action} door"));

            // Creates the "floorName" entity and set it to type list.
            // Adds acceptable values. NOTE the default entity type is Any and so we do not need
            // to declare the "action" entity.
            model.getEntities().put(PatternMatchingEntity.CreateListEntity("floorName", PatternMatchingEntity.EntityMatchMode.Strict, "ground floor", "lobby", "1st", "first", "one", "1", "2nd", "second", "two", "2"));

            // Creates the "parkingLevel" entity as a pre-built integer
            model.getEntities().put(PatternMatchingEntity.CreateIntegerEntity("parkingLevel"));

            ArrayList<LanguageUnderstandingModel> modelCollection = new ArrayList<LanguageUnderstandingModel>();
            modelCollection.add(model);

            recognizer.applyLanguageModels(modelCollection);

            System.out.println("Say something...");

            IntentRecognitionResult result = recognizer.recognizeOnceAsync().get();

            if (result.getReason() == ResultReason.RecognizedSpeech) {
                System.out.println("RECOGNIZED: Text= " + result.getText());
                System.out.println(String.format("%17s", "Intent not recognized."));
            }
            else if (result.getReason() == ResultReason.RecognizedIntent)
            {
                System.out.println("RECOGNIZED: Text= " + result.getText());
                System.out.println(String.format("%17s %s", "Intent Id=", result.getIntentId() + "."));
                Dictionary<String, String> entities = result.getEntities();

                switch (result.getIntentId())
                {
                    case "ChangeFloors":
                        if (entities.get("floorName") != null) {
                            System.out.println(String.format("%17s %s", "FloorName=", entities.get("floorName")));
                        }
                        if (entities.get("floorName:1") != null) {
                            System.out.println(String.format("%17s %s", "FloorName:1=", entities.get("floorName:1")));
                        }
                        if (entities.get("floorName:2") != null) {
                            System.out.println(String.format("%17s %s", "FloorName:2=", entities.get("floorName:2")));
                        }
                        if (entities.get("parkingLevel") != null) {
                            System.out.println(String.format("%17s %s", "ParkingLevel=", entities.get("parkingLevel")));
                        }
                        break;

                    case "DoorControl":
                        if (entities.get("action") != null) {
                            System.out.println(String.format("%17s %s", "Action=", entities.get("action")));
                        }
                        break;
                }
            }
            else if (result.getReason() == ResultReason.NoMatch) {
                System.out.println("NOMATCH: Speech could not be recognized.");
            }
            else if (result.getReason() == ResultReason.Canceled) {
                CancellationDetails cancellation = CancellationDetails.fromResult(result);
                System.out.println("CANCELED: Reason=" + cancellation.getReason());

                if (cancellation.getReason() == CancellationReason.Error)
                {
                    System.out.println("CANCELED: ErrorCode=" + cancellation.getErrorCode());
                    System.out.println("CANCELED: ErrorDetails=" + cancellation.getErrorDetails());
                    System.out.println("CANCELED: Did you update the subscription info?");
                }
            }
        }
    }
}
Compilare ed eseguire l'app
A questo punto, si è pronti per compilare l'app e testare il riconoscimento finalità usando il servizio parlato e il criterio di ricerca.
Selezionare il pulsante Esegui in Eclipse o premere CTRL+F11, quindi osservare l'output per la richiesta “Di’ qualcosa”. Una volta visualizzata la richiesta, pronunciare l'espressione e osservare l'output.
Ad esempio, se si pronuncia la frase "Portami al 2° piano", questo dovrebbe essere l'output:
Say something...
RECOGNIZED: Text=Take me to floor 2.
       Intent Id=ChangeFloors.
       FloorName=2
Come altro esempio, se si pronuncia la frase "Portami al 7° piano", questo dovrebbe essere l'output:
Say something...
RECOGNIZED: Text=Take me to floor 7.
    Intent not recognized.
Nessuna finalità riconosciuta perché 7 non era presente nell'elenco di valori validi per floorName.
