Personalizzazione di Web Chat
SI APPLICA A: SDK v4
Questo articolo illustra come personalizzare gli esempi di Web Chat per adattarli al bot.
Integrare Web Chat nel sito Web in uso
La panoramica chat Web descrive come integrare il controllo chat Web nel sito Web.
Personalizzazione degli stili
Il controllo chat Web offre opzioni di personalizzazione avanzate: è possibile modificare colori, dimensioni, posizionamento di elementi, aggiungere elementi personalizzati e interagire con la pagina Web di hosting. Di seguito sono riportati alcuni esempi di come personalizzare l'interfaccia utente chat Web.
È possibile trovare l'elenco completo di tutte le impostazioni che è possibile modificare in chat Web nel StyleOptions.ts file. I valori predefiniti per chat Web sono disponibili nel file di defaultStyleOptions.ts
Tali impostazioni generano un set di stili, ovvero un set di regole CSS migliorate con glamor. È possibile trovare l'elenco completo degli stili CSS generati nel set di stili nel createStyleSet.ts file.
Impostare le dimensioni del contenitore Web Chat
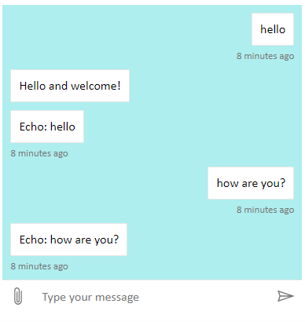
Per regolare le dimensioni del contenitore chat Web, usare le proprietà e rootWidth del set di rootHeight stili. L'esempio seguente imposta anche il colore di sfondo del contenitore per mostrare le dimensioni del controller.
<!DOCTYPE html>
<head>
    <script src="https://cdn.botframework.com/botframework-webchat/latest/webchat.js"></script>
</head>
<body>
  <div style="height: 60%; width: 40%; margin-top:5%; margin-left:10%" id="webchat" role="main"></div>
  <script>
     // Set  the CSS rules.
     const styleSet = window.WebChat.createStyleSet({
         rootHeight: '100%',
         rootWidth: '50%',
         backgroundColor: 'paleturquoise'
      });

    window.WebChat.renderWebChat({
      directLine: window.WebChat.createDirectLine({
          token: '<Your Direct Line token>'}),
      styleSet
    }, document.getElementById('webchat'));

  </script>
</body>

Avviso
Nella pagina Web di hosting non usare la chiave Direct Line in modo semplice. Usare un token come illustrato nella sezione Opzione di incorporamento produzione di come connettere un bot a chat Web.
Modificare il carattere e il colore della bolla di chat
È possibile personalizzare il colore di sfondo e i tipi di carattere usati nelle bolle di chat in modo che corrispondano allo stile della pagina Web che ospita il controllo chat Web. Il frammento di codice seguente mostra come eseguire questa operazione.

<!DOCTYPE html>
<head>
    <script src="https://cdn.botframework.com/botframework-webchat/latest/webchat.js"></script>
</head>
<body>
  <div style="height: 60%; width: 40%; margin-top:5%; margin-left:10%" id="webchat" role="main"></div>
  <script>

     // Set  the CSS rules.
     const styleSet = window.WebChat.createStyleSet({
         bubbleBackground: 'rgba(0, 0, 255, .1)',
         bubbleFromUserBackground: 'rgba(0, 255, 0, .1)',
         rootHeight: '100%',
         rootWidth: '50%',
         backgroundColor: 'paleturquoise'
      });

      // After generated, you can modify the CSS rules.
      // Change font family and weight.
      styleSet.textContent = {
         ...styleSet.textContent,
         fontFamily: "'Comic Sans MS', 'Arial', sans-serif",
         fontWeight: 'bold'
      };
    window.WebChat.renderWebChat({
      directLine: window.WebChat.createDirectLine({
          token: '<Your Direct Line token>'}),
      styleSet
    }, document.getElementById('webchat'));

  </script>
</body>
Modificare i bot e gli avatar utente
chat Web supporta avatar, che è possibile personalizzare impostando botAvatarInitials e userAvatarInitials nella styleOptions proprietà .
![]()
<!DOCTYPE html>
<head>
    <script src="https://cdn.botframework.com/botframework-webchat/latest/webchat.js"></script>
</head>
<body>
  <div style="height: 60%; width: 40%; margin-top:5%; margin-left:10%" id="webchat" role="main"></div>
  <script>

     // Set  the CSS rules.
     const styleSet = window.WebChat.createStyleSet({
         bubbleBackground: 'rgba(0, 0, 255, .1)',
         bubbleFromUserBackground: 'rgba(0, 255, 0, .1)',
         rootHeight: '100%',
         rootWidth: '50%',
         backgroundColor: 'paleturquoise'
      });

      // After generated, you can modify the CSS rules.
      // Change font family and weight.
      styleSet.textContent = {
         ...styleSet.textContent,
         fontFamily: "'Comic Sans MS', 'Arial', sans-serif",
         fontWeight: 'bold'
      };

    // Set the avatar options.
     const avatarOptions = {
         botAvatarInitials: 'BF',
         userAvatarInitials: 'WC'
         };

    window.WebChat.renderWebChat({
      directLine: window.WebChat.createDirectLine({
          token: '<Your Direct Line token>'}),
      styleSet,
      styleOptions: avatarOptions
    }, document.getElementById('webchat'));

  </script>
</body>
Usare la botAvatarInitials proprietà per impostare le iniziali avatar per il bot, che viene visualizzato sul lato sinistro del controllo.
Usa la userAvatarInitials proprietà per impostare le iniziali dell'avatar per l'utente, che vengono visualizzate sul lato destro.
Usare le botAvatarImage proprietà e userAvatarImage per fornire url di immagine per il bot e gli avatar utente. Il controllo visualizzerà questi elementi al posto delle iniziali, come illustrato di seguito.
const avatarOptions = {
   botAvatarImage: '<URL to your bot avatar image>',
   botAvatarInitials: 'BF',
   userAvatarImage: '<URL to your user avatar image>',
   userAvatarInitials: 'WC'
};
![]()
Rendering personalizzato di attività e allegati
Con la versione più recente di chat Web, è anche possibile eseguire il rendering di attività o allegati che chat Web non supportano la funzionalità predefinita. Attività e allegai di cui è stato eseguito il rendering vengono inviati in una pipeline personalizzabile modellata dopo il middleware Redux. La pipeline è sufficientemente flessibile e consente di eseguire con facilità le attività seguenti:
- Decorare le attività e gli allegati esistenti
- Aggiungere nuovi allegati/attività
- Sostituire o rimuovere le attività e gli allegati esistenti
- Creare un'infrastruttura daisy-chain del middleware
Visualizzare un repository GitHub come allegato
Ad esempio, se si vuole visualizzare un mazzo di schede del repository GitHub, è possibile creare un nuovo componente React per il repository GitHub e aggiungerlo come middleware. L'immagine e i frammenti di codice seguenti provengono dall'esempio customization-card-components.
Di seguito è riportato l'output quando si immette il messaggio predefinito sample :github-repository.

Se si immette aiuto si ottiene la selezione di tutte le schede che è possibile scegliere. Questo è uno degli esempi seguenti:

import ReactWebChat from 'botframework-webchat';
import ReactDOM from 'react-dom';

// Create a new React component that accept render a GitHub repository attachment
const GitHubRepositoryAttachment = props => (
   <div
      style={{
         fontFamily: "'Calibri', 'Helvetica Neue', Arial, sans-serif",
         margin: 20,
         textAlign: 'center'
      }}
   >
      <svg
         height="64"
         viewBox="0 0 16 16"
         version="1.1"
         width="64"
         aria-hidden="true"
      >
         <path
            fillRule="evenodd"
            d="M8 0C3.58 0 0 3.58 0 8c0 3.54 2.29 6.53 5.47 7.59.4.07.55-.17.55-.38 0-.19-.01-.82-.01-1.49-2.01.37-2.53-.49-2.69-.94-.09-.23-.48-.94-.82-1.13-.28-.15-.68-.52-.01-.53.63-.01 1.08.58 1.23.82.72 1.21 1.87.87 2.33.66.07-.52.28-.87.51-1.07-1.78-.2-3.64-.89-3.64-3.95 0-.87.31-1.59.82-2.15-.08-.2-.36-1.02.08-2.12 0 0 .67-.21 2.2.82.64-.18 1.32-.27 2-.27.68 0 1.36.09 2 .27 1.53-1.04 2.2-.82 2.2-.82.44 1.1.16 1.92.08 2.12.51.56.82 1.27.82 2.15 0 3.07-1.87 3.75-3.65 3.95.29.25.54.73.54 1.48 0 1.07-.01 1.93-.01 2.2 0 .21.15.46.55.38A8.013 8.013 0 0 0 16 8c0-4.42-3.58-8-8-8z"
         />
      </svg>
      <p>
         <a
            href={`https://github.com/${encodeURI(props.owner)}/${encodeURI(
               props.repo
            )}`}
            target="_blank"
         >
            {props.owner}/<br />
            {props.repo}
         </a>
      </p>
   </div>
);

// Creating a new middleware pipeline that will render <GitHubRepositoryAttachment> for specific type of attachment
const attachmentMiddleware = () => next => card => {
   switch (card.attachment.contentType) {
      case 'application/vnd.microsoft.botframework.samples.github-repository':
         return (
            <GitHubRepositoryAttachment
               owner={card.attachment.content.owner}
               repo={card.attachment.content.repo}
            />
         );

      default:
         return next(card);
   }
};

ReactDOM.render(
   <ReactWebChat
      // Prepending the new middleware pipeline
      attachmentMiddleware={attachmentMiddleware}
      directLine={window.WebChat.createDirectLine({ token })}
   />,
   document.getElementById('webchat')
);
In questo esempio viene aggiunto un nuoco componente React denominato GitHubRepositoryAttachment:
const GitHubRepositoryAttachment = props => (
   <div
      style={{
         fontFamily: "'Calibri', 'Helvetica Neue', Arial, sans-serif",
         margin: 20,
         textAlign: 'center'
      }}
   >
      <svg
         height="64"
         viewBox="0 0 16 16"
         version="1.1"
         width="64"
         aria-hidden="true"
      >
         <path
            fillRule="evenodd"
            d="M8 0C3.58 0 0 3.58 0 8c0 3.54 2.29 6.53 5.47 7.59.4.07.55-.17.55-.38 0-.19-.01-.82-.01-1.49-2.01.37-2.53-.49-2.69-.94-.09-.23-.48-.94-.82-1.13-.28-.15-.68-.52-.01-.53.63-.01 1.08.58 1.23.82.72 1.21 1.87.87 2.33.66.07-.52.28-.87.51-1.07-1.78-.2-3.64-.89-3.64-3.95 0-.87.31-1.59.82-2.15-.08-.2-.36-1.02.08-2.12 0 0 .67-.21 2.2.82.64-.18 1.32-.27 2-.27.68 0 1.36.09 2 .27 1.53-1.04 2.2-.82 2.2-.82.44 1.1.16 1.92.08 2.12.51.56.82 1.27.82 2.15 0 3.07-1.87 3.75-3.65 3.95.29.25.54.73.54 1.48 0 1.07-.01 1.93-.01 2.2 0 .21.15.46.55.38A8.013 8.013 0 0 0 16 8c0-4.42-3.58-8-8-8z"
         />
      </svg>
      <p>
         <a
            href={`https://github.com/${encodeURI(props.owner)}/${encodeURI(
               props.repo
            )}`}
            target="_blank"
         >
            {props.owner}/<br />
            {props.repo}
         </a>
      </p>
   </div>
);
Viene creato in seguito un middleware che eseguirà il rendering del nuovo componente React quando il bot invia un allegato con tipo di contenuto application/vnd.microsoft.botframework.samples.github-repository. In caso contrario, continuerà il middleware chiamando next(card).
const attachmentMiddleware = () => next => card => {
   switch (card.attachment.contentType) {
      case 'application/vnd.microsoft.botframework.samples.github-repository':
         return (
            <GitHubRepositoryAttachment
               owner={card.attachment.content.owner}
               repo={card.attachment.content.repo}
            />
         );

      default:
         return next(card);
   }
};
L'attività inviata dal bot è simile alla seguente:
{
   "type": "message",
   "from": {
      "role": "bot"
   },
   "attachmentLayout": "carousel",
   "attachments": [
      {
         "contentType": "application/vnd.microsoft.botframework.samples.github-repository",
         "content": {
            "owner": "Microsoft",
            "repo": "BotFramework-WebChat"
         }
      },
      {
         "contentType": "application/vnd.microsoft.botframework.samples.github-repository",
         "content": {
            "owner": "Microsoft",
            "repo": "BotFramework-Emulator"
         }
      },
      {
         "contentType": "application/vnd.microsoft.botframework.samples.github-repository",
         "content": {
            "owner": "Microsoft",
            "repo": "BotFramework-DirectLineJS"
         }
      }
   ]
}