ポート ミラーリングを検証する
適用対象: Advanced Threat Analytics Version 1.9
Note
この記事は、ATA Lightweight Gateway ではなく ATA ゲートウェイをデプロイする場合にのみ関連します。 ATA ゲートウェイを使用する必要があるかどうかを判断するには、「デプロイに適したゲートウェイの選択」を参照してください。
次の手順では、プロモーションが正しく構成されていることを検証するプロセスについて説明します。 ATA が正常に機能するためには、ATA ゲートウェイがドメイン コントローラー間のトラフィックを確認できる必要があります。 ATA で使用されるメイン データ ソースは、ドメイン コントローラー間のネットワーク トラフィックの Deep Packet Inspection です。 ATA でネットワーク トラフィックを確認するには、ポート ミラーリングを構成する必要があります。 ポート ミラーリングは、あるポート (送信元ポート) から別のポート (宛先ポート) にトラフィックをコピーします。
Windows PowerShell スクリプトを使用してポート ミラーリングを検証する
- このスクリプトのテキストを ATAdiag.ps1 という名前のファイルに保存します。
- 検証する ATA ゲートウェイでこのスクリプトを実行します。 このスクリプトは、ATA ゲートウェイからドメイン コントローラーへの ICMP トラフィックを生成し、ドメイン コントローラー上のキャプチャ NIC でそのトラフィックを検索します。 ATA ゲートウェイは、ATA コンソールで入力した DC IP アドレスと同じ宛先 IP アドレスを持つ ICMP トラフィックを確認した場合、ポート ミラーリングが構成済みだと見なします。
スクリプトを実行する方法のサンプル:
# ATAdiag.ps1 -CaptureIP n.n.n.n -DCIP n.n.n.n -TestCount n
param([parameter(Mandatory=$true)][string]$CaptureIP, [parameter(Mandatory=$true)][string]$DCIP, [int]$PingCount = 10)

# Set variables
$ErrorActionPreference = "stop"
$starttime = get-date
$byteIn = new-object byte[] 4
$byteOut = new-object byte[] 4
$byteData = new-object byte[] 4096  # size of data

$byteIn[0] = 1  # for promiscuous mode
$byteIn[1-3] = 0
$byteOut[0-3] = 0

# Convert network data to host format
function NetworkToHostUInt16 ($value)
{
    [Array]::Reverse($value)
    [BitConverter]::ToUInt16($value,0)
}
function NetworkToHostUInt32 ($value)
{
    [Array]::Reverse($value)
    [BitConverter]::ToUInt32($value,0)
}
function ByteToString ($value)
{
    $AsciiEncoding = new-object system.text.asciiencoding
    $AsciiEncoding.GetString($value)
}

Write-Host "Testing Port Mirroring..." -ForegroundColor Yellow
Write-Host ""
Write-Host "Here is a summary of the connection we will test." -ForegroundColor Yellow

# Initialize a first ping connection
Test-Connection -Count 1 -ComputerName $DCIP -ea SilentlyContinue
Write-Host ""
Write-Host "Press any key to continue..." -ForegroundColor Red
[void][System.Console]::ReadKey($true)
Write-Host ""
Write-Host "Sending ICMP and Capturing data..." -ForegroundColor Yellow

# Open a socket
$socket = new-object system.net.sockets.socket([Net.Sockets.AddressFamily]::InterNetwork,[Net.Sockets.SocketType]::Raw,[Net.Sockets.ProtocolType]::IP)

# Include the IP header
$socket.setsocketoption("IP","HeaderIncluded",$true)
$socket.ReceiveBufferSize = 10000
$ipendpoint = new-object system.net.ipendpoint([net.ipaddress]"$CaptureIP",0)
$socket.bind($ipendpoint)

# Enable promiscuous mode
[void]$socket.iocontrol([net.sockets.iocontrolcode]::ReceiveAll,$byteIn,$byteOut)

# Initialize test variables
$tests = 0
$TestResult = "Noise"
$OneSuccess = 0

while ($tests -le $PingCount)
{
    if (!$socket.Available)  # see if any packets are in the queue
    {
        start-sleep -milliseconds 500
        continue
    }

    # Capture traffic
    $rcv = $socket.receive($byteData,0,$byteData.length,[net.sockets.socketflags]::None)

    # Decode the header so we can read ICMP
    $MemoryStream = new-object System.IO.MemoryStream($byteData,0,$rcv)
    $BinaryReader = new-object System.IO.BinaryReader($MemoryStream)

    # Set IP version & header length
    $VersionAndHeaderLength = $BinaryReader.ReadByte()

    # TOS
    $TypeOfService= $BinaryReader.ReadByte()

    # More values, and the Protocol Number for ICMP traffic
    # Convert network format of big-endian to host format of little-endian
    $TotalLength = NetworkToHostUInt16 $BinaryReader.ReadBytes(2)
    $Identification = NetworkToHostUInt16 $BinaryReader.ReadBytes(2)
    $FlagsAndOffset = NetworkToHostUInt16 $BinaryReader.ReadBytes(2)
    $TTL = $BinaryReader.ReadByte()
    $ProtocolNumber = $BinaryReader.ReadByte()
    $Checksum = [Net.IPAddress]::NetworkToHostOrder($BinaryReader.ReadInt16())

    # The source and destination IP addresses
    $SourceIPAddress = $BinaryReader.ReadUInt32()
    $DestinationIPAddress = $BinaryReader.ReadUInt32()

    # The source and destimation ports
    $sourcePort = [uint16]0
    $destPort = [uint16]0

    # Close the stream reader
    $BinaryReader.Close()
    $memorystream.Close()

    # Cast DCIP into an IPaddress type
    $DCIPP = [ipaddress] $DCIP
    $DestinationIPAddressP = [ipaddress] $DestinationIPAddress

    #Ping the DC at the end after starting the capture
    Test-Connection -Count 1 -ComputerName $DCIP -ea SilentlyContinue | Out-Null

    # This is the match logic - check to see if Destination IP from the Ping sent matches the DCIP entered by in the ATA Console
    # The only way the ATA Gateway should see a destination of the DC is if Port Spanning is configured

    if ($DestinationIPAddressP -eq $DCIPP)  # is the destination IP eq to the DC IP?
    {
        $TestResult = "Port Spanning success!"
        $OneSuccess = 1
    } else {
        $TestResult = "Noise"
    }

    # Put source, destination, test result in Powershell object
    new-object psobject | add-member -pass noteproperty CaptureSource $([system.net.ipaddress]$SourceIPAddress) | add-member -pass noteproperty CaptureDestination $([system.net.ipaddress]$DestinationIPAddress) | Add-Member -pass NoteProperty Result $TestResult | Format-List | Out-Host
    #Count tests
    $tests ++
}

if ($OneSuccess -eq 1)
{
    Write-Host "Port Spanning Success!" -ForegroundColor Green
    Write-Host ""
    Write-Host "At least one packet which was addressed to the DC, was picked up by the Gateway." -ForegroundColor Yellow
    Write-Host "A little noise is OK, but if you don't see a majority of successes, you might want to re-run." -ForegroundColor Yellow
} else {
    Write-Host "No joy, all noise.  You may want to re-run, increase the number of Ping Counts, or check your config." -ForegroundColor Red
}

Write-Host ""
Write-Host "Press any key to continue..." -ForegroundColor Red
[void][System.Console]::ReadKey($true)
Net Mon を使用してポート ミラーリングを検証する
検証する ATA ゲートウェイに Microsoft Network Monitor 3.4 をインストールします。
重要
Microsoft Message Analyzer やその他のトラフィック キャプチャ ソフトウェアを ATA ゲートウェイにインストールしないでください。
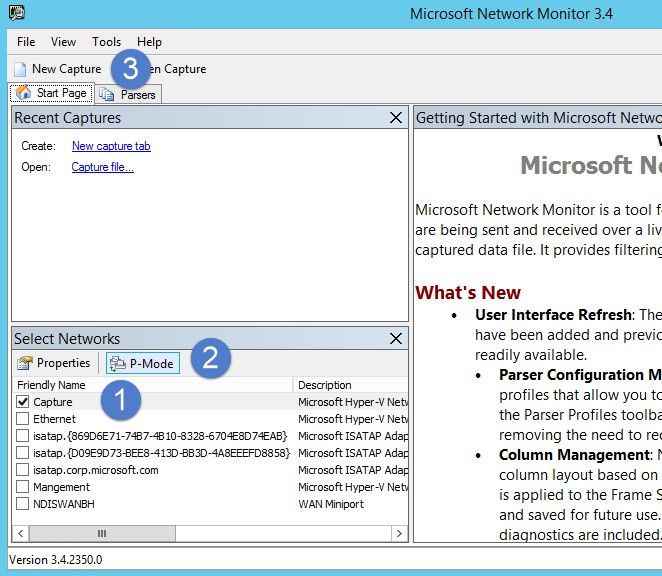
ネットワーク モニターを開き、新しいキャプチャ タブを作成します。
キャプチャ ネットワーク アダプター、ポート ミラーリング宛先として構成されているスイッチ ポートに接続されているネットワーク アダプターのみを選択します。
P モードが有効になっていることを確認します。
[新規キャプチャ] をクリックします。
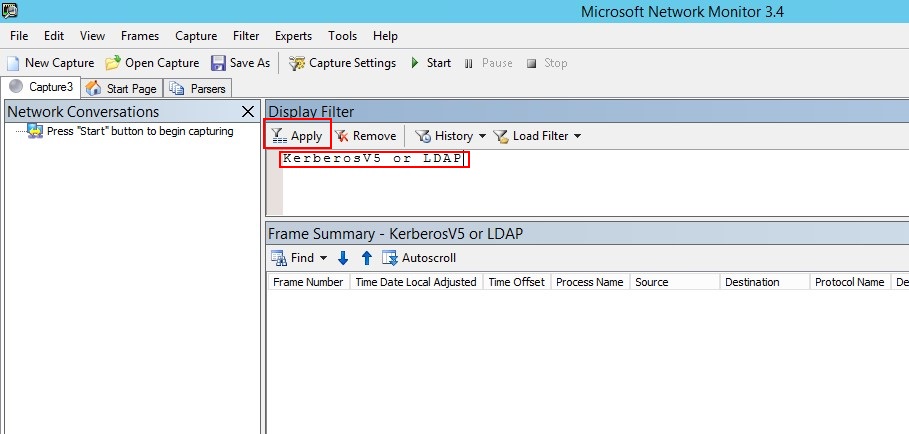
[フィルターを表示] ウィンドウで、KerberosV5 OR LDAP というフィルターを入力したら、[適用] をクリックします。
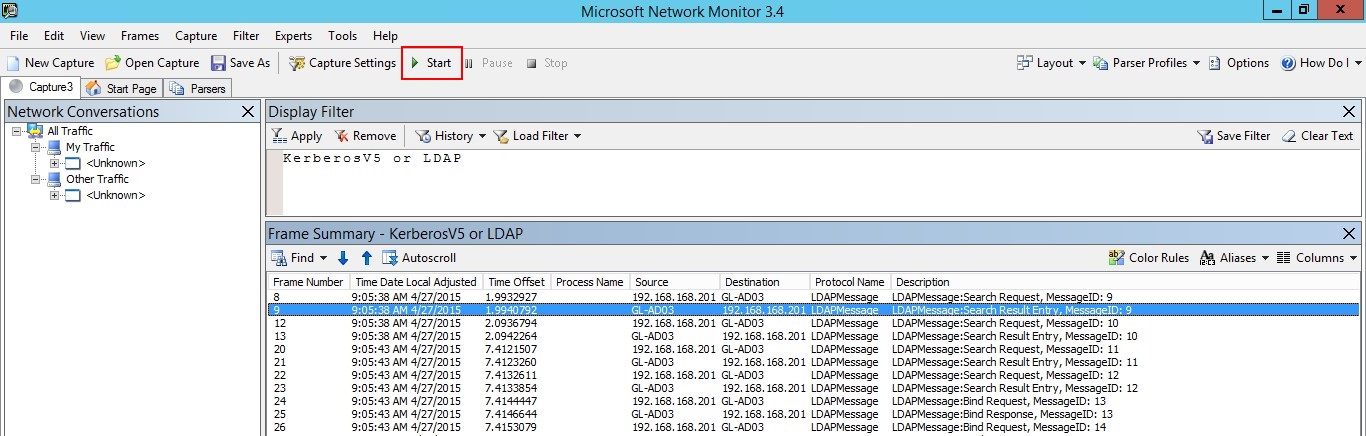
[開始] をクリックして、キャプチャ セッションを開始します。 ドメイン コントローラー間のトラフィックを確認できない場合は、ポート ミラーリング構成を見直します。
Note
ドメイン コントローラー間のトラフィックを確認することが重要です。
一方向のみトラフィックが表示される場合は、ネットワークまたは仮想チームと連携して、ポート ミラーリング構成のトラブルシューティングに役立てます。