チュートリアル: Python Bing Ads API Web アプリケーション
このチュートリアルでは、 Bing Ads Python SDK、 Visual Studio Code IDE、 Django Web フレームワークを使用して Microsoft Advertising Web アプリケーションの実行を開始する方法について説明します。
このチュートリアルでは、データ モデルの操作や管理インターフェイスの作成など、Django 自体に関するさまざまな詳細については説明しません。 これらの側面に関するガイダンスについては、 Django のドキュメントを参照してください。 VS Code ターミナル、エディター、デバッガーで Django を操作する方法の詳細については、「 Visual Studio Code で Django を使用する」を参照してください。 このチュートリアルでは、「 Visual Studio Code で Django を使用する」のセットアップ手順について詳しく説明します。
Web アプリケーションの概要の例
このチュートリアルの終わりまでに、Microsoft Advertising ユーザーの資格情報を認証し、ユーザーとアカウントの情報を表示する Web アプリケーションが実行 http://localhost されます。 その後、複数の Web アプリケーション ユーザーを追加して、アプリケーションで Microsoft Advertising 資格情報を使用するためのアクセスを有効にすることができます。 この Web アプリケーションは、Web アプリケーション ユーザーの 1 対 1 のマッピング (ContosoUser と Microsoft Advertising ユーザーなど) を提供します。 データ モデルを変更する方法の詳細については、 Django のドキュメント を参照してください。 Web アプリケーション ユーザーが Microsoft アカウントを使用して Microsoft Advertising アカウントへのアクセスを有効にした場合、更新トークンは Web サーバー上の SQL Lite データベースに格納されます。
前提条件
このチュートリアルに従うには、 Visual Studio Code をインストールする必要があります。 Django Web アプリを実行するには、Visual Studio Community または Visual Studio Professional を使用できます。ただし、セットアップ手順は、このチュートリアルの手順とは異なります。
python.org から Python 3 をインストールする必要があります。通常、ページの最初に表示される [Python 3.7.0 のダウンロード] ボタン (または最新バージョン) を使用します。 Windows では、Python インタープリターの場所が PATH 環境変数に含まれていることを確認します。 これを確認するには、コマンド プロンプトで を実行 path します。 Python インタープリターのフォルダーが含まれていない場合は、Windows の [設定] を開き、"environment" を検索し、 アカウントの環境変数の編集を選択し、 Path 変数を編集してそのフォルダーを含めます。
Bing Ads Python SDK をインストールする必要があります。このチュートリアルでは、インストールについて説明します。
アプリケーションをローカルにデプロイするには Django Web フレームワーク がインストールされている必要があります。このチュートリアルでは、インストールについて説明します。
Microsoft Advertising の資格情報と 開発者トークンを持つ少なくとも 1 人のユーザーが必要です。
アプリケーションを登録し、クライアント ID (登録済みアプリケーション ID) とクライアント シークレット (登録済みパスワード) を書き留める必要があります。 この例では、(ネイティブではなく) Web アプリを登録する必要があります。 1 つ以上のリダイレクト URL を登録するように求められます。このチュートリアルでは、 を登録 http://localhost/callbackする必要があります。 運用サーバーにデプロイする場合は、代わりに https を使用する必要があります。 アプリケーションの登録と承認コード付与フローの詳細については、「 OAuth による認証」を参照してください。
このチュートリアルは Windows で開発されました。 Windows はサンプルを実行する必要はありませんが、Linux や MacOS などの別のオペレーティング システムを使用する場合、以下の手順の一部は異なります。
Django のプロジェクト環境を作成する
このセクションでは、Django がインストールされている仮想環境を作成します。 仮想環境を使用すると、グローバル Python 環境への Django のインストールを回避し、アプリケーションで使用されるライブラリを正確に制御できます。
ファイル システムで、このチュートリアルのプロジェクト フォルダー (など
hello_django) を作成します。フォルダーで
hello_djangoPowershell またはお気に入りのスクリプト シェルを開き、次のコマンドを使用して、現在のインタープリターに基づいてという名前envの仮想環境を作成します。py -3 -m venv envを実行するか、VS Code を
hello_django実行code .し、[フォルダーを開く]> コマンドを使用して、VS Codeでプロジェクト フォルダーを開きます。
VS Code で、コマンド パレット ([コマンド パレットの表示>] または
Ctrl+Shift+P) を開きます。 次に、[ Python: Select Interpreter]\(Python: インタープリターの選択\) コマンドを選択 します。コマンドは、VS Code が自動的に検索できる使用可能なインタープリターの一覧を示します。 リストは異なります。目的のインタープリターが表示されない場合は、「 Python 環境の構成」を参照してください。 一覧から、 または
.\envで始まるプロジェクト フォルダー内の仮想環境を./env選択します。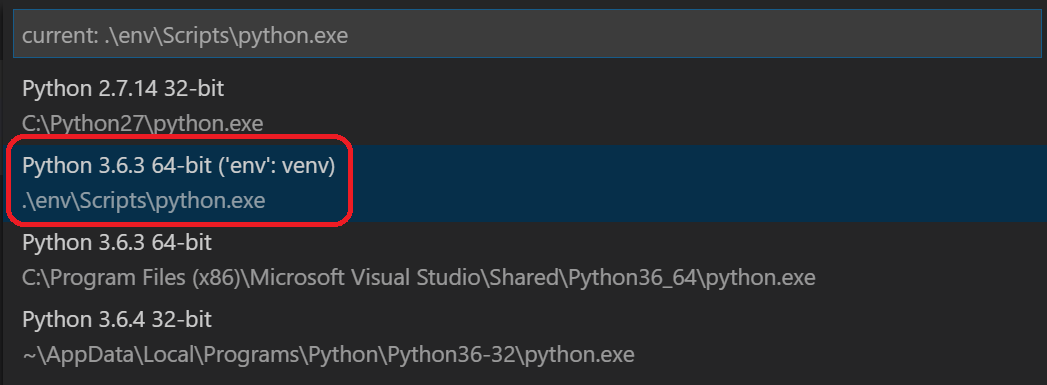
ターミナルの実行: コマンド パレットから 新しいターミナル (
Ctrl+Shift+ `) を作成します。これにより、ターミナルが作成され、アクティブ化スクリプトを実行して仮想環境が自動的にアクティブ化されます。注:
Windows では、既定のターミナルの種類が PowerShell の場合、実行中のスクリプトがシステムで無効になっているため、activate.ps1 を実行できないというエラーが表示されることがあります。 このエラーは、スクリプトを許可する方法に関する情報のリンクを提供する必要があります。 それ以外の場合は、 ターミナル: [既定のシェル] を選択 して、優先する既定値を設定します。
選択した環境が VS Code ステータス バーの左下隅に表示されます。 仮想環境を使用していることを示す (venv) インジケーターに注目してください。

VS Code ターミナルの pip を使用して、仮想環境に Django をインストールします。
python -m pip install djangovs Code ターミナルの pip を使用して、仮想環境に Bing Ads Python SDK をインストールします。
python -m pip install bingads
これで、Django と Microsoft Advertising コードを記述するための自己完結型の仮想環境が整いました。
Django アプリを作成して実行する
Django の用語では、"Django プロジェクト" は、完全な Web アプリケーションを作成するために Web ホストにデプロイする 1 つ以上の "アプリ" と共に、複数のサイト レベルの構成ファイルで構成されます。 Django プロジェクトには複数のアプリを含めることができます。それぞれのアプリは通常、プロジェクトに独立した関数を持ち、同じアプリを複数の Django プロジェクトに含めることができます。 アプリは、Django が期待する特定の規則に従う Python パッケージにすぎません。
Django アプリを作成するには、まず、アプリのコンテナーとして機能する Django プロジェクトを作成してから、アプリ自体を作成する必要があります。 どちらの目的でも、Django 管理ユーティリティ を使用します。これは、 django-adminDjango パッケージをインストールするときにインストールされます。
Django プロジェクトを作成する
仮想環境がアクティブ化されている VS Code ターミナルで、次のコマンドを実行します。
django-admin startproject web_project .このコマンドは
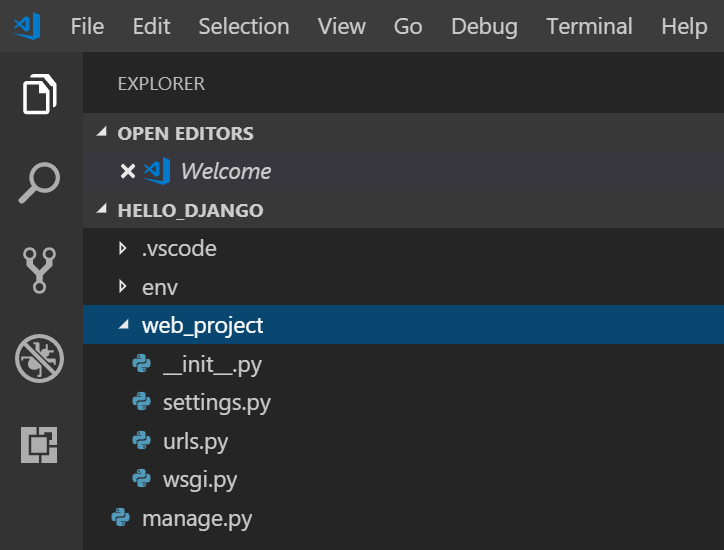
startproject、現在の.フォルダーがプロジェクト フォルダーであることを (最後に を使用して) 想定し、その中に次のフォルダーを作成します。manage.py: プロジェクトの Django コマンド ライン管理ユーティリティ。 プロジェクトの管理コマンドは、 を使用してpython manage.py <command> [options]実行します。という名前
web_projectのサブフォルダー。このサブフォルダーには、次のファイルが含まれています。-
__init__.py: このフォルダーが Python パッケージであることを Python に通知する空のファイル。 -
wsgi.py: WSGI 互換の Web サーバーがプロジェクトにサービスを提供するためのエントリ ポイント。 通常、このファイルは実稼働 Web サーバーのフックを提供しているため、そのままにしておきます。 -
settings.py: Django プロジェクトの設定が含まれています。これは、Web アプリの開発過程で変更します。 -
urls.py: Django プロジェクトの目次が含まれており、開発の過程でも変更します。
-
Django プロジェクトを確認するには、仮想環境がアクティブになっていることを確認してから、 コマンド を使用して Django の開発サーバーを起動します
python manage.py runserver。 サーバーは既定のポート 8000 で実行され、VS Code ターミナル出力ウィンドウに次のような出力が表示されます。Performing system checks... System check identified no issues (0 silenced). You have 15 unapplied migration(s). Your project may not work properly until you apply the migrations for app(s): admin, auth, contenttypes, sessions. Run 'python manage.py migrate' to apply them. October 18, 2018 - 05:38:23 Django version 2.1.2, using settings 'web_project.settings' Starting development server at http://127.0.0.1:8000/ Quit the server with CTRL-BREAK.サーバーを初めて実行すると、ファイル
db.sqlite3に既定の SQLite データベースが作成されます。これは通常、開発目的を目的としていますが、少量の Web アプリの運用環境で使用できます。 また、Django の組み込み Web サーバーは、ローカル開発 のみを 目的としています。 ただし、Web ホストにデプロイする場合、代わりに Django はホストの Web サーバーを使用します。 Django プロジェクトのモジュールはwsgi.py、運用サーバーへのフックを処理します。既定の 8000 とは異なるポートを使用する場合は、コマンド ラインでポート番号 (など
python manage.py runserver 5000) を指定します。Ctrl+clickVShttp://127.0.0.1:8000/Code ターミナル出力ウィンドウの URL を使用して、既定のブラウザーをそのアドレスに開きます。 Django が正しくインストールされていて、プロジェクトが有効な場合は、次に示す既定のページが表示されます。 [VS Code Output]\(VS Code 出力\) ウィンドウには、サーバー ログも表示されます。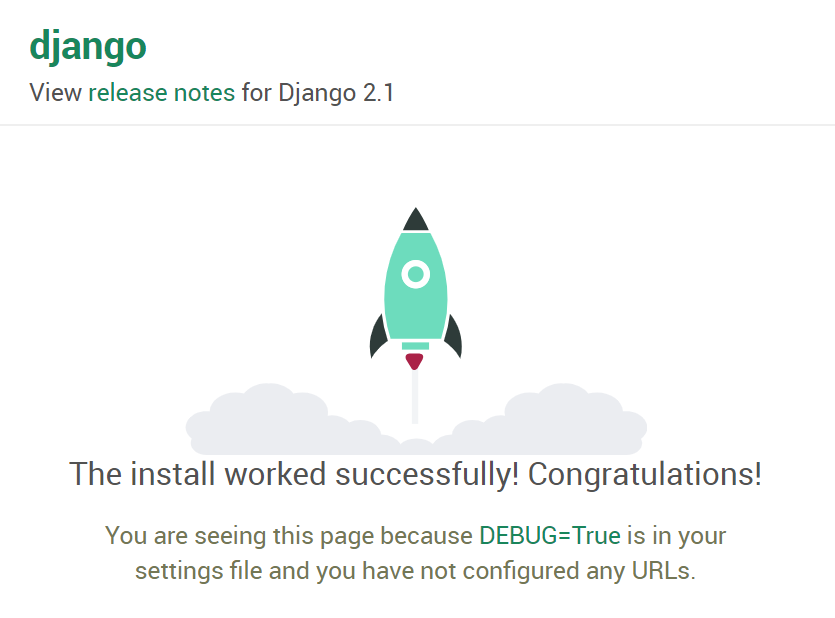
完了したら、ブラウザー ウィンドウを閉じ、VS Code ターミナル出力ウィンドウに示されているように を使用して
Ctrl+CVS Code でサーバーを停止します。
Microsoft Advertising 用の Django アプリを作成する
仮想環境がアクティブ化された VS Code ターミナルで、プロジェクト フォルダー (存在する場所
manage.py) で管理ユーティリティのstartappコマンドを実行します。python manage.py startapp appコマンドは、多数のコード ファイルと 1 つのサブフォルダーを含む という名前
appのフォルダーを作成します。 これらのうち、(Web アプリ内のページを定義する関数を含む) とmodels.py(データ オブジェクトを定義するクラスを含む) を頻繁に操作views.pyします。 このmigrationsフォルダーは、このチュートリアルで後述するように、Django の管理ユーティリティによってデータベース バージョンを管理するために使用されます。apps.pyファイル (アプリの構成)、admin.py(管理インターフェイスを作成するための)、およびtests.py(単体テストの場合) もあります。ここでは説明しません。内
app/settings.pyで次のコードを追加し、独自のCLIENT_ID、CLIENT_SECRET、DEVELOPER_TOKEN、ENVIRONMENT の値を設定します。""" Bing Ads API settings Edit with your credentials. """ REDIRECTION_URI = "http://localhost:8000/callback" CLIENT_ID = "ClientIdGoesHere" # Your registered App ID CLIENT_SECRET="ClientSecretGoesHere" # Your registered App Password DEVELOPER_TOKEN = "DeveloperTokenGoesHere" # Your production developer token ENVIRONMENT = 'production' API_VERSION=13[追加] 内
app/settings.pyで、インストールされているアプリの一覧に追加appします。INSTALLED_APPS = [ 'django.contrib.admin', 'django.contrib.auth', 'django.contrib.contenttypes', 'django.contrib.sessions', 'django.contrib.messages', 'django.contrib.staticfiles', 'app', ]VS Code ターミナルで、 フォルダーと
app/templates/appフォルダーをapp/static/app作成します。(env) PS C:\dev\hello_django> mkdir app/static/app (env) PS C:\dev\hello_django> mkdir app/templates/appフォルダー内に
app/static/appsite.css という名前の新しいファイルを作成し、次の内容を追加します。.message { font-weight: 600; color: blue; } .message_list th,td { text-align: left; padding-right: 15px; } .navbar { background-color: lightslategray; font-size: 1em; font-family: 'Trebuchet MS', 'Lucida Sans Unicode', 'Lucida Grande', 'Lucida Sans', Arial, sans-serif; color: white; padding: 8px 5px 8px 5px; } .navbar a { text-decoration: none; color: inherit; } .navbar-brand { font-size: 1.2em; font-weight: 600; } .navbar-item { font-variant: small-caps; margin-left: 30px; } .body-content { padding: 5px; font-family:'Segoe UI', Tahoma, Geneva, Verdana, sans-serif; } input[name=message] { width: 80%; }フォルダー内に
app/templates/app、以下の内容を含むファイルindex.htmlを作成します。{% extends "app/layout.html" %} {% block content %} {% if errors %} <div class="jumbotron"> <section id="errors"> <h1>Errors occurred in your last request to Bing Ads API.</h1> <table class="message_list"> <tr> <th>Code</th> <th>ErrorCode</th> <th>Message</th> </tr> {% for error in errors %} <tr> <td>{{ error.Code }}</td> <td>{{ error.ErrorCode }}</td> <td>{{ error.Message }}</td> </tr> {% endfor %} </table> </section> </div> {% endif %} {% if user.is_authenticated %} {% if bingadsuser %} <div class="jumbotron"> <section id="enabled"> <h1>Your credentials have access to Microsoft Advertising.</h1> <table class="message_list"> <tr> <th>Id</th> <th>UserName</th> <th>First Name</th> <th>Last Name</th> </tr> <tr> <td>{{ bingadsuser.Id }}</td> <td>{{ bingadsuser.UserName }}</td> <td>{{ bingadsuser.Name.FirstName }}</td> <td>{{ bingadsuser.Name.LastName }}</td> </tr> </table> </section> </div> <div class="jumbotron"> <section id="revoke"> <p class="lead">Click here to revoke access for this app to your Microsoft Advertising accounts. You will then be able to login with a different Microsoft Advertising user. </p> <form id="revokeForm" action="/revoke" method="post" class="navbar-left"> {% csrf_token %} <p><a href="javascript:document.getElementById('revokeForm').submit()" class="btn btn-primary btn-large">Delete Refresh Token</a></p> </form> </section> </div> <div class="jumbotron"> <section id="accounts"> <h1>Account Details</h1> <table class="message_list"> <thead> <tr> <th>Id</th> <th>Name</th> </tr> </thead> <tbody> {% for account in accounts %} <tr> <td>{{ account.Id }}</td> <td>{{ account.Name }}</td> </tr> {% endfor %} </tbody> </table> </section> </div> {% else %} <div class="jumbotron"> <section id="enable"> <h1>Enable Microsoft Advertising Access</h1> <p class="lead"> You are logged into the Django web application, but not yet signed in with your Microsoft Advertising credentials. You can sign in with Microsoft Advertising credentials below. </p> </section> </div> <div> <div class="col-md-6"> <section id="socialLoginForm"> <h1>Microsoft Account Login</h1> <p class="lead"> Click here to authenticate your Microsoft Account. If you don't have Microsoft Advertising credentials, you can go to the <a href="https://ads.microsoft.com/customer/Signup.aspx">Microsoft Advertising Sign Up</a> page. </p> <p><a href="/callback" class="btn btn-primary btn-large">Authenticate Microsoft Account »</a></p> </section> </div> </div> {% endif %} {% else %} <div class="jumbotron"> <div class="col-md-6"> <section id="socialLoginForm"> <h1>Microsoft Advertising Example Web Application</h1> <p class="lead"> Before you can provide your Microsoft Advertising user credentials and access Microsoft Advertising data, you must <a href="{% url 'login' %}">login</a> to the Django web application. </p> <p class="lead">Use your site's Django admin portal to add web app users.</p> <p><a href="/admin" class="btn btn-primary btn-large">Django Admin »</a></p> </section> </div> </div> {% endif %} <div> <div class="col-md-4"> <h2>Get Started Using Python with Bing Ads API</h2> <p>The Bing Ads Python Software Development Kit (SDK) simplifies workflows such as OAuth authentication and report file parsing.</p> <p><a class="btn btn-default" href="https://video2.skills-academy.com/advertising/guides/get-started-python">Learn more »</a></p> </div> <div class="col-md-4"> <h2>Django</h2> <p>Django is a free web framework for building Web sites and Web applications using HTML, CSS and JavaScript.</p> <p><a class="btn btn-default" href="https://www.djangoproject.com/">Learn more »</a></p> </div> <div class="col-md-4"> <h2>Microsoft Azure</h2> <p>You can publish your web app to Microsoft Azure. Find out how you can host your application with a free trial today.</p> <p><a class="btn btn-default" href="https://azure.microsoft.com">Learn more »</a></p> </div> </div> {% endblock %} {% block scripts %} {% load static %} <link rel="stylesheet" type="text/css" href="{% static 'app/site.css' %}"/> {% endblock %}フォルダー内に
app/templates/app、以下の内容を含むファイルlayout.htmlを作成します。<!DOCTYPE html> <html> <head> <meta charset="utf-8" /> <meta name="viewport" content="width=device-width, initial-scale=1.0"> <title>{{ title }} - My Django Application</title> {% load static %} <link rel="stylesheet" type="text/css" href="{% static 'app/site.css' %}"/> <script src="{% static 'app/scripts/modernizr-2.6.2.js' %}"></script> </head> <body> <div class="navbar navbar-inverse navbar-fixed-top"> <div class="container"> <div class="navbar-header"> <button type="button" class="navbar-toggle" data-toggle="collapse" data-target=".navbar-collapse"> <span class="icon-bar"></span> <span class="icon-bar"></span> <span class="icon-bar"></span> </button> <a href="/" class="navbar-brand">Microsoft Advertising App via Django</a> </div> <div class="navbar-collapse collapse"> <ul class="nav navbar-nav"> <li><a href="{% url 'home' %}">Home</a></li> </ul> {% include 'app/loginpartial.html' %} </div> </div> </div> <div class="container body-content"> {% block content %}{% endblock %} <hr/> <footer> <p>© {{ year }} - My Django Application</p> </footer> </div> {% block scripts %}{% endblock %} </body> </html>フォルダー内に
app/templates/app、以下の内容を含むファイルlogin.htmlを作成します。{% extends "app/layout.html" %} {% block content %} <h2>{{ title }}</h2> <div class="row"> <div class="col-md-8"> <section id="loginForm"> <form action="." method="post" class="form-horizontal"> {% csrf_token %} <h4>Use a local account to log in.</h4> <hr /> <div class="form-group"> <label for="id_username" class="col-md-2 control-label">User name</label> <div class="col-md-10"> {{ form.username }} </div> </div> <div class="form-group"> <label for="id_password" class="col-md-2 control-label">Password</label> <div class="col-md-10"> {{ form.password }} </div> </div> <div class="form-group"> <div class="col-md-offset-2 col-md-10"> <input type="hidden" name="next" value="/" /> <input type="submit" value="Log in" class="btn btn-default" /> </div> </div> {% if form.errors %} <p class="validation-summary-errors">Please enter a correct user name and password.</p> {% endif %} </form> </section> </div> </div> {% endblock %} {% block scripts %} {% load static %} <link rel="stylesheet" type="text/css" href="{% static 'app/site.css' %}"/> {% endblock %}フォルダー内に
app/templates/app、以下の内容を含むファイルloginpartial.htmlを作成します。{% if user.is_authenticated %} <form id="logoutForm" action="/applogout" method="post" class="navbar-right"> {% csrf_token %} <ul class="nav navbar-nav navbar-right"> <li><span class="navbar-brand">Hello {{ user.username }}!</span></li> <li><a href="javascript:document.getElementById('logoutForm').submit()">Log off</a></li> </ul> </form> {% else %} <ul class="nav navbar-nav navbar-right"> <li><a href="{% url 'login' %}">Log in</a></li> </ul> {% endif %}フォルダー内に
app、以下の内容を含むファイルforms.pyを作成します。from django import forms from django.contrib.auth.forms import AuthenticationForm from django.utils.translation import ugettext_lazy as _ class BootstrapAuthenticationForm(AuthenticationForm): """Authentication form which uses boostrap CSS.""" username = forms.CharField(max_length=254, widget=forms.TextInput({ 'class': 'form-control', 'placeholder': 'User name'})) password = forms.CharField(label=_("Password"), widget=forms.PasswordInput({ 'class': 'form-control', 'placeholder':'Password'}))次のコードに一致するように変更
app/models.pyします。from django.db import models from django.contrib.auth.models import User # In this web app a Microsoft Advertising user maps a Django web user to a refresh token. class BingAdsUser(models.Model): user = models.OneToOneField(User, on_delete=models.PROTECT) refresh_token = models.CharField(max_length=200) # def __unicode__(self): # __unicode__ on Python 2 # return self.refresh_token def __str__(self): # __str__ on Python 3 return self.refresh_token次のコードに一致するように変更
app/views.pyします。from django.http import HttpRequest, HttpResponse from django.shortcuts import render from django.template.loader import get_template, render_to_string from web_project import settings from datetime import datetime from django.shortcuts import redirect from django.contrib.auth import authenticate, login, logout, get_user_model from django.contrib.auth.models import User from app.models import BingAdsUser from bingads import * # import logging # logging.basicConfig(level=logging.INFO) # logging.getLogger('suds.client').setLevel(logging.DEBUG) # logging.getLogger('suds.transport').setLevel(logging.DEBUG) authorization_data = AuthorizationData( account_id=None, customer_id=None, developer_token=None, authentication=None) customer_service=None def home(request): """ If an authenticated user returns to this page after logging in, the appropriate context is provided to index.html for rendering the page. """ assert isinstance(request, HttpRequest) # If the Django user has a refresh token stored, # try to use it to get Microsoft Advertising data. if user_has_refresh_token(request.user.username): return redirect('/callback') else: return render( request, 'app/index.html' ) def callback(request): """Handles OAuth authorization, either via callback or direct refresh request.""" assert isinstance(request, HttpRequest) authentication = OAuthWebAuthCodeGrant( client_id=settings.CLIENT_ID, client_secret=settings.CLIENT_SECRET, redirection_uri=settings.REDIRECTION_URI, env=settings.ENVIRONMENT) return authorize_bing_ads_user(request, authentication) def authorize_bing_ads_user(request, authentication): assert isinstance(request, HttpRequest) global customer_service bingadsuser = None try: Users = get_user_model() user = User.objects.get(username=request.user.username) except User.DoesNotExist: return render( request, 'app/index.html' ) try: bingadsuser = user.bingadsuser except BingAdsUser.DoesNotExist: bingadsuser = BingAdsUser() bingadsuser.user = user pass try: # If we have a refresh token let's refresh the access token. if(bingadsuser is not None and bingadsuser.refresh_token != ""): authentication.request_oauth_tokens_by_refresh_token(bingadsuser.refresh_token) bingadsuser.refresh_token = authentication.oauth_tokens.refresh_token # If the current HTTP request is a callback from the Microsoft Account authorization server, # use the current request url containing authorization code to request new access and refresh tokens. elif (request.GET.get('code') is not None): authentication.request_oauth_tokens_by_response_uri(response_uri = request.get_full_path()) bingadsuser.refresh_token = authentication.oauth_tokens.refresh_token except OAuthTokenRequestException: bingadsuser.refresh_token = "" user.save() bingadsuser.save() # If there is no refresh token saved and no callback from the authorization server, # then connect to the authorization server and request user consent. if (bingadsuser.refresh_token == ""): return redirect(authentication.get_authorization_endpoint()) set_session_data(request, authentication) # At this point even if the user has valid Django web application credentials, # we don't know whether they have access to Microsoft Advertising. # Let's test to see if they can call Bing Ads API service operations. bing_ads_user = None accounts=[] errors=[] try: bing_ads_user = get_user(None) accounts = search_accounts_by_user_id(bing_ads_user.Id)['AdvertiserAccount'] except WebFault as ex: errors=get_webfault_errors(ex) pass context = { 'bingadsuser': bing_ads_user, 'accounts': accounts, 'errors': errors, } return render( request, 'app/index.html', context ) def revoke(request): """Deletes the refresh token for the user authenticated in the current session.""" assert isinstance(request, HttpRequest) try: Users = get_user_model() user = User.objects.get(username=request.user.username) bingadsuser = user.bingadsuser if(bingadsuser is not None): bingadsuser.refresh_token = "" bingadsuser.save() except User.DoesNotExist: pass except BingAdsUser.DoesNotExist: pass clear_session_data(request) return render( request, 'app/index.html' ) def user_has_active_session(request): try: return True if request.session['is_authenticated'] else False except KeyError: return False def user_has_refresh_token(username): try: Users = get_user_model() user = User.objects.get(username=username) bingadsuser = user.bingadsuser if(bingadsuser is not None and bingadsuser.refresh_token != ""): return True except User.DoesNotExist: return False except BingAdsUser.DoesNotExist: return False def set_session_data(request, authentication): global authorization_data global customer_service try: request.session['is_authenticated'] = True authorization_data.authentication = authentication authorization_data.developer_token = settings.DEVELOPER_TOKEN customer_service = ServiceClient( service='CustomerManagementService', version=settings.API_VERSION, authorization_data=authorization_data, environment=settings.ENVIRONMENT ) except KeyError: pass return None def clear_session_data(request): global authorization_data global customer_service request.session['is_authenticated'] = False authorization_data = AuthorizationData(account_id=None, customer_id=None, developer_token=None, authentication=None) customer_service = None def applogout(request): logout(request) clear_session_data(request) return redirect('/') def get_user(user_id): ''' Gets a Microsoft Advertising User object by the specified user ID. :param user_id: The Microsoft Advertising user identifier. :type user_id: long :return: The Microsoft Advertising user. :rtype: User ''' global customer_service return customer_service.GetUser(UserId = user_id).User def search_accounts_by_user_id(user_id): ''' Search for account details by UserId. :param user_id: The Microsoft Advertising user identifier. :type user_id: long :return: List of accounts that the user can manage. :rtype: Dictionary of AdvertiserAccount ''' predicates={ 'Predicate': [ { 'Field': 'UserId', 'Operator': 'Equals', 'Value': user_id, }, ] } accounts=[] page_index = 0 PAGE_SIZE=100 found_last_page = False while (not found_last_page): paging=set_elements_to_none(customer_service.factory.create('ns5:Paging')) paging.Index=page_index paging.Size=PAGE_SIZE search_accounts_response = customer_service.SearchAccounts( PageInfo=paging, Predicates=predicates ) if search_accounts_response is not None and hasattr(search_accounts_response, 'AdvertiserAccount'): accounts.extend(search_accounts_response['AdvertiserAccount']) found_last_page = PAGE_SIZE > len(search_accounts_response['AdvertiserAccount']) page_index += 1 else: found_last_page=True return { 'AdvertiserAccount': accounts } def set_elements_to_none(suds_object): for (element) in suds_object: suds_object.__setitem__(element[0], None) return suds_object def get_webfault_errors(ex): errors=[] if not hasattr(ex.fault, "detail"): raise Exception("Unknown WebFault") error_attribute_sets = ( ["ApiFault", "OperationErrors", "OperationError"], ["AdApiFaultDetail", "Errors", "AdApiError"], ["ApiFaultDetail", "BatchErrors", "BatchError"], ["ApiFaultDetail", "OperationErrors", "OperationError"], ["EditorialApiFaultDetail", "BatchErrors", "BatchError"], ["EditorialApiFaultDetail", "EditorialErrors", "EditorialError"], ["EditorialApiFaultDetail", "OperationErrors", "OperationError"], ) for error_attribute_set in error_attribute_sets: errors = get_api_errors(ex.fault.detail, error_attribute_set) if errors is not None: return errors return None def get_api_errors(error_detail, error_attribute_set): api_errors = error_detail for field in error_attribute_set: api_errors = getattr(api_errors, field, None) if api_errors is None: return None errors=[] if type(api_errors) == list: for api_error in api_errors: errors.append(api_error) else: errors.append(api_errors) return errorsの内容を以下の
web_project/urls.py内容に置き換えます。 ファイルはurls.py、異なる URL を適切なビューにルーティングするパターンを指定する場所です。 たとえば、次のコードは、アプリのルート URL ("") を、 に追加したhome関数にapp/views.pyマップします。from django.contrib import admin from django.urls import path from app import views as app_views from django.contrib.auth import views as auth_views from datetime import datetime from django.conf.urls import include, url from app.forms import BootstrapAuthenticationForm from django.contrib.auth.views import HttpResponseRedirect from django.contrib import admin admin.autodiscover() urlpatterns = [ url(r'^applogout', app_views.applogout, name='applogout'), url(r'^callback', app_views.callback, name='callback'), url(r'^revoke', app_views.revoke, name='revoke'), url(r'^$', app_views.home, name='home'), url(r'^login/$', auth_views.LoginView.as_view( template_name='app/login.html', authentication_form=BootstrapAuthenticationForm, extra_context= { 'title':'Log in', 'year':datetime.now().year, } ), name='login'), url(r'^logout$', auth_views.LogoutView.as_view(), { 'next_page': '/', }, name='logout'), url(r'^admin/', admin.site.urls), ]変更したすべてのファイルを で
Ctrl+K S保存します。を実行
python manage.py makemigrationsして、データベースを現在の状態から新しい状態に移行するスクリプトを migrations フォルダーに生成します。を実行
python manage.py migrateして、スクリプトを実際のデータベースに適用します。 移行スクリプトは、データ モデル (models.py) に加えたすべての増分変更を時間の経過と同時に効果的に記録します。 移行を適用することで、Django はモデルに合わせてデータベースを更新します。 各増分変更には独自のスクリプトがあるため、Django は以前のバージョンのデータベース (新しいデータベースを含む) を現在のバージョンに自動的に移行できます。 その結果、基になるデータベース スキーマや移行スクリプトを使用せず、models.py 内のモデルに対してのみ懸念が必要になります。 あなたはDjangoにその部分をやらせましょう!仮想環境の VS Code でターミナルを開き、コマンド
python manage.py createsuperuser --username=<username> --email=<email>を実行して、アプリでスーパーユーザー アカウントを作成し、もちろん、個人情報に置き換え<username><email>、 を実行します。 コマンドを実行すると、Django はパスワードの入力と確認を求めるメッセージを表示します。重要
ユーザー名とパスワードの組み合わせを忘れないでください。 これらは、Web アプリの管理ポータルで認証するために使用する資格情報です。
VS Code ターミナルで、仮想環境がアクティブ化された状態でもう一度、 で開発サーバー
python manage.py runserverを実行し、ブラウザーhttp://127.0.0.1:8000/を開いて "Hello, Django" をレンダリングするページを表示します。Web ブラウザーで、[ユーザー] の下に
http://127.0.0.1:8000/admin/新しい Django Web ユーザーを作成します。 これは Microsoft Advertising ユーザーの資格情報とは異なるため、複数の Microsoft Advertising ユーザーがアプリに個別にログインできます。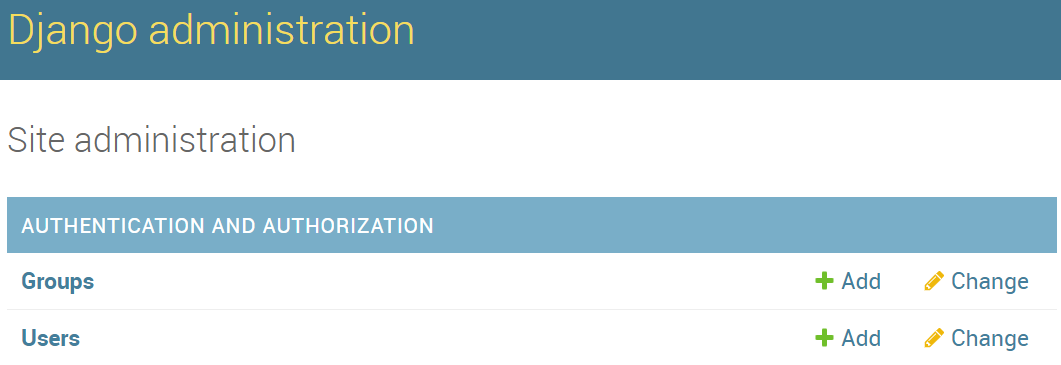
新しいユーザー (スーパー管理者ではなく) でログインすると、Microsoft アカウントで認証するオプションが表示されます。
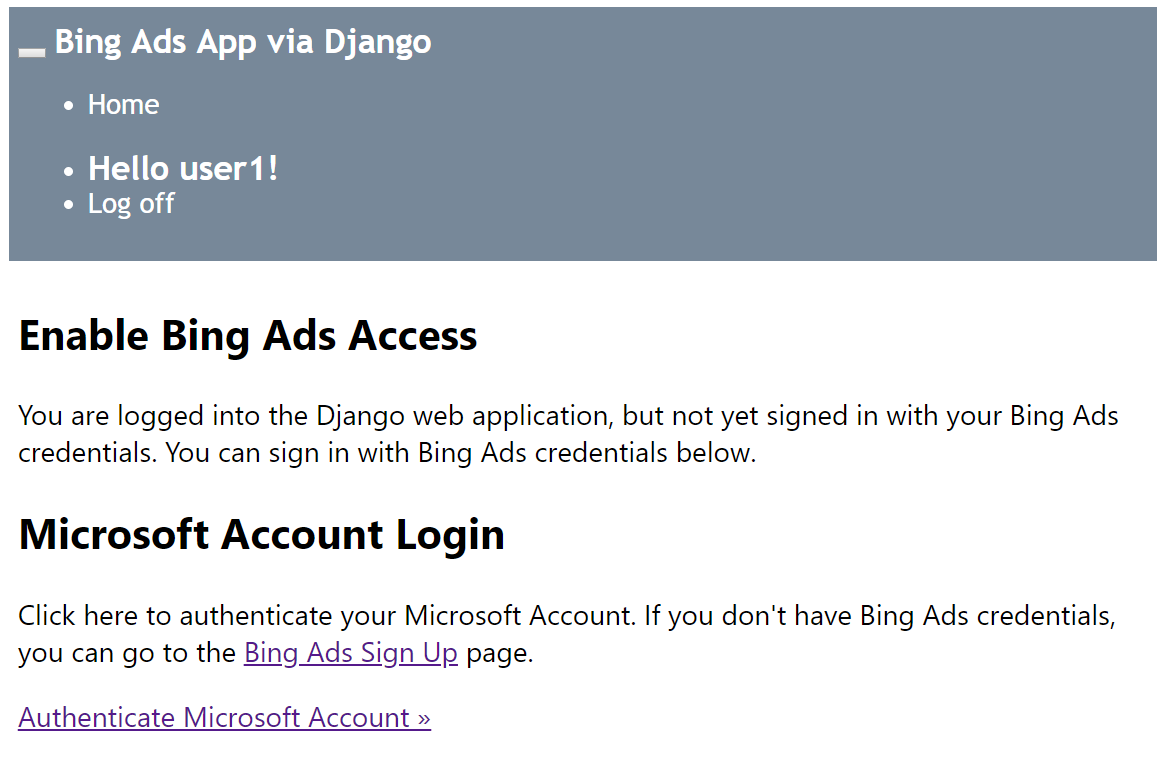
[ Microsoft アカウントの認証 ] をクリックすると、Microsoft Advertising アカウントを管理するための独自の Web アプリのアクセス許可を付与するように求められます。 同意し、Microsoft Advertising アカウントにアクセスできる場合は、アカウント名と ID のビューにリダイレクトされます。