Replacing a Shared Disk on a 2008 Failover Cluster
Several months ago, I posted a blog on adding a new disk to an existing cluster. Another question we get asked a lot is “How do I replace a disk?”
In this blog, I’ll walkthrough the process of replacing a 1GB disk with a 2GB disk. This process is similar to how you could go about doing a SAN migration where you are replacing all of your shared disks with storage from a new SAN.
The preferred way of getting a larger cluster disk is to use the built in capability of most SANs to dynamically expand a LUN then use an OS utility like DiskPart or Disk Manager to extend the size of the disk. If that’s not feasible or you simply want to replace a LUN with a larger one or as I mentioned, as part of a SAN migration, this process works well.
The first thing we need to do is present your new disk to the cluster. The nuts and bolts of how to do that are outside the scope of this post so just ask your SAN administrator for a new LUN and present it to all nodes of the cluster. Since by default in Server 2008, we leave new LUNs offline, there’s no risk in presenting a new LUN to all nodes at the same time. In the below figure is what Disk Manager would look like after my new disk had been presented.
Figure 1.
Note how the new disk ‘Disk 9’ is in an ‘Offline’ state. In order to prepare it to be the replacement disk for an existing disk, we need to do the following.
- Online the disk
- Initialize the disk (MBR or GPT)
- Create a new volume
- Format as either FAT32 or NTFS
Note: You do NOT need to assign the new drive a drive letter during the format process.
Figure 2.
Figure 2 now shows ‘Disk 9’ as Online and formatted with an NTFS partition. At this point, we can now go into Failover Cluster Manager to complete the rest of the replacement.
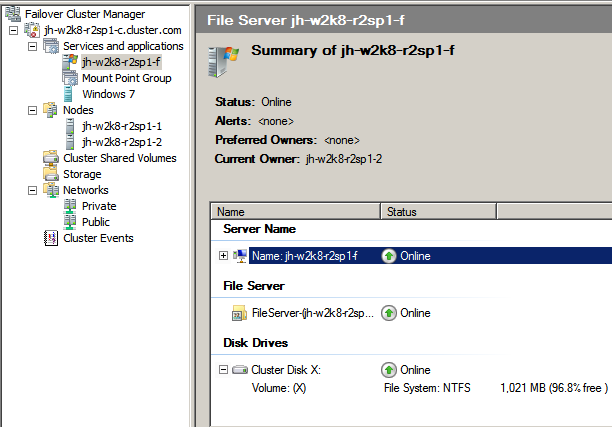
The screenshot below shows a File Server group with ‘Cluster Disk X:’ of size 1GB. This is the disk that I am going to replace with the new 2GB disk from above.
Figure 3.
Failover Cluster Manager has a built in ‘repair’ functionality that allows replacing a failed disk with a new disk. Since we’re not really replacing a failed disk but a working one, we need to put that disk into an 'offline' state so that the ‘repair’ function will be enabled.
Figure 4.
Now right-click the disk resource, ‘More actions…’, ‘Repair’. This will launch the ‘Repair a Disk Resource’ window.
Figure 5.
Figure 5 shows the disk that we presented and created in Figure 2. Select that disk, click [OK]/
Now bring the resource online. You’ll see in Figure 8. that the disk now shows as 2GB. We essentially swapped one disk for another without having to worry about resource dependencies. If the drive letter needs to be changed to match the old drive letter, do so now.
Figure 6.
So now that we’ve replaced the 1GB disk with the 2GB disk, what happened to the old disk? When you used the ‘Repair’ function, the old disk got removed from under the control of the cluster. The final step in the replacement is to bring the old disk back into the cluster so that we can bring it online and move the data from the old disk to the new.
To add the disk back in, from Failover Cluster Manager, go to the ‘Storage’ group. In the right-most column, in the ‘Actions’ pane, click on ‘Add a disk’
Figure 7.
Figure 8 shows the disk we just removed from the cluster. Select this disk, click [OK]
Figure 8.
This disk now shows up in ‘Available Storage’. Figure 12.
Figure 9..
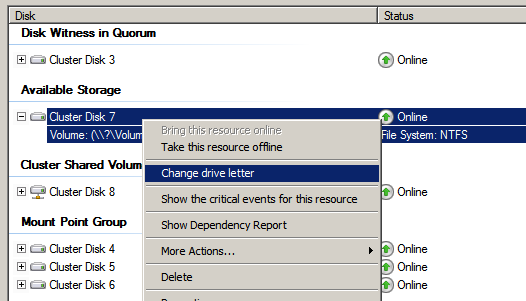
The final steps in the replacement are to assign this disk a drive letter so that it’s exposed to the OS to get your data moved from the old disk to the new.
Figure 10.
Now that ‘Cluster Disk 7’ (the old disk) shows as online and has a drive letter (D:) , you can use your favorite data copy method to move the data from the old disk to the new disk. If you are no longer going to use the old LUN, you can simply delete this resource from Failover Cluster Manager and unpresent that LUN from all nodes of the cluster. That finishes up the clean-up process. You can also just leave the disk in ‘Available Storage’, format it, and have it ready for some other ‘Service or application’ cluster group to use in the future.
Hope you find this blog useful especially for those SAN migrations.
Jeff Hughes
Senior Support Escalation Engineer
Microsoft Enterprise Platforms Support
Comments
- Anonymous
January 01, 2003
What does the repair function do in this case ?I've seen a case when the only disk being introduced in a cluster (made via cli) failed & wount come online. After REPAIR its workimg. - Anonymous
January 01, 2003
Thanks for the documentation. - Anonymous
January 01, 2003
Hi Jeff,you have not to edit "cluster disk X:" policies to force the resource to not failover to the other node and then simulate the failure. You can simply put "cluster disk X:" offline and the do the "repair" wizard. It works. - Anonymous
January 01, 2003
Got a question. Would you be able to replace cluster disk with a disk type.egOld disk - 1024 GB - Initialised as MBR.New disk - 3072 GB - Initialised as GPT (GUID Partition Table). - Anonymous
March 08, 2012
Thanks for the information. What additional steps are required to replace the quorum disk? Do you still have to start the cluster service with the /fixquorum switch like in Windows 2003?Thanks - Anonymous
March 19, 2012
A really good one.Thanks a lot - Anonymous
June 08, 2012
Hi Jeff,very smart approach.Any information, link, post on how migrating Win2003 R2 File Server cluster to new SAN ? I've been looking on thenet without success. - Anonymous
August 30, 2013
I'm trying to script the above procedure using powershell. I have it all working except for the assigning of a drive letter. I can't seem to find a way for the clustered disk to use the drive letter that was assigned to it before it was added to the cluster. The disk being attached is a snapshot of an existing disk on the cluster.I can't find a powershell command that can set the drive letter for the physical disk resource. Am I missing something, or can this not be done? - Anonymous
December 18, 2014
Great article.
Can you use this same strategy for mount points?
Thanks - Anonymous
July 03, 2015
Thanks so much, such an easy way to replace a clustered file server disk - Anonymous
November 05, 2015
If still moderating this thread, I have a question. After all these years, and specifically on a 2008 non-R2 cluster, you still have to take the app offline to do the actual data migration? Really?


