Tutorial #4. How to publish new pages and posts
Okay, you’ve created your website, set up the look and feel now it’s time to add some great content!
You put content on your web page by adding posts. You can publish posts on just about anything that interest you. It’s more fun if it’s something you love. For example, you can publish posts about your projects, your travels, nature, animals, birds etc. – something you know and care about and want to share with others. Do be careful when you share information on the internet to NEVER publish personal information such as your age, school, address, phone number and so on.
Your blog can have multiple pages that contain information about you or your blog and should be. For example, you can publish a list of favorite things, links to your YouTube channel, etc.
Let’s see how we add a new page and a new post to our blog.
Regardless of whether you are creating a new page or a new post, you need to go to your site, log in with your administrator password and select Content from the Administrator widget.
Select the Posts tab to edit a post, and the Pages tab to edit pages. On both the Pages and Posts tab, you will see a list of published and draft pages or posts. Drafts are not visible to the public but because you are the administrator, you can open it in any time to edit them and make changes. You can probably guess how to delete or unpublish any page or post: select the page or post from the list and click Delete or Unpublish. To create a new page or post, click Add new page or Add new post button (depending whether you are on the pages or posts tab) in the top right corner.
Let’s add our first post:
Select the Posts tab, and click the Add new post button.
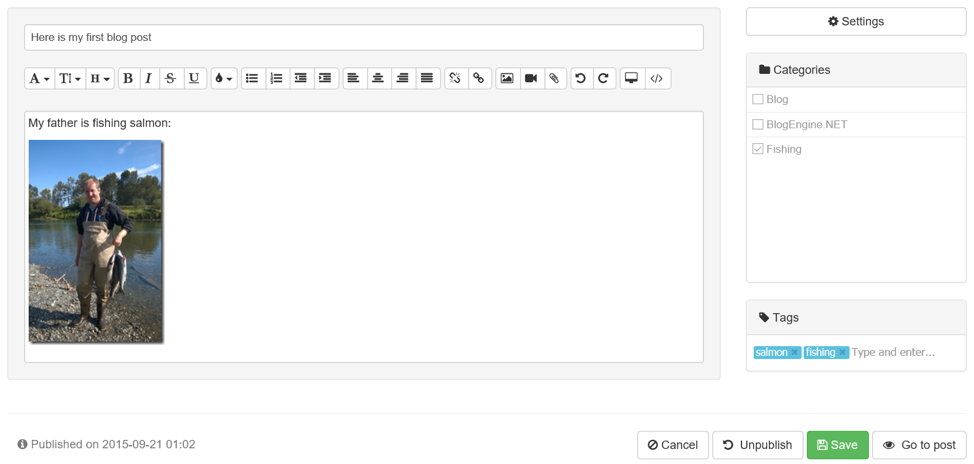
The post contains a title and a body. Just type the text you want to display. There are lots of tools in the toolbar that allow to change the font, use colors, add hyperlinks and add images. After you type the text you want, you format it, save it as a draft or publish it right away. Remember, once you publish it people visiting your site can see it, so saving it as a draft is a great way to save your work until it is ready to publish.
The </> button on the toolbox allows to switch to HTML view. With the HTML view you can edit the code that is used by the browser to display the content. For example, HTML contains information about paragraphs, fonts, styles etc. You don’t have to edit the HTML, but if you start to learn HTML web development, you can edit the HTML here. There might be times when it is useful to add code in HTML view, for example, if you publish a video on YouTube you can right click on the video and choose “Copy Embed Code” this will give you an HTML code snippet you can paste that into the HTML code of your post and so that you can show your video YouTube video from inside your blog post.
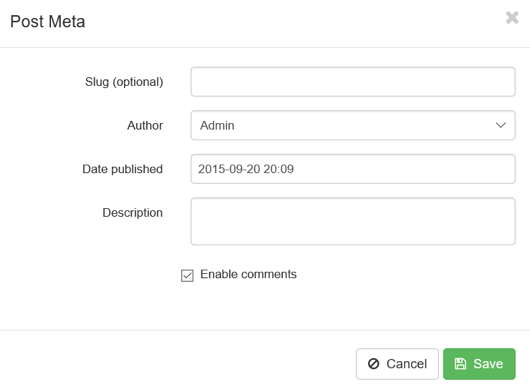
Your post has settings as well which you can change with the Post editor by clicking the Settings button
Here you can pick a date when you want your post published, add a description to your entry and enable or disable comments to your post. (if you are wondering what a “slug” is you can find out here, it’s a trick you use to make it easier for sites like Bing and Google to find your blog post)
Finally, you can assign your post to one or several categories (you can make different categories for different posts :recipes, book reviews, cool places to visit, etc… this makes it easier for others to find the posts that interest them on your blog). Another way to help people find posts that interest them is to add tags. Tags should be keywords that describe the content of your post for example animal, museum, my cat, fishing, etc…
The page editor is similar to the post editor but you don’t have tags and categories. They are not necessary because there are links to pages on the main page, so they are easy to find.
Bonus tip: Using Live Writer to write blog posts
If you have a Windows computer, I would be remiss if I didn’t mention Windows Live Writer. Live Writer is a tool that is installed as part of Windows Essentials. You can use this tool to write the posts for your blog instead of using the BlogEngine.NET editor.
Once you install the tool, you add your blog:
To add your blog, select Other.
In the next window enter the address of your blog (<yourwebsitename>.azurewebsites.net), your BlogEngine.NET login (admin) and your password
If you want, Live Writer can download the blog’s theme for you, that makes the editor in Live Writer look more like the actual web page that will appear on your published post. But you don’t have to download the theme, you can simply click No.
Once you are done, you can use Live Writer to compose new posts
Live Writer contains more commands than the BlogEngine.NET web interface and if you spend some time you can find of extensions for the tool that allow you to publish code, videos from YouTube, formulas etc.
When you are finished composing the post in Live Writer, click the Publish button. Later, if you want to modify the post, you can open it, modify it, and then click Publish again – Live Writer is clever enough to replace the original post with the edited one.
Congratulations! You know how to publish posts to your blog!


