UAG 2010 SP1: Improving Testing in our Push for Quality
Hi everyone. I’m David from the UAG test team. In this post I want to tell you a bit about the test work we did for UAG 2010 SP1.
During this release, our major goal was to bring the product to a new level of quality, and to do this we pretty much rebuilt our tests from scratch.
Here’s a short overview of our key investments:
Immediate results - running all the tests every night
One of the most important lessons from past releases is that if an automatic test doesn’t run every night – it breaks, and once tests start to break, heavy costs are involved to fix them.
Our goal was simple - if the nightly build ends at 11pm, all automatic tests must finish running on that build by 8am the next morning. That provides 9 hours to run all the automatic tests. Sounds simple, huh?
But the challenge is huge. In terms of UAG tests, 9 hours is a very short time. Just deploying the topology (which beside the UAG machines, also contains: clients, ADFS servers, SharePoint and Exchange servers, etc…) takes a minimum of 2 hours, not to mention the fact that UAG has lots of features to test, which means insane amount of tests.
Parallelization is the key here. Although running all the automated tests takes well over 40 hours, running them in 6 labs in parallel gets us to our goal. The trick is to get automation to a state where it’s possible to easily run tests in parallel. Here are some of the steps we took to get there:
- Automate lab deployment
- Focus tests on key topologies
- Decoupling test suites (which partly use virtualization)
Robustness – Configuring the user interface (UI) without UI automation
A classic testability problem – you can only configure UAG using its UI. Pre-SP1 automation solved this problem using a traditional approach of UI automation. As you can guess, that approach isn’t very robust. To improve it we tried a new approach – creating testability hooks to access the UI code directly, thus bypassing the testability problem, without fragile UI dependencies. This method isn’t bullet proof, and does have downsides, but it allows the discovery of most test-breaking changes during compile time, and even provides some coverage of UI code paths.
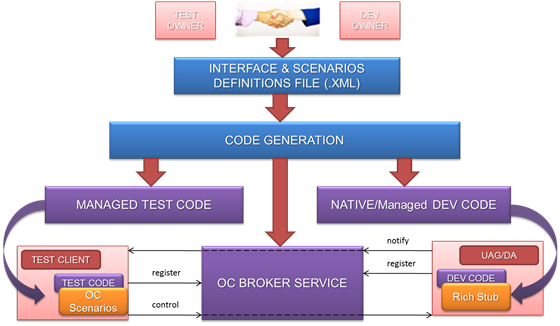
We used code generation to simplify the process even further. To update the product configuration, hook was written. The hook definitions (structure, parameters to pass) are kept in an XML file. From the XML files we generate code that the product code can include, as well as scripts that the test code can execute. All that is then required is to implement the actual hook logic in the product code, and you have your hook, with almost no test code to implement.
The process of adding a UI hook looks like this:
Agility - Utilizing the power of virtualization
Automatic tests running each night don’t help if the tests break too often. We want tests to find the problems before damage is done. Changing tests from being bug detectors to bug preventers is probably the holy grail of test teams everywhere, but it’s much easier said than done.
Why? One of the reasons is that running tests require labs, and lab resources are usually limited.
Even if you manage to simplify your automation so that anyone can run it, it isn’t effective if a 20-box ultra-complex topology is needed to run the tests. This is especially a problem in a product such as UAG, where the topologies we use to simulate real customer scenarios are complex.
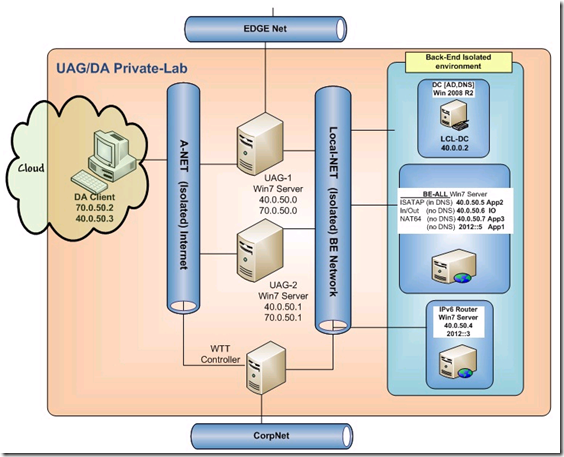
Here virtualization came into play. We designed a single virtual 8-box topology (nicknamed “private lab”), that includes everything required to run most automatic tests.
The next step, believe it or not, was to provide every developer and tester with his or her own private lab. We’re talking about over 1,000 virtual machines, hosted on a few ultra-powerful hosts. This wasn’t easy to maintain, but it was well worth the price. Bugs were found before getting submitted, and developers were able to easily evaluate the effect of their code changes.
Here’s a representation of a private lab (Note that this is the DirectAccess flavor of the private lab. When testing Secure Web Publishing scenarios, we used different lab flavors).
Private lab topology
During virtualization we utilized the power of snapshots, which helped us in 2 ways:
1 – Speeding up new build deployment:
Instead of rebuilding the topology every night before running the tests, each topology came with a snapshot named “Baseline”. The baseline snapshot contained all the static elements of the lab (meaning all the stuff that doesn’t change between builds). To clean up the lab between builds, we simply reverted the lab back to its baseline snapshot.
2 – Solving the “dirty lab” problem:
A major challenge during testing is cleaning up machines between test suites. This is especially a problem when testing technologies like DirectAccess, which spreads GPOs across most of the lab machines, and are difficult to clean up. Our solution was to create a snapshot called “CleanConfiguration” during the automation cycle flow. This snapshot provided a common starting point for all test suites, making cleanup the simple step of reverting the lab back to the CleanConfiguration snapshot. By using this approach, Parallelization became an easy task.
To better explain, here’s a short pseudo-code implementation of our automation cycle flow :
1. Revert the lab to the “Baseline” snapshot.
2. Prepare the lab to run tests (install the product, etc…).
3. Create “CleanConfiguration” snapshot (if one already exists, overwrite it).
4. For each test suite
a. Run the test suite.
b. Revert the lab to the “CleanConfiguration” snapshot.
Note that at the end of our cycle, the lab has the “CleanConfiguration” snapshot of the latest build it ran. This is not accidental – it’s used in case we need to rerun a test on an exact same lab (for example, to confirm the reproducibility of a certain bug). We are able to do this until the next cycle, without needing to redeploy the product.
Reusability - Separate tests from topology
Accessing topology data inside test code isn’t easy. On the one hand, you want to decouple tests from the topology as much as possible. On the other, you want a simple, logical, maintainable object model that allows you to write simple clean code. For example:
foreach (Machine machine in lab.Topology.Machines)
{
Console.WriteLine("I'm machine {0}, from domain {1}",
machine.FQDN,
machine.Domain);
}
To do this we created a special topology API, which includes both the code that creates the topology, and the tests can access.
By separating the tests from the topology data, we were able to do cool stuff like run all our automatic tests using different topologies (that better simulate real customer scenarios), without writing a single extra line of code.
We used the .Net WCF ServiceModel Metadata Utility tool (svcutil.exe) to auto-generate the object model from a schema XSD file, and kept the XSD (which is somewhat easier to maintain then the actual code). We were able to easily serialize and deserialize all the topology data from an easy and intuitive XML format (that already has a schema) for no cost. Naturally, the generated code you get from SVCUtil isn’t enough, since the topology objects sometimes require some more complex actions. To support them, we added extension classes to the generated code.
In the end, it looked something like the following example –
· We have our schema XSD file, which contained topology objects, such as this:
<xs:complexType name="Credentials">
<xs:complexContent>
<xs:extension base="om:ReferenceObject">
<xs:sequence>
<xs:element type="xs:string" name="Username" minOccurs="0" maxOccurs="1"/>
<xs:element type="xs:string" name="Password" minOccurs="0" maxOccurs="1"/>
<xs:element type="xs:string" name="Domain" minOccurs="0" maxOccurs="1" />
</xs:sequence>
</xs:extension>
</xs:complexContent>
</xs:complexType>
· After running SVCUtil, we get this auto-generated code that matches the Credentials object:
[System.Diagnostics.DebuggerStepThroughAttribute()]
[System.CodeDom.Compiler.GeneratedCodeAttribute("System.Runtime.Serialization", "3.0.0.0")]
[System.Runtime.Serialization.DataContractAttribute(Name="Credentials", Namespace="https://AAG.Test.Infrastructure.Configuration.ObjectModel/", IsReference=true)]
public partial class Credentials : aag.test.infrastructure.configuration.objectmodel.ReferenceObject
{
private string UsernameField;
private string PasswordField;
private string DomainField;
[System.Runtime.Serialization.DataMemberAttribute(EmitDefaultValue=false)]
public string Username
{
get {return this.UsernameField;}
set {this.UsernameField = value;}
}
[System.Runtime.Serialization.DataMemberAttribute(EmitDefaultValue=false, Order=1)]
public string Password
{
get{return this.PasswordField;}
set{this.PasswordField = value;}
}
· And that object can be easily serialized and de-serialized from an XML file looking like this –
<Admin z:Id="DomainAdmin">
<ID>DomainAdmin</ID>
<Username>admin</Username>
<Password>admin</Password>
<Domain>contoso.com</Domain>
</Admin>
If you have any questions, or would like to see more such posts in the future, comment this post and let us know.
Thanks!
David
David Bahat
Anywhere Access Group (AAG)
Comments
Anonymous
December 22, 2010
What a fantastic and insightful post of the testing mindset for UAG, keep them coming! :)Anonymous
December 23, 2010
A discussion on the testing process is nice and is appreciated, but the overall lack of postings and apparent progress of supporting the technology itself with products that Microsoft sells is disturbing. Examples:
- A month after launch, Lync is still not even discussed, more or less supported by the application.
- The rulesets for OWA in Exchange 2010 SP1 need to be modified by hand. This is not to mention wizards that simplify setup: For example: allow the admin to decide that they want to use inbound SMTP when running through the Exchange setup, without having to jump into TMG interface. SImiliar options for allowing Communicator or Citrix Online/Offline Plugins to work would be swell as well, when running through the wizards for the application setup as well.

