Sentiment Analysis in USD with Cognitive Services Text Analytics
As noted in an earlier post, Microsoft’s Cognitive Services offer an array of intelligent APIs that allow developers to build new apps, and enhance existing ones, with the power of machine-based AI. These services enable users to interact with applications and tools in a natural and contextual manner. These types of intelligent application interactions have significant applicability in the realm of Service, to augment the experiences of both customers and agents.
In this post, we will focus on the Text Analytics API, and how it can be leveraged within the agent’s experience, to automatically detect the sentiment of activities and information during customer interactions, and to enable automated actions based on that sentiment within the Unified Service Desk. We will build a custom Unified Service Desk hosted control that will allow us to determine and visualize the sentiment of any text-based information available in USD, and automatically trigger actions based on the sentiment score determined.
Concept and Value
As agents interact with customers in an omni-channel customer care environment, two-way communication will take place between the customer and the agent. The communication may take place by voice, email, live chat, or other channels. Regardless of the channel used, the messages sent back and forth will contain sentiments, and being able to programmatically determine whether the sentiment being expressed is positive or negative in real-time can offer significant value to the efficiency and effectiveness of a customer engagement strategy.
Being able to detect the sentiment of customer and agent communications can offer possibilities including:
- Automatically flagging or escalating live chats and phone-based contacts in the event of ongoing negative sentiment expressed by either customer or agent
- Routing inbound emails, web submissions, phone calls, and live chats based on customer sentiment; for example, automatically routing contacts that contain negative sentiment to a Tier 2 queue
- Capturing and recording the customer sentiment expressed during contacts, to allow for reporting and trend analysis by customer, product, or service
- Capturing and recording the agent sentiment expressed during contacts, to assist with ongoing agent performance evaluation
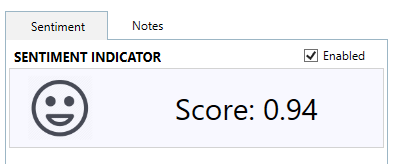
The custom control we build in this post will allow us to call an action with any string of text, have the sentiment score calculated and displayed to the agent, give a visualization of positive or negative sentiment via an updating image, and raise an event in USD to allow automation of actions. The control we create is shown in the image below, showing the sentiment expressed in a case submitted via a CRM Portal:
In this post, we will build on the sample code available in these two resources:
- Create custom Unified Service Desk hosted control on MSDN, and the associated USD Custom Hosted Control template in the CRM SDK
- The Text Analytics API quick start guide in the Cognitive Services documentation
Pre-requisites
The pre-requisites for building and deploying our custom hosted control include:
- An instance of Dynamics CRM Online, with the Unified Service Desk installed
- You can request a trial of Dynamics CRM Online here
- When installing the Unified Service Desk in your instance of CRM Online and on your client desktop, you can deploy the Interactive Service Hub sample application, as was done in this walk-through; other sample applications should work as well
- A subscription and key for the Cognitive Services Text Analytics API
- As of the time of writing, you can obtain a free subscription to this preview service by logging in with your Microsoft account here, and requesting a new trial of the “Text Analytics - Preview” product
- Visual Studio 2015
- Microsoft .NET Framework 4.5.2
- NuGet Package Manager for Visual Studio 2015
- Microsoft Dynamics CRM SDK templates for Visual Studio that contains the Unified Service Desk custom hosted control project template. You can get it in one of the following ways:
- Download the CRM SDK template from the Visual Studio gallery. Double-click the CRMSDKTemplates.vsix file to install the template in Visual Studio.
- Download and install the CRM SDK. The templates file, CRMSDKTemplates.vsix, is located in the SDK\Templates folder. Double-click the template file to install it in Visual Studio.
Building our Custom Control
In Visual Studio 2015, we will first create a new project using the Visual C# USD Custom Hosted Control template, and will name our project USDSentiment:
We set the Platform Target for our project build to the appropriate CPU (x64 or x86).
Adding References
We add references to our project by right-clicking the USDSentiment project in the Solution Explorer, and adding the following:
- System.Net
- System.Net.Http
- System.Runtime.Serialization
- System.Web
Adding a Data Contract for the Text Analytics API
To facilitate interacting with the Text Analytics API, we add a new item to our project: a Visual C# class which we will name TextAnalytics.JSON.cs. We will populate this file with the JSON data contracts for the REST Services outlined in the Text Analytics API documentation:
[snippet slug=usdsentiment_datacontract lang=c-sharp]
Laying Out our UI
For our custom control, we will design it to sit in the LeftPanelFill display group of the default USD layout. In our XAML code, we add:
- A Checkbox, to allow the agent to choose whether the sentiment detection is enabled
- An Image, to allow us to give a quick and simple visualization of the most recently detected sentiment to the agent
- A TextBlock , to allow us to render the actual score of the most recently detected sentiment to the agent
- Note that the Text Analytics API will return sentiment scores between 0 and 1, with 0 indicating very negative sentiment, and 1 indicating very positive sentiment
Our final markup should appear as shown below:
[snippet slug=usdsentiment_xaml lang=xml]
Our custom control should appear as shown below:
Adding Our Sentiment Indicator Images
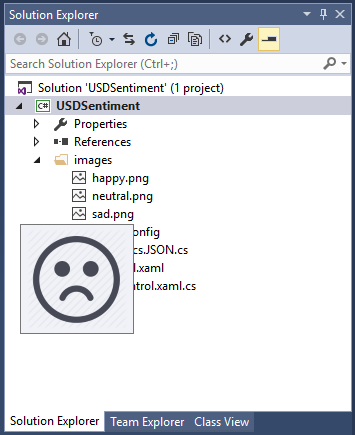
We will add three images to our project (happy, neutral, and sad), to give quick visualizations of the calculated sentiment. In our Solution Explorer, we Add a New Folder to our USDSentiment project, and into that folder, we copy three PNG images, which we also add to the project:
Adding Our C# Code
In our USDControl.xaml.cs code-behind, we add several using statements. We also:
- use a private a variable for our Text Analytics API Subscription Key that we obtained as one of our pre-requisites
- set variables for each of the images we will use to render sentiment
- set other variables and events that we will use in our code
[snippet slug=usdsentiment_using lang=c-sharp]
To our UII Constructor, we add a call to our InitUIBinding method, which configures some initial bound variables:
[snippet slug=usdsentiment_init lang=c-sharp]
We now adapt the DoAction method of the custom hosted control project template, to handle an action named GetSentiment. When this action is called, we will ensure the ‘Enabled’ checkbox is clicked, then extract two parameters from the action data:
- Text – this contains the string of text that we will detect the sentiment of
- Source – this contains a string that identifies the source of the text, in case we are detecting the sentiment of multiple sources; we can then take specific actions after the sentiment has been detected, depending on the source
We then call the GetSentiment method, passing in the text, the source, and the API subscription key as parameters:
[snippet slug=usdsentiment_doaction lang=c-sharp]
In the GetSentiment method, we receive the three incoming parameters, and build and issue our request to the Text Analytics API via the HttpClient object.
We add our API subscription key to the headers of the request, and create some basic JSON data to send in our request body. Note that the API is capable of receiving multiple ‘documents’ with the request, but we will send just a single one.
We receive our response, and use our data contract to serialize the response. We check for errors, and determine whether we have received any results in our response. Depending on the results returned, we use the overloaded DisplaySentiment method to either display the sentiment score, or to gray-out the results display if no score is returned, depending on the parameters passed.
If we have a score returned, we also call AddSentimentToContext to allow the sentiment results to trigger other actions in USD, if applicable:
[snippet slug=usdsentiment_getsentiment lang=c-sharp]
We have two definitions for the overloaded DisplaySentiment method. When a score is passed, the method will use some arbitrarily defined tiers to determine whether to display a happy, neutral, or sad face as a visualizing image. The score itself is also displayed, and the opacity set to full.
We also have a definition that takes no parameters, and when called, the sentiment display is effectively disabled, with the visualization opacity set to partial, to indicate no score:
[snippet slug=usdsentiment_displaysentiment lang=c-sharp]
In the AddSentimentToContext method, we add the score and the source of the text to the session context. We then fire the SentimentFound event, to allow for the sentiment determination to initiate other actions in USD:
[snippet slug=usdsentiment_addsentimenttocontext lang=c-sharp]
In our code-behind, we add in some additional methods to cover some other basics. These additional code snippets are found in the downloadable solution at the end of this post.
We can now Build our solution in Visual Studio.
Upon successful build, we can retrieve the resulting DLL, which should be available in a subdirectory of our project folder:
.\USDSentiment\bin\Debug\USDSentiment.dll
We can copy this DLL into the USD directory on our client machine, which by default will be:
C:\Program Files\Microsoft Dynamics CRM USD\USD
Note that instead of copying the files manually, we could also take advantage of the Customization Files feature, as outlined here, to manage the deployment of our custom DLLs.
Configuring Unified Service Desk
We now need to configure Unified Service Desk, by adding our custom hosted control, and the associated actions and events to allow it to detect and display sentiment.
To start, we log in to the CRM web client as a user with System Administrator role.
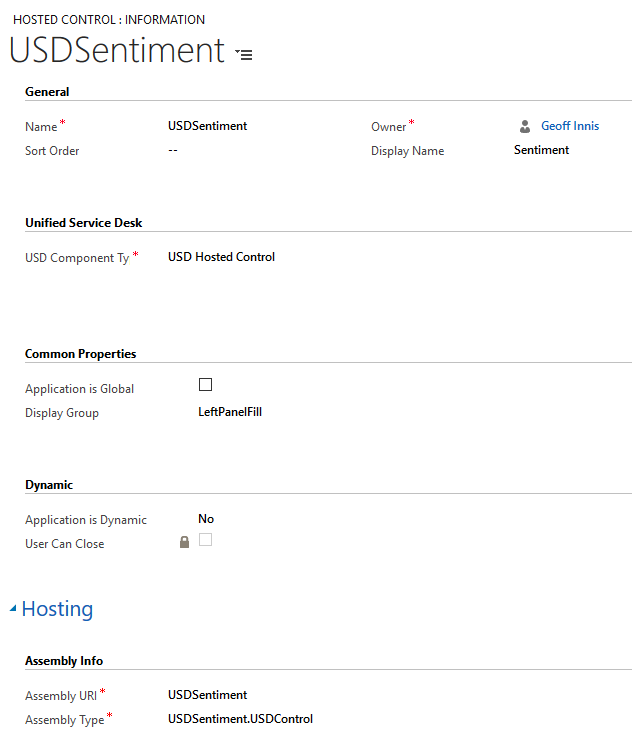
Next, we will add a new Hosted Control, which is our new custom control that we have created. By navigating to Settings > Unified Service Desk > Hosted Controls, we add in a Hosted Control with inputs as shown below. Note that the USD Component Type is USD Hosted Control, and the Assembly URI and Assembly Type values incorporate the name of our DLL:
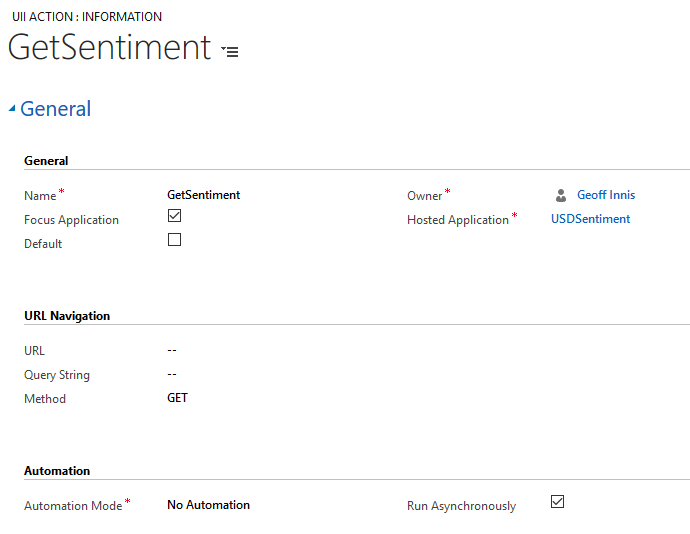
We will add a new UII Action to our USDSentiment hosted control. While viewing our USDSentiment hosted control, we can select the chevron in our navigation, and selecting UII Actions. We then click ‘Add New UII Action’, and create our new UII Action, which we name GetSentiment, to match the action as defined in our hosted control code:
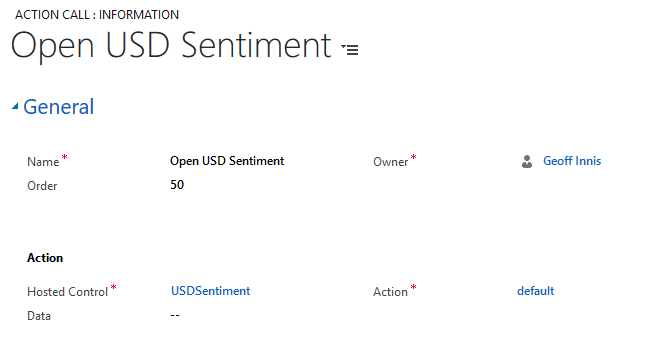
Next, we will add a new Action Call, by navigating to Settings > Unified Service Desk > Action Calls, and adding a new one, as shown below. We use the default action of our newly added hosted control, which will instantiate the control when the action is called:
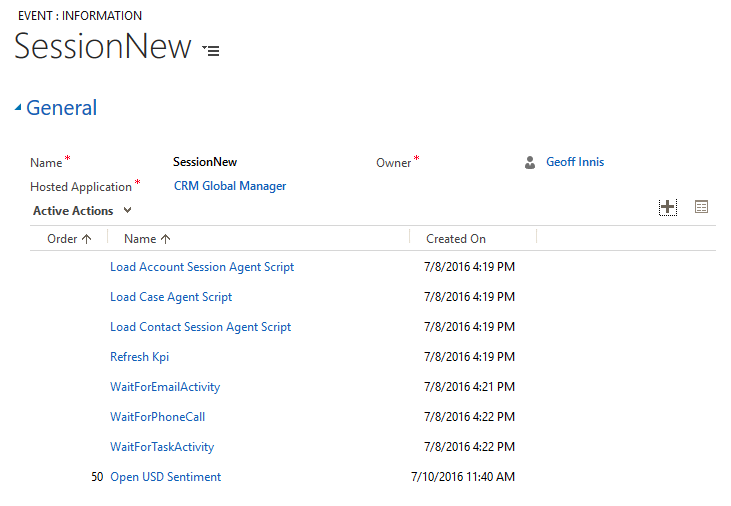
Next, we will add our new Action Call to the SessionNew event of the CRM Global Manager, which will cause our control to be instantiated when a new session is initiated. We can do this by navigating to Settings > Unified Service Desk > Events, and opening the SessionNew event of the CRM Global Manager. We add our new action to the Active Actions for the event:
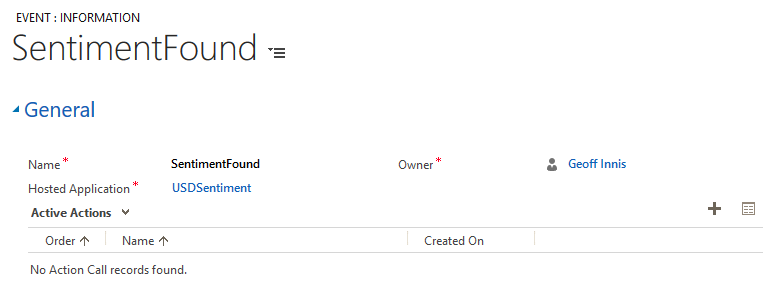
Next, we will add a new event, to make it possible for us to take specific actions when sentiment is detected. We navigate to Settings > Unified Service Desk > Events, and add a New Event. Our Event is called SentimentFound, to match the name of the event our custom USD control raises. We add this event to the USDSentiment Hosted Control:
By attaching Action Calls to this event, we can take specific actions when sentient is detected, such as:
- Updating case records to store the sentiment
- Automatically escalating chats or phone calls based on negative sentiment
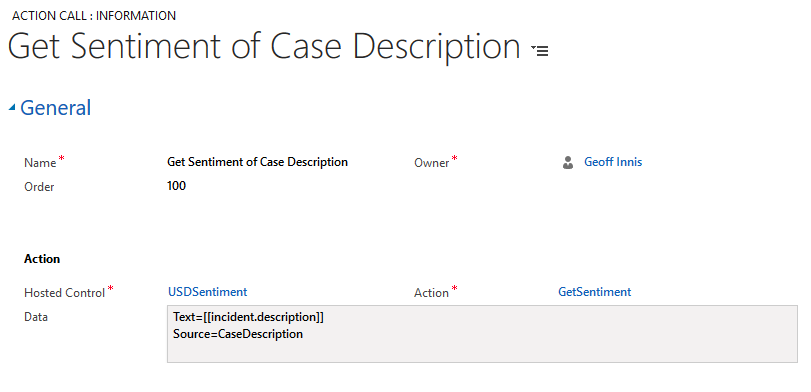
In our example, we will use our custom hosted control to determine the sentiment a customer has expressed in a case submitted by email or through web portal submission. To do this, we will add a new Action Call, by navigating to Settings > Unified Service Desk > Action Calls, and adding a new one, as shown below. We pass in our case description as the text which we will use to calculate the sentiment, and we pass in an identifier of the source of the sentiment:
We can also add a Condition to our Action Call so that the search is only conducted when we have a non-empty search term, with a condition like this: "[[incident.description]]" != "" 
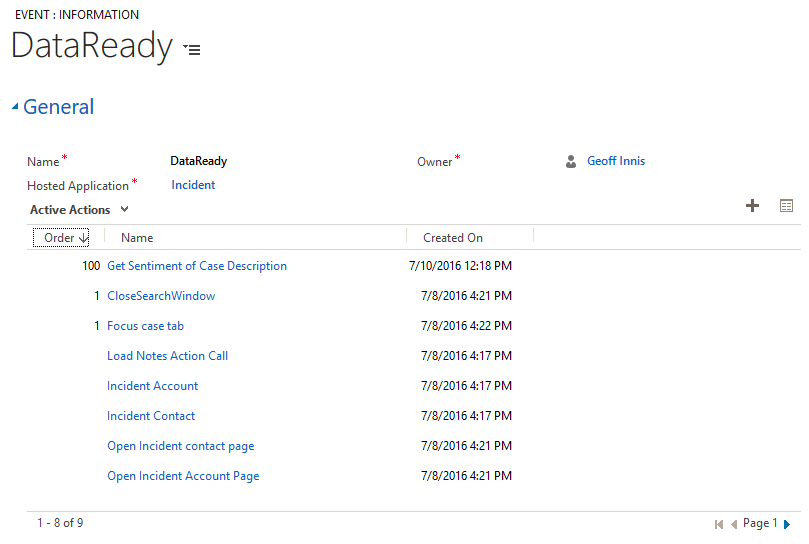
Next, we will add our new Action Call to the DataReady event of the Incident hosted control, which will cause the sentiment of cases to be determined and displayed when the case is loaded. We can do this by navigating to Settings > Unified Service Desk > Events, and opening the DataReady event of the Incident control. We add our new action to the Active Actions for the event:
Testing our Custom Hosted Control
We are now ready to launch the Unified Service Desk on our client machine, and test the hosted control. After we log into USD, we can open cases that contain a Description, and have the sentiment expressed in the case description automatically determined and displayed, as shown in the examples below:
Positive Sentiment Captured from Case Description 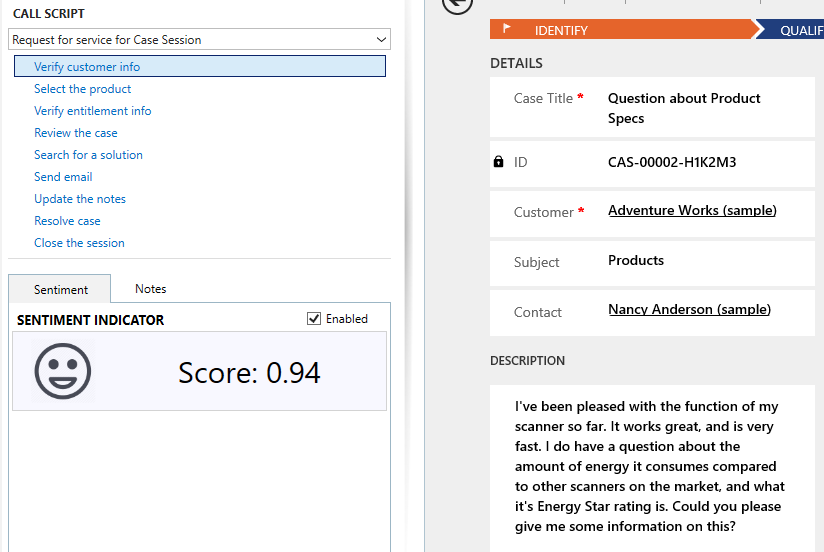
Negative Sentiment Captured from Case Description 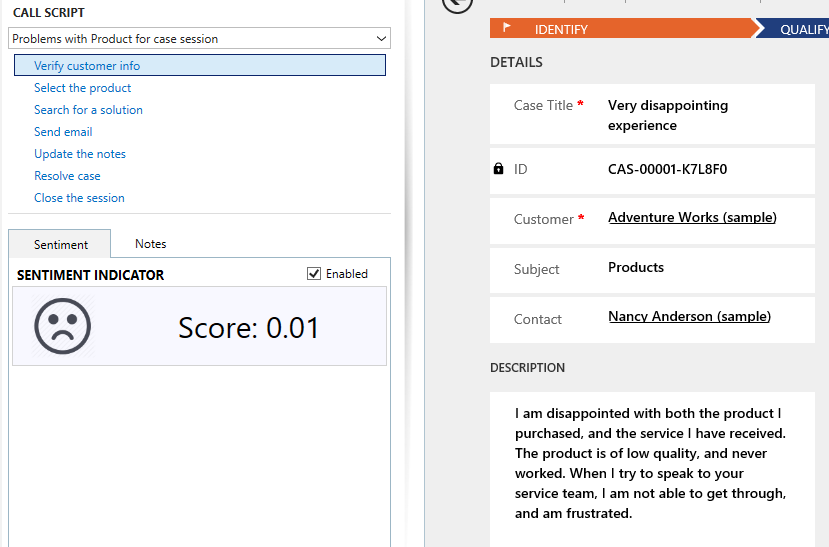
Visualizing the sentiment of a case as we open it is just a basic example of how we can leverage sentiment. The video below gives a few examples of how we can combine the Cognitive Services Speech Recognition from our earlier post, along with the Sentiment Analysis in this post, to augment agent efficiency in a number of ways, including:
Chat Channel in USD:
- Speech-to-Chat to augment agent chat efficiency
- Speech-to-Chat to augment agent chat efficiency
- Automatic sentiment analysis on all chat messages
- Voice-powered search for knowledge during chat
Phone Channel in USD:
- Automated capture of call transcript
- Sentiment analysis on call transcript as it is captured
Web and Email Cases in USD:
- Automated sentiment analysis on submitted case content
[video width="800" height="450" mp4="https://msdnshared.blob.core.windows.net/media/2016/07/CognitiveSpeechSentimentUSD.mp4"][/video]
The solution source code can be downloaded here. You will need to insert your Text Analytics API subscription key into the placeholder in the code-behind.
Comments
- Anonymous
August 20, 2017
The comment has been removed- Anonymous
August 22, 2017
Hi Jinal,Have you taken a look at this post, which leverages the same Cognitive Services Text Analytics API for sentiment detection from a D365 Custom Workflow Activity? This will likely be a better starting point for you: https://blogs.msdn.microsoft.com/geoffreyinnis/2016/07/19/routing-cases-by-sentiment-with-cognitive-services-text-analytics/
- Anonymous

