Checklist when configuring ADFS with SharePoint
Hi everyone!
This time, let's summarize a check list if you have to configure AD FS for a SharePoint 2013 environment. The basic steps are well described in the following TechNet article: https://technet.microsoft.com/en-us/library/hh305235.aspx I will just mention things that you should take care of before and during the configuration process. My first recommendation is to read both this and the mentioned article before starting your configuration.
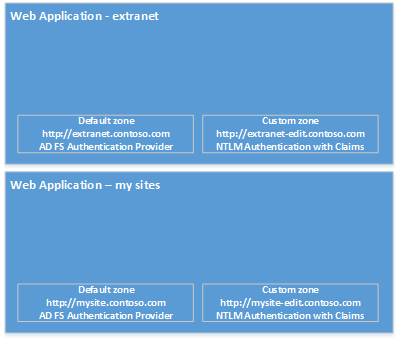
We will have the following topology:
And the following web application setup:
Checklist for the preparations:
- Certificates for the AD FS and for every web application (and extension) you create in SharePoint. For this example, we will use just mention one certificate in the form of *.contoso.com. If you don't know how to create a self signed certificate, download this and follow this instructions.
- The certificates, has to be trusted by every server in SharePoint, AD FS farm and clients that will access the web application.
- For testing, just add the certificate in the Trusted Root Authority and Personal folders and get the thumbprint of the certificate (you will need it later in this list).
- Plan your urls, as the above picture, you will need to know the URL for the AD FS service, lets say: fs.contoso.com.
- Your DNS needs to have all the URL's pointing to the appropriate servers. Ping everyone and ensure that your AD FS URL points to your AD FS server, and so on.
- I assume you already have your AD FS running. if you have to create yours, I would recommend Window Server 2012 R2 and have prepared a running SQL Server instance somewhere in your network, because the installation is as easy as this script (note the certificate thumbprint):
 #

# Windows PowerShell script for AD FS Deployment
#
Import-Module ADFS
# Get the credential used for the federation service account
$serviceAccountCredential = Get-Credential -Message "Enter the credential for the Federation Service Account."

Install-AdfsFarm `
-CertificateThumbprint:"836CD9B85B16EDE2658D7560103B56CAFC9EAD6A" `
-FederationServiceDisplayName:"SPFarmCreator ADFS" `
-FederationServiceName:"fs.spfarmcreator.local" `
-ServiceAccountCredential:$serviceAccountCredential `
-SQLConnectionString:"Data Source=sql2\sharepoint;Initial Catalog=ADFSConfiguration;Integrated Security=True;Min Pool Size=20"
Checklist for the AD FS configuration:
When adding the relying party trust, ensure that you have the realm uri included in the identifiers for your RP, like this image: Keep that uri for later when configuring SharePoint.

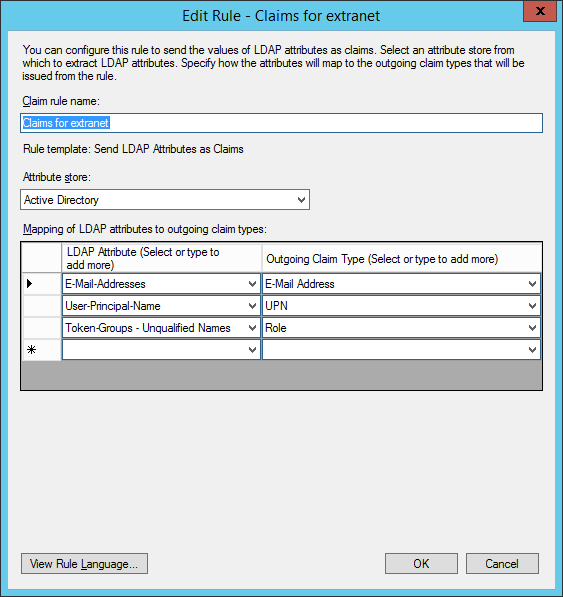
When creating the rules, ensure you map the role claim, in my example I have just mapped the email, upn and role.

Be careful when exporting the signing certificate, in our case is simple but in production environments you may need to export any intermediate certificates.
Checklist when creating the trust identity provider:
- Ensure you at least create the same three claim mappings, in the mentioned article you will include SID but I haven't in this simplified script to create it.
 $cert = New-Object System.Security.Cryptography.X509Certificates.X509Certificate2("C:\temp\ADFS.cer")

New-SPTrustedRootAuthority -Name "Token Signing Cert" -Certificate $cert

$emailClaimMap = New-SPClaimTypeMapping -IncomingClaimType "https://schemas.xmlsoap.org/ws/2005/05/identity/claims/emailaddress" -IncomingClaimTypeDisplayName "EmailAddress" –SameAsIncoming
$upnClaimMap = New-SPClaimTypeMapping -IncomingClaimType "https://schemas.xmlsoap.org/ws/2005/05/identity/claims/upn" -IncomingClaimTypeDisplayName "UPN" –SameAsIncoming
$roleClaimMap = New-SPClaimTypeMapping -IncomingClaimType "https://schemas.microsoft.com/ws/2008/06/identity/claims/role" -IncomingClaimTypeDisplayName "Role" -SameAsIncoming

$realm = "urn:sharepoint:spfarmcreator"

$signInURL = "https://fs.spfarmcreator.local/adfs/ls"

$ap = New-SPTrustedIdentityTokenIssuer -Name "ADFS for Extranet" -Description "SharePoint secured by SAML" -realm $realm -ImportTrustCertificate $cert -ClaimsMappings $emailClaimMap,$upnClaimMap, $roleClaimMap -SignInUrl $signInURL -IdentifierClaim $emailClaimMap.InputClaimType
- Remember to double and triple check the realm you are passing to the new trusted IP, it has to be the same identifier in the step 1 of the previous list.
Checklist when assigning the trusted IP (Identity Provider) to the web applications:
- Remember that if you are modifying an existing web application, from the web application management list, click on the big ribbon button "Authentication Providers" and then click on the "Default" zone. You will now have the options you are looking for.
- If this is the first time you are testing all of this, leave your web application with both Windows Authentication and AD FS, so you can still have access to your web application if your AD FS is not well configured. Once you have ensure AD FS works like a charm, uncheck the Enable Windows Authentication checkbox.
- If you finally decide to just enable AD FS for the default zone of your web application, extend it and enable in the extended zone windows authentication. This is required for search, and in case AD FS doesn't work you still have a "back door".
Checklist when configuring User Profiles
- Unless necessary, use the Lightweight option for synchronizing, not the FIM. If you don't know what is this about, read this.
- Ensure you map the claim user identifier for the user profiles to be updated the right way. In my case I used the email for that, this article will explain how to it: Mappping User Profiles for SAML Users
Checklist when adding my sites:
- You have to create a new Relying Party Trust for each web application in your farm that requires AD FS. This means you will need a new uri for your realm.
- The realm also needs to be added to your Trusted Identity Provider, this simple script will do the trick:
$ti = Get-SPTrustedIdentityTokenIssuer "You identity name"
$uri = New-Object System.Uri("https://mysites.contoso.com")
$ti.ProviderRealms.Add($uri, "urn:contoso:mysites")
$ti.Update()
Checklist for Search:
- As mentioned above, ensure you have at least one extension in you web application that allows Windows Authentication. So your crawler can happily index your content.
- Change your content sources to map your extended url's.
- If needed, add a mapping to your search application so it will render the public url (i.e. the default zone url) in the user's search results.
Checklist for using groups:
- Ensure the group is a security group.
- Ensure is global or universal.
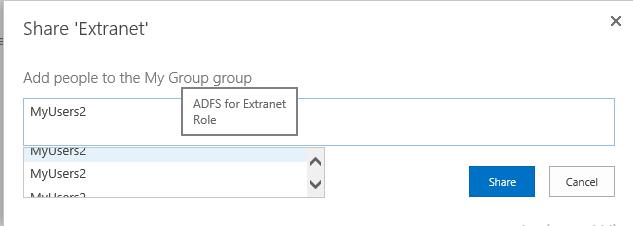
- When you grant access a group, ensure that the tooltip that will appear over the group name in the people picker says "Role", as they say, a picture is worth a thousand words:
Things that don't work like in AD old times:
- You can't have Kerberos negotiation, this is because the Claim to Window Token Service only understands windows claims, not SAML-tokens. Consider using Secure Store Service with SSO.
- People picker will not find the names and/or groups, you have to create a custom claim provider for that.
- RSS webparts mapped to SharePoint feeds require authentication, since this can be done with Kerberos, with AD FS it will not work.
- There might be some limitations with the size of the SAML token or at least from the traffic perspective. Since you map a claim that include the roles (user's membership), ensure that the user doesn't belong to a big amount of groups, nested or not.
Finally! I think this is it!
Comments
- Anonymous
January 01, 2003
Hi Yaron, when you say remote search, are you talking about a search center in a different site collection? If so, yes, you need to grant access to that site collection as well.


