VMM Service Deployments in Depth: Deploying System Center Orchestrator as a Service Part 3 – SQL Server and Application Profiles
Quick Blog Description: In the two previous postings of this blog series I’ve introduced VMM Service Templates as well as demonstrated a VMM Service deployment using System Center Orchestrator as the example service. Blog posting 2 detailed all prerequisites needed in order to deploy Orchestrator as a service. In this posting, the third in the series I will be detailing how to create a SQL Server Profile that will be used during the service deployment to complete the SQL Instance configuration. I will also be walking through the creation of two application profiles, the first used to install all Orchestrator components and SQL Server Management Studio, and the second used to install only the Orchestrator Runbook Server component.
Prerequisites Recap: If you recall from the previous posting, the following items have been created / gathered in support of this service template / deployment. Many of these will be utilized throughout this process.
- SCVMM Virtual Hard Drive with SQL generalized and ready for deployment
- SCVMM Virtual Hard Drive (without SQL)
- SCVMM VM Template for each VHD/VHDX
- The information necessary for the SQL deployment
- Custom SCVMM Resource containing the System Center Orchestrator installation media
- The commands / scripts required for an unattended installation of all Orchestrator components
- The commands / scripts required for an unattended installation of only an Orchestrator Runbook server
SQL Server Profile:
SQL Server Profiles can be added to a Server Template and serve the purpose of completing the SQL imaging process of a SYSPREPED SQL instance. In the example being detailed throughout this series of posting, the SQL Server Profile will be added to the Tier 1 VM of the service deployment and will ultimately prepare the SQL instance that will host the Orchestrator database. In order to create a SQL Server profile, navigate to appropriate node under the VMM Library workspace, and create a new SQL Server Profile.
Recall from my previous post that several pieces of data will be required for this configuration. This data includes:
- Name of the SQL Instance: MSSQLSERVER is the default name given to a non-modified instance
- Instance ID: Specified during the SQL SYSPREP process
- Media Source: In my example I have made a copy of the media local to the VM before creating my VHDX / VM Template. This copy was placed under c:\source\sql2012
Configure the SQL Server Deployment as seen below. In this case ‘Name:’ is an internal to VMM value and is not related to the prepared instance of SQL on the VHDX, anything can be placed here. Also notice that not only have I specified the Instance Name and Instance ID, but I have also increased the timeout value.
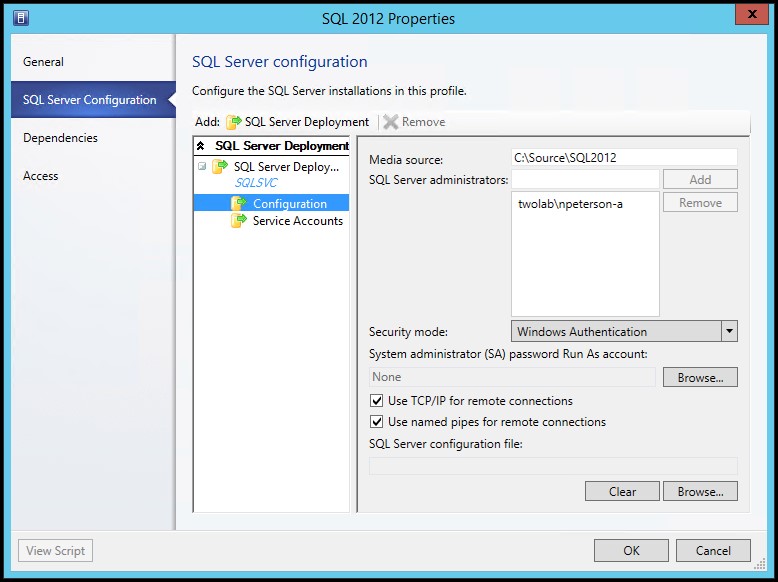
Configure the SQL Server Configuration thusly. Notice that not only have I specified the media source, but have specified a SQL administrator and ensured that TCP/IP and named pipes has been enabled.
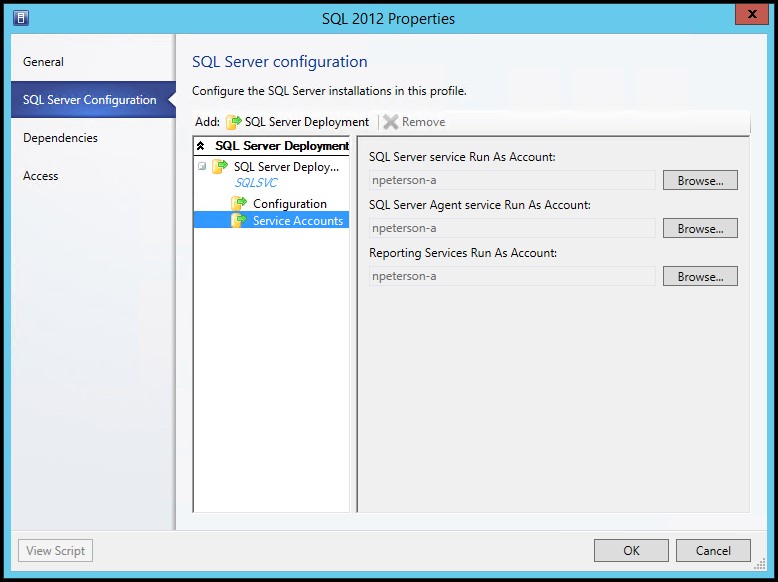
Finally specify VMM Run As accounts to be uses as service accounts for the SQL instance.
This completes the creation of the SQL Server Profile and it is now ready for use in our Tier 1 configuration. I will detail how to use the profile later on in this blog series.
Application Profile for all Orchestrator Components plus SQL Server Management Studio:
In addition to completing the SQL configuration on my Tier 1 VM, I will also be deploying all System Center Orchestrator components as well as SQL Server Management Studio. These items can be taken care of using one Application Profile. Just like SQL Server Profiles, Application profiles can be added to a service template and are used to preform post VM service configurations such as installing application, executing scripts, and providing access to VMM Library resources.
To create the Tier 1 Application Profile navigate to the appropriate profile node under the VMM Library workspace and create a new application profile. On the general tab give the profile a name similar to ‘Orchestrator Management Server'.
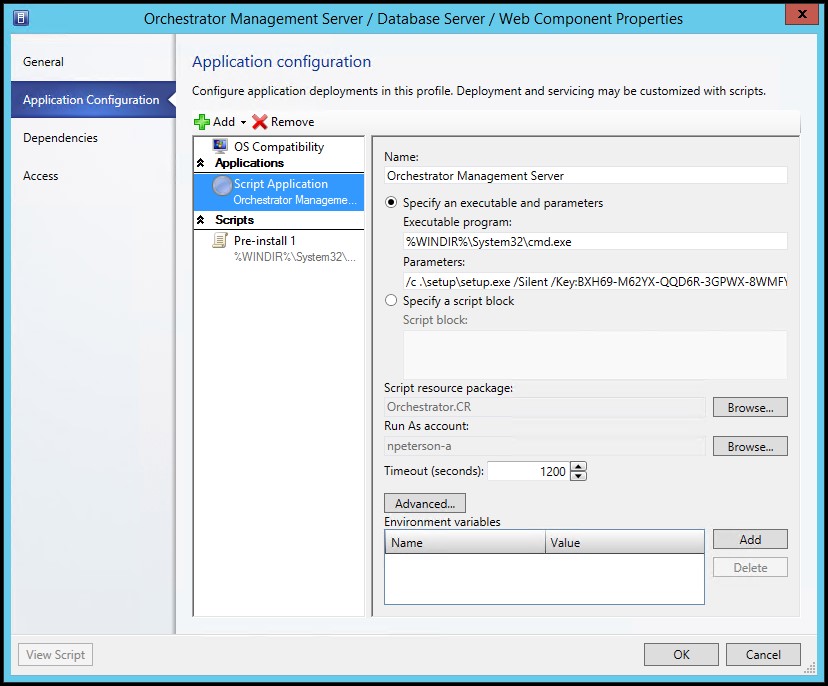
On the Application Configuration tab add a Script Application and name it similar to ‘Orchestrator Management Server’. Recall in the previous blog that I had detailed the command that would perform a complete and unattended installation of System Center Orchestrator. We are going to use that information here. Configure the Script Application like the following:
Where the Executable Program is:
%WINDIR%\System32\cmd.exe
And the Parameters are:
/c .\setup\setup.exe /Silent /Key:<insert key> /ServiceUserName<insert service account> /ServicePassword:<insert password> /Components:All /DbServer:@computerName@ /DbNameNew:Orchestrator /WebServicePort:81 /WebConsolePort:82 /OrchestratorRemote /UseMicrosoftUpdate:0 /SendCEIPReports:0 /EnableErrorReporting:never
Let’s back up a bit and take a closer inspection of the Executable Program and parameters. Please notice the following
- Executable Program: we are not executing setup.exe for Orchestrator, rather a CMD shell or interpreter
- Because we are executing a command shell we need to specify /c indicating that the commands following should be executed
- /DbServer:@COMP@ - what is this about? VMM allows us to define variables when creating service. What we will see is that in the OS template for deploying the Tier 1 VM, we will specify @COMP@ as its computer name. Hence, we will be prompted to populate this value at service deployment time. Any place in our service template that the @COMP@ variable is referenced will consume the provided value. Essentially @COMP@ will be the name of the Tier 1 VM, which is also where the Orchestrator database will be stored, which is why I am using /Dbserver:@COMP@. I will revisit this in more detail when we configure the Tier 1 VM deployment.
- Be sure to select the Custom Resource package which includes the orchestrator media.
- Take note that several items in the parameter need to be changed to match your media / environment (anything with <insert etc.>).
Finally for the Tier 1 application profile, to install SQL Server Management Studio we will add a script to the application profile and configure it as follows:
Where the Executable Program is:
%WINDIR%\System32\cmd.exe
And the Parameters are:
/c c:\source\sql2012\setup.exe /q /ACTION=install /FEATURES=ssms /IACCEPTSQLSERVERLICENSETERMS
The one item to note here is the path to setup.exe. This is the path on the reference VM in which I have stored the SQL media.
Application Profile for only the Runbook Server Components:
To complete the Tier 2 end of this service deployment we will need an additional application profile that will deploy only the Orchestrator Runbook Server components.
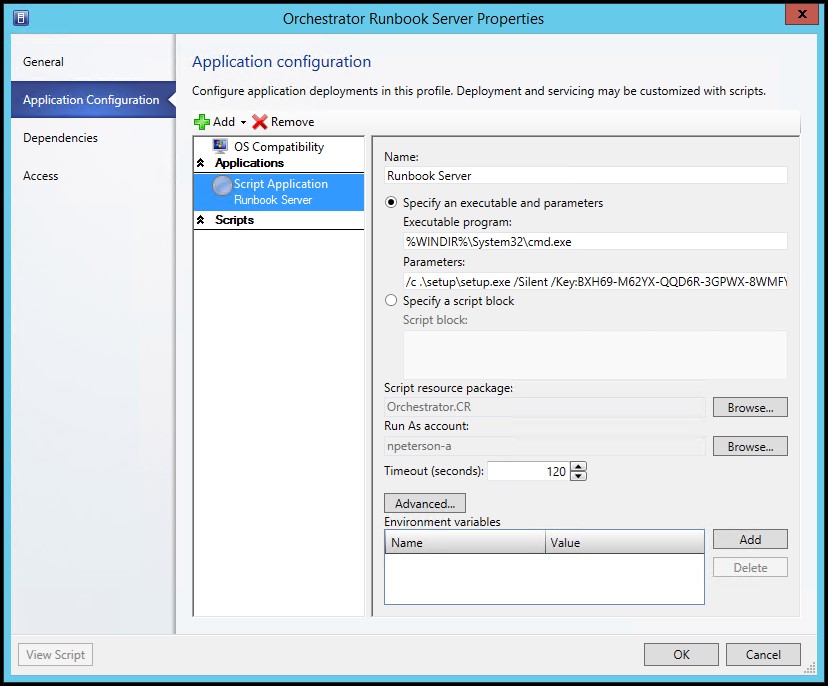
So we will create a new application profile naming it something like ‘Orchestrator Runbook Server’ and configure it thusly:
Where the Executable Program is:
%WINDIR%\System32\cmd.exe
And the Parameters are:
/c .\setup\setup.exe /Silent /Key:<insert Key>/ServiceUserName:<Insert Service Account> /ServicePassword:<Insert service Password> /Components:RunbookServer /DbServer:@COMP@ /DbNameExisting:Orchestrator /OrchestratorRemote /UseMicrosoftUpdate:0 /SendCEIPReports:0 /EnableErrorReporting:never
Be sure to replace any items marked with <Insert>, as well note that where the Tier 1 application profile was configured to install all Orchestrator components (/Components:ALL), here we are only installing a Runbook Server (/Components:RunbookServer).
Conclusion:
I'm going to wrap this post up here. If you have been following along, at this point we've discussed Service Deployments and seen one in action, have gathered all needed prerequisites and configured our SQL Server and Application Profiles. Stick around as I will soon place up the final post to this series in which I will pull this all together into a Service Template for precise, mass, and repeatable service deployments.


