How Do I: Import and Store a Data File
Today’s post is going to be a short one about how to import a file through a Visual Studio LightSwitch application (Desktop or Web) and store the data on the backend (e.g. SQL Server).
Sometimes we want to upload files in binary format and store them in the database, like a Word document or PDF file or any other file containing unstructured data. LightSwitch already has the built-in ability to store and retrieve images, but if you want to store other types of files we have to write a small bit of code.
Backstory
This post is really just me picking out various pieces of code from my other posts and cramming it together to make a new post. Which is a nice break for me, since writing a post often takes about a week (after I write the code and write up a draft blog, then get feedback, and double check the code several times). But with this one I should be done in a day leaving more time to enjoy the very brief Summers we have up here in Fargo, North Dakota.
Create the project and a table
Alright, let’s get started making a simple LightSwitch Web Application.
Let’s create the project, and a table that will hold our file data.
- Launch Visual Studio LightSwitch and create a new C# Visual Studio LightSwitch project
- Call the project: ImportFiles
- In the Solution Explorer, right click “Properties” and select Open.
- Change the Application Type from “Desktop” to “Web”
- Note - this sample will work as a Desktop application as well
- Add a table called “FileInformation” and add the following fields to the table:
- Name | String |
- Miscellaneous | String |
- Data | Binary |
- You should have a table now that looks like this:

Create the screen
- Add a screen using the “Editable Grid Screen” template and tie the screen to the FileInformation table.
- In the screen designer, under Rows Layout –> Data Grid –> Data Grid Row delete the “Data” control so that it won’t display when we run the application
- It doesn’t make much sense for us to display this field on the screen since it just the file’s binary data.
- In the screen designer, under Rows Layout –> Screen Command Bar, add a button called “ImportAFile”
- You should now have a screen that looks something like this:
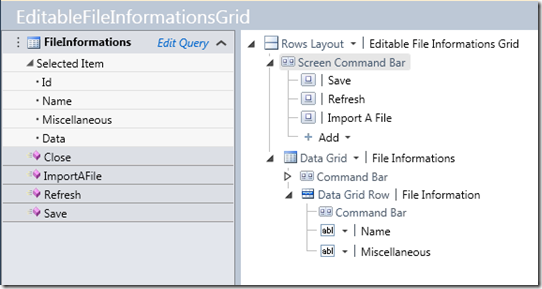
- Right click the ImportAFile button and select “Edit Execute Code”
- We do this to create the “User” folder where we will be placing some custom user code. We’ll come back and add our button code later
Add a custom Silverlight dialog
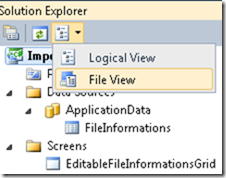
In the Solution Explorer we need to switch to the “File View” mode so we can add some custom code.
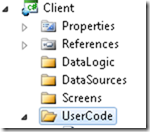
After switching to the File View mode, navigate to the Client project and open up the User Code folder
We are going to add our custom Silverlight dialog just like we did in the last blog post. We need our own custom Silverlight dialog because we want to display an OpenFileDialog to the user and we are running inside a LightSwitch web application. (For the longer explanation please read my previous blog post).
Right click UserCode folder and select “Add-> New Item”
Select “Text File” in the “Add New Item” dialog. Call the file “SelectFileWindow.xaml”
Now copy and paste the below code into the “SelectFileWindow.xaml” file:
<controls:ChildWindow x:Class="LightSwitchApplication.UserCode.SelectFileWindow"xmlns="https://schemas.microsoft.com/winfx/2006/xaml/presentation"xmlns:x="https://schemas.microsoft.com/winfx/2006/xaml"xmlns:controls="clr-namespace:System.Windows.Controls;assembly=System.Windows.Controls"Width="394" Height="305"Title="Select File Dialog" ><Grid x:Name="LayoutRoot" Margin="2"><Grid.RowDefinitions><RowDefinition /><RowDefinition Height="Auto" /></Grid.RowDefinitions><Button x:Name="CancelButton" Content="Cancel" Click="CancelButton_Click" Width="75" Height="23" HorizontalAlignment="Right" Margin="0,12,0,0" Grid.Row="1" /><Button x:Name="OKButton" Content="OK" Click="OKButton_Click" Width="75" Height="23" HorizontalAlignment="Right" Margin="0,12,79,0" Grid.Row="1" /><Button Content="Browse" Height="23" HorizontalAlignment="Left" Margin="291,92,0,0" Name="BrowseButton" VerticalAlignment="Top" Width="75" Click="BrowseButton_Click" /><TextBox Height="23" HorizontalAlignment="Left" Margin="66,92,0,0" Name="FileTextBox" VerticalAlignment="Top" Width="219" IsEnabled="True"/></Grid></controls:ChildWindow>This Silverlight dialog code contains 4 controls – an OK button, Cancel button, Text field, and a Browse button. The Browse button will launch an OpenFileDialog dialog which will let the user select a file to import, and the text field will display the name of the file about to be imported.
We need to add some code for our Silverlight dialog, so right click the “UserCode” folder and select “Add-> Class”
Name the class “SelectFileWindow.cs” and copy the below code into the class:
//' Copyright © Microsoft Corporation. All Rights Reserved.//' This code released under the terms of the //' Microsoft Public License (MS-PL, https://opensource.org/licenses/ms-pl.html) using System; using System.IO; using System.Windows; using System.Windows.Controls;namespace LightSwitchApplication.UserCode{public partial class SelectFileWindow : ChildWindow{public SelectFileWindow(){InitializeComponent();}private FileStream documentStream;public FileStream DocumentStream{get { return documentStream; }set { documentStream = value; }}private String safeFileName;public String SafeFileName{get { return safeFileName; }set { safeFileName = value; }}/// <summary>/// OK Button/// </summary>private void OKButton_Click(object sender, RoutedEventArgs e){this.DialogResult = true;}/// <summary>/// Cancel button/// </summary>private void CancelButton_Click(object sender, RoutedEventArgs e){this.DialogResult = false;}/// <summary>/// Browse button/// </summary>private void BrowseButton_Click(object sender, RoutedEventArgs e){OpenFileDialog openFileDialog = new OpenFileDialog();if (openFileDialog.ShowDialog() == true){this.FileTextBox.Text = openFileDialog.File.Name;this.safeFileName = openFileDialog.File.Name;this.FileTextBox.IsReadOnly = true;FileStream myStream = openFileDialog.File.OpenRead();this.documentStream = myStream;}}}}The SelectFileWindow class contains the following code:
- The methods for our button controls
- The browse button has code in it to create a System.Windows.Controls.OpenFileDialog object which we use to open up our Open File Dialog to allow the user to pick any arbitrary file to import.
- A public FileStream property which will contain the data for the file we want to import
- A public String property which will contain the name of the file we want to import
We need to add a reference to the Silverlight dll we are using, so in Solution Explorer, navigate to “Client –> References”, right click and select “Add Reference…”
Add a .NET reference to the System.Windows.Controls assembly
Add our screen’s button code
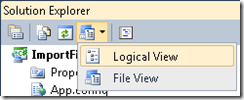
Let’s switch back to the “Logical View”
Open up the screen designer for the EditableFileInformationsGrid
Right click the “ImportAFile” and select “Edit Execute Code”
Copy and paste the below code into the EditableFileInformationsGrid.cs:
//' Copyright © Microsoft Corporation. All Rights Reserved.//' This code released under the terms of the //' Microsoft Public License (MS-PL, https://opensource.org/licenses/ms-pl.html) using System; using System.Collections.Generic; using System.IO; using System.IO.IsolatedStorage; using System.Linq; using LightSwitchApplication.UserCode; using Microsoft.LightSwitch; using Microsoft.LightSwitch.Framework.Client; using Microsoft.LightSwitch.Presentation; using Microsoft.LightSwitch.Presentation.Extensions; using Microsoft.LightSwitch.Threading;namespace LightSwitchApplication{public partial class EditableFileInformationsGrid{partial void ImportAFile_Execute(){// To invoke our own dialog, we have to do this inside of the "Main" Dispatcher// And, since this is a web application, we can't directly invoke the Silverlight OpenFileDialog// class, we have to first invoke our own Silverlight custom control (i.e. SelectFileWindow)// and that control will be able to invoke the OpenFileDialog class (via the Browse button)Dispatchers.Main.BeginInvoke(() =>{SelectFileWindow selectFileWindow = new SelectFileWindow();selectFileWindow.Closed += new EventHandler(selectFileWindow_Closed);selectFileWindow.Show();});}/// <summary>/// Invoked when our custom Silverlight window closes/// </summary>void selectFileWindow_Closed(object sender, EventArgs e){SelectFileWindow selectFileWindow = (SelectFileWindow)sender;// Continue if they hit the OK button AND they selected a fileif (selectFileWindow.DialogResult == true && (selectFileWindow.DocumentStream != null)){byte[] fileData = new byte[selectFileWindow.DocumentStream.Length];using (StreamReader streamReader = new StreamReader(selectFileWindow.DocumentStream)){for (int i = 0; i < selectFileWindow.DocumentStream.Length; i++){fileData[i] = (byte)selectFileWindow.DocumentStream.ReadByte();}}// Create a new record for this file, and store the data, name and lengthFileInformation fileInformation = this.DataWorkspace.ApplicationData.FileInformations.AddNew();fileInformation.Name = selectFileWindow.SafeFileName;fileInformation.Miscellaneous = "Size of file in bytes: " + fileData.Length;fileInformation.Data = fileData;selectFileWindow.DocumentStream.Close();selectFileWindow.DocumentStream.Dispose();}}}}There are two methods in this class:
- ImportAFile_Execute() – since we are inside of button code here we are NOT inside the main UI thread anymore. So we need to switch back to the main UI thread only because we want to display our own UI dialogs (like our custom Silverlight dialog and an OpenFileDialog). This method switches to the main UI, invokes our Silverlight dialog, and adds an EventHandler to the “Closed” event. So that when the dialog is closed, we call our own method to do some additional work.
- selectFileWindow_Closed() – this method is invoked once our Silverlight dialog closes. It reads in the file from the SelectFileWindow.DocumentStream public property we mentioned earlier. And stores the data from this FileStream into a byte array. We then create a new record for our FileInformation table, and set the Name field to the name of the file, the Miscellaneous field is set to the size of the file, and the Data field is set to the value of the byte array. The Data field is what actually contains our imported file.
Run it and import some files
- In Solution Explorer, right click the ImportFiles project, and select “Build”.
- After the build, press F5 to run your project
- You should see the inside the command bar on the screen a button called “Import A File”
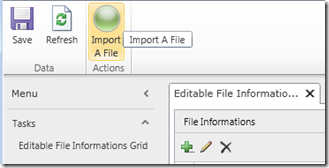
- Click the “Import A File” button to display our custom Silverlight Dialog
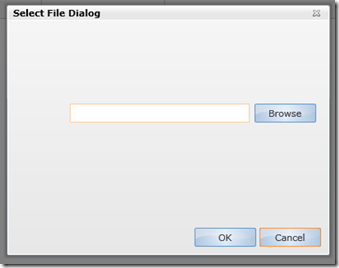
- Select the “Browse” button and select any file you wish to import
- Click “OK”
- Our code to import the data will now run and we will get a new record created on our screen
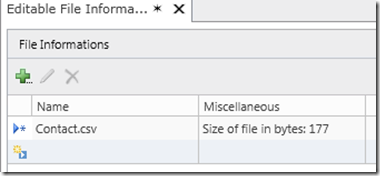
- As you can see, we display the file’s name and it’s size in bytes
- You can now save the data to persist it to the database by clicking the “Save” button on the command bar
Additionally, there is an extension that can be added to Visual Studio LightSwitch called Document Toolkit for LightSwitch, which handles importing and viewing Word Documents. It will only work for Desktop applications, and it isn’t free, but other than that it looks like a slick extension.
That’s it for this brief post. I've included a zip file below of the C# code.
Again, love to hear if there are any questions, and if you think something is wrong with this code (or the title) then you are probably right ![]() so please let me know.
so please let me know.
-Matt Sampson ![]()
Comments
Anonymous
June 07, 2011
Nice post, it would also be nice to get some examples of uploading files into a sharepoint library, or saving them to a UNC Path on the network.Anonymous
June 25, 2011
I used some of this code to create a sample that uploads files to the file system: lightswitchhelpwebsite.com/.../Saving-Files-To-File-System-With-LightSwitch-Uploading-Files.aspxAnonymous
June 28, 2011
Thanks, Michael. Nice work on the sample. Flattered to hear you used some of this code :) -Matt SampsonAnonymous
July 29, 2011
Hi Matt, Great post, very helpfull and NO bugs... Saves me a great amount of time. This is working on LightSwitch 2011 RTM Maybe for beginners, simply tell them to rename "ApplicationData" to their own data source name. FrancisAnonymous
August 11, 2011
Hi Matt, I also posted this question on the LightSwitch forum: I'm developing a project in which on several occasions I have to add a document to a table. I read the tutorial by Matt Sampson (blogs.msdn.com/.../how-to-import-and-store-a-data-file.aspx) and was able to create the custom control and add files to a table. But, when this table is a detail table in a master/detail screen and I add this code to the AddAndEditNew_Execute method on the grid this does not work properly. Here is the code fragment: void selectFileWindow_Closed(object sender, EventArgs e) { SelectFileWindow selectFileWindow = (SelectFileWindow)sender; if (selectFileWindow.DialogResult == true && (selectFileWindow.DocumentStream != null)) { byte[] fileData = new byte[selectFileWindow.DocumentStream.Length]; using (StreamReader streamReader = new StreamReader(selectFileWindow.DocumentStream)) { for (int i = 0; i < selectFileWindow.DocumentStream.Length; i++) { fileData[i] = (byte)selectFileWindow.DocumentStream.ReadByte(); } } Document document = this.Documents.AddNew(); document.Name = selectFileWindow.SafeFileName; document.Misc = "Grootte in bytes: " + fileData.Length; document.Data = fileData; selectFileWindow.DocumentStream.Close(); selectFileWindow.DocumentStream.Dispose(); } } I get the error message: IVisualCollection<T>.AddNew() shouldn't be called from the UI Thread. I'm not really smart when it comes to threading so I don't know what this exactly means(I Googled it but didn't find any useful results). I know the custom control needs to run in a separate thread for some reason but I don't understand why the code in the tutorial was able to store the file successfully in a single, separate table through "this.DataWorkspace.ApplicationData.Documents.AddNew()"but when it's in a table linked to a master table and I use "this.Documents.AddNew()" this error occurs. Does anyone know what I'm doing wrong? Or does anyone have an alternative method of up- and downloading binaries to and from the database? Thanks, H.Anonymous
August 18, 2011
And how to allow the user to again download files and view them on his computer?Anonymous
August 28, 2011
@Willem Check out this application from Michael Washington: lightswitchhelpwebsite.com/.../Saving-Files-To-File-System-With-LightSwitch-Uploading-Files.aspx He's modified the application from this blog, and made it better. It might fit your needs and solve your bug issue.Anonymous
September 07, 2011
Excellent work. I added a bit of code to download the bytes from the database as a file: partial void DownloadCV_Execute() { // Must invoke on UI thread Dispatchers.Main.BeginInvoke(() => { // Gte the object which has bytes Candiadte candidate = this.Candiadtes.SelectedItem; byte[] data = candidate.CVFile; SaveFileDialog dlg = new SaveFileDialog(); // set the default extension if you have also stored the file name dlg.DefaultExt = System.IO.Path.GetExtension(candidate.CVName); dlg.Filter = string.Format("{0} files(.{0})|.{0}", dlg.DefaultExt); // Ideally you should set the file name, but can't do it in this version of Silverlight. Wait for 5.0 dlg.FilterIndex = 1; if ((bool)dlg.ShowDialog()) { Stream stream = dlg.OpenFile(); foreach (byte datum in data) { stream.WriteByte(datum); } stream.Close(); stream.Dispose(); } } ); }Anonymous
September 07, 2011
Why are we using "dispatcher" here? Isn't the call to download the file running on the UI thread? ThanksAnonymous
September 08, 2011
@Bilal - When you click on a button, the "button's" code is running in the background thread and NOT the UI thread. So we need to switch back to the UI thread in this instance to get our dialog to display.Anonymous
October 13, 2011
It would be really helpful to have an example of how to get the file out of the database. The solution below by Rahul Kumar does not work. Apparently, dialog boxes need to be executed via a button click? However, I have not been successful with anything that I have tried.Anonymous
December 19, 2011
Hi Matt Do you have any article regarding download saved file from lightswitch application to external drive. if Yes then please refer me. ThanksAnonymous
January 26, 2012
Is it Possible to put progress bar (upload) on the select file dialog?Anonymous
January 26, 2012
The comment has been removedAnonymous
January 26, 2012
@RASHMI - Check out Michael Washington's blogs: lightswitchhelpwebsite.com/.../Saving-Files-To-File-System-With-LightSwitch-Uploading-Files.aspx he talks about saving file to a hard drive (not a database).Anonymous
February 14, 2012
Hi, great work, i want to know if it is possible to upload files to hard drive with wcf ria service ?Anonymous
February 15, 2012
Hi Matt: thanks for this useful example I've figured to adapt it for VB; however, hasn't had success writing the code for the inverse path: to retrieve the binary file previously stored in the database and save it on a local folder (in web mode). You have any example to accomplish this?Anonymous
March 31, 2012
Is it possible to have this code in VB?Anonymous
April 01, 2012
@Neil Sitko - Neil there is a C# to VB converter out there that I use for all my needs - www.developerfusion.com/.../csharp-to-vbAnonymous
April 03, 2012
Thanks MattAnonymous
April 22, 2012
Hi Matt, thats a nice example. I tried to expand your "SelectFileDialog" with a additional button which works like the "add" Button in LightSwitch Business application. Unfortunately I failed. Could you show how I can add such a button please. thxAnonymous
April 24, 2012
The comment has been removedAnonymous
April 24, 2012
@John_C Hey John- I think the problem may be that you need to do something like DataWorkspace.<YourDataSourceName>.<YourDataSourceEntityName> So like DataWorkspace.NorthwindData.Products.AddNew() Let me know if that helps. -Matt SAnonymous
April 24, 2012
Hi Matt, thanks it works. :)Anonymous
May 22, 2012
How can we view this data we imported? view and export?Anonymous
November 17, 2012
Now that you have shown how to save files, how about exporting the files back on desired location. by selection so if some one has dozens to export it would be easy to do, just for more then one file example.Anonymous
November 19, 2012
hi, I posted a comment here about exporting files back to file system. Maybe you haven't checked on comments yet but when you do. let me : Bmuzammil@gmail.com and relationship with person etc was also my comment. thank you. I only know basics of C#, hardly even basics.Anonymous
December 28, 2012
@Marvyn Cosep - It's possible to do basic file I/O of the file itself to read the data out and write it to the desktop. Though you may not have access to save it to the desktop potentially unless you are running as a Silverlight Desktop application (not a web app). If you want to read the contents of the file - I'd encourage you to look over the source code. There should be at least one place in there where we open up the file and read in the data. If that file were xml, for example, you could use an XmlReader to read in the data, parse it out, and store it in the necessary LightSwitch entitiesAnonymous
February 13, 2013
This is awesome, but is there a VB version of this code out there?Anonymous
February 26, 2013
hello, when i try to import file than more of 5 mb i got this error "An unexpected error occurred during communication with the server" i have this partial void Application_Initialize() { this.Details.ClientTimeout = 100000; } have you had this problem? could you help me? Thanks in Advance!Anonymous
July 22, 2013
Would you update the code to download the imported file?Anonymous
July 30, 2013
Pittrecon08 - I know - everyone keeps asking for this. I just need to set aside some time to do this. In the meantime please peruse the comments on this blog of people who have posted code snippets on how to make this work, as well as the link I gave to Michael Washington's blog on how he accomplished thisAnonymous
July 31, 2013
I separated the binary data from its metadata,, for instance for streaming purposes, by using two separate tables (sound_infoes and sound_data) with a 1-1 relationship between them. In this table structure I am unable to "Save Changes" after adding records to both tables. I get a Data Validation error "sound_info(filename): The referenced sound_info is either not set or no longer exists". When I click on the error I can manually select the missing SoundKey, after which the Save operation succeeds, but this is clearly not acceptable. Here is the code I use to create both records and to fill them (closely tracking your selectFileWindow_Closed method): private void selectFileControl_Closed(object sender, EventArgs e) { SelectFileControl sfc = (SelectFileControl)sender; // Continue if the OK button is clicked AND a file was selected if (sfc.DialogResult == true && sfc.DocumentStream != null) { byte[] fileData = new byte[sfc.DocumentStream.Length]; using (StreamReader streamReader = new StreamReader(sfc.DocumentStream)) { for (int i = 0; i < sfc.DocumentStream.Length; i++) { fileData[i] = (byte)sfc.DocumentStream.ReadByte(); } } sound_info soundInfo = this.DataWorkspace.InterfaceSounds.sound_infoes.AddNew(); soundInfo.SoundKey = sfc.SaveFileName; soundInfo.OriginalFileName = sfc.SaveFileName; soundInfo.FileSize = fileData.Length; sound_datum soundData = this.DataWorkspace.InterfaceSounds.sound_data.AddNew(); soundData.SoundKey = sfc.SaveFileName; soundData.SoundDataStream = fileData; sfc.DocumentStream.Close(); sfc.DocumentStream.Dispose(); } } Any idea how I can go about fixing this?Anonymous
August 08, 2013
Matt, I've used some of your code as well as Michael Washington's and Yann's to get my upload, download and save functions to work. Howver, I need to connect my "FileInformations" table to a parent table for a parent-child, 1 to many. I have a parent named Resolutions which can have many child, "FileInformations", documents attached to it. Since I created a custom screen asper your code, I'm finding it hard to save a file when it's missing the parent data on the "Save" function. How can I keep the parent-child relationship when saving and retrieving the files?Anonymous
August 12, 2013
@ABrinson - Maybe just have a dummy table called TempFileTable. Save files there. And then during the saving operation of the entity (TempFileTable_Inserting) operation, you could write some logic to grab the correct "Resolutions" table record, and then create a new "FileInformations" child table entry off of it. ANd basically "copy/cut" the TempFileTable record over to the FileInformations table. HTH - Matt SAnonymous
March 06, 2014
Hello, I get the same message as Willem: IVisualCollection<T>.AddNew() shouldn't be called from the UI Thread. What can I do? My goal is to save the file in a database.Anonymous
February 12, 2015
OK, I did the Upload file and works perfectly! Thank you!! But what about a open/download button? Gr, MariusAnonymous
March 22, 2017
Very good article. I absolutely love this site.Continue the good work!
