Configuring Microsoft Azure Online Backup on Windows Server 2012 R2 Essentials
[This post comes to us courtesy of Sabir Chandwale and Sandeep Biswas from Global Business Support]
Microsoft Azure Backup is a cloud-based backup solution that enables online backup and restore of important data to help protect against loss and corruption. This feature can be comfortably integrated to the Windows Server Essentials Dashboard.
Here are some significant features of Microsoft Azure Backup:
- Simplified setup and configuration via Windows Server Essentials Dashboard
- Incremental backup
- Data compression and encryption
- Retention policies
- Bandwidth throttling
Get started by installing add-in for Microsoft Azure Backup
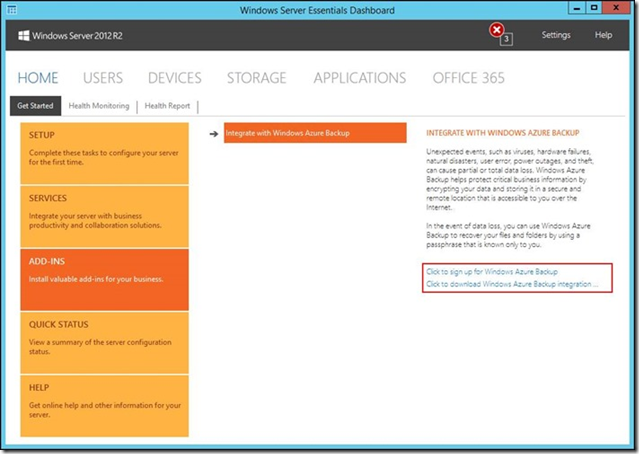
1. Open the Windows Server Essentials Dashboard. Navigate to HOME tab and then click ADD-INS under the Get Started sub-tab
2. Select Integrate with Windows Azure Backup, and then click the following links to sign up and download the Online Backup Module respectively:
- Click to sign up for Windows Azure Backup
You may opt for a free trial for a month or you may purchase the services
- Click to download Windows Azure Backup integration module
Download and save the file OnlineBackupAddin.wssx
3. Install the Online Backup integration module by running OnlineBackupAddin.wssx. Follow the wizard to complete the installation. After the installation wizard successfully completes, reopen the Dashboard
4. A new tab named AZURE BACKUP appears on the Windows Server Essentials Dashboard containing the common online backup/restore administrative tasks. It consists of the following sub-tabs:
- Azure Backup: After you register the server for online backup, this section displays the current backup status, storage status, and account information
- Protected Folders: Here you will find the list of all shared folders and File History folders on the server, and any other folders that you have selected to back up in Windows Azure
- Backup History: This section would list recent backup and restore operations
Configuring and Registering Server for Microsoft Azure backup
There are two ways in which we can configure a Windows Server Essentials to backup data on Azure:
Create a backup vault under “Recovery Service” and register the server using Windows Server Essentials Dashboard
Directly run the “Register the server backup” wizard
Note: Prior to the update for Windows Azure Recovery Agent it was mandatory to create backup vault before registering the server. After the update it is no longer required to first create a backup vault under recovery service. This can be done while registering the server.
Registering your server
1. Navigate to the AZURE BACKUP tab on the Windows Server Essentials Dashboard
2. In the Azure Backup page, click Register this server for backup under Azure Backup Task
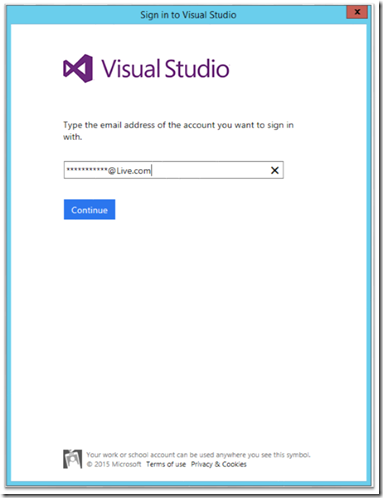
3.Click on “Sign in”
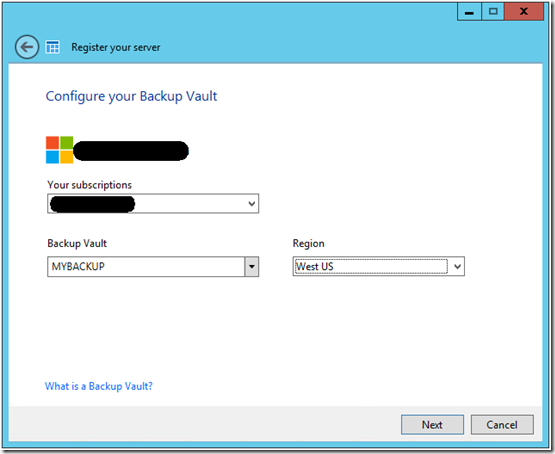
4.Once the sign in is successful we get to a page wherein we can choose to create a new backup vault or chose an existing one which has been created earlier in the Azure Portal. In addition, if we have more than one subscription being managed we can choose the subscription as well
5. Once the server has been configured with Azure Recovery Service we get the option to choose the files and folders which can be selected to be backed up
6. By default, we have the following options selected:
a. Company
b. File History Backups
c. Folder Redirection
d. Users
7. In addition to this we Add Folders which are intended to be backed up
8. We get the following result once the registering of server has been completed
This completes the configuration and you are ready to use Microsoft Azure backup.
As the backups are taken, you would start seeing the same in the Backup History page of the Azure BACKUP tab on the Windows Server Essentials Dashboard. You can see these backups on the Azure portal as well.
Comments
- Anonymous
January 01, 2003
thank you - Anonymous
January 01, 2003
Which Azure pricing model does this fall under? - Anonymous
January 01, 2003
@Boon Tee: The OnlineBackupAddin.wssx currently doesn't work with the Datacenter edition SKUs, and we are working on it. You'll soon hear from us. - Anonymous
January 01, 2003
http://www.pinterest.com/hassansayedissa/ - Anonymous
January 01, 2003
I have a HP Generation 8 server with Windows Server 2012 R2 Datacenter edition and server essentials role installed. The backup agen will not work for Azure. Any updates on when this will be fixed? - Anonymous
May 01, 2014
This does not work with the Essentials Role on WS2012R2 Datacenter edition.
The error message is "The add-in cannot be installed because it is not compatible with WIndows Server 2012 R2 Essentials." - Anonymous
May 01, 2014
I have heard that this might only be a case specific to Essentials running on Datacenter edition in Azure. I have not yet tested this with on-premises Datacenter edition. - Anonymous
May 05, 2014
same problem, not working on datacenter vm on prem. I will install on a physical enterprise machine and retest - Anonymous
May 09, 2014
227 Microsoft Team blogs searched, 64 blogs have new articles. 197 new articles found searching from - Anonymous
May 19, 2014
Pingback from How To Protect Your Home Network - iForeignAffairs - Anonymous
May 19, 2014
Pingback from How To Protect Your Home Network - iForeignAffairs - Anonymous
May 19, 2014
Pingback from How To Protect Your Home Network - iForeignAffairs - Anonymous
June 11, 2014
Produktový tým Windows Serveru Essentials začal na svém blogu vydávat sérii - Anonymous
July 23, 2014
Any update on this? - Anonymous
July 24, 2014
It would be really nice if Microsoft fixed the add-in problem - Anonymous
August 11, 2014
These are the top Microsoft Support solutions for the most common issues experienced when you use Windows - Anonymous
August 12, 2014
These are the top Microsoft Support solutions for the most common issues experienced when you use Windows - Anonymous
August 16, 2014
These are the top Microsoft Support solutions for the most common issues experienced when you use Windows - Anonymous
August 22, 2014
Yes, Microsoft should have fixed the add-in problem. Is there any one who will give me solution? - Anonymous
September 10, 2014
The comment has been removed - Anonymous
September 11, 2014
原文地址: http://blogs.technet.com/b/sbs/archive/2014/05/01/configuring-microsoft-azure-online-backup-on - Anonymous
November 14, 2014
The Azure Backup Add-in no longer looks anything like the above screenshots. Actually, it's not even called the Online Backup anymore.
But when I use the new add-in and try to register my server, the first step is to signin. For some reason it won't accept my username even though its an active Azure account.
Anyone have any similar issues? - Anonymous
May 15, 2015
These are the top Microsoft Support solutions for the most common issues experienced when you use Windows - Anonymous
January 07, 2016
http://www.happynewyear2016wishesimagessms.com/hindu-festival-2016/
http://www.happynewyear2016wishesimagessms.com/lohri-pics-lohri-sms-lohri-wallpapers/
http://www.happynewyear2016wishesimagessms.com/happy-lohri-images/
http://www.happynewyear2016wishesimagessms.com/happy-lohri-quotes/
http://www.happynewyear2016wishesimagessms.com/happy-lohri-wishes/
http://www.happynewyear2016wishesimagessms.com/happy-lohri-wallpaper/
http://www.happynewyear2016wishesimagessms.com/lohri-greetings/
http://www.happynewyear2016wishesimagessms.com/lohri-images/
http://www.happynewyear2016wishesimagessms.com/lohri-songs/
http://www.happynewyear2016wishesimagessms.com/lohri-wishes/
http://www.happynewyear2016wishesimagessms.com/lohri-festival/
http://www.happynewyear2016wishesimagessms.com/happy-lohri-bonfire-festival/
http://www.happynewyear2016wishesimagessms.com/lohri-bonfire-festival/
http://www.happynewyear2016wishesimagessms.com/lohri-the-bonfire-festival/
http://www.happynewyear2016wishesimagessms.com/up-helly-aa-event-in-scotland/
http://www.happynewyear2016wishesimagessms.com/dinagyang-festival/
http://www.happynewyear2016wishesimagessms.com/sundance-film-festival-2016/
http://www.happynewyear2016wishesimagessms.com/wwe-in-india-wwe-live-event-in-new-delhi/
http://www.happynewyear2016wishesimagessms.com/lohri-wishes-for-friends-family/
http://www.happynewyear2016wishesimagessms.com/cowboy-poetry/
http://www.happynewyear2016wishesimagessms.com/ati-atihan-festival-full-information/
http://www.happynewyear2016wishesimagessms.com/holy-ship-2016/
http://www.happynewyear2016wishesimagessms.com/things-to-do-in-banff-town-canada/
http://www.happynewyear2016wishesimagessms.com/rainbow-serpent-festival/
http://www.happynewyear2016wishesimagessms.com/sundance-film-festival-winners/
http://www.happynewyear2016wishesimagessms.com/junkanoo-parade/
http://www.happynewyear2016wishesimagessms.com/hogmanay-2016/
http://www.happynewyear2016wishesimagessms.com/ice-sculpture-snow-sculpture-festival/
http://www.happynewyear2016wishesimagessms.com/carnevale-di-venezia/
http://www.happynewyear2016wishesimagessms.com/bpm-festival-what-bpm-festival-is/
http://www.happynewyear2016wishesimagessms.com/thaipusam-thaipusam-is-a-hindu-festival/
http://www.happynewyear2016wishesimagessms.com/holy-ship-unveils-massive-lineups-for-2016-cruises/
http://www.happynewyear2016wishesimagessms.com/quebec-winter-carnival/
http://www.happynewyear2016wishesimagessms.com/jam-cruise/
http://www.happynewyear2016wishesimagessms.com/things-to-do-in-edinburgh/
http://www.happynewyear2016wishesimagessms.com/harbin-ice-festival/
http://www.happynewyear2016wishesimagessms.com/the-sundance-film-festival-a-program-of-the-sundance-institute/ - Anonymous
January 07, 2016
http://www.republicdayimagesi.com/republic-day-songs/
http://www.republicdayimagesi.com/republic-day-status-republic-day-wallpaper/
http://www.republicdayimagesi.com/republic-day-information-republic-day-photos/
http://www.republicdayimagesi.com/republic-day-pictures-republic-day-pics/
http://www.republicdayimagesi.com/republic-day-messages-republic-day-sms/
http://www.republicdayimagesi.com/republic-day-in-hindi/
http://www.republicdayimagesi.com/essay-on-republic-day/
http://www.republicdayimagesi.com/what-is-republic-day/
http://www.republicdayimagesi.com/republic-day-wishes/
http://www.republicdayimagesi.com/speech-on-republic-day-in-hindi-speech-for-republic-day/
http://www.republicdayimagesi.com/republic-day-speech-in-hindi/
http://www.republicdayimagesi.com/republic-day-image/
http://www.republicdayimagesi.com/india-republic-day/
http://www.republicdayimagesi.com/republic-day-quotes/
http://www.republicdayimagesi.com/images-of-republic-day-pics-of-republic-day/
http://www.republicdayimagesi.com/speech-on-republic-day/
http://www.republicdayimagesi.com/republic-day-2016/
http://www.republicdayimagesi.com/republic-day-india/
http://www.republicdayimagesi.com/republic-day-speech/
http://www.republicdayimagesi.com/republic-day-images/
http://www.republicdayimagesi.com/happy-republic-day/
http://www.republicdayimagesi.com/republic-day/
http://www.republicdayi.com/republic-day-songs/
http://www.republicdayi.com/republic-day-status-republic-day-wallpaper/
http://www.republicdayi.com/republic-day-information-republic-day-photos/
http://www.republicdayi.com/republic-day-pictures-republic-day-pics/
http://www.republicdayi.com/republic-day-messages-republic-day-sms/
http://www.republicdayi.com/speech-on-republic-day-in-hindi-speech-for-republic-day/
http://www.republicdayi.com/republic-day-in-hindi/
http://www.republicdayi.com/essay-on-republic-day/
http://www.republicdayi.com/what-is-republic-day/
http://www.republicdayi.com/republic-day-wishes/
http://www.republicdayi.com/republic-day-speech-in-hindi/
http://www.republicdayi.com/republic-day-image/
http://www.republicdayi.com/india-republic-day/
http://www.republicdayi.com/republic-day-quotes/
http://www.republicdayi.com/images-of-republic-day/
http://www.republicdayi.com/speech-on-republic-day/
http://www.republicdayi.com/republic-day-2016/
http://www.republicdayi.com/republic-day-india/
http://www.republicdayi.com/republic-day-speech/
http://www.republicdayi.com/republic-day-images/
http://www.republicdayi.com/happy-republic-day/
http://www.republicdayi.com/republic-day/ - Anonymous
January 07, 2016
http://www.happylohrii.com/lohri-pics-lohri-sms-lohri-wallpapers/
http://www.happylohrii.com/happy-lohri-images/
http://www.happylohrii.com/hindu-festival-2016/
http://www.happylohrii.com/happy-lohri-quotes/
http://www.happylohrii.com/happy-lohri-wishes/
http://www.happylohrii.com/happy-lohri-wallpaper/
http://www.happylohrii.com/lohri-greetings/
http://www.happylohrii.com/lohri-images/
http://www.happylohrii.com/lohri-songs/
http://www.happylohrii.com/lohri-wishes/
http://www.happylohrii.com/lohri-festival/
http://www.happylohrii.com/happy-lohri-bonfire-festival/
http://www.happylohrii.com/lohri-bonfire-festival/ - Anonymous
January 12, 2016
I was working and suddenly I visits your site frequently and recommended it to me to read also. The writing style is superior and the content is relevant. Thanks for the insight you provide the readers!
Happy wheels: http://www.happywheelsy8.com/
Happy wheels 2: http://www.happywheels-2.com/
friv: http://friv4schoolonline.net/
gamesgogirls: http://www.girlsgo2games.com/
games2girls: http://www.games2girls2.com/


