Installing and Configuring the Windows Server Essentials Experience role
My name is Mike Chen, a program manager working on the Windows Server Essentials Deployment team. I’m honored today to introduce the new deployment story for Windows Server Essentials.
Now available as a server role
Previously, we heard a lot of feedback that users want rich features in Windows Server Essentials to be available more broadly beyond the Windows Server Essentials edition. In the Windows Server 2012 R2 Essentials release, we’ve made major investments into making our deployment available as a server role. Therefore, as Jason mentioned in an earlier blog, the features in Windows Server Essentials are being released in both Windows Server 2012 R2 Essentials and as the Windows Server Essentials Experience server role in Windows Server 2012 R2.
We use a consistent architecture across the following editions: Windows Server 2012 R2 Essentials, and Windows Server 2012 R2 Standard and Datacenter. From a technical perspective, features are packaged into the Windows Server Essentials Experience role in exactly the same way. The key difference regarding the deployment is that in Windows Server 2012 R2 Essentials, the role is pre-enabled and the configuration wizard is configured to pop up automatically when a user logs on to the computer. (There are also differences around locks and limits that are not in the scope of this blog.)
Multiple options for deployment depending on your environment
As a server role, Windows Server Essentials Experience can be deployed on a workgroup box, a domain controller, or a member server in the domain. The limitations here are that Windows Server Essentials Experience can only be deployed to a single domain environment and you can’t have a read-only domain controller (RODC) in your environment.
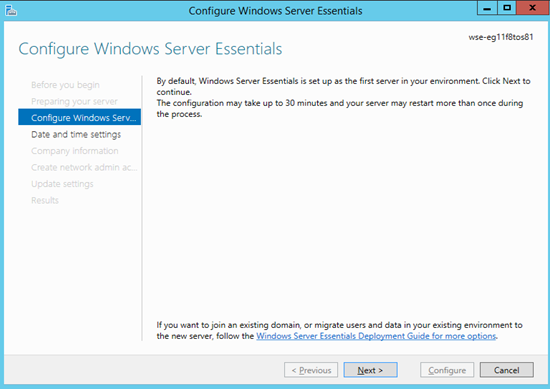
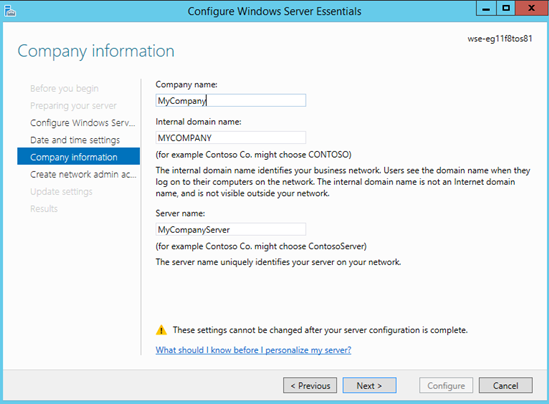
When deployed on a workgroup box, the configuration wizard will ask you for information to bring up a new Active Directory domain environment and configure other roles and features that the role depends on.
When deployed on a member server in the domain or on an existing domain controller (you need to join your existing domain by using native tools), the configuration wizard simply configures other roles and features without changing your domain environment. Therefore, for users who want to try out the experience, the best way is to deploy Windows Server Essentials on a member server in your existing IT environment, which is much less intrusive. The steps are:
- Join Windows Server 2012 R2 Standard or Datacenter to your domain.
- Enable and configure the Windows Server Essentials Experience role in Server Manager.
You may have already noticed that previous migration paths in the configuration wizard are not needed, because Windows Server Essentials can be deployed on an existing domain controller. If you want to migrate to the latest platform, just do an Active Directory replication and then configure Windows Server Essentials. For more information about migration, see Migrate from Previous Versions to Windows Server 2012 R2 Essentials.
Remote installation and Windows PowerShell
In addition to configuring Windows Server Essentials directly from the local box, you can now use Windows PowerShell cmdlets for more advanced scenarios; for example, remote configuration in the hosting environment using Windows PowerShell, or unattended installation using first logon scripts.
You can run these simple commands to perform the installation and configuration:
- Install the Windows Server Essentials Experience role by using the following command:
Add-WindowsFeature ServerEssentialsRole - To configure it, use Start-WssConfigurationService. You can get more help information about this command by using get-help start-wssconfigurationservice.
- Run the following script to configure a workgroup box:
Start-WssConfigurationService -CompanyName "ContosoTest" -DNSName "ContosoTest.com" -NetBiosName "ContosoTest" -ComputerName "YourServerName” –NewAdminCredential $cred - Run the following command to start the configuration to set up Windows Server Essentials as an existing domain member. You must be a member of the Enterprise Admin group and Domain Admin group in Active Directory to perform this task:
Start-WssConfigurationService –Credential <Your Credential>
- Run the following script to configure a workgroup box:
- Monitor the progress of the installation by using the following commands:
- To have installation status displayed on the progress bar, run:
Get-WssConfigurationStatus –ShowProgress. - To get the immediate progress without the progress bar, run:
Get-WssConfigurationStatus
- To have installation status displayed on the progress bar, run:
Deploying Windows Server Essentials on virtual machines
With the wide adoption of virtualization, we’ve heard more and more feedback that customers want to deploy their servers as virtual machines (VMs). Windows Server Essentials Experience provides a great tool that allows an end user to seamlessly set up their physical server as a VM host and bring up virtualized Windows Server Essentials as a VM guest. This tools requires that OEM and system builders do some pre-configuration on the image. The tool works for Windows Server 2012 R2 Essentials and Windows Server 2012 R2 Standard. In a future blog post, we will share more detailed steps about how to configure this.
As a system provider, you have the option to let your customer choose between a virtual deployment or a physical deployment.
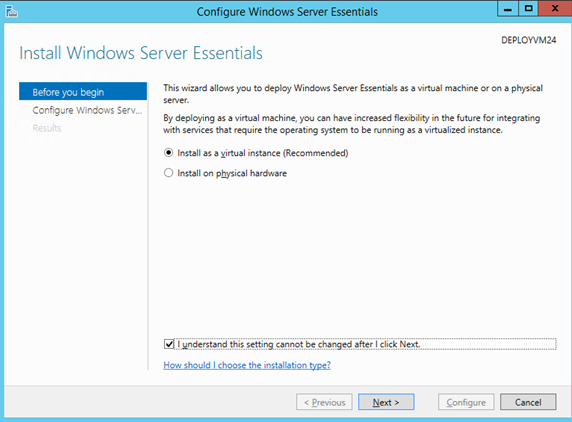
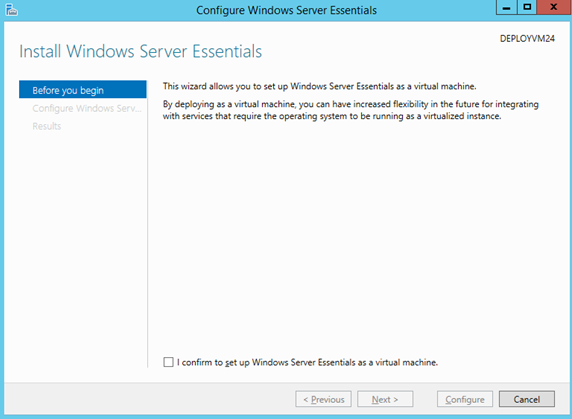
If an end user chooses a virtual deployment, Windows Server Essentials will have the Hyper-V role installed and will be able to run VMs, and the wizard will create a customized Windows Server Essentials VM based on the end user’s settings. In addition, any Windows Server roles that aren’t necessary for hosting VMs will be removed from the host to reduce the footprint on the host.
If the user chooses to do a physical deployment, the configuration wizard will install and configure the Windows Server Essentials role on the physical box.
For more information, see Install and Configure Windows Server 2012 R2 Essentials.
End user can select a virtual deployment or a physical deployment
End user is provided with a virtual deployment
Comments
Anonymous
January 01, 2003
Thanks for sharing.Anonymous
January 01, 2003
@Raghu, the product team is actively working on this issue. You will hear from us in the near future on the solution.Anonymous
January 01, 2003
Thanks for sharing.Anonymous
September 17, 2013
The comment has been removedAnonymous
September 21, 2013
can not download facebook .com serverAnonymous
November 19, 2013
The comment has been removedAnonymous
November 24, 2013
@Roland, do you mean your server is in a workgroup and you want to join a domain? If yes, you have to join a existing domain firstly. Then run "Start-WssConfigurationService -Credential".Anonymous
August 11, 2014
These are the top Microsoft Support solutions for the most common issues experienced when you use WindowsAnonymous
August 12, 2014
These are the top Microsoft Support solutions for the most common issues experienced when you use WindowsAnonymous
August 16, 2014
These are the top Microsoft Support solutions for the most common issues experienced when you use WindowsAnonymous
August 20, 2014
great jobAnonymous
February 17, 2015
"The limitations here are that Windows Server Essentials Experience can only be deployed to a single domain environment" - what exactly do they mean by single domain environment?Anonymous
May 19, 2015
I ran into a strange issue when installing Essentials on two separate W2012R2 systems. When configuring after installation, I first got the infamous 87% error, but after some serious faultfinding I realized that the mirrored drive was causing the problem. I broke the mirror and then the configuration went on smoothly. I tried then to reestablish the mirroring, but then the streaming stopped, no media files was ever shown, only the folder structure. I broke the mirror, restarted and then the streaming worked again.Anonymous
August 17, 2015
I'm having problems connecting to the internetAnonymous
December 16, 2015
Can you point me to some resources on how to assign the certificate, set up the firewall and access the feature from the client?
ThanksAnonymous
December 23, 2015
[This post comes to us courtesy of Sandeep Biswas and Rituraj Choudhary from Global Business SupportAnonymous
January 07, 2016
http://www.happynewyear2016wishesimagessms.com/hindu-festival-2016/
http://www.happynewyear2016wishesimagessms.com/lohri-pics-lohri-sms-lohri-wallpapers/
http://www.happynewyear2016wishesimagessms.com/happy-lohri-images/
http://www.happynewyear2016wishesimagessms.com/happy-lohri-quotes/
http://www.happynewyear2016wishesimagessms.com/happy-lohri-wishes/
http://www.happynewyear2016wishesimagessms.com/happy-lohri-wallpaper/
http://www.happynewyear2016wishesimagessms.com/lohri-greetings/
http://www.happynewyear2016wishesimagessms.com/lohri-images/
http://www.happynewyear2016wishesimagessms.com/lohri-songs/
http://www.happynewyear2016wishesimagessms.com/lohri-wishes/
http://www.happynewyear2016wishesimagessms.com/lohri-festival/
http://www.happynewyear2016wishesimagessms.com/happy-lohri-bonfire-festival/
http://www.happynewyear2016wishesimagessms.com/lohri-bonfire-festival/
http://www.happynewyear2016wishesimagessms.com/lohri-the-bonfire-festival/
http://www.happynewyear2016wishesimagessms.com/up-helly-aa-event-in-scotland/
http://www.happynewyear2016wishesimagessms.com/dinagyang-festival/
http://www.happynewyear2016wishesimagessms.com/sundance-film-festival-2016/
http://www.happynewyear2016wishesimagessms.com/wwe-in-india-wwe-live-event-in-new-delhi/
http://www.happynewyear2016wishesimagessms.com/lohri-wishes-for-friends-family/
http://www.happynewyear2016wishesimagessms.com/cowboy-poetry/
http://www.happynewyear2016wishesimagessms.com/ati-atihan-festival-full-information/
http://www.happynewyear2016wishesimagessms.com/holy-ship-2016/
http://www.happynewyear2016wishesimagessms.com/things-to-do-in-banff-town-canada/
http://www.happynewyear2016wishesimagessms.com/rainbow-serpent-festival/
http://www.happynewyear2016wishesimagessms.com/sundance-film-festival-winners/
http://www.happynewyear2016wishesimagessms.com/junkanoo-parade/
http://www.happynewyear2016wishesimagessms.com/hogmanay-2016/
http://www.happynewyear2016wishesimagessms.com/ice-sculpture-snow-sculpture-festival/
http://www.happynewyear2016wishesimagessms.com/carnevale-di-venezia/
http://www.happynewyear2016wishesimagessms.com/bpm-festival-what-bpm-festival-is/
http://www.happynewyear2016wishesimagessms.com/thaipusam-thaipusam-is-a-hindu-festival/
http://www.happynewyear2016wishesimagessms.com/holy-ship-unveils-massive-lineups-for-2016-cruises/
http://www.happynewyear2016wishesimagessms.com/quebec-winter-carnival/
http://www.happynewyear2016wishesimagessms.com/jam-cruise/
http://www.happynewyear2016wishesimagessms.com/things-to-do-in-edinburgh/
http://www.happynewyear2016wishesimagessms.com/harbin-ice-festival/
http://www.happynewyear2016wishesimagessms.com/the-sundance-film-festival-a-program-of-the-sundance-institute/Anonymous
January 07, 2016
http://www.republicdayimagesi.com/republic-day-songs/
http://www.republicdayimagesi.com/republic-day-status-republic-day-wallpaper/
http://www.republicdayimagesi.com/republic-day-information-republic-day-photos/
http://www.republicdayimagesi.com/republic-day-pictures-republic-day-pics/
http://www.republicdayimagesi.com/republic-day-messages-republic-day-sms/
http://www.republicdayimagesi.com/republic-day-in-hindi/
http://www.republicdayimagesi.com/essay-on-republic-day/
http://www.republicdayimagesi.com/what-is-republic-day/
http://www.republicdayimagesi.com/republic-day-wishes/
http://www.republicdayimagesi.com/speech-on-republic-day-in-hindi-speech-for-republic-day/
http://www.republicdayimagesi.com/republic-day-speech-in-hindi/
http://www.republicdayimagesi.com/republic-day-image/
http://www.republicdayimagesi.com/india-republic-day/
http://www.republicdayimagesi.com/republic-day-quotes/
http://www.republicdayimagesi.com/images-of-republic-day-pics-of-republic-day/
http://www.republicdayimagesi.com/speech-on-republic-day/
http://www.republicdayimagesi.com/republic-day-2016/
http://www.republicdayimagesi.com/republic-day-india/
http://www.republicdayimagesi.com/republic-day-speech/
http://www.republicdayimagesi.com/republic-day-images/
http://www.republicdayimagesi.com/happy-republic-day/
http://www.republicdayimagesi.com/republic-day/
http://www.republicdayi.com/republic-day-songs/
http://www.republicdayi.com/republic-day-status-republic-day-wallpaper/
http://www.republicdayi.com/republic-day-information-republic-day-photos/
http://www.republicdayi.com/republic-day-pictures-republic-day-pics/
http://www.republicdayi.com/republic-day-messages-republic-day-sms/
http://www.republicdayi.com/speech-on-republic-day-in-hindi-speech-for-republic-day/
http://www.republicdayi.com/republic-day-in-hindi/
http://www.republicdayi.com/essay-on-republic-day/
http://www.republicdayi.com/what-is-republic-day/
http://www.republicdayi.com/republic-day-wishes/
http://www.republicdayi.com/republic-day-speech-in-hindi/
http://www.republicdayi.com/republic-day-image/
http://www.republicdayi.com/india-republic-day/
http://www.republicdayi.com/republic-day-quotes/
http://www.republicdayi.com/images-of-republic-day/
http://www.republicdayi.com/speech-on-republic-day/
http://www.republicdayi.com/republic-day-2016/
http://www.republicdayi.com/republic-day-india/
http://www.republicdayi.com/republic-day-speech/
http://www.republicdayi.com/republic-day-images/
http://www.republicdayi.com/happy-republic-day/
http://www.republicdayi.com/republic-day/Anonymous
January 07, 2016
http://www.happylohrii.com/lohri-pics-lohri-sms-lohri-wallpapers/
http://www.happylohrii.com/happy-lohri-images/
http://www.happylohrii.com/hindu-festival-2016/
http://www.happylohrii.com/happy-lohri-quotes/
http://www.happylohrii.com/happy-lohri-wishes/
http://www.happylohrii.com/happy-lohri-wallpaper/
http://www.happylohrii.com/lohri-greetings/
http://www.happylohrii.com/lohri-images/
http://www.happylohrii.com/lohri-songs/
http://www.happylohrii.com/lohri-wishes/
http://www.happylohrii.com/lohri-festival/
http://www.happylohrii.com/happy-lohri-bonfire-festival/
http://www.happylohrii.com/lohri-bonfire-festival/


