Using the Azure Key Vault Key Store Provider for Always Encrypted
During the SQL PASS Summit 2015, we released a custom key store provider that enables support for column master keys stored in Azure Key Vault to Nuget.org. As you may recall, an earlier blog post discussed the process of creating a custom key store provider using Azure Key Vault as an example key store. That article remains a great source for those who wish to implement their own provider for a key store not supported directly by Microsoft. In this article, however, we will go over the streamlined process for integrating the Azure Key Vault column master key provider NuGet package into your client-side application.
Setup
Azure Key Vault
The first thing you’ll need is access to an Azure Key Vault with the correct permissions. We’ll walk you through the steps here, but for a complete view on setting this up, you can always take a look at Azure Key Vault’s Getting Started page. These instructions will use the Azure PowerShell 1.0 Preview, which can be installed by running the following commands in an Administrator-elevated PowerShell window:
Set-ExecutionPolicy RemoteSignedInstall-Module AzureRMInstall-AzureRM |
Sign in to your Azure account:
Login-AzureRmAccount |
Create a new Azure Key Vault:
New-AzureRmKeyVault -VaultName "<your vault name>" -ResourceGroupName "<your resource group>" -Location "Choose an Azure region" |
By default, when you create a new Azure Key Vault, it will have certain default vault-level permissions, however to use keys with Azure Key Vault, we’ll need to have all of create, get, sign, verify, wrapKey, and unwrapKey permissions. These permissions are required for creating a new column master key in Azure Key Vault and using it to set up encryption via SQL Server Management Studio, which we’ll go over later in this post. To grant those permissions, run the following command in the Azure PowerShell window:
|
Note: The permissions listed above are required for using the Always Encrypted wizard in SQL Server Management Studio. If you wish to use the "New Column Master Key" window (accessed via right-clicking on the "Always Encrypted Keys" folder under "Security"), you'll also need the list permission.
SQL Server/Azure SQL DB
Create a table containing some sensitive data that you wish to be encrypted. For this demo, we’ll using a similar sample schema as in a previous article on the SSMS Encryption wizard:
CREATE TABLE [dbo].[Patients]( [PatientId] [int] IDENTITY(1,1), [SSN] [char](11) NOT NULL, [FirstName] [nvarchar](50) NULL, [LastName] [nvarchar](50) NULL, [MiddleName] [nvarchar](50) NULL, [StreetAddress] [nvarchar](50) NULL, [City] [nvarchar](50) NULL, [ZipCode] [char](5) NULL, [State] [char](2) NULL, [BirthDate] [date] NOT NULL PRIMARY KEY CLUSTERED ([PatientId] ASC) ON [PRIMARY]) GO |
Configure Encryption on your Table
As detailed in earlier articles on Always Encrypted, you can use two different methods in SQL Server Management Studio 2016 CTP3 (or later) to create your column master key and column encryption key. The easiest way to do this is by using the new Always Encrypted wizard, detailed in SSMS Encryption Wizard - Enabling Always Encrypted in a Few Easy Steps.
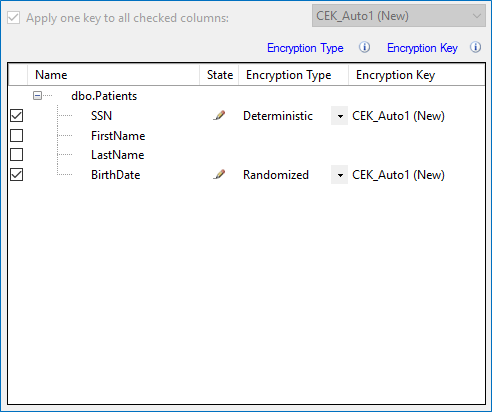
On the Column Selection step, choose Deterministic encryption for the SSN column and Randomized for BirthDate. Make sure a new generated key is selected for both columns, which will be configured in the next step.
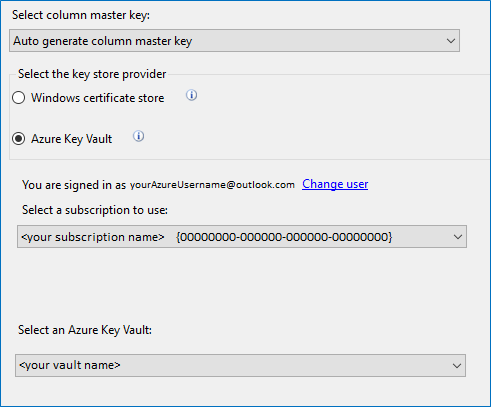
When you get to the Master Key Configuration step in the wizard, select Azure Key Vault as your key store provider, sign in with the Azure account you used to create the vault, and select it from the drop-down below.
If you right-click on your newly-generated column master key and script it, you’ll see something like the following:
CREATE COLUMN MASTER KEY [CMK_Auto1]WITH( KEY_STORE_PROVIDER_NAME = N'AZURE_KEY_VAULT', KEY_PATH = N'https://<your_vault>.vault.azure.net:443/keys/CMKAuto1/<key_identifier>')GO |
Note that the key store provider name is “AZURE_KEY_VAULT”. This string must match the one you use to register the Azure Key Vault provider with ADO.net in a later step. Don’t worry; I’ll remind you once we get there.
Development and Configuration Changes
Generate Application ID and Secret
In order to allow your client application to access and use the keys in your Azure Key Vault, we need to provision a Client ID and Secret that your app will use to authenticate. To do this, head to the Azure Portal and log in.
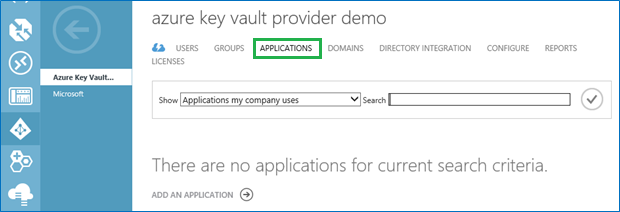
Select “Active Directory” in the left sidebar, choose the Active Directory you wish to use (or create a new one if it doesn’t exist), then click “Applications”
Add a new application by filling out the modal window that appears.
Enter a name, select “Web Application” as the type, and enter any URL for the Sign-On URL and App ID URI. These must include “https://”, but do not need to be real pages. For this example, I’m using “https://AkvProviderDemo.ms” for both.
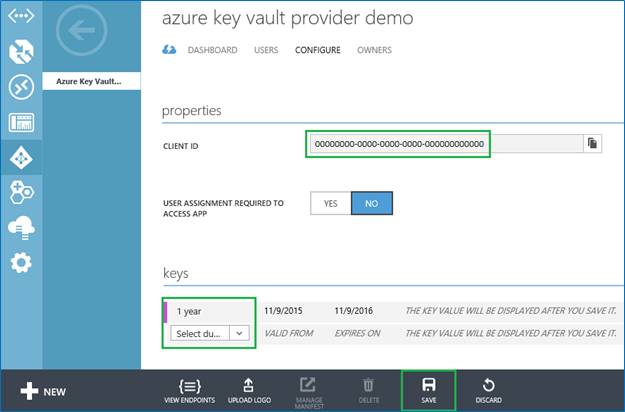
Go to the “Configure” tab and generate a new client key (also called a “secret”) by selecting a duration from the dropdown, then saving the configuration. Copy the client ID and secret out to a text file, as they’ll be used later in this blog post!
Now, grant the Client ID you just generated access to your key vault by running the following in the Azure PowerShell window:
Set-AzureRmKeyVaultAccessPolicy -VaultName "<your vault name>" -ResourceGroupName "<your resource group>" -ServicePrincipalName "<your client ID>" -PermissionsToKeys get,wrapKey,unwrapKey,sign,verify |
This set of permissions are necessary for the Azure Key Vault provider to decrypt the column encryption key and therefore enable normal functionality for the client application.
Integrate the Azure Key Vault Provider into your Application
Now, you’re ready to actually package the Azure Key Vault key store provider into your client application so you can begin to benefit from all the setup work you’ve done. To demonstrate this step, we’ll be using a simple sample application that was used in earlier articles about Always Encrypted.
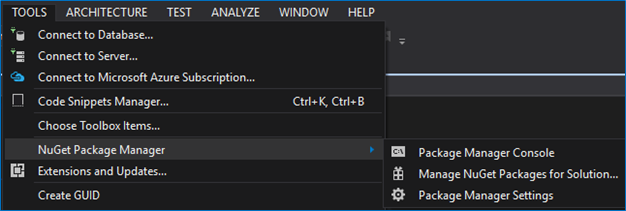
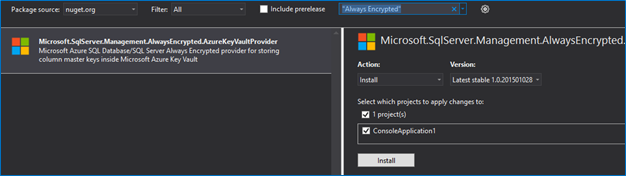
First, you’ll need to install the Microsoft.SqlServer.Management.AlwaysEncrypted.AzureKeyVaultProvider and Microsoft.IdentityModel.Clients.ActiveDirectory NuGet packages either by using the Package manager console or the NuGet Package Manager built into Visual Studio, both of which can be found under Tools -> NuGet Package Manager.
Package manager console:
Install-Package Microsoft.SqlServer.Management.AlwaysEncrypted.AzureKeyVaultProviderInstall-Package Microsoft.IdentityModel.Clients.ActiveDirectory |
Package Manager:
In order to inform the ADO.net driver that you’d like to use a key store provider that didn’t ship with .NET, you now need to register the Azure Key Vault provider with the driver. To do this, add the follow code to the startup of your application:
|
Four things to note about this method:
- It’s reading the Client ID and Client Secret (those strings you copied from the Azure Portal) from the app.config file in your project. You'll need to add the following entries in order to enable this:
<appSettings> <add key="AuthClientId" value="<your client id>" /> <add key="AuthClientSecret" value="<your client secret/key>" /></appSettings> - We constructed the ClientCredential object using the Client ID and Secret. This is just one (perhaps the most straightforward) method to create the ClientCredential, although username and password and two-factor authentication methods can also be used. It’s all up to you!
- Remember when I mentioned the "AZURE_KEY_VAULT" key store provider name? To make it easy to use the default name, it’s hardcoded into SqlColumnEncryptionKeyStoreProvider as a static property. When you register a provider with ADO.net, it knows which one to use for which column master keys by this string, so be careful if you decide to change the defaults!
- The constructor for SqlColumnEncryptionAzureKeyVaultProvider takes a delegate as an argument. This function is the one that will provide an access token for your vault to the driver anytime an Azure Key Vault operation is required.
|
At this point, you may be wondering why none of these steps were necessary for the case where column master keys are protected in the Windows certificate store. .NET 4.6 ships with the SqlColumnEncryptionCertificateStoreProvider class, which contains all the logic necessary for accessing the certificate store of the machine where that code is running. Providers that are included in .NET are pre-registered with the ADO.NET driver, saving you the effort of doing so yourself.
When you use a certificate as the column master key, the execution context of the application is used to access the certificate installed in either the Local Machine or that context's Current User certificate store. Because authorization is handled at a lower level than the application, there’s no need for you to implement an authentication delegate or add credentials to app.config.
One thing that remains the same between the Windows certificate store and Azure Key Vault providers is that your connection string still needs to contain “Column Encryption Setting = Enabled” in order for your client application to know to try to transparently handle encryption.
Conclusion
And that’s it! Once you have the Client IDs and Secrets provisioned, integrating Azure Key Vault into your existing client-side application is as easy as installing some NuGet packages, adding a couple entries to your app.config, and pasting in 20 lines of code.
Check out the downloadable sample Visual Studio project to experiment further with the Always Encrypted capabilities, like transparently encrypting new entries, reading existing rows, and querying your table via equality WHERE clauses.
Have questions or feedback? Please, let us know in the comments!
AzureKeyVaultProviderClientSample.zip
Comments
Anonymous
November 13, 2015
The comment has been removedAnonymous
November 13, 2015
@Justin - It’d be awesome if you could tell me more about how you encountered the message. Did you see it when using SSMS or in client application C# code? What steps did you do to produce it?Anonymous
November 18, 2015
@Benjin Dubishar Sorry for taking this long to get back to you and double sorry for providing a criminally minimal amount of information in my original post. I followed the guide to encrypt my columns and place the master key in Azure Key Vault. Then I restarted SMSS and added this parameter to my connection options: "Column Encryption Setting = Enabled". Then I tried to query the table that had the encrypted columns, but the error in my original post was displayed. It seems that the AZURE_KEY_VAULT provider is not registered with SMSS 2016 CTP3 and thus I am unable to decrypt the data. For what it's worth, I have had success decrypting the data through my own application C# code using the Azure Key Vault Provider libs in NuGet.Anonymous
November 19, 2015
@Justin No worries; thanks for getting back to me with more details! The behavior you describe is a bug in CTP 3.0 and SSMS October update. The issue, as you surmised, is that the Azure Key Vault provider is not registered if you open the Query Editor window opening the Always Encrypted wizard first. We’ve already fixed this for the next update of SSMS! In the meantime, the workaround is to open the Always Encrypted wizard (you can close it/cancel immediately after opening) which will cause the Azure Key Vault provider to get registered. This bug manifests itself only through this specific case (using the Query Editor before the wizard), and won’t at all impact your ability to use the Always Encrypted wizard or use the Azure Key Vault provider with any of your client applications.Anonymous
November 29, 2015
The comment has been removedAnonymous
December 02, 2015
@Satya Currently, SQL Server and SSMS 2016 are in preview, and we do not yet support Azure Key Vault column master keys for Always Encrypted in the Import/Export wizard. Could you tell me more about your scenario? It’s possible that this workaround may help you to proceed:
- Export your current data as a bacpac.
- Create the new table(s) with the desired encrypted schema, but use a column master key in the Windows Certificate Store instead of Azure Key Vault.
- Use the Import/Export wizard to import your data.
- Create a new column master key for Azure Key Vault.
- “Rotate” from the certificate-backed master key to the Azure Key Vault-backed one by right-clicking on the original master key and selecting “Rotate”.
- Click-click on the original master key and select “Clean Up” If your scenario looks more like Justin’s above (using DacFx or the Always Encrypted wizard), you can find the fix in the November update for SSMS!
- Anonymous
December 02, 2015
The comment has been removed - Anonymous
June 04, 2016
Hi,How about the node.js implementation for column encrypted + Azure Vault HSM? - Anonymous
June 20, 2016
Does that mean anyone who can access the app.config file, got the AuthClientId and AuthClientSecret values, would be able to get the Master Key? Is there any way to prevent other people/programs to access the Azure Key Vault, or at least log these abnormal login in the access log of the Azure Key Vault? - Anonymous
October 11, 2016
Working from https://blogs.msdn.microsoft.com/sqlsecurity/2016/07/05/developing-databases-using-always-encrypted-with-sql-server-data-tools/How do I get the Encryptedalue parameter value to call New-SqlColumnEncryptionKeyhttps://technet.microsoft.com/en-us/library/mt759808.aspxfrom the Azure KeyVault? - Anonymous
January 08, 2017
Hi,How to do this encryption using Entity framework code first approach.Thanks,KoteswaraRao.N- Anonymous
January 09, 2017
Please take a look at the following blog article, for information on how Always Encrypted works with code-first approach: https://blogs.msdn.microsoft.com/sqlsecurity/2015/08/27/using-always-encrypted-with-entity-framework-6/.
- Anonymous
- Anonymous
November 18, 2017
"although username and password and two-factor authentication methods can also be used"Can you provide an example that uses username and password, please?