Using System Center Update Publisher 2007 with Verisign Certificates
Using System Center Update Publisher with Verisign Certificates
The System Center Update Publisher (SCUP) allows for third party or custom updates to be published in the WSUS catalog for consumption by ConfigMgr or other systems that use WSUS as a back end. Configuring SCUP to work with WSUS requires the use of certificates to ‘sign’ the updates as they are entered into the catalog. Using certificates is not difficult but does require configuration both on the servers hosting SCUP and WSUS and the target systems that will consume these updates. The default choice is to configure SCUP to use the WSUS self-signed certificate. In some cases, however, corporate policy may require the use another certificate source, such as a certificate generated by a 3rd party. This document will walk through the process of configuring SCUP to work with a certificate provided by Verisign including required configuration on the client side. Though the processes described here are useful in general, the specific focus will be on Verisign generated certificates.
Configure SCUP
The first step is to generate a certificate that is usable by SCUP. When a certificate is received from Verisign it likely will consist of two files; one with a pvk extension and one with a spc extension. A certificate in this form is not usable by SCUP until it is converted to a single file with a pfx extension. There are several tools that can be used to perform the needed conversion. The one used here is PVKIMPRT.EXE which is available here.
With the tool installed, simply execute the command line as shown – this will convert the supplied files to a single pfx file and import it to the local certificates store in one operation.

Executing this command line will launch a window asking for the password associated with the certificate being converted. Supply the password and select OK.

From here, the certificate import wizard will launch

Click next and select whether to allow the tool to choose the store where the certificate will be located. Either option selected here will result in the certificate being imported to the certificate stores associated with the logged on user. Allowing the tool to automatically select the store will result in the certificate being placed in the users personal store or the specific store can be selected if desired. Keeping with defaults, configure the tool to automatically choose the store and click next.

Review the action about to take place and click finish.

A few seconds after clicking finish a window should appear indicating that the import was successful. At this point, ensure SCUP is installed. If it isn’t, take a break and install it. Once installed, launch the certificates MMC on the system where the PVKIMPRT.EXE tool was run and where SCUP is installed. Open both the user and computer store on the local system. Navigate to Certificates – Current User > Personal > Certificates and the certificate just imported will available. There may be other certificates listed here as well.

The certificate isn’t useful in the personal store and it also needs to be imported into SCUP. Right-click on the certificate and export it.

Select YES, to export the private key and click next.

Choose the defaults on the Export File Format screen and click next

Supply a password for the exported file and click next

Choose a filename for the certificate export and click next

Review the summary pane and click Finish

After selecting finish a window indicating the export was successful should appear. With the certificate exported it’s time to import it to SCUP. Open the SCUP console, right click on any section of the main node and select settings.

In the signing certificate section, select browse and locate the pfx file just exported. Select it and then select create in the SCUP console. A prompt will be presented to supply the password associated with the certificate. Enter it and select OK. If all goes well a popup indicating the new certificate was created will be seen and the certificate issuer will reflect the provider of the certificate just imported.

To verify all is configured appropriately, open the certificates MMC and navigate to Certificates (Local Computer) > WSUS > Certificates and the new signing certificate should be listed

Right-click and open the certificate, select the certification path screen. This lists all of the certificates that have to be in place in order for the certificate to be valid.

Make sure all of the certificates in the listed chain are in place. From the screenshot above most likely the middle certificate will be in the intermediate store as shown.

The top level certificate should be in the Trusted Root store as shown.

Note that the name of the certificate in the Trusted Root store doesn’t match exactly the name
shown on the certificate chain when looking at the imported cert. Be sure the check the friendly
names for a match as shown to confirm the certificate selected is the correct one. Also note that multiple similarly named certificates may be listed. Always check certificate properties to be sure the right one is present and is not expired.

At this point it’s a good idea to stop and verify that SCUP is configured to use the right certificate. Open the UpdatesPublisher.log and an entry similar to the following will be seen if the certificate was imported properly into the tool

There is one more step to do before updates can be signed with this new certificate. So far the certificate has been imported as a signing certificate and the certificate trust chain verified to continuity. To use the certificate for signing it also has to be imported into the trusted publishers store. Right-click the certificate from the WSUS store and select to export.

Click next and on the export private key window, select NO – do not export the private key

Select the DER encoded option and click next.

Specify a filename for the expored certificate and click next.

From here, navigate to the trusted publishers store and import the certificate that was just exported. If successful, the certificate store will appear similar to the following. Note again that this certificate should NOT have had the private key exported in the previous step.

At this point, the SCUP tool is ready to publish updates to WSUS. Once updates are configured, select to publish, complete the wizard and the publication should be successful. When publishing it’s a good idea to select the prompt for re-signing updates while publishing option on the advanced tab of the settings menu. Sucessful publishing can be confirmed in the UpdatesPublisher log.

Configuring Clients
Certificates are now in place, updates are published but, to this point, configuration on the client side has not been discussed. There are two configurations that need to be put in place on each client; the certificate needs to be imported as a trusted publisher in the clients local computer certificate store and local policy needs to be configured to allow updates to be applied from an intranet updates server. Both of these items are straight forward. On a client system, open the certificates MMC. Import the exportednokey.cer file created earlier into the trusted publisher store as shown

On Windows 2008 systems this import will also cause the intermediate certificate in the trust chain shown above to be imported to the intermediate store. On Windows 2003 systems, both certificates will import to the trusted publisher store. Make sure the intermediate certificate is located in the correct store and verify the certificate chain as shown previously.
Once the certificate is imported adjustments need to be made to local policy to allow updates from a intranet updates server to be accepted. Open the local policy MMC and enable the option to allow signed updates from an intranet update server as shown

The required client side configurations are made manually here but automation options exist and vary depending on the target operating system being configured. Choices include delivering the required certificates via policy, script, ConfigMgr package, manually, etc.
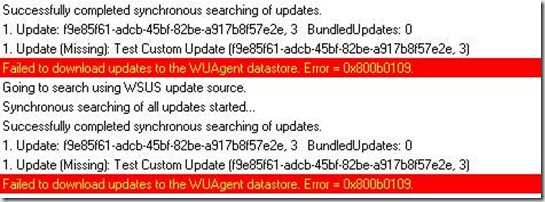
Once clients are configured, updates are ready to be distributed to the target systems. If a setting is configured incorrectly, review the windowsupdate.log or the WUAHandler.log for clues as to the problem. An excerpt from the WUAHandler log is below that shows an error during processing

The error code displayed can be interpreted by the error lookup function of SMSTrace. This specific error indicates the certificate chain cannot be validated. Note that this error can be misleading. If the certificates are properly configured but the local policy settings haven’t been configured to allow updates from the local WSUS server, this error will result as well.
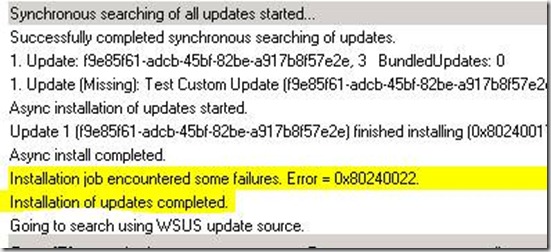
A successful log entry will appear similar to the following

The error code noted above is due to an invalid update used in testing and, in this case, is meaningless.
Comments
- Anonymous
May 15, 2013
Wonderful guide !!! Thanks