FIM 2010: Kerberos Authentication Setup
The goal of this article is to provide some background information regarding the Kerberos related configuration steps of the FIM Portal and FIM Service. The article has been written in such a way so that most of the points can in fact be used for any application requiring Kerberos. This article will not discuss the various possible FIM Topologies. All information should be valid regardless whether all roles are combined on a single server or split across multiple servers.
Throughout the article a demo domain will be used. The domain which will be referenced as an example is contoso.com (NetBIOS name: CONTOSO).
1. Identify Services
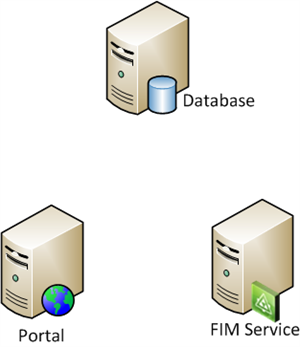
Before we can start configuring SPN's (Service Principal Names) we have to determine what services we want to enable for Kerberos authentication. A typical FIM Portal deployment has the following services:
- Database for the FIM Service (SQL Service)
- FIM Service
- FIM Portal (Windows Sharepoint Services (WSS))
Note
In the above overview we're leaving the FIM Synchronization Service and the databases for the WSS aside. They don't bring any added value to this article.
The following picture provides an overview of these services.

2. Identify Service Identities
Kerberos is all about authenticating principals to a service. Each principal is represented by an account in AD. This can either be a computer or a user account. Before Kerberos can take place, each service should be represented by an account in AD. Again this can either be a computer or a user account. Therefore it's important to determine which account represents a given service.
Note
A typical Windows Service has its identity configured in the Services MMC. A website however has its identity configured in the IIS Management Console (below the Application Pools section)
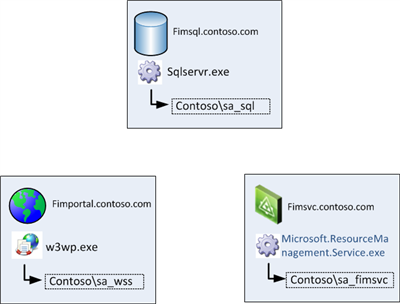
The list below provides an overview of our services and their associated identities.
- Database for the FIM Service: the user account running the sqlservr.exe process of the SQL Instance hosting that database
- FIM Service: the user account running the FIM Service service
- FIM Portal: Application Pool identity in IIS for the FIM Portal site
This information is displayed in the following picture.

3. Name Services
Besides the principal representing a service, we also need to determine a name to access the service. Choosing names can be rather important when actual people are involved. Check the following examples:
- The FIM Service is configured to access its database on SPRDL2FIMSQL01B.contoso.com
- Users visit the FIM Portal by browsing to SPRDL3FIMPOR01.contoso.com
The first one is in fact not a problem at all. Nobody will mind that a name, for which IT probably has an explanation, is configured for a service to use. In the second example your users will by no means be able to remember the URL. Something like fimportal.contoso.com is way more feasible.
Note
Choose your service names carefully and always keep in mind whether end-users will use them.

In the picture above several client-server communication arrows have been pictured. In our example we will go with the following names to access the services:
- Database for the FIM Service: fimsql.contoso.com
- FIM Service: fimsvc.contoso.com
- FIM Portal: fimportal.contoso.com
Note
There's nothing wrong with choosing the actual server name of the SQL server to associate with your SQL service.
4. Configure DNS
Clients have to be able to resolve the names for these services. We can register these records in DNS. It might seem convenient to use an alias (CNAME) record for some of the services. However this is a bad idea as explained in the following paragraph. Using a CNAME record would ensure that updating the server its IP has no influence on the service name record. However CNAME records resolve in another way than A records. A client requesting a Kerberos ticket for a given service will ask AD a ticket for whatever the name resolves to.
This is how a client will resolve those names:
- fimsvc.contoso.com (CNAME) -> server01.contoso.com -> IP_of_FIM_Server
- fimsvc.contoso.com (A) -> IP_of_FIM_Server
In bold the names are shown for which a Kerberos authentication attempt will be performed. In the first example you can clearly see that our client will request a Kerberos ticket for the wrong service as our service is coupled to fimsvc.contoso.com. So things will go wrong. For more information check Kerberos Basic Troubleshooting: Tip 3: SPNS and CNAME Records.
Note
Register A records to ensure the correct service name is used in the Kerberos authentication attempt
5. Configure Service Principal Names (SPN's)
So we got a name and an identity for our service. How do we tell AD that these belong together? Ahah! Now we get to the Service Principal Names (SPN's). Whenever someone wants to use Kerberos to authenticate to a given service, they contact the Key Distribution Centre (KDC) and ask for a service ticket. The KDC is running on each domain controller. It knows which ticket to hand out because the client specified the service it wants a ticket for. The service was in fact specified by its name. More particularly by using the Service Principal Name (SPN).
An SPN is based upon the following format <service>/<fqdn>:<port>
In our example we will execute the following commands:
-
- Setspn -S MSSQLsvc/fimsql.contoso.com:1433 sa_sqlsvc
- Setspn -S MSSQLsvc/fimsql:1433 sa_sqlsvc
- Setspn -S FIMService/fimsvc.contoso.com sa_fimsvc
- Setspn -S FIMService/fimsvc sa_fimsvc
- Setspn -S HTTP/fimportal.contoso.com sa_wss
Setspn -S HTTP/fimportal sa_wss
Note
Never register a given service (<service>/<fqdn>:<port>) on multiple accounts. Whenever multiple accounts are responsible for the same service, AD cannot determine which account to use to hand out the Kerberos service ticket. As such Kerberos authentication breaks. This issue is called Duplicate SPNs. You can do a quick check in your domain for duplicate SPN's by executing Setspn -X.
Note
Always register both short and long (domain fqdn) for a service. This will ensure Kerberos is available at all times
Note
SQL always requires an SPN of the format MSSQLsvc/<fqdn>:<port>, even when using the default (1433) port. If your port is dynamic you have to configure it to be static or give the SQL Server service account permissions to update its own SPN's.
Note
A lot of guides will tell you to use Setspn -A instead of setspn -S. The advantage of using the -S option is that it will check the domain prior to adding the SPN. This will avoid setting duplicate SPNs.
6. Configure IIS for Kerberos
When the above steps have been implemented, both the FIM Service and SQL will start accepting Kerberos. However IIS is slightly different. In fact skipping this particular step will often break your configuration all together. One of the symptoms when having a bad Kerberos implementation is the following: you type the URL of your website, you get presented with an authentication prompt, and no matter how many times you correctly enter your credentials, you keep getting prompted over and over again.
This issue occurs because by default IIS uses the account of the server to validate service tickets instead of the Application Pool identity. We can force IIS to use the identity of the application pool by configuring this in the applicationHost.config configuration file.
Note
The applicationHost.config is typically located in c:\windows\system32\inetsrv\config\ Remember to take a backup when modifying this file.
The following steps are required to configure Kerberos Authentication to work with a custom Application Pool Identity.
Launch an elevated command prompt and execute the following commands:
- cd c:\Windows\System32\inetsrv\config
- copy applicationHost.config applicationHost.config.dateOfToday.bak
- notepad applicationHost.config
Search for windowsAuthentication enabled="true" if you are below:
<``location path``=``"SharePoint - 80"``>
The above might actually be different in your environment. You need to locate the path of the IIS site which represent your FIM Portal WSS site.
Add useAppPoolCredentials="true" so the line looks like: <``windowsAuthentication`` ``enabled``=``"true"`` ``useAppPoolCredentials``=``"true"``>
Save the file and exit notepad
Execute the following command: iisreset
7. Identify Delegation Requirements
Now that we got Kerberos authentication working for all of the involved services we have to determine whether additional configuration is required. Sometimes it's obvious that Kerberos delegation has to be configured, sometimes it's less obvious. Either way, it's advised to check the product specific documentation to be sure. Kerberos delegation will allow a service to impersonate a visiting user and authenticate to another service as if it were the user himself who visits that service.
From the FIM Installation Guide we know that the following delegation scenarios are required:
- FIM Portal to FIM Service
- FIM Service to FIM Service
This is explained in the "Establish SPNs for FIM 2010" section of the installation guide.

8. Configure Delegation
To allow a given service to delegate to an other service, we have to configure delegation on the service its service account to the delegated service its SPN. Delegation can be configured using Active Directory Users & Computers (ADUC). As explained in the previous section we have to configure the following delegation scenario's:
For the Portal to be able to delegate to the FIM Service we would have to:
- Open ADUC and locate the service account for the Portal (sa_wss)
- Open the properties of sa_wss and choose the delegation tab
- Check Trust this user for delegation to the specified services only
- Check Use Kerberos only
- Click Add...
- Click users or Computers...
- Type the name of your FIM Service service account: sa_fimsvc
- Click Check Names and Click Ok
- Select the FIMService entry and Click Ok
- Click Ok to close the account properties
Some screenshots to aid in the process: FIMService selection screen.

And the resulting Delegation tab for the sa_wss account:

For the FIM Service to be able to delegate to the FIM Service we would have to:
- Open ADUC and locate the service account for the FIM Service (sa_fimsvc)
- Open the properties of sa_fimsvc and choose the delegation tab
- Check Trust this user for delegation to the specified services only
- Check Use Kerberos only
- Click Add...
- Click users or Computers...
- Type the name of your FIM Service service account: sa_fimsvc
- Click Check Names and Click Ok
- Select the FIMService entry and Click Ok
- Click Ok to close the account properties
Note
The delegation tab on a user is only visible when an SPN has been registered for that account.
The above procedure assumes your domain is in 2003 DFL or higher. Windows 2000 DFL only has unconstrained delegation available.
9. Enforce Kerberos (FIM Specific)
Optionally you can configure the FIM Portal to only accept Kerberos. This is explained in the FIM Installation Guide > Installing The FIM 2010 Server Components > Activating The Kerberos Protocol Only (link)
The following steps are required to force Kerberos Authentication for the FIM Portal.
Launch an elevated command prompt and execute the following commands:
- cd c:\inetpub\wwwroot\wss\VirtualDirectories\80
- copy web.config web.config.dateOfToday.bak
- notepad web.config
The above might actually be different in your environment. You need to locate the path of the IIS site which represent your FIM Portal WSS site.
Locate the element <``resourceManagementClient`` ``. . . />
Add requireKerberos="true" so that it reads <``resourceManagementClient`` ``requireKerberos``=``"true"`` ``. . . />
Save the file and exit notepad
Execute the following command: iisreset
Related FIM Forum Posts
See also
- SPN's en CNAME records
- Paul Williams: How to setup a load balanced FIM Portal and service deployment
Note
To provide feedback about this article, create a post on the FIM TechNet Forum.