ASP.NET Identity を空または既存の Web フォーム プロジェクトに追加する
このチュートリアルでは、ASP.NET Identity (ASP.NET の新しいメンバーシップ システム) を ASP.NET アプリケーションに追加する方法を示します。
Visual Studio 2017 RTM で新しい Web Forms または MVC プロジェクトを個別のアカウントで作成する場合、Visual Studio によって、必要なすべてのパッケージがインストールされ、必要なすべてのクラスが追加されます。 このチュートリアルでは、既存の Web Forms プロジェクトまたは新しい空のプロジェクトに ASP.NET Identity サポートを追加する手順について説明します。 インストールする必要があるすべての NuGet パッケージと、追加する必要があるクラスについて概要を説明します。 ユーザー管理と認証の主なエントリ ポイント API をすべて取り上げながら、新しいユーザーを登録してログインするためのサンプル Web Forms について説明します。 このサンプルでは、Entity Framework 上に構築された SQL データ ストレージ用に ASP.NET Identity の既定の実装を使用します。 このチュートリアルでは、SQL データベースに LocalDB を使用します。
ASP.NET Identity の概要
まず、Visual Studio 2017 をインストールして実行します。
[スタート] ページで [新しいプロジェクト] を選択するか、メニューを使用して [ファイル] を選択してから [新しいプロジェクト] を選択できます。
左側のウィンドウで [Visual C#] を展開し、[Web] を選択してから、[ASP.NET Web アプリケーション (.Net Framework)] を選択します。 プロジェクトに "WebFormsIdentity" という名前を付け、[OK] を選択します。

[新しい ASP.NET プロジェクト] ダイアログで、[空] テンプレートを選択します。
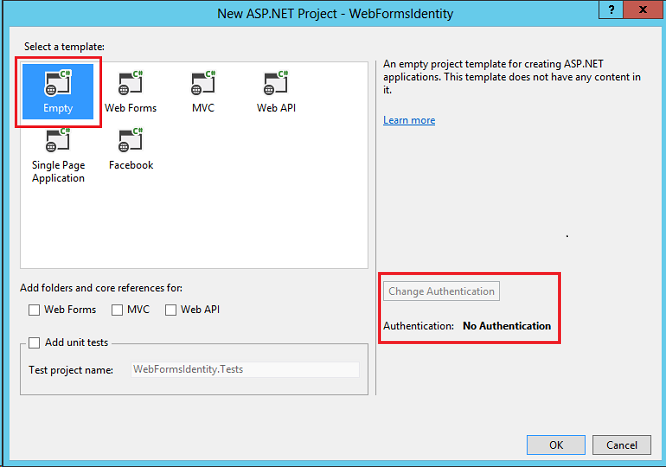
[認証の変更] ボタンが無効になっており、このテンプレートでは認証サポートが提供されていないことに注意してください。 Web Forms、MVC、Web API テンプレートを使用すると、認証方法を選択できます。
アプリに Identity パッケージを追加する
ソリューション エクスプローラーで、プロジェクトを右クリックし、[NuGet パッケージの管理] を選択します。 Microsoft.AspNet.Identity.EntityFramework パッケージを検索してインストールします。

このパッケージでは、EntityFramework と Microsoft ASP.NET Identity Core という依存関係パッケージがインストールされることに注目してください。
ユーザーを登録する Web フォームを追加する
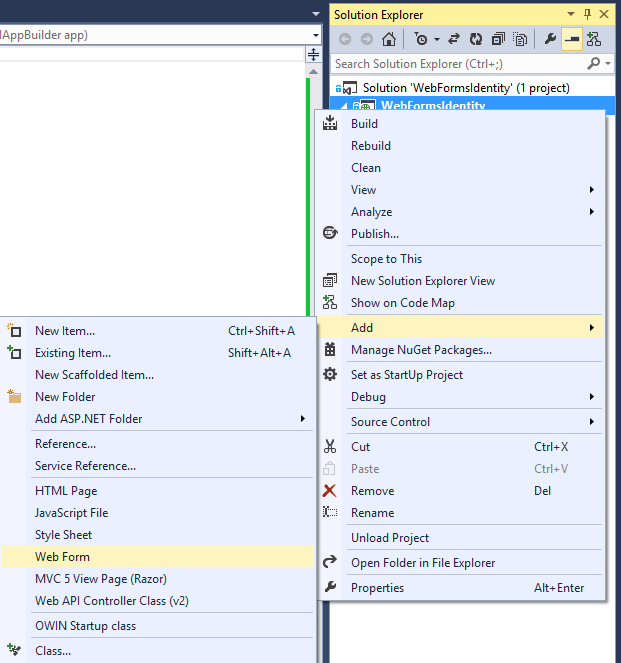
ソリューション エクスプローラーで、プロジェクトを右クリックし、[追加]、[Web フォーム] を選択します。

[項目の名前を指定] ダイアログ ボックスで、新しい Web フォームに Register という名前を付け、[OK] を選択します
生成された Register.aspx ファイル内のマークアップを次のコードに置き換えます。 コードの変更が強調表示されています。
<%@ Page Language="C#" AutoEventWireup="true" CodeBehind="Register.aspx.cs" Inherits="WebFormsIdentity.Register" %>

<!DOCTYPE html>

<html xmlns="http://www.w3.org/1999/xhtml">
<head runat="server">
    <title></title>
</head>
<body style="font-family: Arial, Helvetica, sans-serif; font-size: small">
    <form id="form1" runat="server">
    <div>
        <h4 style="font-size: medium">Register a new user</h4>
        <hr />
        <p>
            <asp:Literal runat="server" ID="StatusMessage" />
        </p>
        <div style="margin-bottom:10px">
            <asp:Label runat="server" AssociatedControlID="UserName">User name</asp:Label>
            <div>
                <asp:TextBox runat="server" ID="UserName" />
            </div>
        </div>
        <div style="margin-bottom:10px">
            <asp:Label runat="server" AssociatedControlID="Password">Password</asp:Label>
            <div>
                <asp:TextBox runat="server" ID="Password" TextMode="Password" />
            </div>
        </div>
        <div style="margin-bottom:10px">
            <asp:Label runat="server" AssociatedControlID="ConfirmPassword">Confirm password</asp:Label>
            <div>
                <asp:TextBox runat="server" ID="ConfirmPassword" TextMode="Password" />
            </div>
        </div>
        <div>
            <div>
                <asp:Button runat="server" OnClick="CreateUser_Click" Text="Register" />
            </div>
        </div>
    </div>
    </form>
</body>
</html>
Note
これは、新しい ASP.NET Web Forms プロジェクトを作成するときに作成される Register.aspx ファイルの簡略化されたバージョンです。 上記のマークアップは、フォーム フィールドと、新しいユーザーを登録するためのボタンを追加します。
Register.aspx.cs ファイルを開き、ファイルの内容を次のコードに置き換えます。
using Microsoft.AspNet.Identity;
using Microsoft.AspNet.Identity.EntityFramework;
using System;
using System.Linq;

namespace WebFormsIdentity
{
   public partial class Register : System.Web.UI.Page
   {
      protected void CreateUser_Click(object sender, EventArgs e)
      {
         // Default UserStore constructor uses the default connection string named: DefaultConnection
         var userStore = new UserStore<IdentityUser>();
         var manager = new UserManager<IdentityUser>(userStore);

         var user = new IdentityUser() { UserName = UserName.Text };
         IdentityResult result = manager.Create(user, Password.Text);

         if (result.Succeeded)
         {
            StatusMessage.Text = string.Format("User {0} was created successfully!", user.UserName);
         }
         else
         {
            StatusMessage.Text = result.Errors.FirstOrDefault();
         }
      }
   }
}
Note
- 上記のコードは、新しい ASP.NET Web Forms プロジェクトを作成するときに作成される Register.aspx.cs ファイルの簡略化されたバージョンです。
- IdentityUser クラスは、IUser インターフェイスの既定の EntityFramework 実装です。 IUser インターフェイスは、ASP.NET Identity Core 上のユーザーの最小インターフェイスです。
- UserStore クラスは、ユーザー ストアの既定の EntityFramework 実装です。 このクラスは、ASP.NET Identity Core の最小限のインターフェイス (IUserStore、IUserLoginStore、IUserClaimStore、IUserRoleStore) を実装します。
- UserManager クラスは、自動的に UserStore に変更を保存するユーザー関連 API を公開します。
- IdentityResult クラスは、ID 操作の結果を表します。
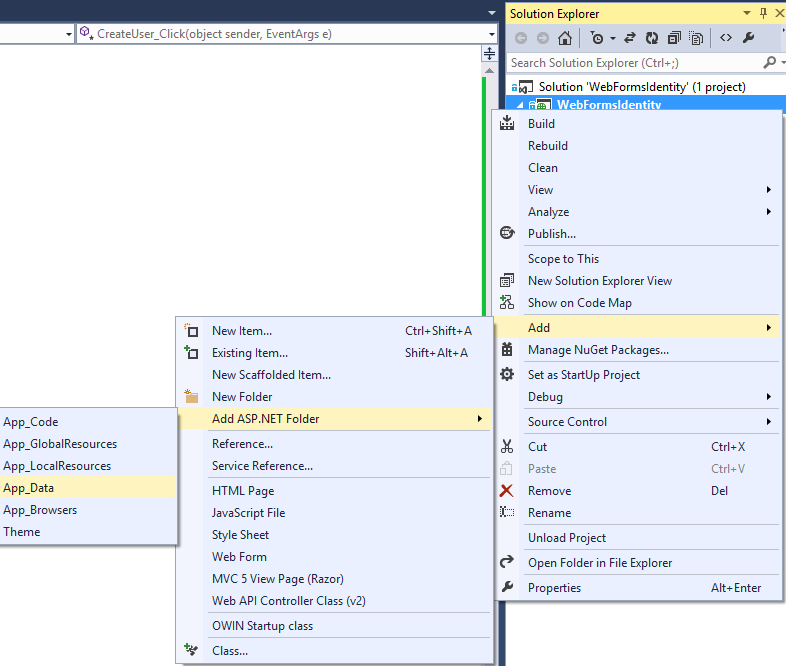
ソリューション エクスプローラーでプロジェクトを右クリックし、[追加]、[ASP.NET フォルダーの追加]、[App_Data] の順に選択します。
Web.config ファイルを開き、ユーザー情報の格納に使用するデータベースの接続文字列エントリを追加します。 データベースは、Identity エンティティ用に EntityFramework によって実行時に作成されます。 接続文字列は、新しい Web Forms プロジェクトの作成時に作成されるものに似ています。 強調表示されているコードは、追加する必要があるマークアップを示しています。
<?xml version="1.0" encoding="utf-8"?>
<!--
  For more information on how to configure your ASP.NET application, please visit
  https://go.microsoft.com/fwlink/?LinkId=169433
  -->
<configuration>
  <configSections>
    <!-- For more information on Entity Framework configuration, visit https://go.microsoft.com/fwlink/?LinkID=237468 -->
    <section name="entityFramework" type="System.Data.Entity.Internal.ConfigFile.EntityFrameworkSection, EntityFramework, Version=6.0.0.0, Culture=neutral, PublicKeyToken=b77a5c561934e089" requirePermission="false" />
  </configSections>
   <connectionStrings>
      <add name="DefaultConnection" connectionString="Data Source=(LocalDb)\v11.0;AttachDbFilename=|DataDirectory|\WebFormsIdentity.mdf;Initial Catalog=WebFormsIdentity;Integrated Security=True"
            providerName="System.Data.SqlClient" />
   </connectionStrings>
  <system.web>
    <compilation debug="true" targetFramework="4.5" />
    <httpRuntime targetFramework="4.5" />
  </system.web>
  <entityFramework>
    <defaultConnectionFactory type="System.Data.Entity.Infrastructure.LocalDbConnectionFactory, EntityFramework">
      <parameters>
        <parameter value="v11.0" />
      </parameters>
    </defaultConnectionFactory>
    <providers>
      <provider invariantName="System.Data.SqlClient" type="System.Data.Entity.SqlServer.SqlProviderServices, EntityFramework.SqlServer" />
    </providers>
  </entityFramework>
</configuration>
Note
Visual Studio 2015 以降の場合、接続文字列で
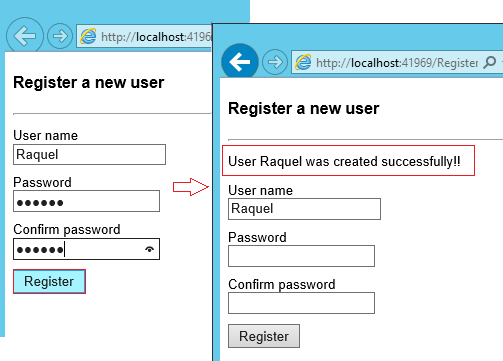
(localdb)\v11.0を(localdb)\MSSQLLocalDBに置き換えてください。プロジェクト内のファイル Register.aspx を右クリックし、[スタート ページとして設定] を選択します。 Ctrl + F5 キーを押して Web アプリケーションをビルドし、実行します。 新しいユーザー名とパスワードを入力し、[登録] を選択します。
Note
ASP.NET Identity では検証がサポートされています。このサンプルでは、Identity Core パッケージから取得したユーザーとパスワード検証コントロールで既定の動作を確認できます。 ユーザーの既定の検証コントロール (
UserValidator) には、既定値がtrueに設定されているプロパティAllowOnlyAlphanumericUserNamesがあります。 パスワードの既定の検証コントロール (MinimumLengthValidator) では、パスワードが 6 文字以上であることを確認します。 これらの検証コントロールはUserManagerのプロパティであり、カスタム検証を行う場合にオーバーライドできます。
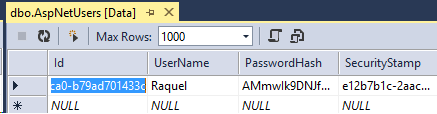
Entity Framework によって生成される LocalDb Identity データベースとテーブルを確認する
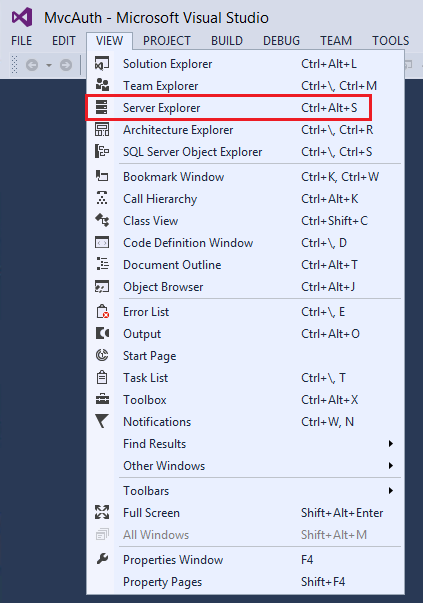
[表示] メニューで、[サーバー エクスプローラー] を選択します。
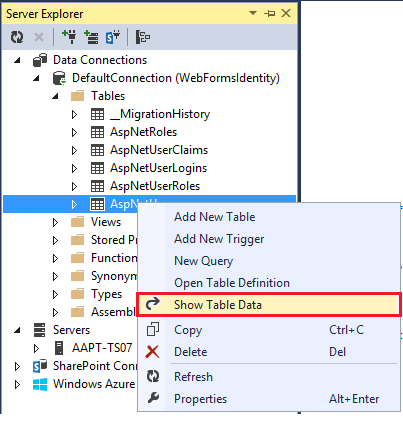
DefaultConnection (WebFormsIdentity) を展開し、[テーブル] を展開し、[AspNetUsers] を右クリックして、[テーブル データの表示] を選択します。
OWIN 認証用にアプリケーションを構成する
この時点で、ユーザー作成のサポートのみを追加しました。 次に、ユーザーをログインさせるための認証を追加する方法を示します。 ASP.NET Identity では、フォーム認証に Microsoft OWIN 認証ミドルウェアを使用します。 OWIN Cookie 認証は、OWIN または IIS でホストされている任意のフレームワークで使用できる Cookie およびクレーム ベースの認証メカニズムです。 このモデルでは、ASP.NET MVC や Web Forms など、複数のフレームワーク全体で同じ認証パッケージを使用できます。 プロジェクト Katana の詳細とホストに依存しないミドルウェアの実行方法については、「Katana プロジェクトの概要」を参照してください。
認証パッケージをアプリケーションにインストールする
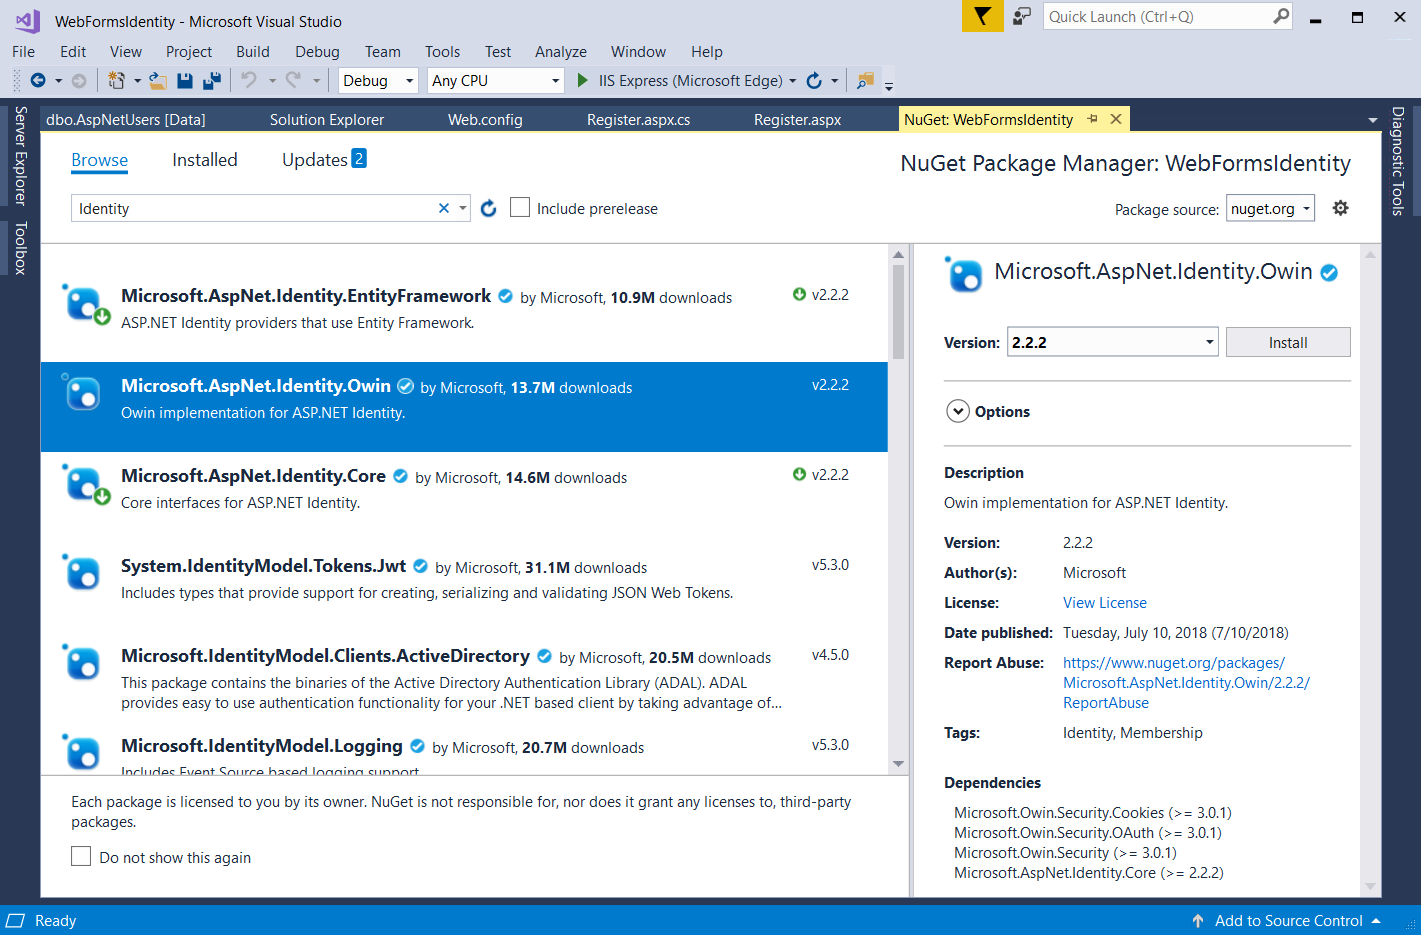
ソリューション エクスプローラーで、プロジェクトを右クリックし、[NuGet パッケージの管理] を選択します。 Microsoft.AspNet.Identity.Owin パッケージを検索してインストールします。
Microsoft.Owin.Host.SystemWeb パッケージを検索してインストールします。
Note
Microsoft.Aspnet.Identity.Owin パッケージには、ASP.NET Identity Core パッケージで使用される OWIN 認証ミドルウェアを管理および構成するための一連の OWIN 拡張クラスが含まれています。 Microsoft.Owin.Host.SystemWeb パッケージには、ASP.NET 要求パイプラインを使用して OWIN ベースのアプリケーションを IIS で実行できるようにする OWIN サーバーが含まれています。 詳細については、「IIS 統合パイプラインの OWIN ミドルウェア」を参照してください。
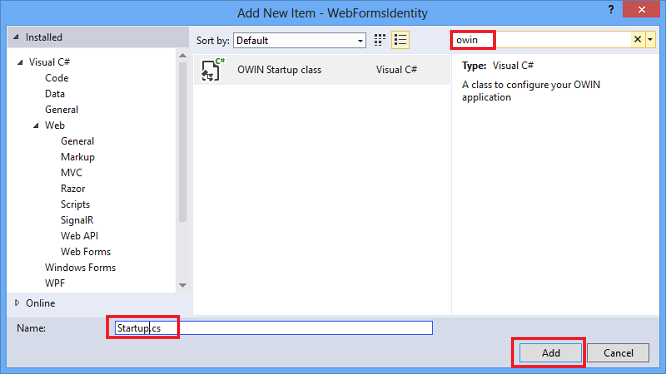
OWIN スタートアップおよび認証構成クラスを追加する
ソリューション エクスプローラーで、プロジェクトを右クリックし、[追加]、[新しい項目の追加] を選択します。 検索テキスト ボックス ダイアログで、「owin」と入力します。 クラスに "Startup" という名前を付けて、[追加] を選択します。
Startup.cs ファイルで、以下に示す強調表示されたコードを追加して、OWIN Cookie 認証を構成します。
using Microsoft.AspNet.Identity;
using Microsoft.Owin;
using Microsoft.Owin.Security.Cookies;
using Owin;

[assembly: OwinStartup(typeof(WebFormsIdentity.Startup))]

namespace WebFormsIdentity
{
   public class Startup
   {
      public void Configuration(IAppBuilder app)
      {
         // For more information on how to configure your application, visit https://go.microsoft.com/fwlink/?LinkID=316888
         app.UseCookieAuthentication(new CookieAuthenticationOptions
         {
            AuthenticationType = DefaultAuthenticationTypes.ApplicationCookie,
            LoginPath = new PathString("/Login")
         });
      }
   }
}
Note
このクラスには、OWIN スタートアップ クラスを指定するための
OwinStartup属性が含まれています。 どの OWIN アプリケーションにも、アプリケーション パイプラインのコンポーネントを指定するスタートアップ クラスがあります。 このモデルの詳細については、「OWIN スタートアップ クラス検出」を参照してください。
ユーザーを登録およびサインインさせるための Web フォームを追加する
Register.aspx.cs ファイルを開き、登録が成功したときにユーザーをサインインさせる次のコードを追加します。
using Microsoft.AspNet.Identity;
using Microsoft.AspNet.Identity.EntityFramework;
using Microsoft.Owin.Security;
using System;
using System.Linq;
using System.Web;

namespace WebFormsIdentity
{
   public partial class Register : System.Web.UI.Page
   {
      protected void CreateUser_Click(object sender, EventArgs e)
      {
         // Default UserStore constructor uses the default connection string named: DefaultConnection
         var userStore = new UserStore<IdentityUser>();
         var manager = new UserManager<IdentityUser>(userStore);
         var user = new IdentityUser() { UserName = UserName.Text };

         IdentityResult result = manager.Create(user, Password.Text);

         if (result.Succeeded)
         {
            var authenticationManager = HttpContext.Current.GetOwinContext().Authentication;
            var userIdentity = manager.CreateIdentity(user, DefaultAuthenticationTypes.ApplicationCookie);
            authenticationManager.SignIn(new AuthenticationProperties() { }, userIdentity);
            Response.Redirect("~/Login.aspx");
         }
         else
         {
            StatusMessage.Text = result.Errors.FirstOrDefault();
         }
      }
   }
}
Note
- ASP.NET Identity と OWIN Cookie 認証はクレーム ベースのシステムであるため、フレームワークでは、アプリ開発者がユーザー用に ClaimsIdentity を生成する必要があります。 ClaimsIdentity には、ユーザーが属するロールなど、ユーザーのすべてのクレームに関する情報があります。 この段階で、ユーザーのクレームをさらに追加することもできます。
- OWIN から AuthenticationManager を使用し、上記のように
SignInを呼び出し、ClaimsIdentity を渡すことで、ユーザーをサインインさせることができます。 このコードにより、ユーザーがサインインし、Cookie も生成されます。 この呼び出しは、FormsAuthentication モジュールで使用される FormAuthentication.SetAuthCookie に似ています。
ソリューション エクスプローラーで、プロジェクトを右クリックし、[追加]、[Web フォーム] を選択します。 Web フォームに Login という名前を付けます。
Login.aspx ファイルの内容を次のコードに置き換えます。
<%@ Page Language="C#" AutoEventWireup="true" CodeBehind="Login.aspx.cs" Inherits="WebFormsIdentity.Login" %>

<!DOCTYPE html>

<html xmlns="http://www.w3.org/1999/xhtml">
<head runat="server">
   <title></title>
</head>
<body style="font-family: Arial, Helvetica, sans-serif; font-size: small">
   <form id="form1" runat="server">
      <div>
         <h4 style="font-size: medium">Log In</h4>
         <hr />
         <asp:PlaceHolder runat="server" ID="LoginStatus" Visible="false">
            <p>
               <asp:Literal runat="server" ID="StatusText" />
            </p>
         </asp:PlaceHolder>
         <asp:PlaceHolder runat="server" ID="LoginForm" Visible="false">
            <div style="margin-bottom: 10px">
               <asp:Label runat="server" AssociatedControlID="UserName">User name</asp:Label>
               <div>
                  <asp:TextBox runat="server" ID="UserName" />
               </div>
            </div>
            <div style="margin-bottom: 10px">
               <asp:Label runat="server" AssociatedControlID="Password">Password</asp:Label>
               <div>
                  <asp:TextBox runat="server" ID="Password" TextMode="Password" />
               </div>
            </div>
            <div style="margin-bottom: 10px">
               <div>
                  <asp:Button runat="server" OnClick="SignIn" Text="Log in" />
               </div>
            </div>
         </asp:PlaceHolder>
         <asp:PlaceHolder runat="server" ID="LogoutButton" Visible="false">
            <div>
               <div>
                  <asp:Button runat="server" OnClick="SignOut" Text="Log out" />
               </div>
            </div>
         </asp:PlaceHolder>
      </div>
   </form>
</body>
</html>
Login.aspx.cs ファイルの内容を次に置き換えます。
using Microsoft.AspNet.Identity;
using Microsoft.AspNet.Identity.EntityFramework;
using Microsoft.Owin.Security;
using System;
using System.Web;
using System.Web.UI.WebControls;

namespace WebFormsIdentity
{
   public partial class Login : System.Web.UI.Page
   {
      protected void Page_Load(object sender, EventArgs e)
      {
         if (!IsPostBack)
         {
            if (User.Identity.IsAuthenticated)
            {
               StatusText.Text = string.Format("Hello {0}!!", User.Identity.GetUserName());
               LoginStatus.Visible = true;
               LogoutButton.Visible = true;
            }
            else
            {
               LoginForm.Visible = true;
            }
         }
      }

      protected void SignIn(object sender, EventArgs e)
      {
         var userStore = new UserStore<IdentityUser>();
         var userManager = new UserManager<IdentityUser>(userStore);
         var user = userManager.Find(UserName.Text, Password.Text);

         if (user != null)
         {
            var authenticationManager = HttpContext.Current.GetOwinContext().Authentication;
            var userIdentity = userManager.CreateIdentity(user, DefaultAuthenticationTypes.ApplicationCookie);

            authenticationManager.SignIn(new AuthenticationProperties() { IsPersistent = false }, userIdentity);
            Response.Redirect("~/Login.aspx");
         }
         else
         {
            StatusText.Text = "Invalid username or password.";
            LoginStatus.Visible = true;
         }
      }

      protected void SignOut(object sender, EventArgs e)
      {
         var authenticationManager = HttpContext.Current.GetOwinContext().Authentication;
         authenticationManager.SignOut();
         Response.Redirect("~/Login.aspx");
      }
   }
}
Note
Page_Loadは現在のユーザーの状態をチェックし、そのContext.User.Identity.IsAuthenticated状態に基づいてアクションを実行します。 ログイン ユーザー名の表示: Microsoft ASP.NET Identity フレームワークでは、System.Security.Principal.IIdentity に拡張メソッドが追加されました。これにより、ログインしているユーザーのUserNameとUserIdを取得できます。 これらの拡張メソッドは、Microsoft.AspNet.Identity.Coreアセンブリで定義されます。 これらの拡張メソッドは、HttpContext.User.Identity.Name に代わるものです。- SignIn メソッド:
Thisメソッドは、このサンプルの前のCreateUser_Clickのメソッドに置き換わり、ユーザーを正常に作成した後にユーザーをサインインさせます。
Microsoft OWIN フレームワークでは、IOwinContextへの参照を取得できるようにするSystem.Web.HttpContextに拡張メソッドが追加されました。 これらの拡張メソッドは、Microsoft.Owin.Host.SystemWebアセンブリで定義されます。OwinContextクラスは、現在の要求で使用可能な認証ミドルウェアの機能を表すIAuthenticationManagerプロパティを公開します。 OWIN からAuthenticationManagerを使用し、上記のようにSignInを呼び出し、ClaimsIdentityを渡すことで、ユーザーをサインインさせることができます。 ASP.NET Identity と OWIN Cookie 認証はクレームベースのシステムであるため、フレームワークではアプリがユーザー用にClaimsIdentityを生成する必要があります。ClaimsIdentityには、ユーザーが属するロールなど、ユーザーのすべてのクレームに関する情報があります。 この段階で、ユーザーのクレームをさらに追加することもできます。このコードにより、ユーザーがサインインし、Cookie も生成されます。 この呼び出しは、FormsAuthentication モジュールで使用される FormAuthentication.SetAuthCookie に似ています。 SignOutメソッド: OWIN からAuthenticationManagerへの参照を取得し、SignOutを呼び出します。 これは、FormsAuthentication モジュールで使用される FormsAuthentication.SignOut メソッドに似ています。
Ctrl + F5 キーを押して Web アプリケーションをビルドし、実行します。 新しいユーザー名とパスワードを入力し、[登録] を選択します。
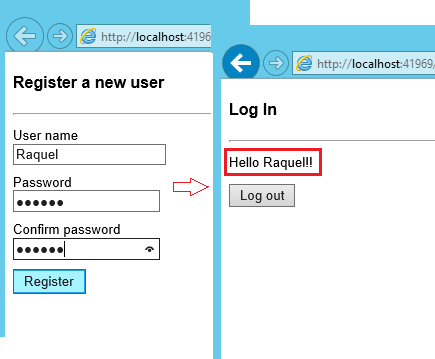
注: この時点で、新しいユーザーが作成され、ログインしています。[ログアウト] ボタンを選択します。 [ログイン] フォームにリダイレクトされます。
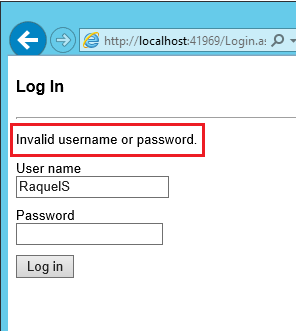
無効なユーザー名またはパスワードを入力し、[ログイン] ボタンを選択します。
UserManager.Findメソッドは null を返し、"ユーザー名またはパスワードが無効です " というエラー メッセージが表示されます。