パート 7: メンバーシップと承認
投稿者: Jon Galloway
MVC Music Store は、ASP.NET MVC と Visual Studio を使用した Web 開発の手順を段階的に紹介し、説明するチュートリアル アプリケーションです。
MVC Music Store は、音楽アルバムをオンラインで販売する軽量なサンプル ストアの実装です。基本的なサイト管理、ユーザー サインイン、ショッピング カート機能を実装しています。
このチュートリアル シリーズでは、ASP.NET MVC Music Store サンプル アプリケーションを作成するために必要なすべての手順について詳しく説明します。 パート 7 では、メンバーシップと承認について説明します。
現在、ストア マネージャー コントローラーには、サイトにアクセスするすべてのユーザーがアクセスできます。 これを変更して、アクセス許可をサイト管理者に制限してみましょう。
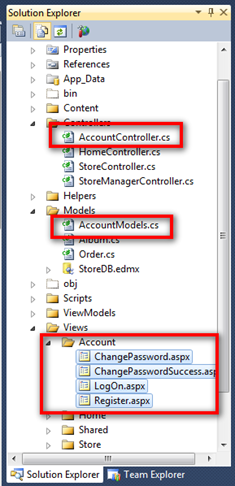
AccountController とビューの追加
完全な ASP.NET MVC 3 Web アプリケーション テンプレートと空の ASP.NET MVC 3 Web アプリケーション テンプレートの違いの 1 つは、空のテンプレートにはアカウント コントローラーが含まれていない点です。 完全な ASP.NET MVC 3 Web アプリケーション テンプレートから作成された新しい ASP.NET MVC アプリケーションからいくつかのファイルをコピーして、アカウント コントローラーを追加します。
完全な ASP.NET MVC 3 Web アプリケーション テンプレートを使用して新しい ASP.NET MVC アプリケーションを作成し、次のファイルをプロジェクト内の同じディレクトリにコピーします。
- Controllers ディレクトリ内の AccountController.cs をコピーします
- Models ディレクトリ内の AccountModels をコピーします
- Views ディレクトリ内にアカウント ディレクトリを作成し、次の 4 つのビューをすべてコピーします
コントローラーおよびモデル クラスの名前空間が MvcMusicStore で始まるように変更します。 AccountController クラスは MvcMusicStore.Controllers 名前空間を使用し、AccountModels クラスは MvcMusicStore.Models 名前空間を使用する必要があります。
注: これらのファイルは、チュートリアルの冒頭でサイト デザイン ファイルをコピーした MvcMusicStore-Assets.zip ダウンロードからも入手できます。 メンバーシップ ファイルは Code ディレクトリにあります。
更新後のソリューションは次のようになります。
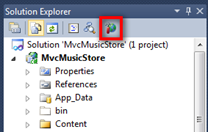
ASP.NET 構成サイトでの管理ユーザーの追加
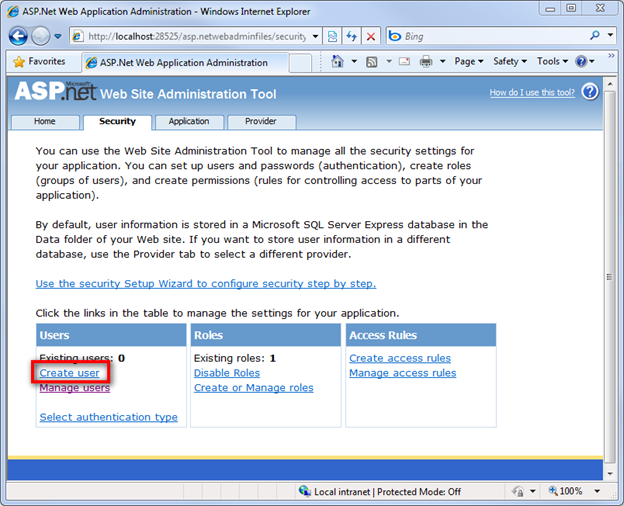
Web サイトで認可を要求する前に、アクセス権を持つユーザーを作成する必要があります。 ユーザーを作成する最も簡単な方法は、組み込みの ASP.NET 構成 Web サイトを使用することです。
ソリューション エクスプローラーのアイコンをクリックして、ASP.NET 構成 Web サイトを起動します。
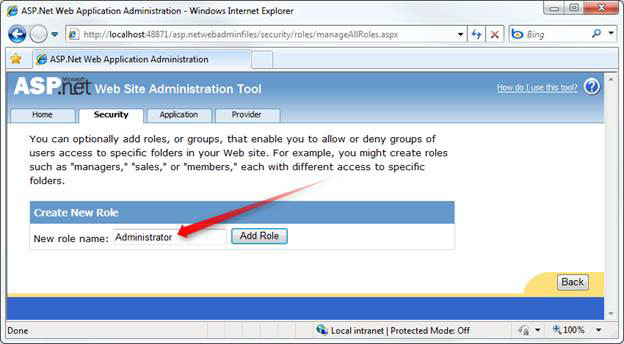
これにより、構成 Web サイトが起動します。 ホーム画面の [セキュリティ] タブをクリックし、画面の中央にある [ロールの有効化] リンクをクリックします。
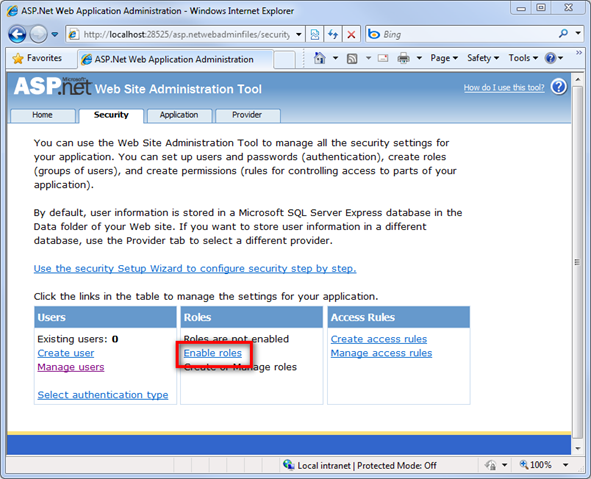
[ロールの作成または管理] リンクをクリックします。
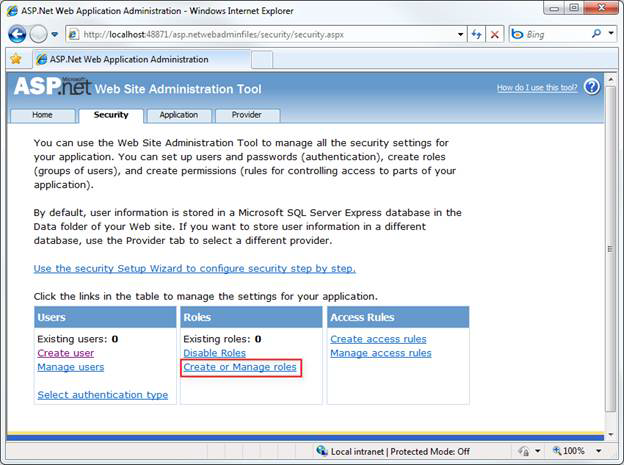
ロール名として「管理者」と入力し、[ロールの追加] ボタンを押します。
[戻る] ボタンをクリックし、左側の [ユーザーの作成] リンクをクリックします。
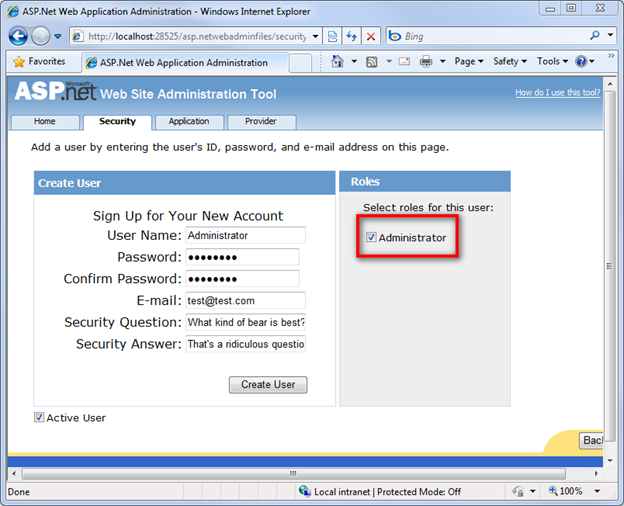
次の情報を使用して、左側のユーザー情報フィールドに以下を入力します。
| フィールド | Value |
|---|---|
| ユーザー名 | 管理者 |
| パスワード | password123! |
| [パスワードの確認入力] | password123! |
| 電子メール | (任意のメール アドレス) |
| セキュリティの質問 | (任意の値) |
| セキュリティ返答 | (任意の値) |
注: もちろん、任意のパスワードを使用できます。 既定のパスワード セキュリティ設定では、パスワードの長さが 7 文字で、英数字以外の文字が 1 つ含まれている必要があります。
このユーザーに管理者の役割を選択し、[ユーザーの作成] ボタンをクリックします。
この時点で、ユーザーが正常に作成されたことを示すメッセージが表示されます。
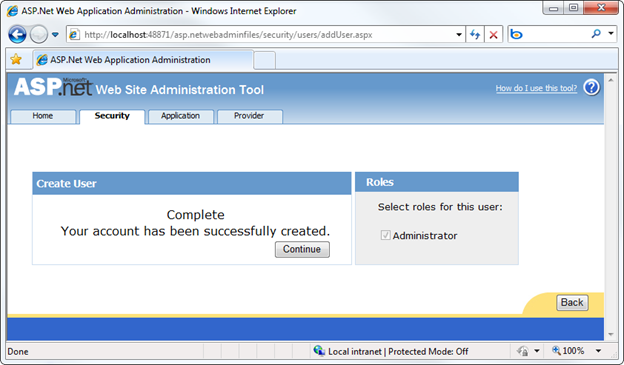
これで、ブラウザー ウィンドウを閉じることができます。
ロール ベースの承認
これで、[Authorize] 属性を使用して StoreManagerController へのアクセスを制限し、クラス内のすべてのコントローラー アクションにアクセスするにはユーザーが管理者の役割に含まれている必要があることを指定できるようになりました。
[Authorize(Roles = "Administrator")]
public class StoreManagerController : Controller
{
    // Controller code here
}
注: [Authorize] 属性は、コントローラー クラス レベルだけでなく、特定のアクション メソッドにも配置できます。
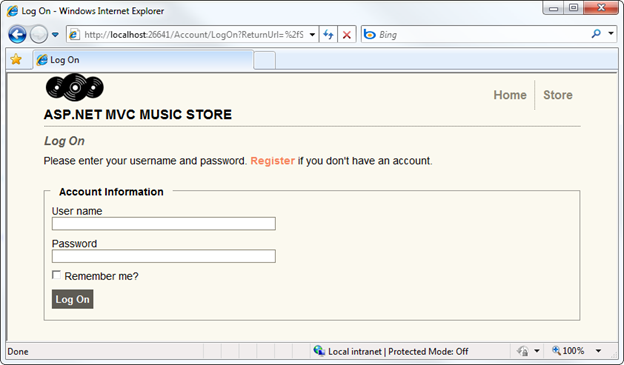
次に、/StoreManager を参照して、ログオン ダイアログを表示します。
新しい管理者アカウントでログオンすると、以前と同様にアルバム編集画面に移動できます。