Azure Worker ロールで ASP.NET Web API 2 をホストする
作成者: Mike Wasson
このチュートリアルは、OWIN を使用して Web API フレームワークをセルフホストする Azure Worker ロールで ASP.NET Web API をホストする方法を示すものです。
Open Web Interface for .NET (OWIN) は、.NET Web サーバーと Web アプリケーションの間の抽象化を定義します。 OWIN はサーバーから Web アプリケーションを切り離します。そのため、OWIN は IIS 外部の (たとえば Azure worker ロール内の) 独自のプロセスで Web アプリケーションをセルフホストするのに最適です。
このチュートリアルでは、Microsoft.Owin.Host.HttpListener パッケージを使用します。これは、OWIN アプリケーションのセルフホストに使用される HTTP サーバーを提供します。
チュートリアルで使用するソフトウェアのバージョン
- Visual Studio 2013
- Web API 2
- Azure SDK for .NET 2.3
Microsoft Azure プロジェクトの作成
管理者特権で Visual Studio を起動します。 Azure Compute Emulator を使用してアプリケーションをローカルでデバッグするには、管理者特権が必要です。
[ファイル] メニューの [新規作成] をクリックし、[プロジェクト] をクリックします。 [インストールされているテンプレート] から、[Visual C#] の下の [クラウド] をクリックし、[Windows Azure クラウド サービス] をクリックします。 プロジェクトに "AzureApp" という名前を付け、[OK] をクリックします。

[新しい Windows Azure クラウド サービス] ダイアログで、[Worker ロール] をダブルクリックします。 既定の名前 ("WorkerRole1") のままにします。 この手順では、ソリューションに worker ロールを追加します。 OK をクリックします。

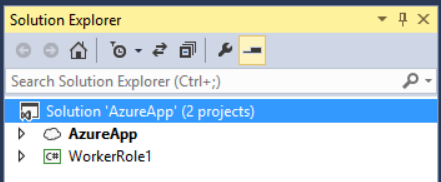
作成される Visual Studio ソリューションには、次の 2 つのプロジェクトが含まれています。
- "AzureApp" は、Azure アプリケーションのロールと構成を定義します。
- "WorkerRole1" には、worker ロールのコードが含まれています。
一般に、Azure アプリケーションには複数のロールを含めることができますが、このチュートリアルでは 1 つのロールを使用します。
Web API と OWIN パッケージを追加する
[ツール] メニューで、[NuGet パッケージ マネージャー] をクリックし、[パッケージ マネージャー コンソール] をクリックします。
[パッケージ マネージャー コンソール] ウィンドウで、次のコマンドを入力します。
Install-Package Microsoft.AspNet.WebApi.OwinSelfHost
HTTP エンドポイントを追加する
ソリューション エクスプローラーで AzureApp プロジェクトを展開します。 [ロール] ノードを展開し、[WorkerRole1] を右クリックし、[プロパティ] を選択します。

[エンドポイント] をクリックして、[エンドポイントの追加] をクリックします。
[プロトコル] ドロップダウン リストで、[http] を選択します。 [パブリック ポート] と [プライベート ポート] に「80」と入力します。 このポート番号は別の番号でもかまいません。 パブリック ポートは、クライアントがロールに要求を送信するときに使用します。

セルフホスト用に Web API を構成する
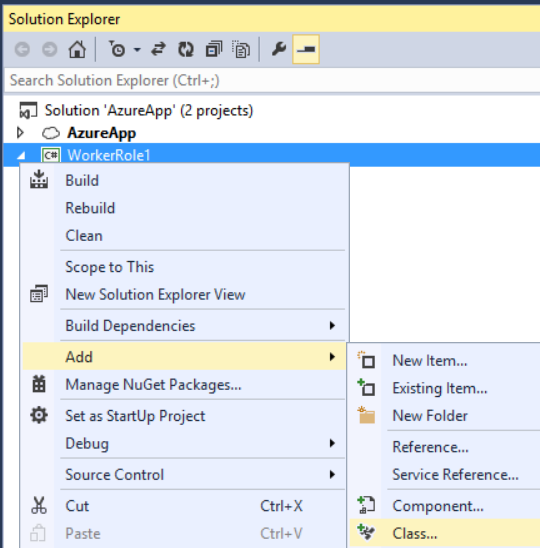
ソリューション エクスプローラーで、WorkerRole1 プロジェクトを右クリックし、[追加] / [クラス] を選択して新しいクラスを追加します。 クラスに Startup という名前を付けます。
このファイル内のすべての定型コードを次のように置き換えます。
using Owin;
using System.Web.Http;

namespace WorkerRole1
{
    class Startup
    {
        public void Configuration(IAppBuilder app)
        {
            HttpConfiguration config = new HttpConfiguration();
            config.Routes.MapHttpRoute(
                "Default",
                "{controller}/{id}",
                new { id = RouteParameter.Optional });

            app.UseWebApi(config);
        }
    }
}
Web API コントローラーを追加する
次に、Web API コントローラー クラスを追加します。 WorkerRole1 プロジェクトを右クリックし、[追加] / [クラス] を選択します。 TestController クラスに名前を付けます。 このファイル内のすべての定型コードを次のように置き換えます。
using System;
using System.Net.Http;
using System.Web.Http;

namespace WorkerRole1
{
    public class TestController : ApiController
    {
        public HttpResponseMessage Get()
        {
            return new HttpResponseMessage()
            {
                Content = new StringContent("Hello from OWIN!")
            };
        }

        public HttpResponseMessage Get(int id)
        {
            string msg = String.Format("Hello from OWIN (id = {0})", id);
            return new HttpResponseMessage()
            {
                Content = new StringContent(msg)
            };
        }
    }
}
わかりやすくするために、このコントローラーはプレーンテキストを返す 2 つの GET メソッドを定義するだけにします。
OWIN ホストを起動する
WorkerRole.cs ファイルを開きます。 このクラスは、worker ロールが開始および停止されたときに実行されるコードを定義します。
次の using ステートメントを追加します。
using Microsoft.Owin.Hosting;
IDisposable メンバーを WorkerRole クラスに追加します。
public class WorkerRole : RoleEntryPoint
{
    private IDisposable _app = null;

    // ....
}
OnStart メソッドで、ホストを起動する次のコードを追加します。
public override bool OnStart()
{
    ServicePointManager.DefaultConnectionLimit = 12;

    // New code:
    var endpoint = RoleEnvironment.CurrentRoleInstance.InstanceEndpoints["Endpoint1"];
    string baseUri = String.Format("{0}://{1}",
        endpoint.Protocol, endpoint.IPEndpoint);

    Trace.TraceInformation(String.Format("Starting OWIN at {0}", baseUri),
        "Information");

    _app = WebApp.Start<Startup>(new StartOptions(url: baseUri));
    return base.OnStart();
}
WebApp.Start メソッドは OWIN ホストを起動します。 Startup クラスの名前は、メソッドの型パラメーターです。 慣例により、ホストはこのクラスの Configure メソッドを呼び出します。
OnStop をオーバーライドして、_app インスタンスを破棄します。
public override void OnStop()
{
    if (_app != null)
    {
        _app.Dispose();
    }
    base.OnStop();
}
WorkerRole.cs の完全なコードを次に示します。
using Microsoft.Owin.Hosting;
using Microsoft.WindowsAzure.ServiceRuntime;
using System;
using System.Diagnostics;
using System.Net;
using System.Threading;

namespace WorkerRole1
{
    public class WorkerRole : RoleEntryPoint
    {
        private IDisposable _app = null;

        public override void Run()
        {
            Trace.TraceInformation("WebApiRole entry point called", "Information");

            while (true)
            {
                Thread.Sleep(10000);
                Trace.TraceInformation("Working", "Information");
            }
        }

        public override bool OnStart()
        {
            ServicePointManager.DefaultConnectionLimit = 12;

            var endpoint = RoleEnvironment.CurrentRoleInstance.InstanceEndpoints["Endpoint1"];
            string baseUri = String.Format("{0}://{1}",
                endpoint.Protocol, endpoint.IPEndpoint);

            Trace.TraceInformation(String.Format("Starting OWIN at {0}", baseUri),
                "Information");

            _app = WebApp.Start<Startup>(new StartOptions(url: baseUri));
           return base.OnStart();
        }

        public override void OnStop()
        {
            if (_app != null)
            {
                _app.Dispose();
            }
            base.OnStop();
        }
    }
}
ソリューションをビルドし、F5 キーを押して Azure Compute Emulator でアプリケーションをローカルで実行します。 ファイアウォールの設定によっては、ファイアウォール経由でエミュレーターを許可することが必要になる場合があります。
Note
次のような例外が発生した場合は、このブログ記事で回避策を参照してください。 「ファイルまたはアセンブリ 'Microsoft.Owin, Version=2.0.2.0, Culture=neutral, PublicKeyToken=31bf3856ad364e35'、またはその依存関係の 1 つが読み込めませんでした。 指定したアセンブリのマニフェスト定義がアセンブリ参照と一致しません。 (HRESULT からの例外: 0x80131040)」
コンピューティング エミュレーターは、エンドポイントにローカル IP アドレスを割り当てます。 IP アドレスは、コンピューティング エミュレーター UI を表示することで確認できます。 タスク バーの通知領域でエミュレーター アイコンを右クリックし、[コンピューティング エミュレーター UI の表示] を選択します。
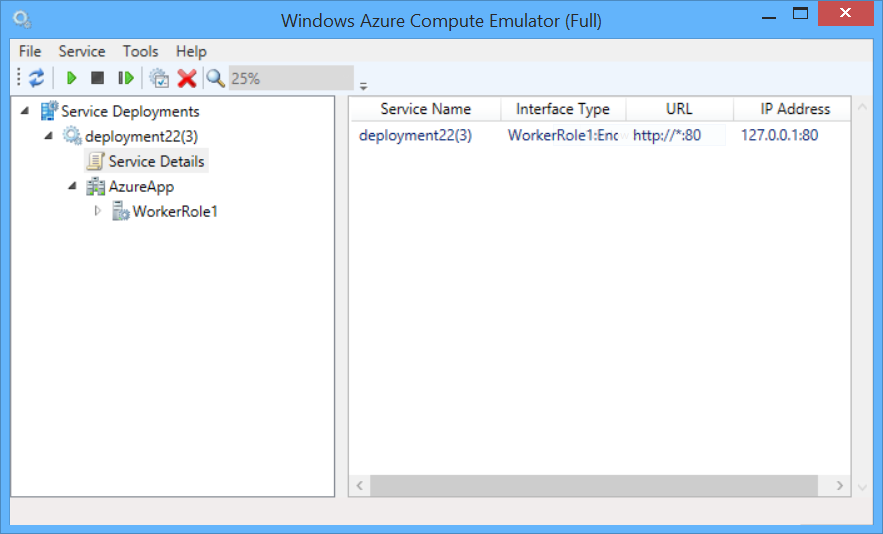
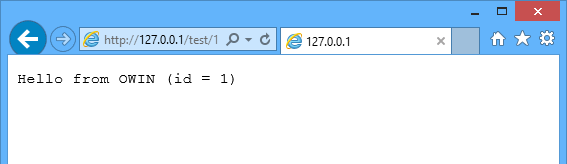
[サービスのデプロイ]、デプロイ [id]、[サービスの詳細] で IP アドレスを見つけます。 Web ブラウザーを開き、http:// address/test/1 に移動します。ここで、address はコンピューティング エミュレーターによって割り当てられる IP アドレスであり、http://127.0.0.1:80/test/1 などです。 Web API コントローラーからの応答が表示されます。
Azure に展開する
この手順では、Azure アカウントが必要です。 アカウントがない場合は、ほんの数分で無料評価版のアカウントを作成できます。 詳細については、「Microsoft Azure 無料評価版」を参照してください。
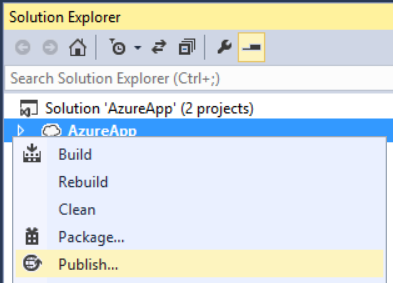
ソリューション エクスプローラーで、AzureApp プロジェクトを右クリックします。 公開を選択します。
まだ Azure アカウントにサインインしていない場合は、[サインイン] をクリックします。

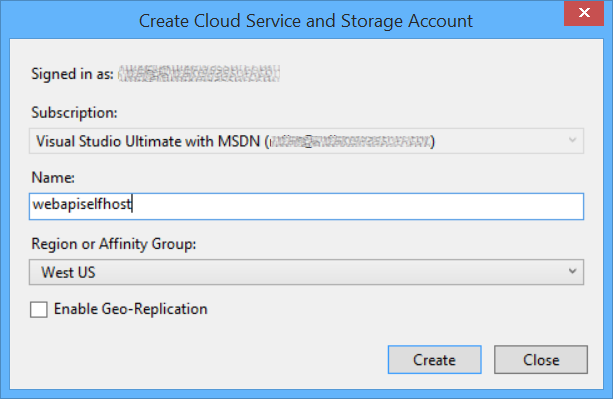
サインインしたら、サブスクリプションを選択し、[次へ] をクリックします。

クラウド サービスの名前を入力し、リージョンを選択します。 Create をクリックしてください。
[発行] をクリックします。

Azure クラウド サービス (クラシック) のカスタム ドメイン名の構成