Entity Framework 4.0 Database First と ASP.NET 4 Web Forms の概要 - 第 5 部
著者: Tom Dykstra
Contoso University のサンプル Web アプリケーションでは、Entity Framework 4.0 と Visual Studio 2010 を使用して、ASP.NET Web Forms アプリケーションを作成する方法を示します。 このチュートリアル シリーズについては、このシリーズでの最初のチュートリアルを参照してください
関連データの操作 (続き)
前のチュートリアルでは、EntityDataSource コントロールを使用して関連データを操作し始めました。 複数レベルの階層と編集されたデータをナビゲーション プロパティ内に表示しました。 このチュートリアルでは、リレーションシップを追加および削除し、既存のエンティティとのリレーションシップを持つ新しいエンティティを追加することで、関連データを引き続き操作します。
部署に割り当てられているコースを追加するページを作成します。 それらの部署は既に存在し、新しいコースを作成すると、それと同時に既存の部署との間にリレーションシップが確立されます。

また、講師をコースに割り当てる (選択する 2 つのエンティティ間のリレーションシップを追加する)、またはコースから講師を削除する (選択する 2 つのエンティティ間のリレーションシップを削除する) ことにより、多対多リレーションシップを操作するページも作成します。 データベース内で、講師とコースの間にリレーションシップを追加すると、CourseInstructor 関連付けテーブルに新しい行が追加されます。リレーションシップを削除するには、CourseInstructor 関連付けテーブルから行を削除する必要があります。 ただし、Entity Framework 内では、CourseInstructor テーブルを明示的に参照せずに、ナビゲーション プロパティを設定することでこれを行います。

リレーションシップを持つエンティティの、既存エンティティへの追加
Site.Master マスター ページを使用する CoursesAdd.aspx という名前の新しい Web ページを作成し、Content2 という名前の Content コントロールに次のマークアップを追加します。
<h2>Add Courses</h2>
    <asp:EntityDataSource ID="CoursesEntityDataSource" runat="server"
        ContextTypeName="ContosoUniversity.DAL.SchoolEntities" EnableFlattening="False"
        EntitySetName="Courses"
        EnableInsert="True" EnableDelete="True" >
    </asp:EntityDataSource>
    <asp:DetailsView ID="CoursesDetailsView" runat="server" AutoGenerateRows="False"
        DataSourceID="CoursesEntityDataSource" DataKeyNames="CourseID"
        DefaultMode="Insert" oniteminserting="CoursesDetailsView_ItemInserting">
        <Fields>
            <asp:BoundField DataField="CourseID" HeaderText="ID" />
            <asp:BoundField DataField="Title" HeaderText="Title" />
            <asp:BoundField DataField="Credits" HeaderText="Credits" />
            <asp:TemplateField HeaderText="Department">
                <InsertItemTemplate>
                    <asp:EntityDataSource ID="DepartmentsEntityDataSource" runat="server" ConnectionString="name=SchoolEntities"
                        DefaultContainerName="SchoolEntities" EnableDelete="True" EnableFlattening="False"
                        EntitySetName="Departments" EntityTypeFilter="Department">
                    </asp:EntityDataSource>
                    <asp:DropDownList ID="DepartmentsDropDownList" runat="server" DataSourceID="DepartmentsEntityDataSource"
                        DataTextField="Name" DataValueField="DepartmentID"
                        oninit="DepartmentsDropDownList_Init">
                    </asp:DropDownList>
                </InsertItemTemplate>
            </asp:TemplateField>
            <asp:CommandField ShowInsertButton="True" />
        </Fields>
    </asp:DetailsView>
このマークアップにより、コースを選択し、挿入を有効にして、Inserting イベントのハンドラーを指定する、EntityDataSource コントロールが作成されます。 そのハンドラーを使用して、新しい Course エンティティの作成時に Department ナビゲーション プロパティを更新します。
このマークアップでは、新しい Course エンティティの追加に使用する DetailsView コントロールも作成されます。 このマークアップでは、Course エンティティ プロパティにバインドされたフィールドが使用されます。 CourseID の値はユーザーが入力する必要があります。これはシステムによって生成される ID フィールドではないためです。 むしろこれは、このコースを作成する際に手動で指定する必要があるコース番号です。
ナビゲーション プロパティは BoundField コントロールで使用できないため、Department ナビゲーション プロパティにはテンプレート フィールドを使用します。 そのテンプレート フィールドでは、部署を選択するためのドロップダウン リストが提供されます。 そのドロップダウン リストは、Bind ではなく Eval を使用して Departments エンティティ セットにバインドされます。繰り返しになりますが、これはナビゲーション プロパティを直接バインドして更新することができないためです。 DropDownList コントロールの Init イベントのハンドラーを指定し、DepartmentID 外部キーを更新するコードで使用されるコントロールへの参照を保存できるようにします。
CoursesAdd.aspx.cs 内で、部分クラス宣言の直後に、DepartmentsDropDownList コントロールへの参照を保持するクラス フィールドを追加します。
private DropDownList departmentDropDownList;
そのコントロールへの参照を保存できるように、DepartmentsDropDownList コントロールの Init イベントのハンドラーを追加します。 これにより、ユーザーが入力した値を取得し、それを使用して Course エンティティの DepartmentID の値を更新できます。
protected void DepartmentsDropDownList_Init(object sender, EventArgs e)
{
    departmentDropDownList = sender as DropDownList;
}
DetailsView コントロールの Inserting イベントのハンドラーを追加します。
protected void CoursesDetailsView_ItemInserting(object sender, DetailsViewInsertEventArgs e)
{
    var departmentID = Convert.ToInt32(departmentDropDownList.SelectedValue);
    e.Values["DepartmentID"] = departmentID;
}
ユーザーが [Insert] をクリックすると、新しいレコードが挿入される前に Inserting イベントが発生します。 このハンドラー内のコードは DropDownList コントロールから DepartmentID を取得し、それを使用して Course エンティティの DepartmentID プロパティに使用される値を設定します。
Entity Framework は、関連付けられている Department エンティティの Courses ナビゲーション プロパティに、このコースを追加する処理を行います。 また、Course エンティティの Department ナビゲーション プロパティにその部署を追加します。
このページを実行します。
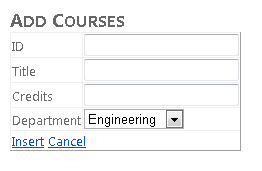
[ID]、[Title]、[Credits] の数を入力し、[Department] を選択して、[Insert] をクリックします。
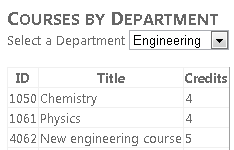
Courses.aspx ページを実行し、同じ部署を選択して新しいコースを表示します。
多対多リレーションシップの操作
Courses エンティティ セットと People エンティティ セットの間のリレーションシップは、多対多リレーションシップです。 Course エンティティには、0 個以上の関連した Person エンティティ (そのコースを教えるために割り当てられた講師を表します) を含めることができる、People という名前のナビゲーション プロパティがあります。 そして、Person エンティティには、0 個以上の関連した Course エンティティ (講師が教えるために割り当てられているコースを表します) を含めることができる、Courses という名前のナビゲーション プロパティがあります。 1 人の講師が複数のコースを教える場合があり、また、1 つのコースが複数の講師によって教えられる場合があります。 このチュートリアルのこのセクションでは、関連エンティティのナビゲーション プロパティを更新することで、Person と Course エンティティ間のリレーションシップを追加および削除します。
Site.Master マスター ページを使用する InstructorsCourses.aspx という名前の新しい Web ページを作成し、次のマークアップを Content2 という名前の Content コントロールに追加します。
<h2>Assign Instructors to Courses or Remove from Courses</h2>
    <br />
    <asp:EntityDataSource ID="InstructorsEntityDataSource" runat="server"
        ContextTypeName="ContosoUniversity.DAL.SchoolEntities" EnableFlattening="False"
        EntitySetName="People"
        Where="it.HireDate is not null" Select="it.LastName + ', ' + it.FirstMidName AS Name, it.PersonID">
    </asp:EntityDataSource>
    Select an Instructor:
    <asp:DropDownList ID="InstructorsDropDownList" runat="server" DataSourceID="InstructorsEntityDataSource"
        AutoPostBack="true" DataTextField="Name" DataValueField="PersonID"
        OnSelectedIndexChanged="InstructorsDropDownList_SelectedIndexChanged"
        OnDataBound="InstructorsDropDownList_DataBound">
    </asp:DropDownList>
    <h3>
        Assign a Course</h3>
    <br />
    Select a Course:
    <asp:DropDownList ID="UnassignedCoursesDropDownList" runat="server"
        DataTextField="Title" DataValueField="CourseID">
    </asp:DropDownList>
    <br />
    <asp:Button ID="AssignCourseButton" runat="server" Text="Assign" OnClick="AssignCourseButton_Click" />
    <br />
    <asp:Label ID="CourseAssignedLabel" runat="server" Visible="false" Text="Assignment successful"></asp:Label>
    <br />
    <h3>
        Remove a Course</h3>
    <br />
    Select a Course:
    <asp:DropDownList ID="AssignedCoursesDropDownList" runat="server"
        DataTextField="title" DataValueField="courseiD">
    </asp:DropDownList>
    <br />
    <asp:Button ID="RemoveCourseButton" runat="server" Text="Remove" OnClick="RemoveCourseButton_Click" />
    <br />
    <asp:Label ID="CourseRemovedLabel" runat="server" Visible="false" Text="Removal successful"></asp:Label>
このマークアップでは、講師の Person エンティティの名前と PersonID を取得する EntityDataSource コントロールが作成されます。 DropDrownList コントロールは、EntityDataSource コントロールにバインドされます。 DropDownList コントロールは、DataBound イベントのハンドラーを指定します。 このハンドラーを使用して、コースを表示する 2 つのドロップダウン リストをデータバインドします。
このマークアップでは、選択された講師にコースを割り当てるために使用する、次のコントロールのグループも作成されます。
- 割り当てるコースを選択するための
DropDownListコントロール。 このコントロールには、選択された講師に現在割り当てられていないコースが設定されます。 - 割り当てを開始する
Buttonコントロール。 - 割り当てが失敗した場合にエラー メッセージを表示する
Labelコントロール。
最後に、このマークアップでは、選択された講師からコースを削除するために使用するコントロールのグループも作成されます。
InstructorsCourses.aspx.cs 内で、using ステートメントを追加します。
using ContosoUniversity.DAL;
コースを表示する 2 つのドロップダウン リストを設定するメソッドを追加します。
private void PopulateDropDownLists()
{
    using (var context = new SchoolEntities())
    {
        var allCourses = (from c in context.Courses
                          select c).ToList();

        var instructorID = Convert.ToInt32(InstructorsDropDownList.SelectedValue);
        var instructor = (from p in context.People.Include("Courses")
                          where p.PersonID == instructorID
                          select p).First();

        var assignedCourses = instructor.Courses.ToList();
        var unassignedCourses = allCourses.Except(assignedCourses.AsEnumerable()).ToList();

        UnassignedCoursesDropDownList.DataSource = unassignedCourses;
        UnassignedCoursesDropDownList.DataBind();
        UnassignedCoursesDropDownList.Visible = true;

        AssignedCoursesDropDownList.DataSource = assignedCourses;
        AssignedCoursesDropDownList.DataBind();
        AssignedCoursesDropDownList.Visible = true;
    }
}
このコードは、Courses エンティティ セットからすべてのコースを取得し、選択された講師の Person エンティティの Courses ナビゲーション プロパティからコースを取得します。 次に、その講師に割り当てられているコースを判別し、それに応じてドロップダウン リストを設定します。
Assign ボタンの Click イベントのハンドラーを追加します。
protected void AssignCourseButton_Click(object sender, EventArgs e)
{
    using (var context = new SchoolEntities())
    {
        var instructorID = Convert.ToInt32(InstructorsDropDownList.SelectedValue);
        var instructor = (from p in context.People
                          where p.PersonID == instructorID
                          select p).First();
        var courseID = Convert.ToInt32(UnassignedCoursesDropDownList.SelectedValue);
        var course = (from c in context.Courses
                      where c.CourseID == courseID
                      select c).First();
        instructor.Courses.Add(course);
        try
        {
            context.SaveChanges();
            PopulateDropDownLists();
            CourseAssignedLabel.Text = "Assignment successful.";
        }
        catch (Exception)
        {
            CourseAssignedLabel.Text = "Assignment unsuccessful.";
            //Add code to log the error.
        }
        CourseAssignedLabel.Visible = true;
    }
}
このコードは、選択された講師の Person エンティティを取得し、選択されたコースの Course エンティティを取得して、選択されたコースを講師の Person エンティティの Courses ナビゲーション プロパティに追加します。 次に、変更をデータベースに保存し、ドロップダウン リストを再設定して、結果をすぐに確認できるようにします。
Remove ボタンの Click イベントのハンドラーを追加します。
protected void RemoveCourseButton_Click(object sender, EventArgs e)
{
    using (var context = new SchoolEntities())
    {
        var instructorID = Convert.ToInt32(InstructorsDropDownList.SelectedValue);
        var instructor = (from p in context.People
                          where p.PersonID == instructorID
                          select p).First();
        var courseID = Convert.ToInt32(AssignedCoursesDropDownList.SelectedValue);
        var courses = instructor.Courses;
        var courseToRemove = new Course();
        foreach (Course c in courses)
        {
            if (c.CourseID == courseID)
            {
                courseToRemove = c;
                break;
            }
        }
        try
        {
            courses.Remove(courseToRemove);
            context.SaveChanges();
            PopulateDropDownLists();
            CourseRemovedLabel.Text = "Removal successful.";
        }
        catch (Exception)
        {
            CourseRemovedLabel.Text = "Removal unsuccessful.";
            //Add code to log the error.
        }
        CourseRemovedLabel.Visible = true;
    }
}
このコードは、選択された講師の Person エンティティを取得し、選択されたコースの Course エンティティを取得して、選択されたコースを Person エンティティの Courses ナビゲーション プロパティから削除します。 次に、変更をデータベースに保存し、ドロップダウン リストを再設定して、結果をすぐに確認できるようにします。
報告するエラーがない場合にエラー メッセージを表示しないようにするコードを Page_Load メソッドに追加し、講師のドロップダウン リストの DataBound および SelectedIndexChanged イベントのハンドラーを追加して、コースのドロップダウン リストを設定します。
protected void Page_Load(object sender, EventArgs e)
{
    CourseAssignedLabel.Visible = false;
    CourseRemovedLabel.Visible = false;
}

protected void InstructorsDropDownList_DataBound(object sender, EventArgs e)
{
    PopulateDropDownLists();
}

protected void InstructorsDropDownList_SelectedIndexChanged(object sender, EventArgs e)
{
    PopulateDropDownLists();
}
このページを実行します。
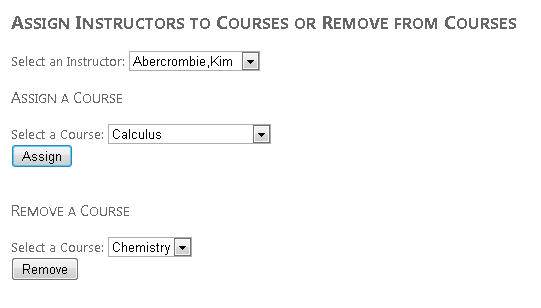
講師を選択します。 [Assign A Course] のドロップダウン リストには、その講師が教えていないコースが表示され、[Remove A Course] のドロップダウン リストには、その講師が既に割り当てられているコースが表示されます。 [Assign A Course] セクション内でコースを選択し、[Assign] をクリックします。 そのコースは [Remove A Course] のドロップダウン リストに移動します。 [Remove A Course] セクション内でコースを選択し、[Remove] をクリックします。そのコースは [Assign A Course] のドロップダウン リストに移動します。
これで、関連データを操作するための方法をいくつか確認しました。 次のチュートリアルでは、データ モデル内で継承を使用して、アプリケーションの保守性を向上させる方法について説明します。