パート 7: 機能の追加
作成者: Joe Stagner
Tailspin Spyworks は、.NET プラットフォーム用の高性能でスケーラブルなアプリケーションを簡単に作成できる方法を実証します。 ASP.NET 4 の優れた新機能を使用して、ショッピング、チェックアウト、管理などのオンライン ストアを構築する方法を示します。
このチュートリアル シリーズでは、Tailspin Spyworks サンプル アプリケーションを構築するために必要なすべての手順について詳しく説明します。 パート 7 では、アカウント レビュー、製品レビュー、"人気のあるアイテム" や "こちらも購入しています" ユーザー コントロールなどの追加機能が追加されます。
機能の追加
ユーザーはカタログを閲覧し、ショッピング カートに商品を入れ、チェックアウト プロセスを完了できますが、サイトを改善するために組み込むサポート機能が多数あります。
- アカウント レビュー (注文の一覧表示と詳細の表示)。
- コンテキスト固有のコンテンツをフロント ページに追加します。
- ユーザーがカタログ内の製品を確認できるようにする機能を追加します。
- 人気のあるアイテムを表示するユーザー コントロールを作成し、そのコントロールをフロント ページに配置します。
- "こちらも購入しています" ユーザー コントロールを作成し、製品の詳細ページに追加します。
- お問い合わせページを追加します。
- 概要ページを追加します。
- グローバル エラー
アカウント レビュー
"Account" フォルダーに、OrderList.aspx という名前と OrderDetails.aspx という名前の 2 つの .aspx ページを作成します
OrderList.aspx は、これまでと同様に GridView コントロールと EntityDataSource コントロールを利用します。
<div class="ContentHead">Order History</div><br />

<asp:GridView ID="GridView_OrderList" runat="server" AllowPaging="True"
              ForeColor="#333333" GridLines="None" CellPadding="4" Width="100%"
              AutoGenerateColumns="False" DataKeyNames="OrderID"
              DataSourceID="EDS_Orders" AllowSorting="True" ViewStateMode="Disabled" >
  <AlternatingRowStyle BackColor="White" />
  <Columns>
    <asp:BoundField DataField="OrderID" HeaderText="OrderID" ReadOnly="True"
                    SortExpression="OrderID" />
    <asp:BoundField DataField="CustomerName" HeaderText="Customer"
                    SortExpression="CustomerName" />
    <asp:BoundField DataField="OrderDate" HeaderText="Order Date"
                    SortExpression="OrderDate" />
    <asp:BoundField DataField="ShipDate" HeaderText="Ship Date"
                    SortExpression="ShipDate" />
    <asp:HyperLinkField HeaderText="Show Details" Text="Show Details"
                 DataNavigateUrlFields="OrderID"
                 DataNavigateUrlFormatString="~/Account/OrderDetails.aspx?OrderID={0}" />
  </Columns>
  <FooterStyle BackColor="#990000" Font-Bold="True" ForeColor="White" />
  <HeaderStyle BackColor="#990000" Font-Bold="True" ForeColor="White" />
  <PagerStyle BackColor="#FFCC66" ForeColor="#333333" HorizontalAlign="Center" />
  <RowStyle BackColor="#FFFBD6" ForeColor="#333333" />
  <SelectedRowStyle BackColor="#FFCC66" Font-Bold="True" ForeColor="Navy" />
  <SortedAscendingCellStyle BackColor="#FDF5AC" />
  <SortedAscendingHeaderStyle BackColor="#4D0000" />
  <SortedDescendingCellStyle BackColor="#FCF6C0" />
  <SortedDescendingHeaderStyle BackColor="#820000" />
  <SortedAscendingCellStyle BackColor="#FDF5AC"></SortedAscendingCellStyle>
  <SortedAscendingHeaderStyle BackColor="#4D0000"></SortedAscendingHeaderStyle>
  <SortedDescendingCellStyle BackColor="#FCF6C0"></SortedDescendingCellStyle>
  <SortedDescendingHeaderStyle BackColor="#820000"></SortedDescendingHeaderStyle>
</asp:GridView>

<asp:EntityDataSource ID="EDS_Orders" runat="server" EnableFlattening="False"
                      AutoGenerateWhereClause="True"
                      Where=""
                      OrderBy="it.OrderDate DESC"
                      ConnectionString="name=CommerceEntities"
                      DefaultContainerName="CommerceEntities"
                      EntitySetName="Orders" >
   <WhereParameters>
      <asp:SessionParameter Name="CustomerName" SessionField="UserName" />
   </WhereParameters>
</asp:EntityDataSource>
EntityDataSource は、ユーザーのログイン時にセッション変数に設定した UserName (WhereParameter を参照) でフィルター処理された Orders テーブルからレコードを選びます。
GridView の HyperlinkField でのパラメーターにも注意してください。
DataNavigateUrlFields="OrderID" DataNavigateUrlFormatString="~/Account/OrderDetails.aspx?OrderID={0}"
これにより、各製品の Order の詳細ビューへのリンクが指定され、OrderID フィールドは OrderDetails.aspx ページへの QueryString パラメーターとして指定されます。
OrderDetails.aspx
EntityDataSource コントロールを使用して Orders にアクセスし、FormView を使用して Order データを表示し、GridView を備えた別の EntityDataSource を使用して Order のすべての品目を表示します。
<asp:FormView ID="FormView1" runat="server" CellPadding="4"
                             DataKeyNames="OrderID"
                             DataSourceID="EDS_Order" ForeColor="#333333" Width="250px">
   <FooterStyle BackColor="#990000" Font-Bold="True" ForeColor="White" />
   <HeaderStyle BackColor="#990000" Font-Bold="True" ForeColor="White" />
   <ItemTemplate>
      OrderID : <%# Eval("OrderID") %><br />
      CustomerName : <%# Eval("CustomerName") %><br />
      Order Date : <%# Eval("OrderDate") %><br />
      Ship Date : <%# Eval("ShipDate") %><br />
   </ItemTemplate>
   <PagerStyle BackColor="#FFCC66" ForeColor="#333333" HorizontalAlign="Center" />
   <RowStyle BackColor="#FFFBD6" ForeColor="#333333" />
</asp:FormView>
<asp:EntityDataSource ID="EDS_Order" runat="server"  EnableFlattening="False"
                      ConnectionString="name=CommerceEntities"
                      DefaultContainerName="CommerceEntities"
                      EntitySetName="Orders"
                      AutoGenerateWhereClause="True"
                      Where=""
                      EntityTypeFilter="" Select="">
   <WhereParameters>
      <asp:QueryStringParameter Name="OrderID" QueryStringField="OrderID" Type="Int32" />
   </WhereParameters>
</asp:EntityDataSource>

<asp:GridView ID="GridView_OrderDetails" runat="server"
              AutoGenerateColumns="False"
              DataKeyNames="ProductID,UnitCost,Quantity"
              DataSourceID="EDS_OrderDetails"
              CellPadding="4" GridLines="Vertical" CssClass="CartListItem"
              onrowdatabound="MyList_RowDataBound" ShowFooter="True"
              ViewStateMode="Disabled">
   <AlternatingRowStyle CssClass="CartListItemAlt" />
   <Columns>
     <asp:BoundField DataField="ProductID" HeaderText="Product ID" ReadOnly="True"
                     SortExpression="ProductID"  />
     <asp:BoundField DataField="ModelNumber" HeaderText="Model Number"
                     SortExpression="ModelNumber" />
     <asp:BoundField DataField="ModelName" HeaderText="Model Name"
                     SortExpression="ModelName" />
     <asp:BoundField DataField="UnitCost" HeaderText="Unit Cost" ReadOnly="True"
                     SortExpression="UnitCost" DataFormatString="{0:c}" />
     <asp:BoundField DataField="Quantity" HeaderText="Quantity" ReadOnly="True"
                     SortExpression="Quantity" />
     <asp:TemplateField>
       <HeaderTemplate>Item Total</HeaderTemplate>
       <ItemTemplate>
         <%# (Convert.ToDouble(Eval("Quantity")) *  Convert.ToDouble(Eval("UnitCost")))%>
       </ItemTemplate>
     </asp:TemplateField>
   </Columns>
   <FooterStyle CssClass="CartListFooter"/>
   <HeaderStyle  CssClass="CartListHead" />
 </asp:GridView>
 <asp:EntityDataSource ID="EDS_OrderDetails" runat="server"
                       ConnectionString="name=CommerceEntities"
                       DefaultContainerName="CommerceEntities"
                       EnableFlattening="False"
                       EntitySetName="VewOrderDetails"
                       AutoGenerateWhereClause="True"
                       Where="">
   <WhereParameters>
     <asp:QueryStringParameter Name="OrderID" QueryStringField="OrderID" Type="Int32" />
   </WhereParameters>
</asp:EntityDataSource>
分離コード ファイル (OrderDetails.aspx.cs) には、2 つの小さなハウスキープ処理があります。
まず、OrderDetails が常に OrderId を取得することを確認する必要があります。
protected void Page_Load(object sender, EventArgs e)
{
  if (String.IsNullOrEmpty(Request.QueryString["OrderId"]))
     {
     Response.Redirect("~/Account/OrderList.aspx");
     }
}
また、品目から注文の合計を計算して表示する必要もあります。
decimal _CartTotal = 0;

protected void MyList_RowDataBound(object sender, GridViewRowEventArgs e)
{
  if (e.Row.RowType == DataControlRowType.DataRow)
     {
     TailspinSpyworks.Data_Access.VewOrderDetail myCart = new
                                                        Data_Access.VewOrderDetail();
     myCart = (TailspinSpyworks.Data_Access.VewOrderDetail)e.Row.DataItem;
     _CartTotal += Convert.ToDecimal(myCart.UnitCost * myCart.Quantity);
     }
   else if (e.Row.RowType == DataControlRowType.Footer)
     {
     e.Row.Cells[5].Text = "Total: " + _CartTotal.ToString("C");
   }
}
ホーム ページ
Default.aspx ページに静的コンテンツを追加してみましょう。
まず、"Content" フォルダーを作成し、その中に Images フォルダーを作成します (ホーム ページで使用する画像も含めます)。
Default.aspx ページの下部にあるプレースホルダーに、次のマークアップを追加します。
<h2>
  <asp:LoginView ID="LoginView_VisitorGreeting" runat="server">
    <AnonymousTemplate>
       Welcome to the Store !
    </AnonymousTemplate>
    <LoggedInTemplate>
      Hi <asp:LoginName ID="LoginName_Welcome" runat="server" />. Thanks for coming back.
    </LoggedInTemplate>
  </asp:LoginView>
</h2>

<p><strong>TailSpin Spyworks</strong> demonstrates how extraordinarily simple it is to create powerful, scalable applications for the .NET platform. </p>
<table>
  <tr>
    <td>
      <h3>Some Implementation Features.</h3>
      <ul>
                <li><a href="#">CSS Based Design.</a></li>
                <li><a href="#">Data Access via Linq to Entities.</a></li>
                <li><a href="#">MasterPage driven design.</a></li>
                <li><a href="#">Modern ASP.NET Controls User.</a></li>
                <li><a href="#">Integrated Ajac Control Toolkit Editor.</a></li>
        </ul>
    </td>
    <td>
        <img src="Content/Images/SampleProductImage.gif" alt=""/>
    </td>
  </tr>
</table>

<table>
  <tr>
    <td colspan="2"><hr /></td>
  </tr>
  <tr>
    <td>
        <!-- Popular Items -->
    </td>
    <td>
      <center><h3>Ecommerce the .NET 4 Way</h3></center>
      <blockquote>
        <p>
        ASP.NET offers web developers the benefit of more that a decade of innovation.
        This   demo leverages many of the latest features of ASP.NET development to
        illustrate really simply building rich web applications with ASP.NET can be.
        For more information about build web applications with ASP.NET please visit the
        community web site at www.asp.net
        </p>
      </blockquote>
    </td>
  </tr>
</table>

<h3>Spyworks Event Calendar</h3>
<table>
  <tr class="rowH">
    <th>Date</th>
    <th>Title</th>
    <th>Description</th>
  </tr>
  <tr class="rowA">
    <td>June 01, 2011</td>
    <td>Sed vestibulum blandit</td>
    <td>
    Come and check out demos of all the newest Tailspin Spyworks products and experience
    them hands on.
    </td>
  </tr>
  <tr class="rowB">
    <td>November 28, 2011</td>
    <td>Spyworks Product Demo</td>
    <td>
    Come and check out demos of all the newest Tailspin Spyworks products and experience
    them hands on.
    </td>
  </tr>
  <tr class="rowA">
    <td>November 23, 2011</td>
    <td>Spyworks Product Demo</td>
    <td>
     Come and check out demos of all the newest Tailspin Spyworks products and experience
     them hands on.
    </td>
  </tr>
  <tr class="rowB">
    <td>November 21, 2011</td>
    <td>Spyworks Product Demo</td>
    <td>
    Come and check out demos of all the newest Tailspin Spyworks products and experience
    them hands on.
    </td>
  </tr>
</table>
製品レビュー
まず、製品レビューの入力に使用できるフォームへのリンクを含むボタンを追加します。
<div class="SubContentHead">Reviews</div><br />
<a id="ReviewList_AddReview" href="ReviewAdd.aspx?productID=<%# Eval("ProductID") %>">
   <img id="Img2" runat="server"
        src="~/Styles/Images/review_this_product.gif" alt="" />
</a>
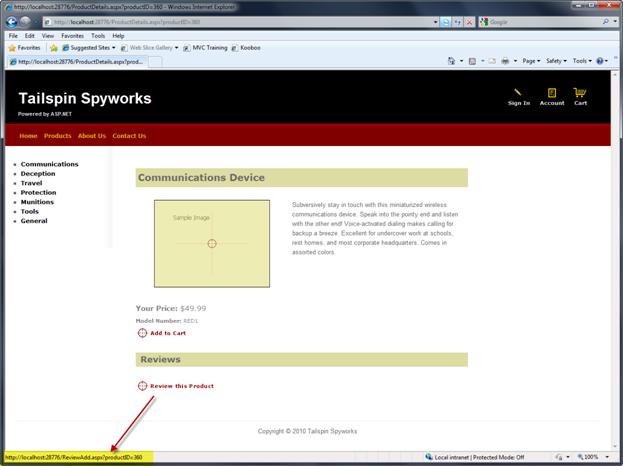
クエリ文字列で ProductID を渡していることに注意してください
次に、ReviewAdd.aspx というページを追加しましょう
このページでは、ASP.NET AJAX Control Toolkit を使用します。 まだダウンロードしていない場合は、DevExpress からダウンロードできます。https://www.asp.net/learn/ajax-videos/video-76.aspx には、Visual Studio で使用するためのツールキットの設定に関するガイダンスがあります。
デザイン モードでは、ツールボックスからコントロールと検証コントロールをドラッグし、次のようなフォームを構築します。
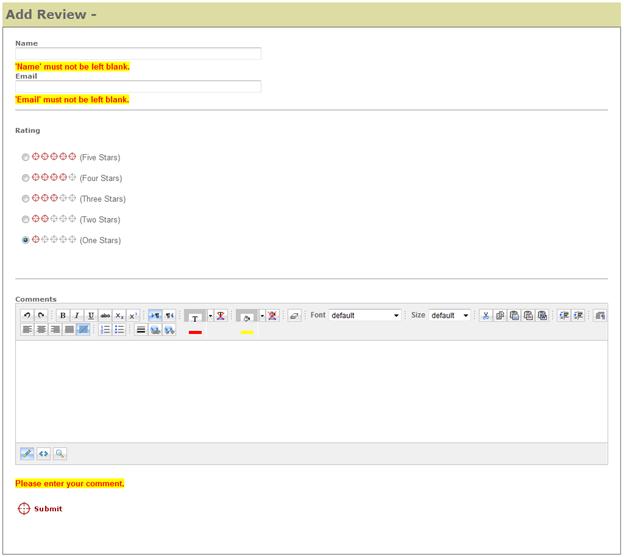
マークアップは次のようになります。
<asp:ToolkitScriptManager ID="ToolkitScriptManager1" runat="server">
</asp:ToolkitScriptManager>
<div class="ContentHead">Add Review - <asp:label id="ModelName" runat="server" /></div>
<div>
  <span class="NormalBold">Name</span><br />
  <asp:TextBox id="Name" runat="server" Width="400px" /><br />
  <asp:RequiredFieldValidator runat="server" id="RequiredFieldValidator1"
                              ControlToValidate="Name"
                              Display="Dynamic"
                              CssClass="ValidationError"
                              ErrorMessage="'Name' must not be left blank."  /><br />
  <span class="NormalBold">Email</span><br />
  <asp:TextBox id="Email" runat="server" Width="400px" /><br />
  <asp:RequiredFieldValidator runat="server" id="RequiredFieldValidator2"
                              ControlToValidate="Email" Display="Dynamic"
                              CssClass="ValidationError"
                              ErrorMessage="'Email' must not be left blank." />
  <br /><hr /><br />
  <span class="NormalBold">Rating</span><br /><br />
  <asp:RadioButtonList ID="Rating" runat="server">
    <asp:ListItem value="5" selected="True"
             Text='<img src="Styles/Images/reviewrating5.gif" alt=""> (Five Stars) '  />
    <asp:ListItem value="4" selected="True"
             Text='<img src="Styles/Images/reviewrating4.gif" alt=""> (Four Stars) '  />
    <asp:ListItem value="3" selected="True"
             Text='<img src="Styles/Images/reviewrating3.gif" alt=""> (Three Stars) '  />
    <asp:ListItem value="2" selected="True"
             Text='<img src="Styles/Images/reviewrating2.gif" alt=""> (Two Stars) '  />
    <asp:ListItem value="1" selected="True"
             Text='<img src="Styles/Images/reviewrating1.gif" alt=""> (One Stars) '  />
  </asp:RadioButtonList>
  <br /><hr /><br />
  <span class="NormalBold">Comments</span><br />
  <cc1:Editor ID="UserComment" runat="server" />
  <asp:RequiredFieldValidator runat="server" id="RequiredFieldValidator3"
                              ControlToValidate="UserComment" Display="Dynamic"
                              CssClass="ValidationError"
                              ErrorMessage="Please enter your comment." /><br /><br />
  <asp:ImageButton ImageURL="Styles/Images/submit.gif" runat="server"
                   id="ReviewAddBtn" onclick="ReviewAddBtn_Click" />
  <br /><br /><br />
</div>
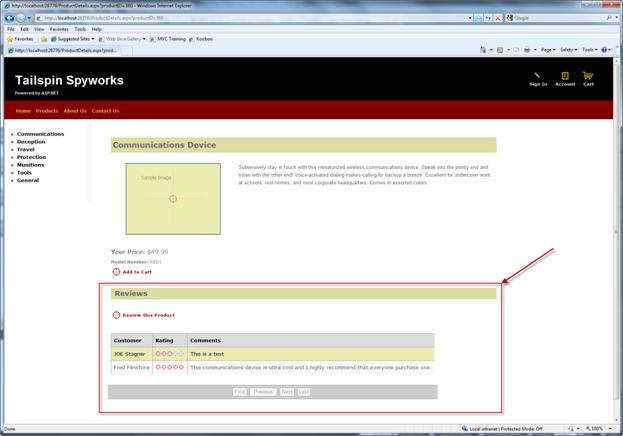
レビューを入力できるようになったので、そのレビューを製品ページに表示してみましょう。
このマークアップを ProductDetails.aspx ページに追加します。
<asp:ListView ID="ListView_Comments" runat="server"
              DataKeyNames="ReviewID,ProductID,Rating" DataSourceID="EDS_CommentsList">
  <ItemTemplate>
    <tr>
      <td><%# Eval("CustomerName") %></td>
      <td>
        <img src='Styles/Images/ReviewRating_d<%# Eval("Rating") %>.gif' alt="">
        <br />
      </td>
      <td>
        <%# Eval("Comments") %>
      </td>
    </tr>
  </ItemTemplate>
  <AlternatingItemTemplate>
    <tr>
      <td><%# Eval("CustomerName") %></td>
      <td>
        <img src='Styles/Images/ReviewRating_da<%# Eval("Rating") %>.gif' alt="">
        <br />
      </td>
      <td><%# Eval("Comments") %></td>
    </tr>
  </AlternatingItemTemplate>
   <EmptyDataTemplate>
     <table runat="server">
       <tr><td>There are no reviews yet for this product.</td></tr>
     </table>
  </EmptyDataTemplate>
  <LayoutTemplate>
    <table runat="server">
      <tr runat="server">
        <td runat="server">
          <table ID="itemPlaceholderContainer" runat="server" border="1">
            <tr runat="server">
              <th runat="server">Customer</th>
              <th runat="server">Rating</th>
              <th runat="server">Comments</th>
             </tr>
             <tr ID="itemPlaceholder" runat="server"></tr>
           </table>
         </td>
       </tr>
       <tr runat="server">
         <td runat="server">
           <asp:DataPager ID="DataPager1" runat="server">
             <Fields>
               <asp:NextPreviousPagerField ButtonType="Button"
                                           ShowFirstPageButton="True"
                                           ShowLastPageButton="True" />
             </Fields>
           </asp:DataPager>
         </td>
       </tr>
     </table>
  </LayoutTemplate>
</asp:ListView>
<asp:EntityDataSource ID="EDS_CommentsList" runat="server"  EnableFlattening="False"
                       AutoGenerateWhereClause="True"
                       EntityTypeFilter=""
                       Select="" Where=""
                       ConnectionString="name=CommerceEntities"
                       DefaultContainerName="CommerceEntities"
                       EntitySetName="Reviews">
   <WhereParameters>
    <asp:QueryStringParameter Name="ProductID" QueryStringField="productID"
                                               Type="Int32" />
  </WhereParameters>
</asp:EntityDataSource>
ここでアプリケーションを実行して製品に移動すると、顧客のレビューを含む製品情報が表示されます。
人気のあるアイテム コントロール (ユーザー コントロールの作成)
Web サイトでの売上を増やすために、人気製品や関連製品を "提案販売" するための機能をいくつか追加します。
これらの機能の最初は、製品カタログの中でとても人気のある製品の一覧です。
アプリケーションのホーム ページに売れ筋のアイテムを表示する "ユーザー コントロール" を作成します。 これはコントロールになるため、Visual Studio のデザイナーでコントロールを任意のページにドラッグ アンド ドロップするだけで、どのページでも使うことができます。
Visual Studio のソリューション エクスプローラーで、ソリューション名を右クリックし、"Controls" という新しいディレクトリを作成します。 そうする必要はありませんが、すべてのユーザー コントロールを "Controls" ディレクトリに作成することで、プロジェクトを整理しておくことに役立ちます。
コントロール フォルダーを右クリックし、[新しい項目] を選びます。
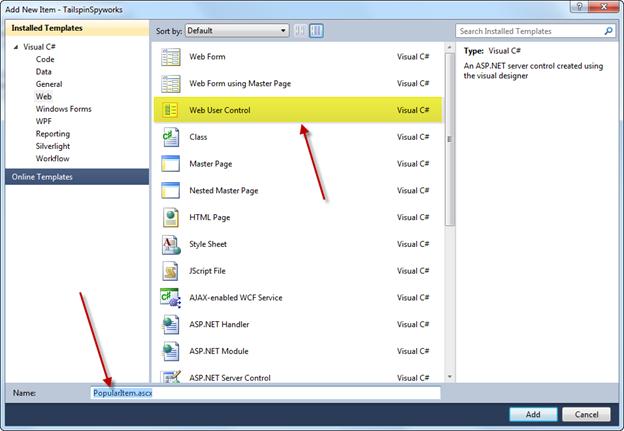
"PopularItems" コントロールの名前を指定します。 ユーザー コントロールのファイル名拡張子は .aspx ではなく .ascx であることに注意してください。
人気のあるアイテム ユーザー コントロールは以下のように定義されます。
<%@ OutputCache Duration="3600" VaryByParam="None" %>
<div class="MostPopularHead">Our most popular items this week</div>
<div id="PanelPopularItems" runat="server">
  <asp:Repeater ID="RepeaterItemsList" runat="server">
    <HeaderTemplate></HeaderTemplate>
      <ItemTemplate>
        <a class='MostPopularItemText'
           href='ProductDetails.aspx?productID=<%# Eval("ProductId") %>'>
                                               <%# Eval("ModelName") %></a><br />
      </ItemTemplate>
    <FooterTemplate></FooterTemplate>
  </asp:Repeater>
</div>
ここでは、このアプリケーションではまだ使用していないメソッドを使用しています。 リピーター コントロールを使用しており、データ ソース コントロールを使用する代わりに、Repeater コントロールを LINQ to Entities クエリの結果にバインドしています。
コントロールの分離コードでは、次のようにします。
using TailspinSpyworks.Data_Access;

protected void Page_Load(object sender, EventArgs e)
{
  using (CommerceEntities db = new CommerceEntities())
    {
    try
      {
      var query = (from ProductOrders in db.OrderDetails
                        join SelectedProducts in db.Products on ProductOrders.ProductID
                        equals SelectedProducts.ProductID
                        group ProductOrders by new
                            {
                            ProductId = SelectedProducts.ProductID,
                            ModelName = SelectedProducts.ModelName
                            } into grp
                        select new
                            {
                            ModelName = grp.Key.ModelName,
                            ProductId = grp.Key.ProductId,
                            Quantity = grp.Sum(o => o.Quantity)
                            } into orderdgrp where orderdgrp.Quantity > 0
                        orderby orderdgrp.Quantity descending select orderdgrp).Take(5);

                    RepeaterItemsList.DataSource = query;
                    RepeaterItemsList.DataBind();
      }
    catch (Exception exp)
      {
      throw new Exception("ERROR: Unable to Load Popular Items - " +
                           exp.Message.ToString(), exp);
      }
    }
}
コントロールのマークアップの先頭にあるこの重要な行にも注目してください。
<%@ OutputCache Duration="3600" VaryByParam="None" %>
最も人気のあるアイテムは刻々と変化するものではないため、キャッシュ ディレクティブを追加してアプリケーションのパフォーマンスを向上させることができます。 このディレクティブにより、コントロールのキャッシュされた出力の有効期限が切れたときにのみコントロールのコードが実行されます。 それ以外の場合は、コントロールの出力のキャッシュされたバージョンが使用されます。
あとは、新しいコントロールを Default.aspx ページに含めるだけです。
ドラッグ アンド ドロップを使用して、既定のフォームの開いている列にコントロールのインスタンスを配置します。
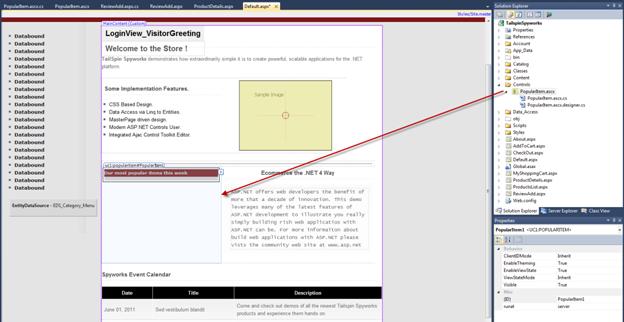
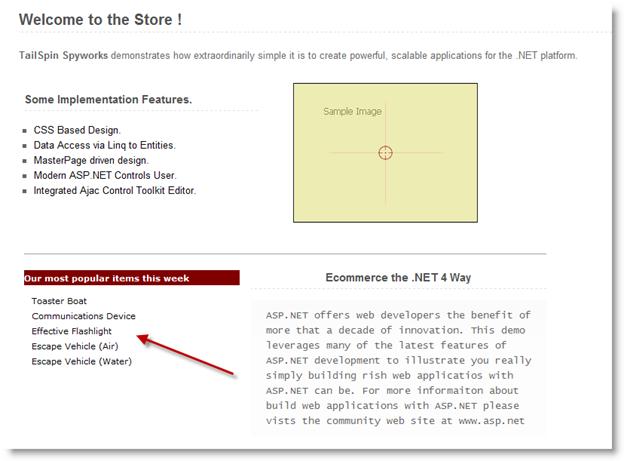
ここでアプリケーションを実行すると、ホーム ページに最も人気のあるアイテムが表示されます。
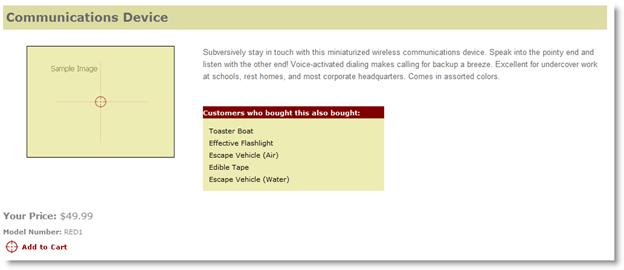
"こちらも購入しています" コントロール (パラメーター付きのユーザー コントロール)
これから作成する 2 つ目のユーザー コントロールでは、コンテキストの特定性を追加することで、提案型販売を次のレベルに引き上げます。
"こちらも購入しています" の上位アイテムを計算するロジックは簡単ではありません。
"こちらも購入しています" コントロールは、現在選ばれている ProductID の OrderDetails レコード (以前に購入したもの) を選び、見つかった一意の注文ごとに OrderID を取得します。
次に、それらすべての Order からすべての製品を選び、購入した数量を合計します。 その数量合計で製品を並べ替え、上位 5 つのアイテムを表示します。
このロジックの複雑さを考慮して、このアルゴリズムをストアド プロシージャとして実装します。
ストアド プロシージャの T-SQL は次のとおりです。
ALTER PROCEDURE dbo.SelectPurchasedWithProducts
 @ProductID int
AS
        SELECT  TOP 5
    OrderDetails.ProductID,
    Products.ModelName,
    SUM(OrderDetails.Quantity) as TotalNum

FROM
    OrderDetails
  INNER JOIN Products ON OrderDetails.ProductID = Products.ProductID

WHERE   OrderID IN
(
    /* This inner query should retrieve all orders that have contained the productID */
    SELECT DISTINCT OrderID
    FROM OrderDetails
    WHERE ProductID = @ProductID
)
AND OrderDetails.ProductID != @ProductID

GROUP BY OrderDetails.ProductID, Products.ModelName

ORDER BY TotalNum DESC
RETURN
このストアド プロシージャ (SelectPurchasedWithProducts) は、アプリケーションに組み込んだときにデータベースに存在していたこと、Entity Data Model を生成したときに、必要なテーブルとビューに加えて、Entity Data Model にこのストアド プロシージャを含めるように指定したことに注意してください。
Entity Data Model からストアド プロシージャにアクセスするには、関数をインポートする必要があります。
ソリューション エクスプローラーで Entity Data Model をダブル クリックしてデザイナーで開き、モデル ブラウザーを開き、デザイナーで右クリックして [関数インポートの追加] を選びます。
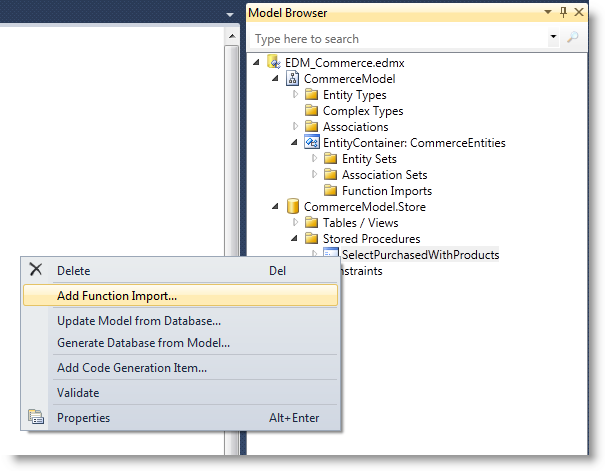
そうすると、このダイアログが開きます。
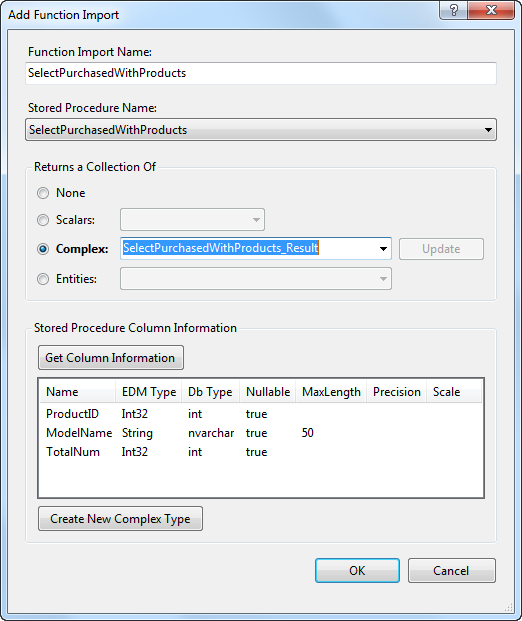
上記のようにフィールドに入力し、[SelectPurchasedWithProducts] を選び、インポートされた関数の名前としてプロシージャ名を使用します。
[OK] をクリックします。
これを完了すると、モデル内の他の項目と同様に、ストアド プロシージャに対して簡単にプログラムできるようになります。
そこで、"Controls" フォルダーに、AlsoPurchased.ascx という名前の新しいユーザー コントロールを作成します。
このコントロールのマークアップは、PopularItems コントロールに非常によく似ています。
<div>
<div class="MostPopularHead">
<asp:Label ID="LabelTitle" runat="server" Text=" Customers who bought this also bought:"></asp:Label></div>
<div id="PanelAlsoBoughtItems" runat="server">
    <asp:Repeater ID="RepeaterItemsList" runat="server">
       <HeaderTemplate></HeaderTemplate>
          <ItemTemplate>
             <a class='MostPopularItemText' href='ProductDetails.aspx?productID=<%# Eval("ProductId") %>'><%# Eval("ModelName") %></a><br />
          </ItemTemplate>
       <FooterTemplate></FooterTemplate>
    </asp:Repeater>
</div>
</div>
注目すべき違いは、レンダリングされるアイテムが製品によって異なるため、出力がキャッシュされないことです。
ProductId はコントロールの "プロパティ" になります。
private int _ProductId;

public int ProductId
{
get { return _ProductId ; }
set { _ProductId = Convert.ToInt32(value); }
}
コントロールの PreRender イベント ハンドラーでは、3 つのことを行う必要があります。
- ProductID が設定されていることを確認します。
- 現在の製品と一緒に購入されたものがあるかどうかを確認します。
- #2 で特定したいくつかのアイテムを出力します。
モデルを通じてストアド プロシージャを呼び出すことがいかに簡単であるかに注目してください。
//--------------------------------------------------------------------------------------+
protected void Page_PreRender(object sender, EventArgs e)
{
  if (_ProductId < 1)
     {
     // This should never happen but we could expand the use of this control by reducing
     // the dependency on the query string by selecting a few RANDOME products here.
     Debug.Fail("ERROR : The Also Purchased Control Can not be used without
                         setting the ProductId.");
     throw new Exception("ERROR : It is illegal to load the AlsoPurchased COntrol
                                  without setting a ProductId.");
     }

  int ProductCount = 0;
  using (CommerceEntities db = new CommerceEntities())
    {
    try
      {
      var v = db.SelectPurchasedWithProducts(_ProductId);
      ProductCount = v.Count();
      }
    catch (Exception exp)
      {
      throw new Exception("ERROR: Unable to Retrieve Also Purchased Items - " +
                                  exp.Message.ToString(), exp);
      }
    }

  if (ProductCount > 0)
     {
     WriteAlsoPurchased(_ProductId);
     }
  else
     {
     WritePopularItems();
     }
}
"こちらも購入しています" があると特定した後は、クエリによって返された結果にリピーターをバインドするだけです。
//-------------------------------------------------------------------------------------+
private void WriteAlsoPurchased(int currentProduct)
{
  using (CommerceEntities db = new CommerceEntities())
        {
        try
          {
          var v = db.SelectPurchasedWithProducts(currentProduct);
          RepeaterItemsList.DataSource = v;
          RepeaterItemsList.DataBind();
          }
         catch (Exception exp)
          {
          throw new Exception("ERROR: Unable to Write Also Purchased - " +
                                                          exp.Message.ToString(), exp);
          }
        }
}
"こちらも購入しています" アイテムがない場合は、カタログ内の他の人気のあるアイテムが表示されます。
//--------------------------------------------------------------------------------------+
private void WritePopularItems()
{
  using (CommerceEntities db = new CommerceEntities())
    {
    try
      {
      var query = (from ProductOrders in db.OrderDetails
                   join SelectedProducts in db.Products on ProductOrders.ProductID
                   equals SelectedProducts.ProductID
                   group ProductOrders by new
                         {
                         ProductId = SelectedProducts.ProductID,
                         ModelName = SelectedProducts.ModelName
                         } into grp
                   select new
                         {
                         ModelName = grp.Key.ModelName,
                         ProductId = grp.Key.ProductId,
                         Quantity = grp.Sum(o => o.Quantity)
                         } into orderdgrp
                   where orderdgrp.Quantity > 0
                   orderby orderdgrp.Quantity descending
                   select orderdgrp).Take(5);

      LabelTitle.Text = "Other items you might be interested in: ";
      RepeaterItemsList.DataSource = query;
      RepeaterItemsList.DataBind();
      }
    catch (Exception exp)
      {
      throw new Exception("ERROR: Unable to Load Popular Items - " +
                                                        exp.Message.ToString(), exp);
      }
    }
}
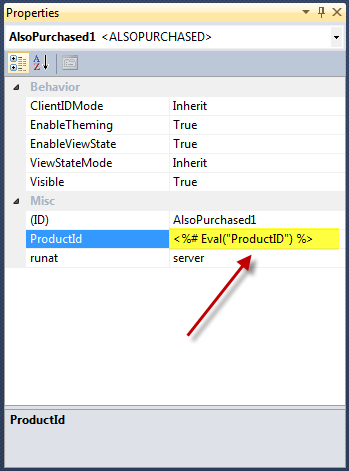
"こちらも購入しています" アイテムを表示するには、ProductDetails.aspx ページを開き、ソリューション エクスプローラーから AlsoPurchased コントロールをドラッグして、マークアップ内のこの位置に表示されるようにします。
<table  border="0">
  <tr>
     <td>
       <img src='Catalog/Images/<%# Eval("ProductImage") %>'  border="0"
                                                   alt='<%# Eval("ModelName") %>' />
     </td>
     <td><%# Eval("Description") %><br /><br /><br />
         <uc1:AlsoPurchased ID="AlsoPurchased1" runat="server" />
     </td>
   </tr>
</table>
これにより、ProductDetails ページの上部にコントロールへの参照が作成されます。
<%@ Register src="Controls/AlsoPurchased.ascx" tagname="AlsoPurchased" tagprefix="uc1" %>
AlsoPurchased ユーザー コントロールには ProductId 番号が必要なので、ページの現在のデータ モデル項目に対して Eval ステートメントを使用して、コントロールの ProductID プロパティを設定します。
ここでビルドして実行し、製品を参照すると、"こちらも購入しています" アイテムが表示されます。