Azure Marketplace イメージを使用して Azure Stack HCI VM イメージを作成する
適用対象: Azure Stack HCI バージョン 23H2
この記事では、Azure Marketplace のソース イメージを使用して、Azure Stack HCI の仮想マシン (VM) イメージを作成する方法について説明します。 Azure portal または Azure CLI を使用して VM イメージを作成し、これらの VM イメージを使用して Azure Stack HCI 上に Arc VM を作成できます。
前提条件
開始する前に、次の前提条件が満たされていることを確認してください。
前提条件を確認して してください。
クライアントを使用して Azure Stack HCI クラスターに接続する場合は、「 クラスターへのリモート接続を参照してください。
Azure Marketplace から VM イメージを追加する
Azure Marketplace イメージから始まる VM イメージを作成し、このイメージを使用して Azure Stack HCI クラスターに VM をデプロイします。
Azure CLI を使用して VM イメージを作成するには、次の手順に従います。
サインインしてサブスクリプションを設定する
Azure Stack HCI システム上 サーバーに接続します。
サインイン。 型:
az login --use-device-codeサブスクリプションを設定します。
az account set --subscription <Subscription ID>
パラメーターを設定します。
イメージのサブスクリプション、リソース グループ、場所、OS の種類のパラメーターを設定します。
< >のパラメーターを適切な値に置き換えます。$subscription = "<Subscription ID>" $resource_group = "<Resource group>" $customLocationName = "<Custom location name>" $customLocationID /subscriptions/<Subscription ID>/resourcegroups/$resource_group/providers/microsoft.extendedlocation/customlocations/$customLocationName $location = "<Location for your Azure Stack HCI cluster>" $osType = "<OS of source image>"パラメーターについては次の表で説明します。
パラメーター 説明 subscriptionAzure Stack HCI クラスターに関連付けられているサブスクリプション。 resource-groupこのイメージに関連付ける Azure Stack HCI クラスターのリソース グループ。 locationAzure Stack HCI クラスターの場所。 たとえば、 eastusになります。os-typeソース イメージに関連付けられているオペレーティング システム。 Windows または Linux を使用できます。 出力例を次に示します。
PS C:\Users\azcli> $subscription = "<Subscription ID>"
PS C:\Users\azcli> $resource_group = "myhci-rg"
PS C:\Users\azcli> $customLocationName = "myhci-cl"
PS C:\Users\azcli> $location = "eastus"
PS C:\Users\azcli> $ostype = "Windows"
Marketplace イメージから VM イメージを作成する
VM イメージをデプロイするカスタムの場所を選択します。 カスタムの場所は、Azure Stack HCI クラスターのカスタムの場所に対応している必要があります。 Azure Stack HCI クラスターのカスタムの場所 ID を取得します。 次のコマンドを実行します。
$customLocationID=(az customlocation show --resource-group $resource_group --name "<custom location name for Azure Stack HCI cluster>" --query id -o tsv)指定したマーケットプレース イメージから始まる VM イメージを作成します。 マーケットプレース イメージのオファー、発行元、SKU、およびバージョンを指定してください。 次の表を使用して、使用可能な Marketplace イメージとその属性値を見つけます。
Name 発行元 プラン SKU バージョン番号 Windows 11 Enterprise マルチセッション + Microsoft 365 Apps バージョン 21H2- Gen2 microsoftwindowsdesktop office-365 win10-21h2-avd-m365-g2 19044.3570.231010 Windows 10 Enterprise マルチセッション バージョン 21H2 + Microsoft 365 Apps- Gen2 microsoftwindowsdesktop office-365 win11-21h2-avd-m365 22000.2538.231010 Windows 10 Enterprise マルチセッション バージョン 21H2- Gen2 microsoftwindowsdesktop windows-10 win10-21h2-avd-g2 19044.3570.231001 Windows 11 Enterprise マルチセッション バージョン 21H2- Gen2 microsoftwindowsdesktop windows-11 win11-21h2-avd 22000.2538.231001 Windows 11 Enterprise マルチセッション バージョン 22H2 - Gen2 microsoftwindowsdesktop windows-11 win11-22h2-avd 22621.2428.231001 Windows 11 バージョン 22H2 Enterprise マルチセッション + Microsoft 365 アプリ (プレビュー) - Gen2 microsoftwindowsdesktop windows11preview win11-22h2-avd-m365 22621.382.220810 Windows Server 2022 Datacenter: Azure Edition - Gen2 microsoftwindowsserver windowsserver 2022-datacenter-azure-edition 20348.2031.231006 Windows Server 2022 Datacenter: Azure Edition Core - Gen2 microsoftwindowsserver windowsserver 2022-datacenter-azure-edition-core 20348.2031.231006 Windows Server 2022 Datacenter: Azure Edition Hotpatch - Gen2 microsoftwindowsserver windowsserver 2022-datacenter-azure-edition-hotpatch 20348.2031.231006 az stack-hci-vm image create --subscription $subscription --resource-group $resource_group --custom-location $customLocationID --location $location --name "<VM image name>" --os-type $ostype --offer "windowsserver" --publisher "<Publisher name>" --sku "<SKU>" --version "<Version number>" --storage-path-id $storagepathidVM イメージのデプロイ ジョブが開始されます。
この例では、ストレージ パスは
--storage-path-idフラグを使用して指定され、ワークロード データ (VM、VM イメージ、OS 以外のデータ ディスクを含む) が指定されたストレージ パスに確実に配置されます。フラグが指定されていない場合、ワークロード データは自動的に高可用性ストレージ パスに配置されます。
イメージのデプロイが完了するまでに数分かかる場合があります。 イメージのダウンロードにかかる時間は、Marketplace イメージのサイズと、ダウンロードに使用できるネットワーク帯域幅によって異なります。
出力例を次に示します。
PS C:\Users\azcli> $customLocationID=(az customlocation show --resource-group $resource_group --name "myhci-cl" --query id -o tsv)
PS C:\Users\azcli> $customLocationID
/subscriptions/<Subscription ID>/resourcegroups/myhci-rg/providers/microsoft.extendedlocation/customlocations/myhci-cl
PS C:\Users\azcli> az stack-hci-vm image create --subscription $subscription --resource-group $resource_group --custom-location $customLocationID --location $location --name "myhci-marketplaceimage" --os-type $ostype --offer "windowsserver" --publisher "microsoftwindowsserver" --sku "2022-datacenter-azure-edition-core" --version "20348.2031.231006" --storage-path-id $storagepathid
{
  "extendedLocation": {
    "name": "/subscriptions/<Subscription ID>/resourceGroups/myhci-rg/providers/Microsoft.ExtendedLocation/customLocations/myhci-cl",
    "type": "CustomLocation"
  },
  "id": "/subscriptions/<Subscription ID>/resourceGroups/myhci-rg/providers/Microsoft.AzureStackHCI/marketplacegalleryimages/myhci-marketplaceimage",
  "location": "eastus",
  "name": "myhci-marketplaceimage",
  "properties": {
    "identifier": {
      "offer": "windowsserver",
      "publisher": "microsoftwindowsserver",
      "sku": "2022-datacenter-azure-edition-core"
    },
    "imagePath": null,
    "osType": "Windows",
    "provisioningState": "Succeeded",
    "status": {
      "downloadStatus": {
        "downloadSizeInMB": 6750
      },
      "progressPercentage": 98,
      "provisioningStatus": {
        "operationId": "13be90e0-a780-45bf-a84a-ae91b6e5e468*A380D53083FF6B0A3A157ED7DFD00D33F6B3D40D5559D11AEAED6AD68F7F1A4A",
        "status": "Succeeded"
      }
    },
    "storagepathId": "/subscriptions/<Subscription ID>/resourceGroups/myhci-rg/providers/Microsoft.AzureStackHCI/storagecontainers/myhci-storagepath",
    "version": {
      "name": "20348.2031.231006",
      "properties": {
        "storageProfile": {
          "osDiskImage": {
            "sizeInMB": 130050
          }
        }
      }
    }
  },
  "resourceGroup": "myhci-rg",
  "systemData": {
    "createdAt": "2023-10-27T21:43:15.920502+00:00",
    "createdBy": "guspinto@contoso.com",
    "createdByType": "User",
    "lastModifiedAt": "2023-10-27T22:06:15.092321+00:00",
    "lastModifiedBy": "319f651f-7ddb-4fc6-9857-7aef9250bd05",
    "lastModifiedByType": "Application"
  },
  "tags": null,
  "type": "microsoft.azurestackhci/marketplacegalleryimages"
}

PS C:\Users\azcli>
![[Azure Marketplace から VM イメージを追加する] オプションを示すスクリーンショット。](media/virtual-machine-image-azure-marketplace/add-image-from-azure-marketplace.png#lightbox)
![[確認と作成] ボタンが強調表示されている [イメージの作成] ページのスクリーンショット。](media/virtual-machine-image-azure-marketplace/create-an-image.png#lightbox)
![[作成] ボタンが強調表示されている [イメージの作成] ページのスクリーンショット。](media/virtual-machine-image-azure-marketplace/create-an-image-create.png#lightbox)


VM イメージを一覧表示する
管理するイメージを選択するには、VM イメージの一覧を表示する必要があります。
Azure CLI を使用して VM イメージを一覧表示するには、次の手順に従います。
PowerShell を管理者として実行します。
パラメーターを設定する。
$subscription = "<Subscription ID associated with your cluster>"
$resource_group = "<Resource group name for your cluster>"
クラスターに関連付けられているすべての VM イメージを一覧表示します。 次のコマンドを実行します。
az stack-hci-vm image list --subscription $subscription --resource-group $resource_group使用するコマンドに応じて、Azure Stack HCI クラスターに関連付けられているイメージの対応するセットが一覧表示されます。
- サブスクリプションのみを指定した場合、コマンドはサブスクリプション内のすべてのイメージを一覧表示します。
- サブスクリプションとリソース グループの両方を指定すると、コマンドによってリソース グループ内のすべてのイメージが一覧表示されます。
これらのイメージには次のものが含まれます。
- Marketplace イメージからの VM イメージ。
- Azure Storage アカウントに存在するカスタム イメージ、またはクラスターまたはクラスターに接続されているクライアント上のローカル共有内にあるカスタム イメージ。
出力例を次に示します。
PS C:\Users\azcli> az stack-hci-vm image list --subscription "<Subscription ID>" --resource-group "myhci-rg"
Command group 'stack-hci-vm' is experimental and under development. Reference and support levels: https://aka.ms/CLI_refstatus
[
  {
    "extendedLocation": {
      "name": "/subscriptions/<Subscription ID>/resourcegroups/myhci-rg/providers/microsoft.extendedlocation/customlocations/myhci-cl",
      "type": "CustomLocation"
    },
    "id": "/subscriptions/<Subscription ID>/resourceGroups/myhci-rg/providers/microsoft.azurestackhci/marketplacegalleryimages/w
inServer2022Az-01",
    "location": "eastus",
    "name": "winServer2022Az-01",
    "properties": {
      "hyperVGeneration": "V2",
      "identifier": {
        "offer": "windowsserver",
        "publisher": "microsoftwindowsserver",
        "sku": "2022-datacenter-azure-edition-core"
      },
      "imagePath": null,
      "osType": "Windows",
      "provisioningState": "Succeeded",
      "status": {
        "downloadStatus": {
          "downloadSizeInMB": 6710
        },
        "progressPercentage": 100,
        "provisioningStatus": {
          "operationId": "19742d69-4a00-4086-8f17-4dc1f7ee6681*E1E9889F0D1840B93150BD74D428EAE483CB67B0904F9A198C161AD471F670ED",
          "status": "Succeeded"
        }
      },
      "storagepathId": null,
      "version": {
        "name": "20348.2031.231006",
        "properties": {
          "storageProfile": {
            "osDiskImage": {
              "sizeInMB": 130050
            }
          }
        }
      }
    },
    "resourceGroup": "myhci-rg",
    "systemData": {
      "createdAt": "2023-10-30T21:44:53.020512+00:00",
      "createdBy": "guspinto@contoso.com",
      "createdByType": "User",
      "lastModifiedAt": "2023-10-30T22:08:25.495995+00:00",
      "lastModifiedBy": "319f651f-7ddb-4fc6-9857-7aef9250bd05",
      "lastModifiedByType": "Application"
    },
    "tags": {},
    "type": "microsoft.azurestackhci/marketplacegalleryimages"
  }
]
PS C:\Users\azcli>

VM イメージのプロパティを表示する
イメージを使用して VM を作成する前に、VM イメージのプロパティを表示したい場合があります。 イメージのプロパティを表示するには、次の手順に従います。
Azure CLI を使用してイメージのプロパティを表示するには、次の手順に従います。
PowerShell を管理者として実行します。
次のパラメーターを設定します。
$subscription = "<Subscription ID>"
$resource_group = "<Cluster resource group>"
$mktplaceImage = "<Marketplace image name>"
イメージのプロパティは、2 つの異なる方法で表示できます。ID を指定するか、名前とリソース グループを指定します。 Marketplace イメージ ID を指定するときは、次の手順を実行します。
次のパラメーターを設定します。
$mktplaceImageID = "/subscriptions/<Subscription ID>/resourceGroups/myhci-rg/providers/Microsoft.AzureStackHCI/galleryimages/myhci-marketplaceimage"次のコマンドを実行してプロパティを表示します。
az stack-hci-vm image show --ids $mktplaceImageIDこのコマンドの出力例を次に示します。
PS C:\Users\azcli> az stack-hci-vm image show --ids $mktplaceImageID
Command group 'stack-hci-vm' is experimental and under development. Reference and support levels: https://aka.ms/CLI_refstatus
{
  "extendedLocation": {
    "name": "/subscriptions/<Subscription ID>/resourcegroups/myhci-rg/providers/microsoft.extendedlocation/customlocations/myhci-cl",
    "type": "CustomLocation"
  },
  "id": "/subscriptions/<Subscription ID>/resourceGroups/myhci-rg/providers/Microsoft.AzureStackHCI/galleryimages/myhci-marketplaceimage",
  "location": "eastus",
  "name": "myhci-marketplaceimage",
  "properties": {
    "containerName": null,
    "hyperVGeneration": null,
    "identifier": null,
    "imagePath": null,
    "osType": "Windows",
    "provisioningState": "Succeeded",
    "status": null,
    "version": null
  },
  "resourceGroup": "myhci-rg",
  "systemData": {
    "createdAt": "2022-08-05T20:52:38.579764+00:00",
    "createdBy": "guspinto@microsoft.com",
    "createdByType": "User",
    "lastModifiedAt": "2022-08-05T20:52:38.579764+00:00",
    "lastModifiedBy": "guspinto@microsoft.com",
    "lastModifiedByType": "User"
  },
  "tags": null,
  "type": "microsoft.azurestackhci/galleryimages"
}
PS C:\Users\azcli>


VM イメージの更新
Azure Marketplace で新しい更新されたイメージを使用できる場合、Azure Stack HCI クラスター上の VM イメージは古くなり、更新する必要があります。 更新操作は、イメージのインプレース更新ではありません。 代わりに、更新されたイメージが使用可能な VM イメージを確認し、更新するイメージを選択できます。 更新後、VM イメージの作成操作では、新しく更新されたイメージが使用されます。
VM イメージを更新するには、Azure portal で次の手順を使用します。
更新プログラムが利用可能かどうかを確認するには、一覧ビューから VM イメージを選択します。
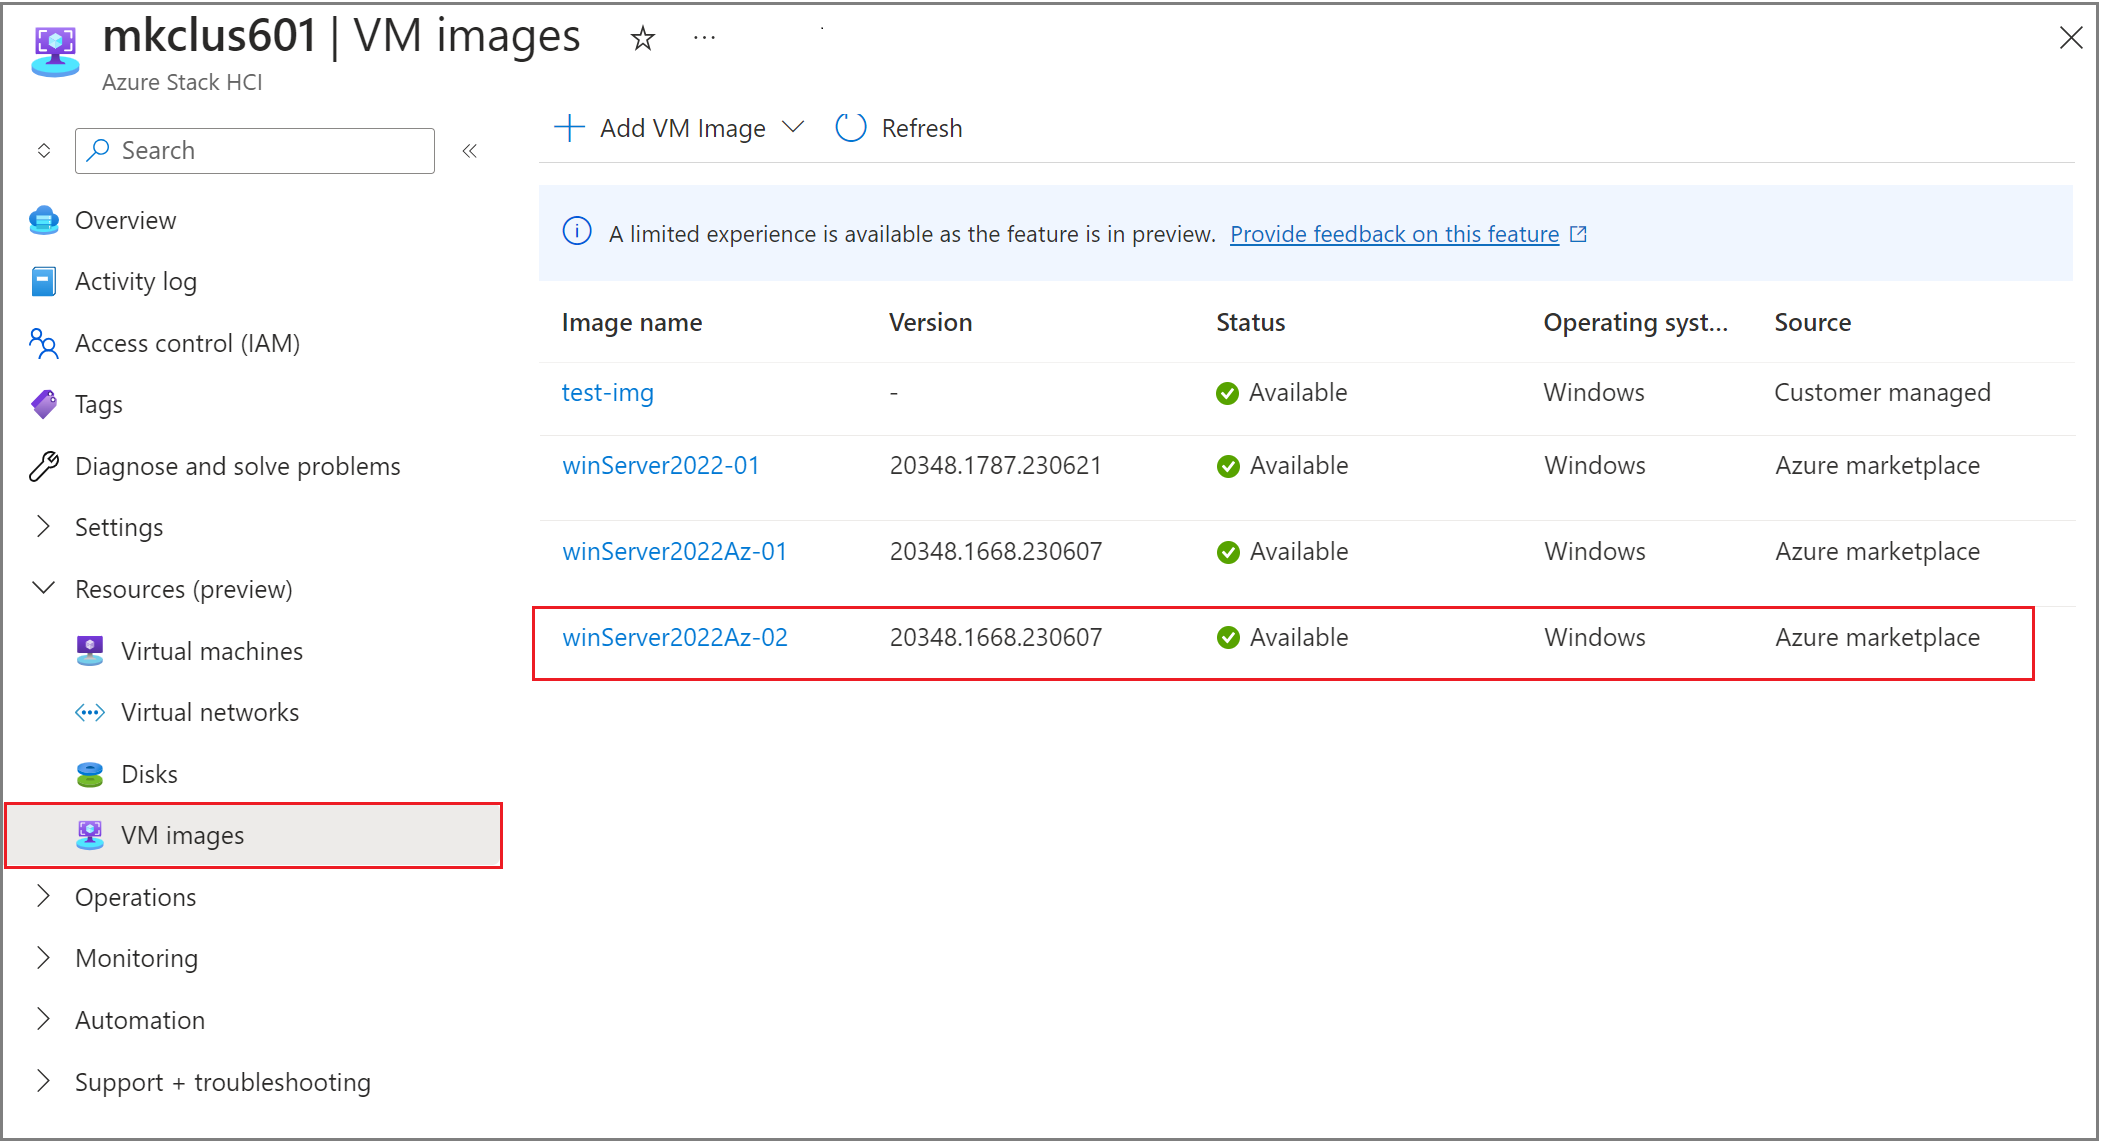
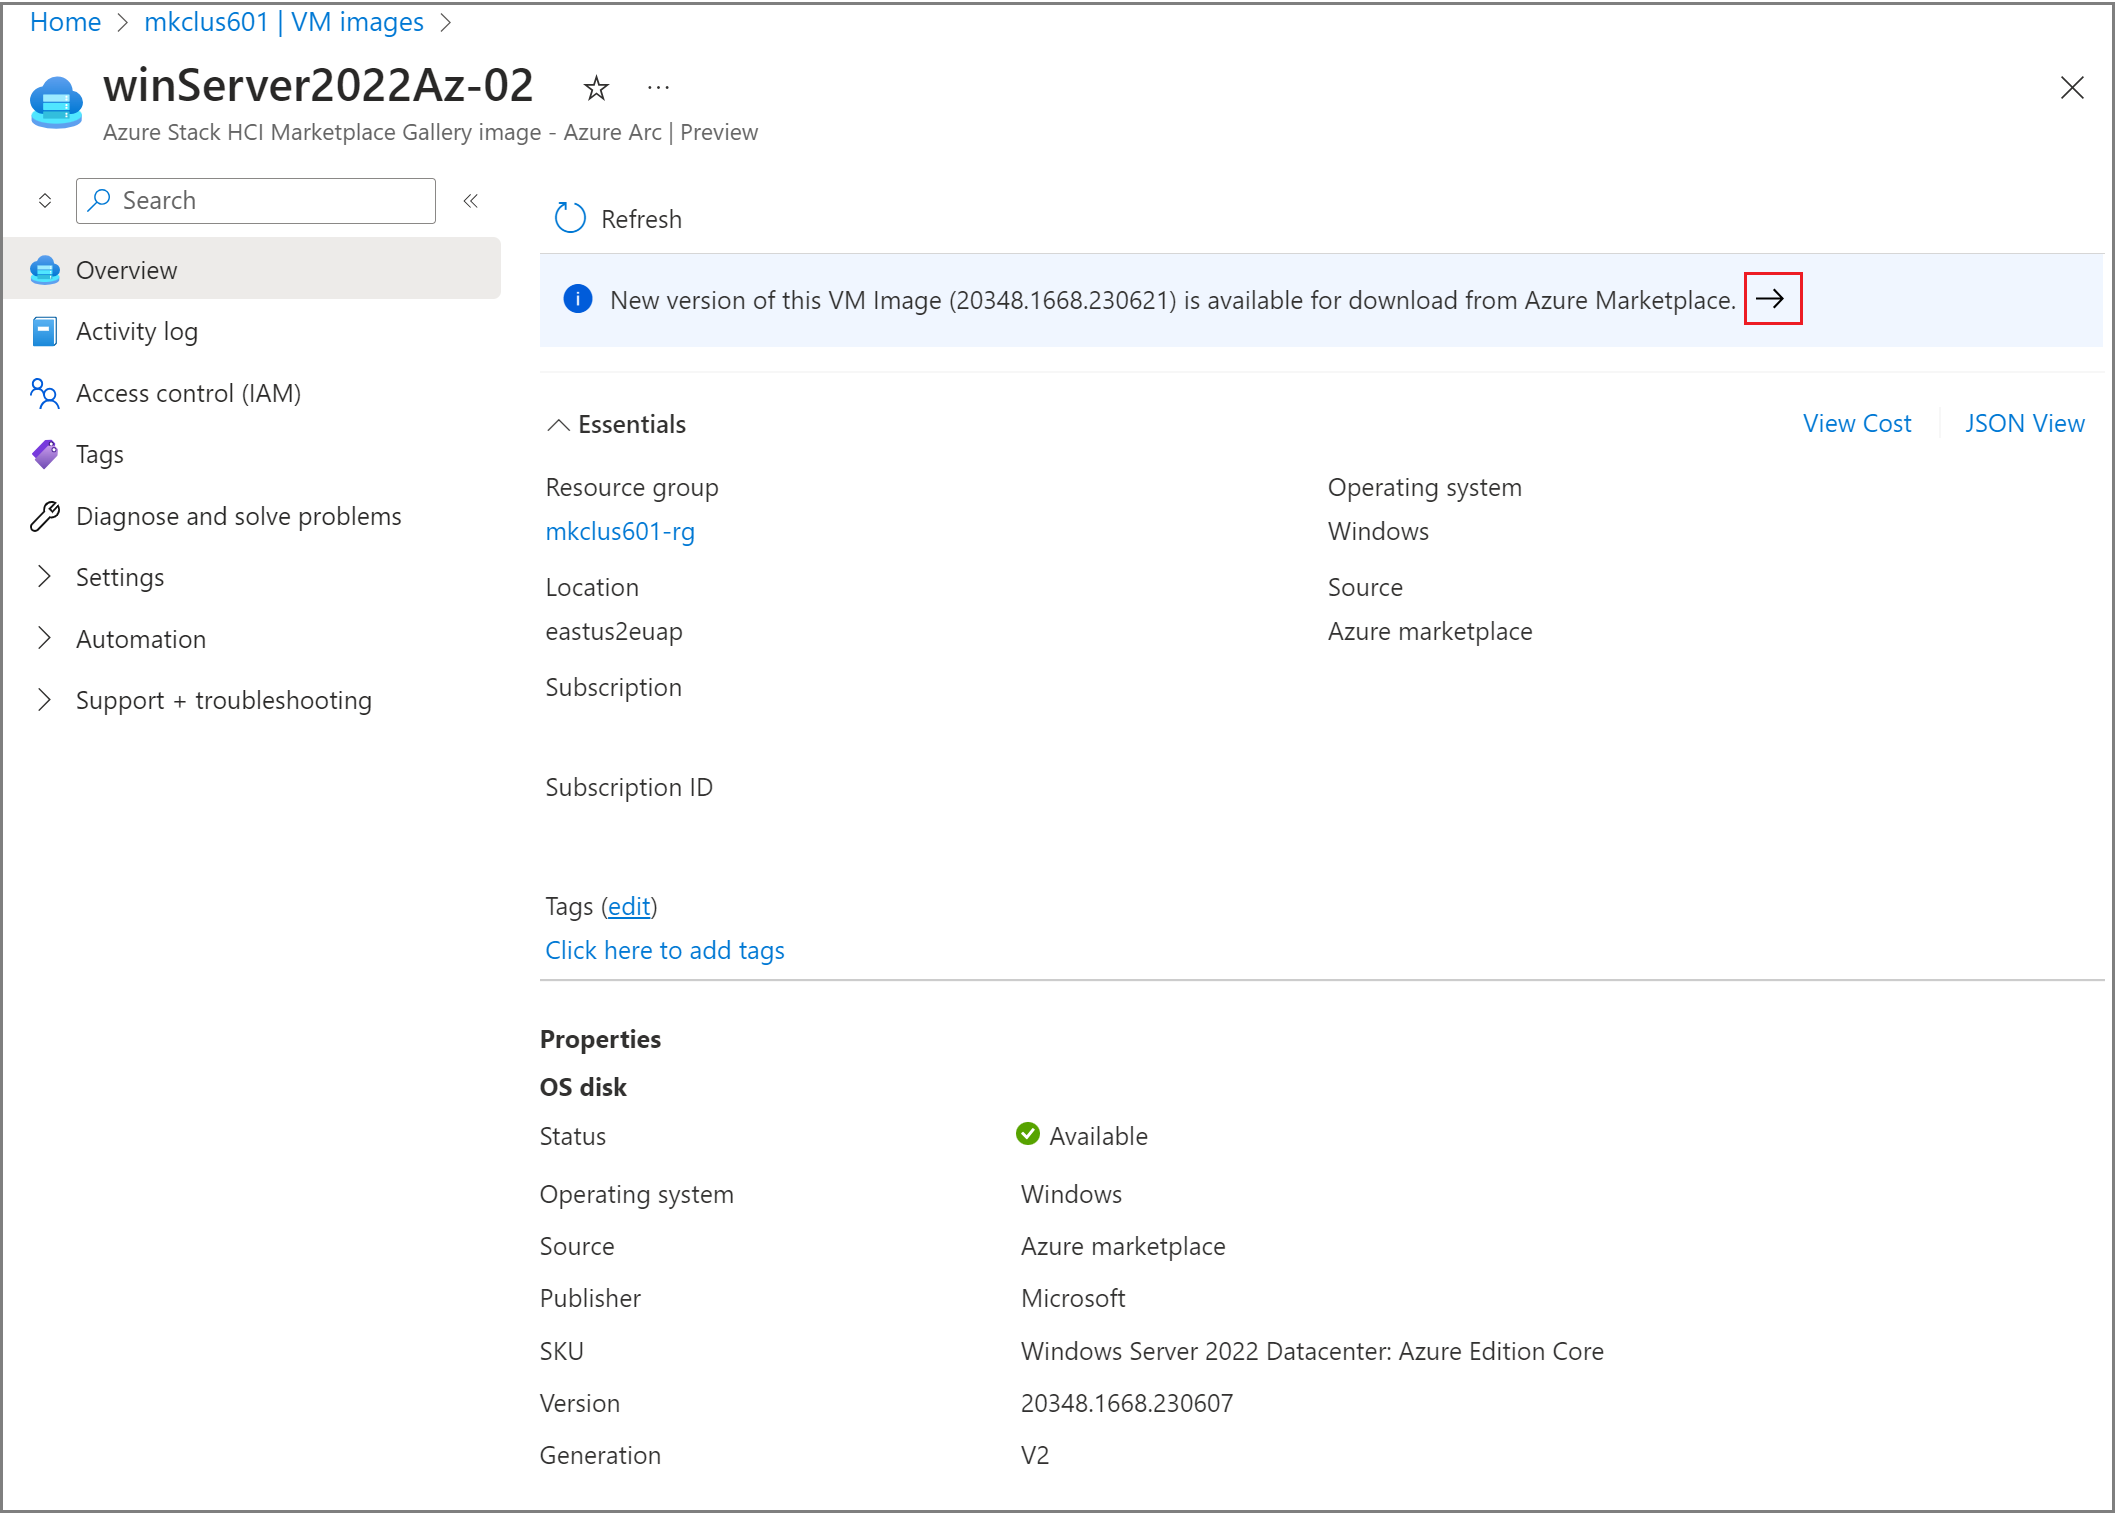
Overview ブレードには、新しい VM イメージがダウンロード可能な場合は、そのイメージが表示されるバナーが表示されます。 新しいイメージに更新するには、矢印アイコン 選択。
イメージの詳細を確認し、 Review と create を選択します。 既定では、新しいイメージでは、前のイメージと同じリソース グループとインスタンスの詳細が使用されます。
新しいイメージの名前は、前のイメージの名前に基づいてインクリメントされます。 たとえば、 winServer2022-01 という名前の既存のイメージには、 winServer2022-02 という名前の更新されたイメージがあります。
![新しい VM イメージの [確認と作成] ダイアログを示すスクリーンショット。](media/virtual-machine-image-azure-marketplace/review-and-create-image.png)
操作を完了するには、[作成] を選択します。
![新しい VM イメージの [イメージの作成] ダイアログを示すスクリーンショット。](media/virtual-machine-image-azure-marketplace/create-image.png)
新しい VM イメージが作成されたら、新しいイメージを使用して VM を作成し、VM が正常に動作することを確認します。 検証後、古い VM イメージを削除できます。
Note
このリリースでは、そのイメージに関連付けられている VM が実行されている場合、VM イメージを削除することはできません。 VM を停止し、VM イメージを削除します。


![新しい VM イメージの [確認と作成] ダイアログを示すスクリーンショット。](media/virtual-machine-image-azure-marketplace/review-and-create-image.png#lightbox)
![新しい VM イメージの [イメージの作成] ダイアログを示すスクリーンショット。](media/virtual-machine-image-azure-marketplace/create-image.png#lightbox)
VM イメージの削除
何らかの理由でダウンロードが失敗した場合、またはイメージが不要になった場合は、VM イメージを削除できます。 VM イメージを削除するには、次の手順に従います。
PowerShell を管理者として実行します。
次のパラメーターを設定します。
$subscription = "<Subscription ID>"
$resource_group = "<Cluster resource group>"
$galleryImageName = "<Gallery image name>"
既存の VM イメージを削除します。 次のコマンドを実行します。
az stack-hci-vm image delete --subscription $subscription --resource-group $resource_group --name $mktplaceImage --yes
イメージは、次の 2 つの方法で削除できます。
- 名前とリソース グループを指定します。
- ID を指定します。
イメージを削除したら、イメージが削除されていることを確認できます。 名前とリソース グループを指定してイメージが削除されたときの出力例を次に示します。
PS C:\Users\azcli> $subscription = "<Subscription ID>"
PS C:\Users\azcli> $resource_group = "myhci-rg"
PS C:\Users\azcli> $mktplaceImage = "myhci-marketplaceimage"
PS C:\Users\azcli> az stack-hci-vm image delete --name $mktplaceImage --resource-group $resource_group
Command group 'stack-hci-vm' is experimental and under development. Reference and support levels: https://aka.ms/CLI_refstatus
Are you sure you want to perform this operation? (y/n): y
PS C:\Users\azcli> az stack-hci-vm image show --name $mktplaceImage --resource-group $resource_group
Command group 'stack-hci-vm' is experimental and under development. Reference and support levels: https://aka.ms/CLI_refstatus
ResourceNotFound: The Resource 'Microsoft.AzureStackHCI/marketplacegalleryimages/myhci-marketplaceimage' under resource group 'myhci-rg' was not found. For more details please go to https://aka.ms/ARMResourceNotFoundFix
PS C:\Users\azcli>

