チュートリアル:Azure Notebooks を使用して電気自動車のルートを案内する (Python)
Azure Maps は、Azure に統合された地理空間サービス API のポートフォリオであり、開発者はこれを使用して、IoT、モビリティ、資産追跡などのさまざまなシナリオに対応する位置認識アプリケーションを作成できます。
Azure Maps REST API は、地理空間データ分析と機械学習に対して Python や R などの言語をサポートしており、車両の種類や到達可能なエリアなどの条件に基づいてルートを計算するための堅牢なルーティング API が用意されています。
このチュートリアルでは、Azure Maps API と共に VS Code での Jupyter ノートブックと Python を使用して電気自動車のルートを指定し、バッテリ残量が少なくなったときは最寄りの充電ステーションを見つける方法について説明します。
このチュートリアルでは、次のことについて説明します。
- VS Code での Jupyter Notebook を作成し、実行します。
- Python で Azure Maps REST API シリーズを呼び出す。
- 電気自動車の消費モデルに基づいて到達可能範囲を調べる。
- 到達可能範囲 (つまり等時線) 内にある電気自動車充電スタンドを検索する。
- 到達可能範囲の境界線と充電スタンドをマップ上にレンダリングする。
- 走行時間に基づいて最も近い電気自動車充電スタンドまでのルートを特定し、視覚化する。
前提条件
- Azure Maps アカウント
- サブスクリプション キー
- Visual Studio Code
- VS Code での Jupyter Notebooks に関する実用的な知識
- Jupyter Notebooks で Python を使用するための環境設定。 詳細については、「環境を設定する」を参照してください。
Note
Azure Maps での認証の詳細については、「Azure Maps での認証の管理」を参照してください。
プロジェクト レベルのパッケージをインストールする
EV ルーティングと到達可能範囲プロジェクトは aiohttp と IPython パイソン ライブラリに依存しています。 Visual Studio ターミナルで pip を使用してインストールできます。
pip install aiohttp
pip install ipython
Visual Studio Code で Jupyter Notebook を開く
ダウンロードして、次のチュートリアルで使用するノートブックを開きます。
GitHub の AzureMapsJupyterSamples リポジトリにある EVrouting.ipynb ファイルを開きます。
画面右上隅の [RAW ファイルをダウンロード] ボタンを選択し、ファイルをローカルに保存します。

ファイルを右クリックして [> Visual Studio Code で開く] を選択するか、VS Code ファイルエクスプローラー経由で、Visual Studio Code でダウンロードしたノートブックを開きます。
必要なモジュールとフレームワークを読み込む
コードが追加されると、セルの左にある [実行] アイコンを使用してセルを実行でき、出力はコード セルの下に表示されます。
必要なモジュールとフレームワークをすべて読み込むには、次のスクリプトを実行します。
import time
import aiohttp
import urllib.parse
from IPython.display import Image, display
![[実行] ボタンが強調表示された、必要なインポート ステートメントを含むノートブックの最初のセルをダウンロードする方法を示すスクリーンショット。](media/tutorial-ev-routing/import-libraries.png)
到達可能範囲の境界線を要求する
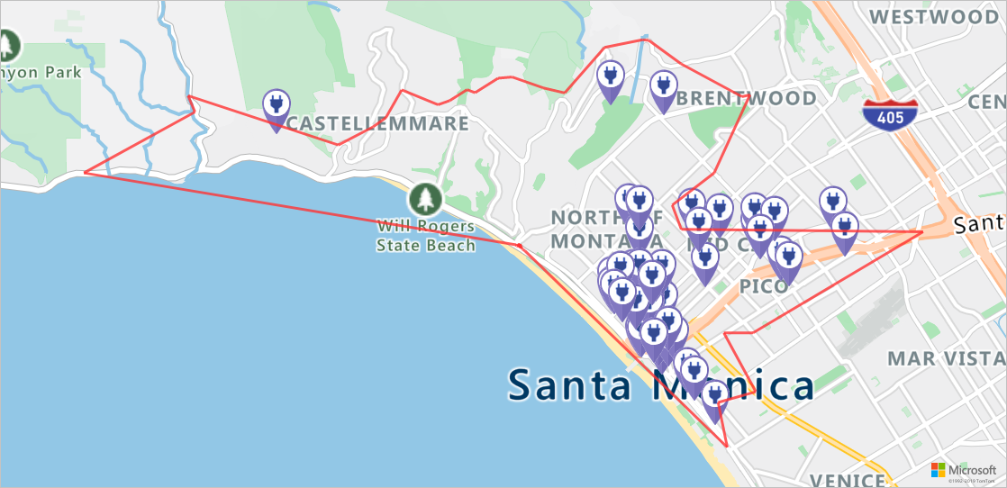
ある配送会社は、何台かの電気自動車を含む車両を運用しています。 これらの車両は、日中に倉庫に戻さずに充電する必要があります。 充電残量が 1 時間を下回ると、到達可能範囲内にある充電ステーションの検索が実行されます。 次に、これらの充電ステーションの範囲の境界情報が取得されます。
要求された routeType は、経済性と速度のバランスを取る eco です。 次のスクリプトでは、車両の消費モデルに関連するパラメーターを使用して、Azure Maps ルート案内サービスの Get Route Range API を呼び出します。 次に、スクリプトによって応答が解析され、車の最大到達可能範囲を表す多角形オブジェクトが GeoJSON 形式で作成されます。
subscriptionKey = "Your Azure Maps key"
currentLocation = [34.028115,-118.5184279]
session = aiohttp.ClientSession()
# Parameters for the vehicle consumption model
travelMode = "car"
vehicleEngineType = "electric"
currentChargeInkWh=45
maxChargeInkWh=80
timeBudgetInSec=550
routeType="eco"
constantSpeedConsumptionInkWhPerHundredkm="50,8.2:130,21.3"
# Get boundaries for the electric vehicle's reachable range.
routeRangeResponse = await (await session.get("https://atlas.microsoft.com/route/range/json?subscription-key={}&api-version=1.0&query={}&travelMode={}&vehicleEngineType={}¤tChargeInkWh={}&maxChargeInkWh={}&timeBudgetInSec={}&routeType={}&constantSpeedConsumptionInkWhPerHundredkm={}"
.format(subscriptionKey,str(currentLocation[0])+","+str(currentLocation[1]),travelMode, vehicleEngineType, currentChargeInkWh, maxChargeInkWh, timeBudgetInSec, routeType, constantSpeedConsumptionInkWhPerHundredkm))).json()
polyBounds = routeRangeResponse["reachableRange"]["boundary"]
for i in range(len(polyBounds)):
coordList = list(polyBounds[i].values())
coordList[0], coordList[1] = coordList[1], coordList[0]
polyBounds[i] = coordList
polyBounds.pop()
polyBounds.append(polyBounds[0])
boundsData = {
"geometry": {
"type": "Polygon",
"coordinates":
[
polyBounds
]
}
}
到達可能範囲内にある電気自動車充電スタンドを検索する
電気自動車の到達可能範囲 (等時線) を決定したら、そのエリア内の充電ステーションを検索できます。
次のスクリプトにより、Azure Maps の Post Search Inside Geometry API が使用され、車両の最大到達可能範囲内にある充電ステーションが検索されます。 次に、応答を解析して到達可能な場所の配列が作成されます。
# Search for electric vehicle stations within reachable range.
searchPolyResponse = await (await session.post(url = "https://atlas.microsoft.com/search/geometry/json?subscription-key={}&api-version=1.0&query=electric vehicle station&idxSet=POI&limit=50".format(subscriptionKey), json = boundsData)).json()

reachableLocations = []
for loc in range(len(searchPolyResponse["results"])):
                location = list(searchPolyResponse["results"][loc]["position"].values())
                location[0], location[1] = location[1], location[0]
                reachableLocations.append(location)
マップ上に充電スタンドと到達可能範囲をレンダリングする
次のスクリプトを実行して、Azure Maps の Get Map Image サービスを呼び出し、静的なマップ画像上に充電ポイントと最大到達可能境界をレンダリングします。
# Get boundaries for the bounding box.
def getBounds(polyBounds):
    maxLon = max(map(lambda x: x[0], polyBounds))
    minLon = min(map(lambda x: x[0], polyBounds))

    maxLat = max(map(lambda x: x[1], polyBounds))
    minLat = min(map(lambda x: x[1], polyBounds))

    # Buffer the bounding box by 10 percent to account for the pixel size of pins at the ends of the route.
    lonBuffer = (maxLon-minLon)*0.1
    minLon -= lonBuffer
    maxLon += lonBuffer

    latBuffer = (maxLat-minLat)*0.1
    minLat -= latBuffer
    maxLat += latBuffer

    return [minLon, maxLon, minLat, maxLat]

minLon, maxLon, minLat, maxLat = getBounds(polyBounds)
polyBoundsFormatted = ('|'.join(map(str, polyBounds))).replace('[','').replace(']','').replace(',','')
reachableLocationsFormatted = ('|'.join(map(str, reachableLocations))).replace('[','').replace(']','').replace(',','')

path = "lcff3333|lw3|la0.80|fa0.35||{}".format(polyBoundsFormatted)
pins = "custom|an15 53||{}||https://raw.githubusercontent.com/Azure-Samples/AzureMapsCodeSamples/e3a684e7423075129a0857c63011e7cfdda213b7/Static/images/icons/ev_pin.png".format(reachableLocationsFormatted)

encodedPins = urllib.parse.quote(pins, safe='')

# Render the range and electric vehicle charging points on the map.
staticMapResponse =  await session.get("https://atlas.microsoft.com/map/static/png?api-version=2022-08-01&subscription-key={}&pins={}&path={}&bbox={}&zoom=12".format(subscriptionKey,encodedPins,path,str(minLon)+", "+str(minLat)+", "+str(maxLon)+", "+str(maxLat)))

poiRangeMap = await staticMapResponse.content.read()

display(Image(poiRangeMap))
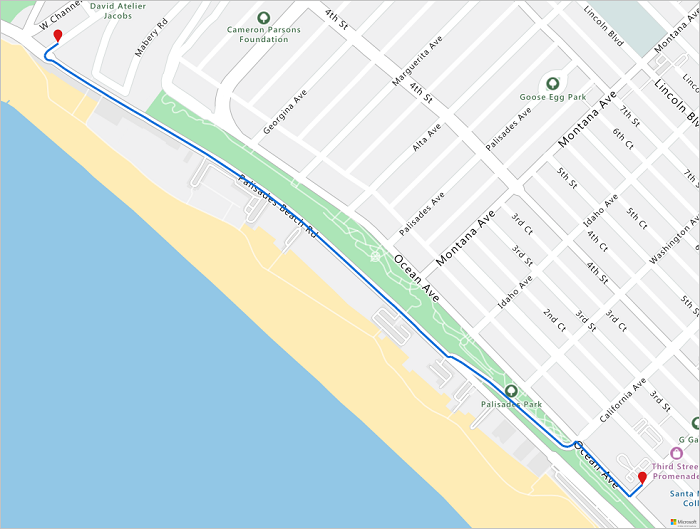
最適な充電スタンドを探す
まず、車両の到達可能範囲内にある可能性のあるすべての充電ステーションを特定します。 次に、これらのステーションのうちどのステーションに最短時間でアクセスできるか判断します。
次のスクリプトでは、Azure Maps の Matrix Routing API を呼び出しています。 車両の位置、移動時間、各充電ステーションまでの距離が返されます。 後続のスクリプトにより、この応答が解析され、最短時間で到達できる最寄りの充電ステーションが特定されます。
locationData = {
            "origins": {
              "type": "MultiPoint",
              "coordinates": [[currentLocation[1],currentLocation[0]]]
            },
            "destinations": {
              "type": "MultiPoint",
              "coordinates": reachableLocations
            }
         }

# Get the travel time and distance to each specified charging station.
searchPolyRes = await (await session.post(url = "https://atlas.microsoft.com/route/matrix/json?subscription-key={}&api-version=1.0&routeType=shortest&waitForResults=true".format(subscriptionKey), json = locationData)).json()

distances = []
for dist in range(len(reachableLocations)):
    distances.append(searchPolyRes["matrix"][0][dist]["response"]["routeSummary"]["travelTimeInSeconds"])

minDistLoc = []
minDistIndex = distances.index(min(distances))
minDistLoc.extend([reachableLocations[minDistIndex][1], reachableLocations[minDistIndex][0]])
closestChargeLoc = ",".join(str(i) for i in minDistLoc)
最も近い充電スタンドへのルートを計算する
最寄りの充電ステーションを見つかったら、Get Route Directions API を使用して、車両の現在位置からの詳細な道順を取得します。 次のセルでスクリプトを実行して、ルートを表す GeoJSON オブジェクトを生成して解析します。
# Get the route from the electric vehicle's current location to the closest charging station.
routeResponse = await (await session.get("https://atlas.microsoft.com/route/directions/json?subscription-key={}&api-version=1.0&query={}:{}".format(subscriptionKey, str(currentLocation[0])+","+str(currentLocation[1]), closestChargeLoc))).json()

route = []
for loc in range(len(routeResponse["routes"][0]["legs"][0]["points"])):
                location = list(routeResponse["routes"][0]["legs"][0]["points"][loc].values())
                location[0], location[1] = location[1], location[0]
                route.append(location)

routeData = {
         "type": "LineString",
         "coordinates": route
     }
ルートを視覚化する
ルートを視覚化するには、Get Map Image API を使用してマップ上にレンダリングします。
destination = route[-1]

#destination[1], destination[0] = destination[0], destination[1]

routeFormatted = ('|'.join(map(str, route))).replace('[','').replace(']','').replace(',','')
path = "lc0f6dd9|lw6||{}".format(routeFormatted)
pins = "default|codb1818||{} {}|{} {}".format(str(currentLocation[1]),str(currentLocation[0]),destination[0],destination[1])


# Get boundaries for the bounding box.
minLon, maxLon = (float(destination[0]),currentLocation[1]) if float(destination[0])<currentLocation[1] else (currentLocation[1], float(destination[0]))
minLat, maxLat = (float(destination[1]),currentLocation[0]) if float(destination[1])<currentLocation[0] else (currentLocation[0], float(destination[1]))

# Buffer the bounding box by 10 percent to account for the pixel size of pins at the ends of the route.
lonBuffer = (maxLon-minLon)*0.1
minLon -= lonBuffer
maxLon += lonBuffer

latBuffer = (maxLat-minLat)*0.1
minLat -= latBuffer
maxLat += latBuffer

# Render the route on the map.
staticMapResponse = await session.get("https://atlas.microsoft.com/map/static/png?api-version=2022-08-01&subscription-key={}&&path={}&pins={}&bbox={}&zoom=16".format(subscriptionKey,path,pins,str(minLon)+", "+str(minLat)+", "+str(maxLon)+", "+str(maxLat)))

staticMapImage = await staticMapResponse.content.read()

await session.close()
display(Image(staticMapImage))
このチュートリアルでは、Python を使用して Azure Maps REST API シリーズを直接呼び出し、Azure Maps のデータを視覚化する方法について説明しました。
このチュートリアルで使用した Azure Maps API の詳細については、以下を参照してください。
- Get Route Directions
- Get Route Range
- Post Route Matrix
- Post Search Inside Geometry
- レンダリング - Get Map Image
Azure Maps REST API シリーズの完全な一覧については、Azure Maps REST API に関する記事を参照してください。