Bicep デプロイ スクリプトからプライベート仮想ネットワークにアクセスする
Microsoft.Resources/deploymentScripts バージョン 2023-08-01では、いくつかの追加構成を使用してプライベート ネットワークでデプロイ スクリプトを実行できます:
ユーザー割り当てマネージド ID を作成して、それを
identityプロパティに指定します。 ID を割り当てるには、Identity を参照してください。プライベート ネットワークにストレージ アカウントを作成し、配置スクリプトを指定して既存のストレージ アカウントを使います。 詳細については、「既存のストレージ アカウントを使用する」を参照してください。 ストレージ アカウントには、いくつかの追加の構成が必要です:
- Azure portal でストレージ アカウントを開きます。
- 左側のメニューの [アクセス制御 (IAM)] を選択し、[ロールの割り当て] タブを選択します。
- ユーザー割り当てマネージド ID にストレージ ファイル データ特権共同作成者 ロールを追加します。
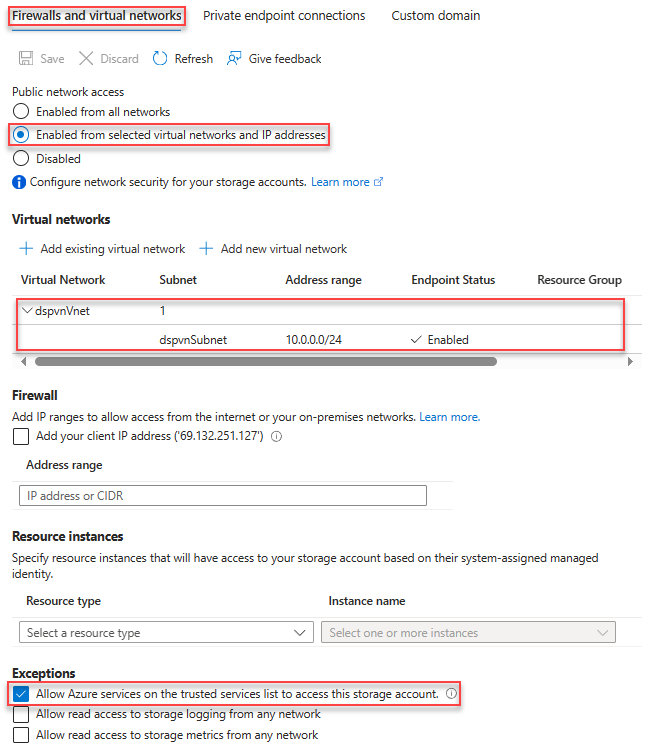
- 左側のメニューの [セキュリティとネットワーク] で、[ネットワーク] を選択し、[ファイアウォールと仮想ネットワーク] を選択します。
- [選択した仮想ネットワークと IP アドレスから有効] を選択します。
- [仮想ネットワーク] で、サブネットを追加します。 次のスクリーンショットでは、サブネットは dspvnVnet という名前です。
- [例外] で [Allow Azure services on the trusted services list to access this storage account]\(信頼されたサービスの一覧の Azure サービスにこのストレージアカウントへのアクセスを許可する\) を選択します。
次の Bicep ファイルは、配置スクリプトを実行するための環境を構成する方法を示しています。
@maxLength(10) // Required maximum length, because the storage account has a maximum of 26 characters
param prefix string
param location string = resourceGroup().location
param userAssignedIdentityName string = '${prefix}Identity'
param storageAccountName string = '${prefix}stg${uniqueString(resourceGroup().id)}'
param vnetName string = '${prefix}Vnet'
param subnetName string = '${prefix}Subnet'

resource vnet 'Microsoft.Network/virtualNetworks@2023-05-01' = {
  name: vnetName
  location: location
  properties: {
    addressSpace: {
      addressPrefixes: [
        '10.0.0.0/16'
      ]
    }
    enableDdosProtection: false
    subnets: [
      {
        name: subnetName
        properties: {
          addressPrefix: '10.0.0.0/24'
          serviceEndpoints: [
            {
              service: 'Microsoft.Storage'
            }
          ]
          delegations: [
            {
              name: 'Microsoft.ContainerInstance.containerGroups'
              properties: {
                serviceName: 'Microsoft.ContainerInstance/containerGroups'
              }
            }
          ]
        }
      }
    ]
  }
}

resource subnet 'Microsoft.Network/virtualNetworks/subnets@2023-05-01' existing = {
  parent: vnet
  name: subnetName
}
resource storageAccount 'Microsoft.Storage/storageAccounts@2023-01-01' = {
  name: storageAccountName
  location: location
  sku: {
    name: 'Standard_LRS'
  }
  kind: 'StorageV2'
  properties: {
    networkAcls: {
      bypass: 'AzureServices'
      virtualNetworkRules: [
        {
          id: subnet.id
          action: 'Allow'
          state: 'Succeeded'
        }
      ]
      defaultAction: 'Deny'
    }
  }
}

resource userAssignedIdentity 'Microsoft.ManagedIdentity/userAssignedIdentities@2023-01-31' = {
  name: userAssignedIdentityName
  location: location
}

resource storageFileDataPrivilegedContributor 'Microsoft.Authorization/roleDefinitions@2022-04-01' existing = {
  name: '69566ab7-960f-475b-8e7c-b3118f30c6bd' // Storage File Data Privileged Contributor
  scope: tenant()
}

resource roleAssignment 'Microsoft.Authorization/roleAssignments@2022-04-01' = {
  scope: storageAccount

  name: guid(storageFileDataPrivilegedContributor.id, userAssignedIdentity.id, storageAccount.id)
  properties: {
    principalId: userAssignedIdentity.properties.principalId
    roleDefinitionId: storageFileDataPrivilegedContributor.id
    principalType: 'ServicePrincipal'
  }
}
次の Bicep ファイルを使って、配置をテストできます。
param prefix string

param location string  = resourceGroup().location
param utcValue string = utcNow()

param storageAccountName string
param vnetName string
param subnetName string
param userAssignedIdentityName string

resource vnet 'Microsoft.Network/virtualNetworks@2023-05-01' existing = {
  name: vnetName

  resource subnet 'subnets' existing = {
    name: subnetName
  }
}

resource userAssignedIdentity 'Microsoft.ManagedIdentity/userAssignedIdentities@2023-01-31' existing = {
  name: userAssignedIdentityName
}

resource dsTest 'Microsoft.Resources/deploymentScripts@2023-08-01' = {
  name: '${prefix}DS'
  location: location
  identity: {
    type: 'userAssigned'
    userAssignedIdentities: {
      '${userAssignedIdentity.id}': {}
    }
  }
  kind: 'AzureCLI'
  properties: {
    forceUpdateTag: utcValue
    azCliVersion: '2.52.0'
    storageAccountSettings: {
      storageAccountName: storageAccountName
    }
    containerSettings: {
      subnetIds: [
        {
          id: vnet::subnet.id
        }
      ]
    }
    scriptContent: 'echo "Hello world!"'
    retentionInterval: 'P1D'
    cleanupPreference: 'OnExpiration'
  }
}
次のステップ
この記事では、プライベート仮想ネットワークにアクセスする方法について説明しました。 詳細については、以下を参照してください。