クイックスタート: ARM テンプレートを使用して Azure SignalR Service をデプロイする
このクイックスタートでは、Azure Resource Manager (ARM) テンプレートを使用して Azure SignalR Service を作成するプロセスについて説明します。 Azure SignalR Service は、Azure portal、PowerShell、CLI のいずれかを使用してデプロイできます。
Azure Resource Manager テンプレートは JavaScript Object Notation (JSON) ファイルであり、プロジェクトのインフラストラクチャと構成が定義されています。 このテンプレートでは、宣言型の構文が使用されています。 デプロイしようとしているものを、デプロイを作成する一連のプログラミング コマンドを記述しなくても記述できます。
環境が前提条件を満たしていて、ARM テンプレートの使用に慣れている場合は、 [Azure へのデプロイ] ボタンを選択します。 サインインすると、Azure portal でテンプレートが開きます。
前提条件
アクティブなサブスクリプションが含まれる Azure アカウント。 無料で作成できます。
テンプレートを確認する
このクイックスタートで使用されるテンプレートは Azure クイックスタート テンプレートからのものです。
{
  "$schema": "https://schema.management.azure.com/schemas/2019-04-01/deploymentTemplate.json#",
  "contentVersion": "1.0.0.0",
  "metadata": {
    "_generator": {
      "name": "bicep",
      "version": "0.9.1.41621",
      "templateHash": "7185938028783900711"
    }
  },
  "parameters": {
    "name": {
      "type": "string",
      "defaultValue": "[uniqueString(resourceGroup().id)]",
      "metadata": {
        "description": "The globally unique name of the SignalR resource to create."
      }
    },
    "location": {
      "type": "string",
      "defaultValue": "[resourceGroup().location]",
      "metadata": {
        "description": "Location for the SignalR resource."
      }
    },
    "pricingTier": {
      "type": "string",
      "defaultValue": "Standard_S1",
      "allowedValues": [
        "Free_F1",
        "Standard_S1",
        "Premium_P1"
      ],
      "metadata": {
        "description": "The pricing tier of the SignalR resource."
      }
    },
    "capacity": {
      "type": "int",
      "defaultValue": 1,
      "allowedValues": [
        1,
        2,
        5,
        10,
        20,
        50,
        100
      ],
      "metadata": {
        "description": "The number of SignalR Unit."
      }
    },
    "serviceMode": {
      "type": "string",
      "defaultValue": "Default",
      "allowedValues": [
        "Default",
        "Serverless",
        "Classic"
      ],
      "metadata": {
        "description": "Visit https://github.com/Azure/azure-signalr/blob/dev/docs/faq.md#service-mode to understand SignalR Service Mode."
      }
    },
    "enableConnectivityLogs": {
      "type": "bool",
      "defaultValue": true
    },
    "enableMessagingLogs": {
      "type": "bool",
      "defaultValue": true
    },
    "enableLiveTrace": {
      "type": "bool",
      "defaultValue": true
    },
    "allowedOrigins": {
      "type": "array",
      "defaultValue": [
        "*"
      ],
      "metadata": {
        "description": "Set the list of origins that should be allowed to make cross-origin calls."
      }
    }
  },
  "resources": [
    {
      "type": "Microsoft.SignalRService/signalR",
      "apiVersion": "2022-02-01",
      "name": "[parameters('name')]",
      "location": "[parameters('location')]",
      "sku": {
        "capacity": "[parameters('capacity')]",
        "name": "[parameters('pricingTier')]"
      },
      "kind": "SignalR",
      "identity": {
        "type": "SystemAssigned"
      },
      "properties": {
        "tls": {
          "clientCertEnabled": false
        },
        "features": [
          {
            "flag": "ServiceMode",
            "value": "[parameters('serviceMode')]"
          },
          {
            "flag": "EnableConnectivityLogs",
            "value": "[string(parameters('enableConnectivityLogs'))]"
          },
          {
            "flag": "EnableMessagingLogs",
            "value": "[string(parameters('enableMessagingLogs'))]"
          },
          {
            "flag": "EnableLiveTrace",
            "value": "[string(parameters('enableLiveTrace'))]"
          }
        ],
        "cors": {
          "allowedOrigins": "[parameters('allowedOrigins')]"
        },
        "networkACLs": {
          "defaultAction": "Deny",
          "publicNetwork": {
            "allow": [
              "ClientConnection"
            ]
          },
          "privateEndpoints": [
            {
              "name": "mySignalRService.1fa229cd-bf3f-47f0-8c49-afb36723997e",
              "allow": [
                "ServerConnection"
              ]
            }
          ]
        },
        "upstream": {
          "templates": [
            {
              "categoryPattern": "*",
              "eventPattern": "connect,disconnect",
              "hubPattern": "*",
              "urlTemplate": "https://example.com/chat/api/connect"
            }
          ]
        }
      }
    }
  ]
}
このテンプレートには、次の Azure リソースが 1 つ定義されています。
テンプレートのデプロイ
ARM テンプレートを使用して Azure SignalR Service をデプロイするには、Azure portal で次のリンクを選択します。
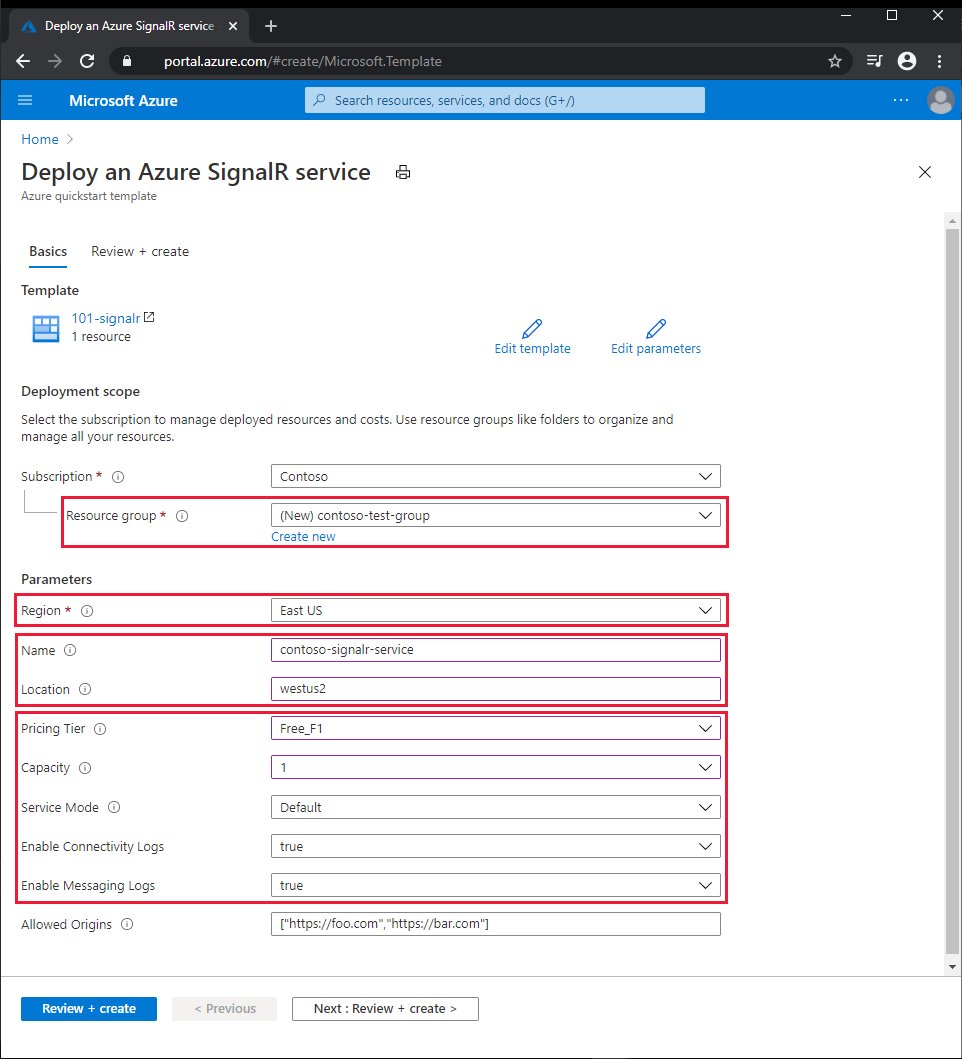
[Deploy an Azure SignalR service](Azure SignalR Service のデプロイ) ページで、次の手順を実行します。
[サブスクリプション] が既定値になっているので、必要に応じて変更します。
[リソース グループ] の [新規作成] を選択し、新しいリソース グループの名前を入力し、 [OK] を選択します。
新しいリソース グループを作成した場合は、リソース グループのリージョンを選択します。
必要に応じて、Azure SignalR Service の新しい [名前] と [場所] (例: eastus2) を入力します。 [名前] を指定しない場合は、自動的に生成されます。 [場所] は、リソース グループのリージョンと同じでも異なっていてもかまいません。 [場所] を指定しない場合、既定では、リソース グループと同じリージョンになります。
[価格レベル] ( [Free_F1] または [Standard_S1] ) を選択し、 [Capacity](キャパシティ) (SignalR ユニットの数) を入力します。 [サービス モード] として、 [既定] (ハブ サーバーが必要)、 [サーバーレス] (サーバー接続を許可しない)、 [クラシック] (ハブにサーバー接続がある場合にのみハブ サーバーにルーティング) のいずれかを選択してください。 次に、[接続ログを有効にする] または [メッセージング ログを有効にする] を選択します。
Note
[Free_F1] 価格レベルの場合、容量は 1 ユニットに制限されます。

[Review + create](レビュー + 作成) を選択します。
利用規約を読んで、 [作成] を選択します。
Note
デプロイが完了するまでに数分かかる場合があります。 Azure SignalR Service の名前とリソース グループの名前は書き留めておいてください。デプロイしたリソースを後で確認する際に使用します。
デプロイされているリソースを確認する
新しい Azure SignalR Service の概要を確認するには、次の手順に従います。
Azure portal で、SignalR を検索して選択します。
SignalR の一覧から新しいサービスを選択します。 新しい Azure SignalR Service の [概要] ページが表示されます。
リソースをクリーンアップする
不要になったら、リソース グループを削除してください。リソース グループを削除すれば、リソース グループ内のリソースが削除されます。
Azure portal で、 [リソース グループ] を検索して選択します。
リソース グループの一覧で、リソース グループの名前を選択します。
リソース グループの [概要] ページで、 [リソース グループの削除] を選択します。
確認のダイアログ ボックスでリソース グループの名前を入力し、 [削除] を選択します。
次のステップ
Resource Manager テンプレートの作成手順について説明したチュートリアルについては、次のページを参照してください。
初めての ARM テンプレートを作成してデプロイする[
