クイック スタート: Azure Communication Services のイベントにサブスクライブする
このクイックスタートでは、ポータル、Azure CLI、PowerShell、.NET SDK を介して、Azure Communication Services からイベントにサブスクライブする方法について説明します。
Communication Services リソースのイベント サブスクリプションは、Azure portal または Azure CLI、PowerShell、あるいは Azure Event Grid Management SDK を介して設定することができます。
このクイック スタートでは、SMS イベントのサブスクライバーとして、 Webhook の設定を、Azure Communication Services から行なうプロセスについて説明します。 イベントの完全なリストについては、この ページを参照してください。
前提条件
- アクティブなサブスクリプションが含まれる Azure アカウント。 無料でアカウントを作成できます。
- Azure Communication Services リソース。
- イベントを受信する Webhook を作成します。 Webhook のイベント配信。
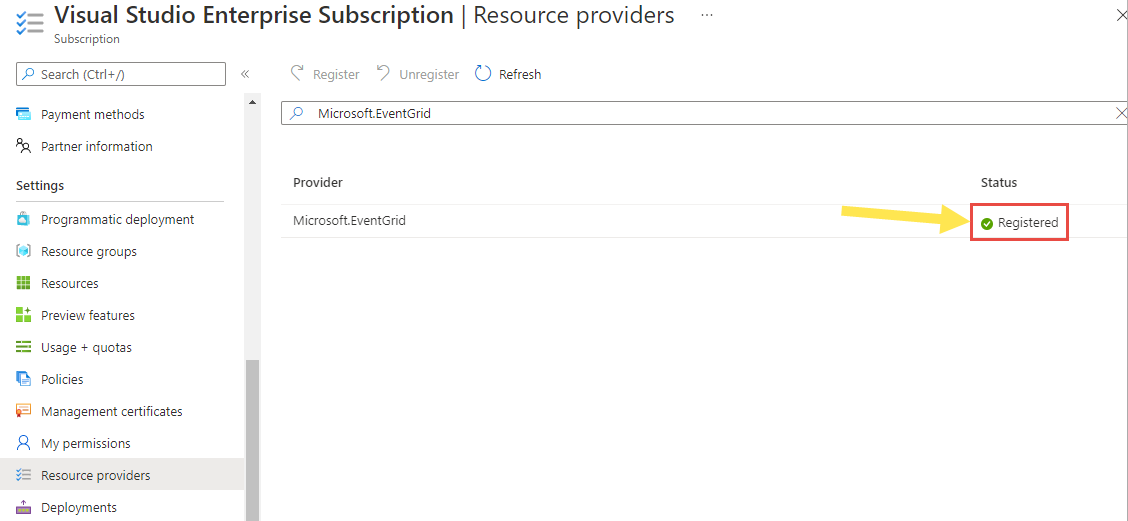
Event Grid リソース プロバイダーを登録する
このアーティクルでは、Azure Event Grid リソース プロバイダーを登録する方法について説明します。 同じサブスクリプションで以前に Event Grid を使用している場合は、次のセクションにスキップしてください。
Azure portal で、次の手順を実行します。
左側のメニューで [サブスクリプション] を選択します。
サブスクリプションのリストから、Event Grid に使用するサブスクリプションを選択します。
[サブスクリプション] ページで、左側のメニューの [設定] の下の [リソース プロバイダー] を選択します。
Microsoft.EventGrid を検索し、[状態] が [未登録] であることを確認します。
プロバイダーの一覧で [Microsoft.EventGrid] を選択します。
コマンド バーの [登録] を選択します。

最新の情報に更新して、Microsoft.EventGrid の状態が [登録済み] に変更されたことを確認します。

イベント サブスクリプションの作成
Azure Communication Services のイベント サブスクリプションを作成するには、次の手順を使用します。 この記事では、Azure Communication Services のイベント サブスクリプションを作成し、Webhook 経由でイベントを受信する方法について説明します。
Azure Communication Services リソースのイベント サブスクリプションを作成するには、まず Azure portal にサインインします。 ページの左上隅で、Communication Services リソースを選択します。
- 左側のメニューで、[イベント] タブを選択します。
- [+ イベント サブスクリプション] を 選択します。

- [イベント サブスクリプションの作成] ページで、次の手順に従います。
イベント サブスクリプションの名前を入力します。
システム トピックの名前を入力します。
イベント サブスクリプションで受信するイベントの種類を選択します。

Communication Services イベントの詳細については、「Communication Services イベント」を参照してください。
エンドポイントの種類として [Webhook] を選択します。

[エンドポイントの構成] を選択します

Webhook へのリンクを入力し、[選択内容の確認] を選択 します。

[フィルター] タブで、サブスクリプションでフィルター処理するイベントの種類の名前を追加し、サブスクリプションで使用するコンテキスト属性フィルターを追加します。 次に、ページの下部にある [次へ: 追加の機能] を選択します。

配信不能レタリングを有効にして、再試行ポリシーをカスタマイズするには、 [追加の機能] を選択します。

完了したら、 [作成] を選択します。


イベント サブスクリプションの更新
Azure Communication Services のイベント サブスクリプションを更新するには、次の手順を使用します。 このセクションでは、Azure Communication Services のイベント サブスクリプションを更新して、Webhook 経由で受信するイベントを更新する方法について説明します。
Azure Communication Services リソースのイベント サブスクリプションを更新するには、まず Azure portal にサインインします。 ページの左上隅で、Communication Services リソースを選択します。
左側のメニューで [イベント] タブを選択します。
[イベント サブスクリプション] を選択した後、更新する Event サブスクリプションを選択します。

[イベント サブスクリプション] ページで、[フィルター] タブを 選択します。イベント サブスクリプションで受信するイベントの種類を選択します。

配信不能レタリングを有効にして、再試行ポリシーをカスタマイズするには、 [追加の機能] を選択します。
イベントを受信するように Webhook を更新するには、Webhook リンクの隣にある [変更] を選択 し、新しいWebhook エンドポイントを入力します。

操作が完了したら、[保存] をクリックします


イベント サブスクリプションの削除
Azure Communication Services のイベント サブスクリプションを削除するには、次の手順を使用します。
Azure Communication Services リソースのイベント サブスクリプションを削除するには、まず Azure portal にサインインします。 ページの左上隅で、Communication Services リソースを選択します。
左側のメニューで、[イベント] タブを選択します。
[イベント サブスクリプション] を選択し、削除するイベント サブスクリプションを選択します。
[イベント サブスクリプション] ページで、上部にある [削除] ボタンを選択します。


次のステップ
- Communication Services イベントのリストについては、「Communication Services イベント」を参照してください。
- サポートされているイベント ハンドラーの一覧については、「イベント ハンドラー」を参照してください。
- イベント配信と再試行については、「Event Grid によるメッセージ配信と再試行」をご覧ください。
- Event Grid の概要については、Event Grid の紹介に関する記事を参照してください。
前提条件
- アクティブなサブスクリプションが含まれる Azure アカウント。 無料でアカウントを作成できます。
- Azure CLI
- Azure Communication Services のリソース。
- イベントを受信する Webhook を作成します。 Webhook のイベント配信
Event Grid リソース プロバイダーを登録する
このアーティクルでは、Azure Event Grid リソース プロバイダーを登録する方法について説明します。 同じサブスクリプションで以前に Event Grid を使用している場合は、次のセクションにスキップしてください。
以下のプロバイダーを登録するコマンドを実行します。
az provider register --namespace Microsoft.EventGrid登録完了まで少し時間がかかることがあります。 状態を確認するには、次のコマンドを実行します。
az provider show --namespace Microsoft.EventGrid --query "registrationState"registrationStateがRegisteredになったら、次に進めることができます。
イベント サブスクリプションの作成
Azure Communication Services リソースのイベント サブスクリプションを作成するには、 Azure CLI にサインインします。 ターミナルから az login コマンドを実行し、資格情報を入力してサインインできます。 次のコマンドを実行して、リソースのイベント サブスクリプションを作成します。
Azure CLI を使用してイベント サブスクリプションを作成するには、az eventgrid event-subscription create コマンドを使用 します。
az eventgrid event-subscription create
    --name EventsWebhookSubscription
    --source-resource-id /subscriptions/<subscriptionId>/resourceGroups/<resourceGroupName>/providers/Microsoft.Communication/CommunicationServices/<acsResourceName>
    --included-event-types Microsoft.Communication.SMSReceived Microsoft.Communication.SMSDeliveryReportReceived
    --endpoint-type webhook
    --endpoint https://azureeventgridviewer.azurewebsites.net/api/updates
Communication Services イベントのリストについては、「Communication Services イベント」を参照してください。
イベント サブスクリプションをリストする
Azure Communication Services リソース用に設定されているすべての既存のイベント サブスクリプションをリストするには、Azure CLI で、az eventgrid event-subscription list コマンドを使用 します。
az eventgrid event-subscription list
    --source-resource-id /subscriptions/<subscriptionId>/resourceGroups/<resourceGroupName>/providers/Microsoft.Communication/CommunicationServices/<acsResourceName>
イベント サブスクリプションの更新
Azure CLI を使用して既存のイベント サブスクリプションを更新するには、az eventgrid event-subscription update コマンドを使用します。
az eventgrid event-subscription update
    --name EventsWebhookSubscription
    --source-resource-id /subscriptions/<subscriptionId>/resourceGroups/<resourceGroupName>/providers/Microsoft.Communication/CommunicationServices/<acsResourceName>
    --included-event-types Microsoft.Communication.SMSReceived Microsoft.Communication.SMSDeliveryReportReceived Microsoft.Communication.ChatMessageReceived
    --endpoint-type webhook
    --endpoint https://azureeventgridviewer.azurewebsites.net/api/updates
イベント サブスクリプションの削除
Azure CLI を使用して既存のイベント サブスクリプションを削除するには、az eventgrid event-subscription delete コマンドを使用します。
az eventgrid event-subscription delete
    --name EventsWebhookSubscription
    --source-resource-id /subscriptions/<subscriptionId>/resourceGroups/<resourceGroupName>/providers/Microsoft.Communication/CommunicationServices/<acsResourceName>
次のステップ
- その他のコマンドの情報については、「Azure Event Grid CLI」を参照してください。
前提条件
- アクティブなサブスクリプションが含まれる Azure アカウント。 無料でアカウントを作成できます。
- お使いのオペレーティング システムに対応した最新バージョンの .NET Core SDK。
- .NET Microsoft Azure Event Grid Management SDK の最新バージョンを取得します。
- 最新バージョンの Azure ID ライブラリを取得します。
- Azure Communication Services リソース。
Event Grid リソース プロバイダーを登録する
このアーティクルでは、Azure Event Grid リソース プロバイダーを登録する方法について説明します。 同じサブスクリプションで以前に Event Grid を使用している場合は、次のセクションにスキップしてください。
Azure portal で、次の手順を実行します。
左側のメニューで [サブスクリプション] を選択します。
サブスクリプションのリストから、Event Grid に使用するサブスクリプションを選択します。
[サブスクリプション] ページで、左側のメニューの [設定] の下の [リソース プロバイダー] を選択します。
Microsoft.EventGrid を検索し、[状態] が [未登録] であることを確認します。
プロバイダーの一覧で [Microsoft.EventGrid] を選択します。
コマンド バーの [登録] を選択します。
最新の情報に更新して、Microsoft.EventGrid の状態が [登録済み] に変更されたことを確認します。
SDK のインストール
まず、NuGet を使用して、.NET 用の Microsoft Azure Event Grid Management ライブラリをインストールします。
dotnet add package Azure.ResourceManager.EventGrid;
C# プロジェクトに Event Grid Management SDK をインクルードします。
using Microsoft.Azure.Management.EventGrid;
using Microsoft.Azure.Management.EventGrid.Models;
Azure ID ライブラリを使用した認証
前提条件:
- 次の手順に従って、Microsoft Entra アプリケーションとサービス プリンシパルを作成し、証明機関によって発行されたクライアント シークレットまたは信頼された証明書を設定します。
- Azure Keyvault に、シークレットまたは証明書を保存します。
- 次の手順に従って、対象アプリケーションのサブスクリプションへのアクセス権を、共同作成者または所有者に付与します。
- Event Grid リソースへのアクセス承認の詳細については、こちらをお読みください。
Azure ID ライブラリは、Azure SDK 全体で、Microsoft Entra ID (以前の Azure Active Directory) トークンの認証をサポートしています。 ここで提供されている一連の TokenCredential 実装は、Microsoft Entra トークン認証をサポートする Azure SDK クライアントをコンストラクトするために使用できます。 詳細については、 こちらを参照してください。
- NuGet を使用して .NET 用の Azure ID クライアント ライブラリをインクルードします。
dotnet add package Azure.Identity;
dotnet add package Azure.Security.KeyVault.Secrets
- C# プロジェクトに Azure ID ライブラリをインクルードする
using Microsoft.Azure.Identity;
using Azure.Security.KeyVault.Secrets
ユーザーは、サービス プリンシパルでの構成に基づいて、シークレット資格情報または証明書資格情報を渡して、アクセス トークンを取得できます。
シークレット資格情報を使用してアクセス トークンを取得する
シークレット資格情報を取得するには、前提条件 #2 で SecretClient を使用して作成した Keyvault から、それを読み取る必要があります。
// Authenticate the Keyvault client with DefaultAzureCredential and get the secret.
SecretClient secretClient = new SecretClient(new Uri("https://myvault.vault.azure.net/"), new DefaultAzureCredential());
string clientSecret = await secretClient.GetSecretAsync(secretName).Value;

// Get access token using secret credentials
string[] scopes = { "https://management.azure.com/.default" };
var application = ConfidentialClientApplicationBuilder
                    .Create('your-servicePrincipal-appId')
                    .WithAuthority(authorityUri: new Uri(authority), validateAuthority: true)
                    .WithTenantId('your-tenant_id')
                    .WithClientSecret(clientSecret)
                    .Build();

var token = await application
                .AcquireTokenForClient(scopes)
                .ExecuteAsync();
証明書資格情報を使用してアクセス トークンを取得する
証明書の資格情報を取得するには、前提条件 #2 で CertificateClient を使用して作成した Keyvault から、それを読み取る必要があります。
Microsoft Entra アプリケーションの構成機関の詳細については、こちらをお読みください
// Authenticate the certificate client with DefaultAzureCredential and get the certificate.
CertificateClient certificateClient = new SecretClient(new Uri("https://myvault.vault.azure.net/"), new DefaultAzureCredential());
X509Certificat2 cert = await certificateClient.DownloadCertificateAsync(certificateName);

// Get access token using certificate credentials
string[] scopes = { "https://management.azure.com/.default" };
string authority = "https://login.microsoftonline.com/<tenant>/";
var application = ConfidentialClientApplicationBuilder
                    .Create('<servicePrincipal-appId>')
                    .WithAuthority(authorityUri: new Uri(authority), validateAuthority: true)
                    .WithTenantId("<tenantId>")
                    .WithCertificate(cert)
                    .Build();

var token = await application
                .AcquireTokenForClient(scopes)
                .WithSendX5C(true)
                .ExecuteAsync();
シークレットまたは証明書の資格情報を使用するアクセス トークンにより、EventGridManagementClient を認証する
// Authenticate EventGridManagementClient with Microsoft Entra ID access token credential
eventGridClient = new EventGridManagementClient(new Uri("https://management.azure.com/"),
    new TokenCredentials(token.AccessToken));

eventGridClient.SubscriptionId = 'your_subscripiton_id';
イベント サブスクリプションを作成する
このコード サンプルでは、Webhook サブスクライバー エンドポイントの、イベント サブスクリプションを作成する方法を示します。
string webhookUri = $"<webhookUri>";
string resourceId="/subscriptions/<subscriptionId>/resourceGroups/<resourceGroupName>/providers/Microsoft.Communication/CommunicationServices/<acsResourceName>";
string[] includedEventTypes = new string[]{ "Microsoft.Communication.SMSReceived",
                                            "Microsoft.Communication.SMSDeliveryReportReceived"
                                            };

EventSubscription eventSubscription = new EventSubscription(
    name: "<eventSubscriptionName>",
    eventDeliverySchema: "EventGridSchema",
    filter: new EventSubscriptionFilter(
    includedEventTypes: includedEventTypes),
    destination: new WebHookEventSubscriptionDestination(webhookUri));

await eventGridClient.EventSubscriptions.CreateOrUpdateAsync(
    scope: resourceId,
    eventSubscriptionName: "<eventSubscriptionName>",
    eventSubscriptionInfo: eventSubscription);
イベント サブスクリプションの更新
このコード サンプルでは、イベント サブスクリプションを更新して、Webhook サブスクライバー エンドポイントで受信するイベントをさらに追加する方法を示します。
string webhookUri = $"<webhookUri>";
string resourceId="/subscriptions/<subscriptionId>/resourceGroups/<resourceGroupName>/providers/Microsoft.Communication/CommunicationServices/<acsResourceName>";
string[] additionalEventTypes = new string[]{
                                            "Microsoft.Communication.ChatMessageReceived"
                                        };

await eventGridClient.EventSubscriptions.UpdateAsync(
    scope: resourceId,
    eventSubscriptionName: "<eventSubscriptionName>",
    eventSubscriptionUpdateParameters: new EventSubscriptionUpdateParameters(
            filter: new EventSubscriptionFilter(includedEventTypes: additionalEventTypes)));
イベント サブスクリプションの削除
このコード サンプルでは、Webhook サブスクライバー エンドポイントのイベント サブスクリプションを削除する方法を示します。
string webhookUri = $"<webhookUri>";
string resourceId="/subscriptions/<subscriptionId>/resourceGroups/<resourceGroupName>/providers/Microsoft.Communication/CommunicationServices/<acsResourceName>";

await eventGridClient.EventSubscriptions.DeleteAsync(
    scope: resourceId,
    eventSubscriptionName: "<eventSubscriptionName>");
前提条件
- アクティブなサブスクリプションが含まれる Azure アカウント。 無料でアカウントを作成できます。
- Azure Az PowerShell モジュールをインストールする
- Azure Communication Services のリソース。
- イベントを受信する Webhook を作成します。 Webhook のイベント配信
Event Grid リソース プロバイダーを登録する
このアーティクルでは、Event Grid リソース プロバイダーを登録する方法について説明します。 同じサブスクリプションで以前に Event Grid を使用している場合は、次のセクションにスキップしてください。
- 次のコマンドを実行します。
Register-AzResourceProvider -ProviderNamespace Microsoft.EventGrid
- 登録完了まで少し時間がかかることがあります。 状態をチェックするには、次を実行します。
Get-AzResourceProvider -ProviderNamespace Microsoft.EventGrid
RegistrationStatus が Registered になったら、次に進めることができます。
イベント サブスクリプションの作成
まず、次のコマンドを使用して、Azure Communication Services モジュール Az.EventGrid をインストールします。
PS C:\> Install-Module Az.EventGrid
Connect-AzAccount コマンドで Azure サブスクリプションにサインインし、画面上の指示に従います。
Connect-AzAccount自分の ID が複数のサブスクリプションに関連付けられている場合は、アクティブなサブスクリプションを、移動する Web PubSub リソースのサブスクリプションに設定します。
$context = Get-AzSubscription -SubscriptionId <subscription-id>
Set-AzContext $context
Azure PowerShell を使用してイベント サブスクリプションを作成するには、New-AzEventGridSubscription コマンドを使用します。
$includedEventTypes = "Microsoft.Communication.SMSReceived", "Microsoft.Communication.SMSDeliveryReportReceived"
New-AzEventGridSubscription
    -EndpointType webhook
    -Endpoint https://azureeventgridviewer.azurewebsites.net/api/updates
    -EventSubscriptionName EventsWebhookSubscription
    -IncludedEventType $includedEventTypes
    -ResourceId "/subscriptions/<subscriptionId>/resourceGroups/<resourceGroupName>/providers/Microsoft.Communication/CommunicationServices/<acsResourceName>"
Communication Services イベントのリストについては、「Communication Services イベント」を参照してください。
イベント サブスクリプションをリストする
Azure Communication Services リソース用に設定されているすべての既存のイベント サブスクリプションをリストするには、Azure PowerShell で Get-AzEventGridSubscription コマンドを使用します。
Get-AzEventGridSubscription
    -ResourceId "/subscriptions/<subscriptionId>/resourceGroups/<resourceGroupName>/providers/Microsoft.Communication/CommunicationServices/<acsResourceName>"
イベント サブスクリプションの更新
Azure PowerShell を使用して既存のイベント サブスクリプションを更新するには、Update-AzEventGridSubscription コマンドを使用します。
$includedEventTypes = "Microsoft.Communication.SMSReceived", "Microsoft.Communication.SMSDeliveryReportReceived", "Microsoft.Communication.ChatMessageReceived"
Update-AzEventGridSubscription
    -EventSubscriptionName ES2
    -IncludedEventType $includedEventTypes
    -ResourceId "/subscriptions/<subscriptionId>/resourceGroups/<resourceGroupName>/providers/Microsoft.Communication/CommunicationServices/<acsResourceName>"
    -Endpoint https://azureeventgridviewer2.azurewebsites.net/api/updates
    -SubjectEndsWith "phoneNumber"
イベント サブスクリプションの削除
Azure PowerShell を使用して既存のイベント サブスクリプションを削除するには、Remove-AzEventGridSubscription コマンドを使用します。
Get-AzResource
    -ResourceId "/subscriptions/<subscriptionId>/resourceGroups/<resourceGroupName>/providers/Microsoft.Communication/CommunicationServices/<acsResourceName>" | Remove-AzEventGridSubscription -EventSubscriptionName ES2
次のステップ
- その他のコマンドについては、「Az.EventGrid PowerShell モジュール」を参照してください。