Azure PowerShell スクリプトを使用して Azure Stack Edge Pro GPU デバイスに VM をデプロイする
適用対象: Azure Stack Edge Pro - GPUAzure Stack Edge Pro 2Azure Stack Edge Pro RAzure Stack Edge Mini R
このチュートリアルでは、Azure PowerShell スクリプトを使用して、Azure Stack Edge Pro デバイスに VM を作成し、それを管理する方法について説明します。
前提条件
このスクリプトを使用して Azure Stack Edge Pro デバイスに VM を作成して管理する前に、次の手順に記載された前提条件をすべて満たしていることを確認する必要があります。
Azure Stack Edge Pro デバイスの条件 (ローカル Web UI を使用)
Azure Stack Edge デバイスに VM を展開する前に、Azure PowerShell 経由で Azure Resource Manager を介してデバイスに接続するようにクライアントを構成する必要があります。 詳細な手順については、「Azure Stack Edge デバイスで Azure Resource Manager に接続する」を参照してください。
次の手順を使用して、クライアントからデバイスにアクセスできることを確認します。 Azure Resource Manager に接続したときに既にこの構成は完了しているため、次はその構成が正常に完了したことを確認します。
次のコマンドを実行して、Azure Resource Manager の通信が機能していることを確認します。
ローカル デバイス API を呼び出して認証を行うには、次のように入力します。
Kubernetes でコンピューティングを構成した場合は、この手順を省略できます。 それ以外の場合は、次の手順に従って、コンピューティング用にネットワーク インターフェイスを有効にしていることを確認します。
a. ローカル ユーザー インターフェイスで、[Compute]\(コンピューティング\) 設定に移動します。
b. 仮想スイッチの作成に使用するネットワーク インターフェイスを選択します。 作成する VM は、このポートおよび関連付けられているネットワークに接続されている仮想スイッチに接続されます。 VM に使用する IP アドレスと一致するネットワークを選択してください。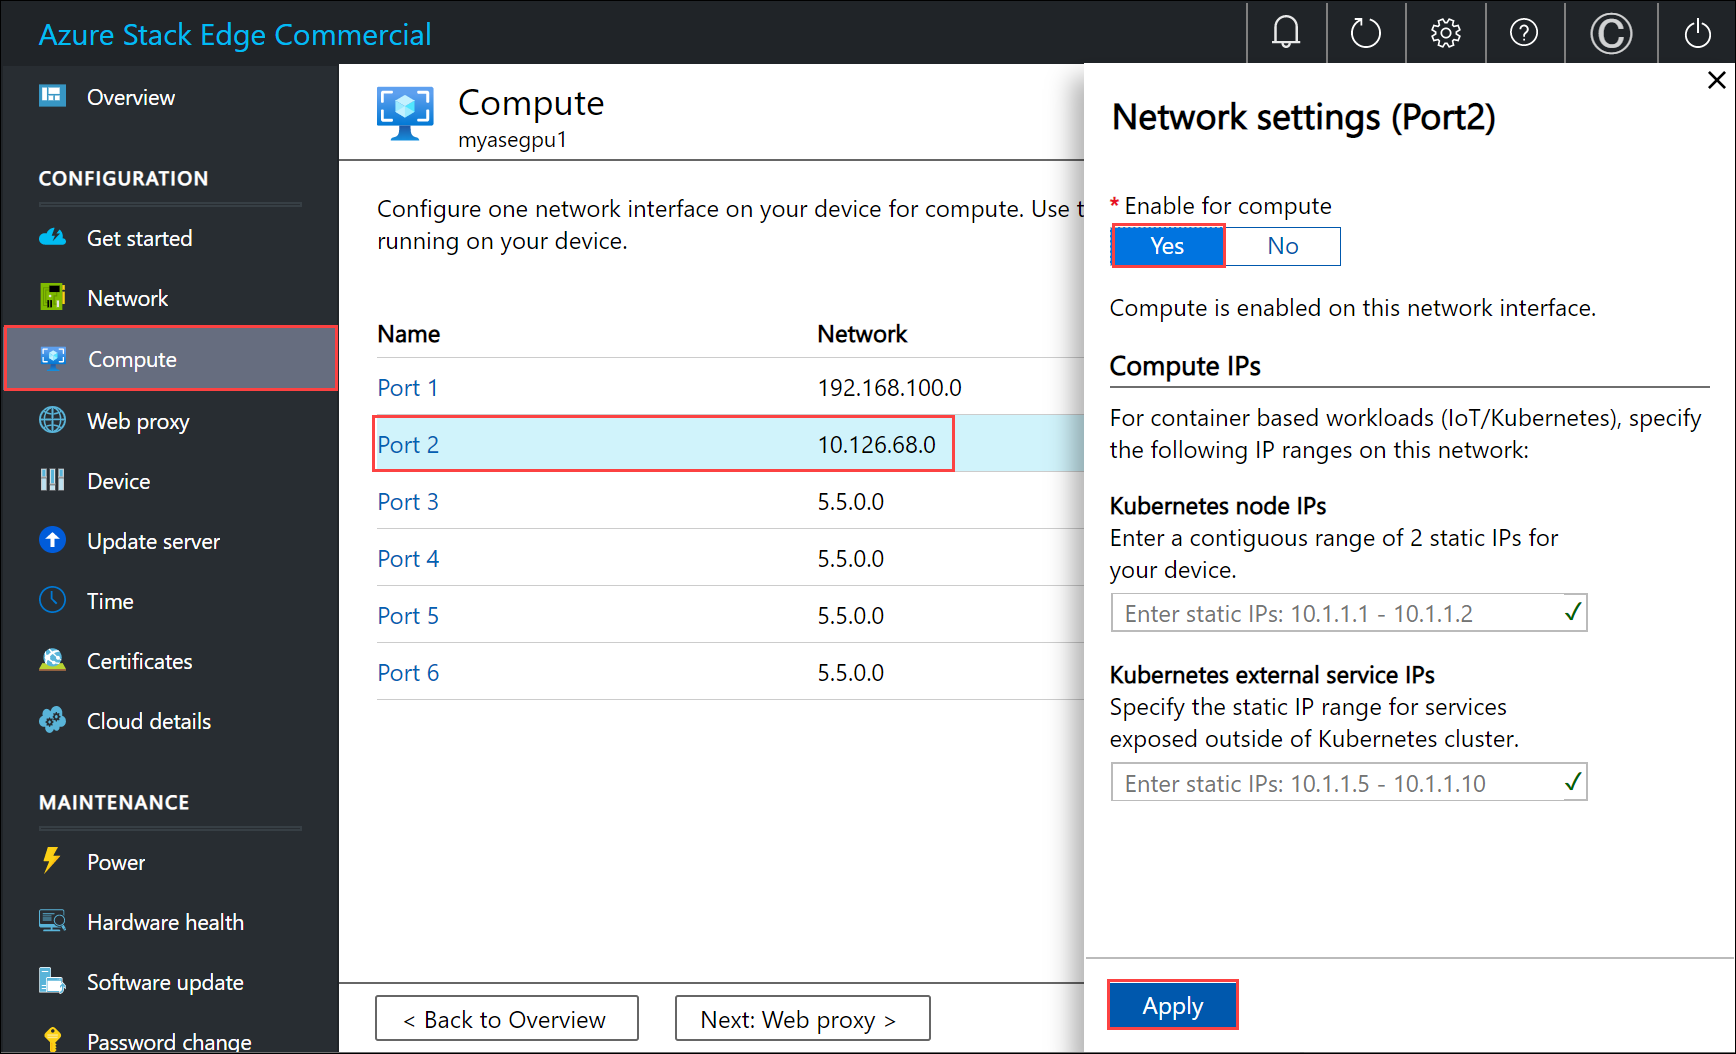
c. ネットワーク インターフェイスの [Enable for compute]\(コンピューティングに対して有効にする\) で、[はい] を選択します。 そのネットワーク インターフェイスに対応する仮想スイッチが Azure Stack Edge によって作成および管理されます。 現時点では、Kubernetes に特定の IP を入力しないでください。 数分でコンピューティングが有効になります。
Note
GPU VM を作成する場合は、インターネットに接続されているネットワーク インターフェイスを選択します。 これにより、デバイスに GPU 拡張機能をインストールできます。
Windows クライアントの条件
以下を変更していることを確認します。
- クライアント上のホスト ファイル、または
- DNS サーバーの構成
重要
エンドポイントの名前解決には、DNS サーバーの構成を変更することをお勧めします。
メモ帳を管理者として起動し (hosts ファイルを保存するには管理者特権が必要です)、
C:\Windows\System32\Drivers\etcにある hosts ファイルを開きます。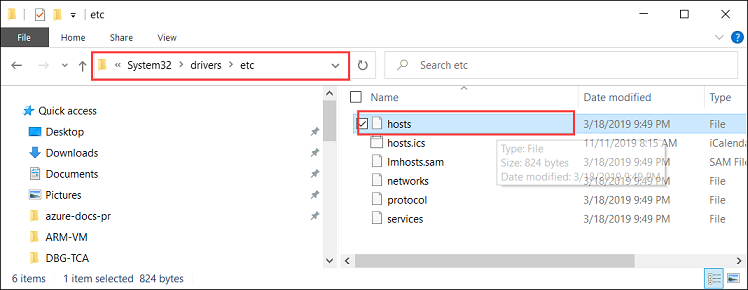
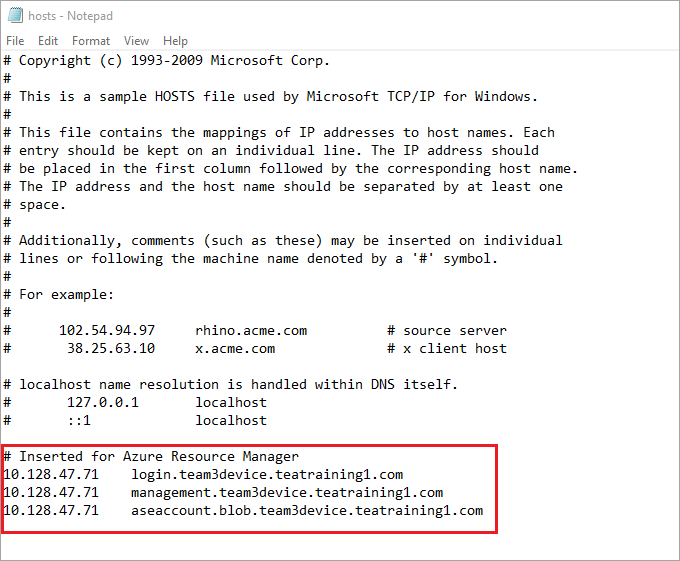
hosts ファイルに次のエントリを追加します。値は、実際のデバイスに合わせて置き換えてください。
<device IP> login.<appliance name>.<DNS domain>
<device IP> management.<appliance name>.<DNS domain>
<device IP> <storage name>.blob.<appliance name>.<DNS domain>
ストレージ アカウントには、新しいストレージ アカウントを作成するためにスクリプトで後から使用する名前を指定できます。 このスクリプトでは、そのストレージ アカウントが存在するかどうかはチェックしません。
次の画像を参照してください。 hosts ファイルを保存します。
この手順で使用した PowerShell スクリプトをダウンロードします。
Windows クライアントで PowerShell 5.0 以降が実行されていることを確認します。
Azure.Storage Module version 4.5.0がシステムにインストールされていることを確認します。 このモジュールは PowerShell ギャラリーから取得できます。 このモジュールをインストールするには、次のように入力します。Install-Module -Name Azure.Storage -RequiredVersion 4.5.0インストールされているモジュールのバージョンを確認するには、次のように入力します。
Get-InstalledModule -name Azure.Storage他のバージョンのモジュールをアンインストールするには、次のように入力します。
Uninstall-Module -Name Azure.StorageWindows クライアントに AzCopy 10 をダウンロードします。 スクリプトの実行中にパラメーターとして渡すので、この場所をメモしておきます。
Windows クライアントで TLS 1.2 以降が実行されていることを確認します。
VM を作成する
PowerShell を管理者として実行します。
スクリプトをダウンロードしたクライアント上のフォルダーに移動します。
スクリプトを実行する前に、デバイスのローカル Azure Resource Manager に接続されたままであり、接続の有効期限が切れていないことを確認します。
PS C:\windows\system32> login-AzureRMAccount -EnvironmentName aztest1 -TenantId c0257de7-538f-415c-993a-1b87a031879d

Account               SubscriptionName              TenantId                             Environment
-------               ----------------              --------                             -----------
EdgeArmUser@localhost Default Provider Subscription c0257de7-538f-415c-993a-1b87a031879d aztest1

PS C:\windows\system32> cd C:\Users\v2
PS C:\Users\v2>
次のコマンドを使用して、スクリプトを実行します。
.\ArmPowershellClient.ps1 -NicPrivateIp <Private IP> -VHDPath <Path> -VHDFile <VHD File, with extension> -StorageAccountName <Name> -OS <Windows/Linux> -VMSize <Supported VM Size> -VMUserName <Username to be used to sign in to VM> -VMPassword <Password for the VM> --AzCopy10Path <Absolute Path>IP を VM に動的に割り当てる場合は、
-NicPrivateIpパラメーターを省略します。スクリプトを実行して Windows VM と Linux VM を作成するときの例を以下に示します。
Windows VM の場合:
作成された Windows VM のサンプル出力を次に示します。
PS C:\Users\v2> .\ArmPowershellClient.ps1 -VHDPath \\asefs\Logs\vmvhd -VHDFile WindowsServer2016Datacenter.vhd -StorageAccountName myasesatest -OS Windows -VMSize Standard_D1_v2 -VMUserName Administrator -VMPassword Password1 -AzCopy10Path C:\Users\AzCopy10\AzCopy.exe
New-AzureRmResourceGroup -Name rg201221071831 -Location DBELocal -Force
Successfully created Resource Group:rg201221071831
Successfully created Resource Group:StorAccRG
Get-AzureRmStorageAccount -Name myasesatest -ResourceGroupName StorAccRG -ErrorAction SilentlyContinue
New-AzureRmStorageAccount -Name myasesatest  -ResourceGroupName StorAccRG -SkuName Standard_LRS -Location DBELocal

Created New Storage Account
Get-AzureRmStorageAccount -name myasesatest -resourcegroupname
StorageAccountName ResourceGroupName Location SkuName     Kind    AccessTier CreationTime          ProvisioningState EnableHttpsTrafficOnly
------------------ ----------------- -------- -------     ----    ---------- ------------          ----------------- ----------------------
myasesatest        StorAccRG         DBELocal StandardLRS Storage            12/22/2020 3:18:38 AM Succeeded         False
myasesatest        StorAccRG         DBELocal StandardLRS Storage            12/22/2020 3:18:38 AM Succeeded         False

 Uploading Vhd to Storage Account

New-AzureStorageContext -StorageAccountName myasesatest -StorageAccountKey hyibjhbVlOROgTlU1nQJIlxrg94eGDhF+RIQ71Z7UVZIxoOPMlHP274NUhZtA1hMxGBcpk2BVApiFasFPEhY/A== -Endpoint https://myasesatest.blob.myasegpuvm.wdshcsso.com/

New-AzureStorageAccountSASToken -Service Blob,File,Queue,Table -ResourceType Container,Service,Object -Permission

SAS Token : ?sv=2017-07-29&sig=TXaGbjum9tFFaJnu3SFmDuslJuqNiNQwvuHfpPJMYN0%3D&spr=https&se=2020-12-22T04%3A18%3A43Z&srt=sco&ss=bfqt&sp=racwdl

 C:\Users\AzCopy10\AzCopy.exe make https://myasesatest.blob.myasegpuvm.wdshcsso.com/vmimages?sv=2017-07-29&sig=TXaGbjum9tFFaJnu3SFmDuslJuqNiNQwvuHfpPJMYN0%3D&spr=https&se=2020-12-22T04%3A18%3A43Z&srt=sco&ss=bfqt&sp=racwdl

Successfully created the resource.

 AzCopy cp \\asefs\Logs\vmvhd\WindowsServer2016Datacenter.vhd https://myasesatest.blob.myasegpuvm.wdshcsso.com/vmimages?sv=2017-07-29&sig=TXaGbjum9tFFaJnu3SFmDuslJuqNiNQwvuHfpPJMYN0%3D&spr=https&se=2020-12-22T04%3A18%3A43Z&srt=sco&ss=bfqt&sp=racwdl

INFO: Scanning...

Job b6f54665-93c4-2f47-4770-5f3b7b0de2dc has started
Log file is located at: C:\Users\Administrator\.azcopy\b6f54665-93c4-2f47-4770-5f3b7b0de2dc.log

INFO: AzCopy.exe: A newer version 10.8.0 is available to download

99.9 %, 0 Done, 0 Failed, 1 Pending, 0 Skipped, 1 Total,  (Disk may be limiting speed)

Job b6f54665-93c4-2f47-4770-5f3b7b0de2dc summary
Elapsed Time (Minutes): 12.7717
Total Number Of Transfers: 1
Number of Transfers Completed: 1
Number of Transfers Failed: 0
Number of Transfers Skipped: 0
TotalBytesTransferred: 13958644224
Final Job Status: Completed

VHD Upload Done

 Creating a new managed disk

  = New-AzureRmDiskConfig -Location DBELocal -CreateOption Import -SourceUri

 Microsoft.Azure.Commands.Compute.Automation.Models.PSDisk

 New-AzureRmDisk -ResourceGroupName rg201221071831 -DiskName ld201221071831 -Disk

ResourceGroupName  : rg201221071831
ManagedBy          :
Sku                : Microsoft.Azure.Management.Compute.Models.DiskSku
Zones              :
TimeCreated        : 12/21/2020 7:31:35 PM
OsType             :
CreationData       : Microsoft.Azure.Management.Compute.Models.CreationData
DiskSizeGB         : 13
EncryptionSettings :
ProvisioningState  : Succeeded
Id                 : /subscriptions/947b3cfd-7a1b-4a90-7cc5-e52caf221332/resourceGroups/rg201221071831/providers/Microsoft.Compute/disks/ld201221071831
Name               : ld201221071831
Type               : Microsoft.Compute/disks
Location           : DBELocal
Tags               : {}

 Created a new managed disk

 Creating a new Image out of managed disk

ResourceGroupName    :
SourceVirtualMachine :
StorageProfile       : Microsoft.Azure.Management.Compute.Models.ImageStorageProfile
ProvisioningState    :
Id                   :
Name                 :
Type                 :
Location             : DBELocal
Tags                 :

 New-AzureRmImage -Image Microsoft.Azure.Commands.Compute.Automation.Models.PSImage -ImageName ig201221071831  -ResourceGroupName rg201221071831 -HyperVGeneration V1

ResourceGroupName    : rg201221071831
SourceVirtualMachine :
StorageProfile       : Microsoft.Azure.Management.Compute.Models.ImageStorageProfile
ProvisioningState    : Succeeded
Id                   : /subscriptions/947b3cfd-7a1b-4a90-7cc5-e52caf221332/resourceGroups/rg201221071831/providers/Microsoft.Compute/images/ig201221071831
Name                 : ig201221071831
Type                 : Microsoft.Compute/images
Location             : dbelocal
Tags                 : {}

 Created a new Image

 Using Vnet /subscriptions/947b3cfd-7a1b-4a90-7cc5-e52caf221332/resourceGroups/ASERG/providers/Microsoft.Network/virtualNetworks/ASEVNET

 Creating a new Newtork Interface
WARNING: The output object type of this cmdlet will be modified in a future release.

VirtualMachine              :
IpConfigurations            : {ip201221071831}
DnsSettings                 : Microsoft.Azure.Commands.Network.Models.PSNetworkInterfaceDnsSettings
MacAddress                  : 001DD87D7216
Primary                     :
EnableAcceleratedNetworking : False
EnableIPForwarding          : False
NetworkSecurityGroup        :
ProvisioningState           : Succeeded
VirtualMachineText          : null
IpConfigurationsText        : [
                                {
                                  "Name": "ip201221071831",
                                  "Etag": "W/\"27785dd5-d12a-4d73-9495-ffad7847261a\"",
                                  "Id": "/subscriptions/947b3cfd-7a1b-4a90-7cc5-e52caf221332/resourceGroups/rg201221071831/providers/Microsoft.Network/networkInterfaces/nic201221071831/ipConfigurations/ip201221071831",
                                  "PrivateIpAddress": "10.57.51.61",
                                  "PrivateIpAllocationMethod": "Dynamic",
                                  "Subnet": {
                                    "Id": "/subscriptions/947b3cfd-7a1b-4a90-7cc5-e52caf221332/resourceGroups/ASERG/providers/Microsoft.Network/virtualNetworks/ASEVNET/subnets/ASEVNETsubNet",
                                    "ResourceNavigationLinks": [],
                                    "ServiceEndpoints": []
                                  },
                                  "ProvisioningState": "Succeeded",
                                  "PrivateIpAddressVersion": "IPv4",
                                  "LoadBalancerBackendAddressPools": [],
                                  "LoadBalancerInboundNatRules": [],
                                  "Primary": true,
                                  "ApplicationGatewayBackendAddressPools": [],
                                  "ApplicationSecurityGroups": []
                                }
                              ]
DnsSettingsText             : {
                                "DnsServers": [],
                                "AppliedDnsServers": [],
                                "InternalDomainNameSuffix": "qgotb4hjdh4efnhn0vz5adtb3f.a--x.internal.cloudapp.net"
                              }
NetworkSecurityGroupText    : null
ResourceGroupName           : rg201221071831
Location                    : dbelocal
ResourceGuid                : e6327ab9-0855-4f04-9b36-17bbf31b5bd8
Type                        : Microsoft.Network/networkInterfaces
Tag                         :
TagsTable                   :
Name                        : nic201221071831
Etag                        : W/"27785dd5-d12a-4d73-9495-ffad7847261a"
Id                          : /subscriptions/947b3cfd-7a1b-4a90-7cc5-e52caf221332/resourceGroups/rg201221071831/providers/Microsoft.Network/networkInterfaces/nic201221071831

 Created Network Interface

 Creating a new VM

 New-AzureRmVMConfig -VMName VM201221071831 -VMSize Standard_D1_v2

 Set-AzureRmVMOperatingSystem -VM Microsoft.Azure.Commands.Compute.Models.PSVirtualMachine -Windows -ComputerName COM201221071831 -Credential System.Management.Automation.PSCredential

 Microsoft.Azure.Commands.Compute.Models.PSVirtualMachine = Set-AzureRmVMOSDisk -VM Microsoft.Azure.Commands.Compute.Models.PSVirtualMachine -Name osld201221071831 -Caching ReadWrite -CreateOption FromImage -Windows -StorageAccountType StandardLRS

 Add-AzureRmVMNetworkInterface -VM Microsoft.Azure.Commands.Compute.Models.PSVirtualMachine -Id /subscriptions/947b3cfd-7a1b-4a90-7cc5-e52caf221332/resourceGroups/rg201221071831/providers/Microsoft.Network/networkInterfaces/nic201221071831.Id

 Set-AzureRmVMSourceImage -VM Microsoft.Azure.Commands.Compute.Models.PSVirtualMachine -Id /subscriptions/947b3cfd-7a1b-4a90-7cc5-e52caf221332/resourceGroups/rg201221071831/providers/Microsoft.Compute/images/ig201221071831

 New-AzureRmVM -ResourceGroupName rg201221071831 -Location DBELocal -VM Microsoft.Azure.Commands.Compute.Models.PSVirtualMachine -Verbose
WARNING: Since the VM is created using premium storage or managed disk, existing standard storage account, myasesa1, is used for boot
diagnostics.
VERBOSE: Performing the operation "New" on target "VM201221071831".

Ticks             : 1533424841
Days              : 0
Hours             : 0
Milliseconds      : 342
Minutes           : 2
Seconds           : 33
TotalDays         : 0.00177479726967593
TotalHours        : 0.0425951344722222
TotalMilliseconds : 153342.4841
TotalMinutes      : 2.55570806833333
TotalSeconds      : 153.3424841

RequestId           :
IsSuccessStatusCode : True
StatusCode          : OK
ReasonPhrase        : OK

PS C:\Users\v2>
Linux VM の場合:
Linux VM の作成に使用されたコマンドのサンプルを次に示します。
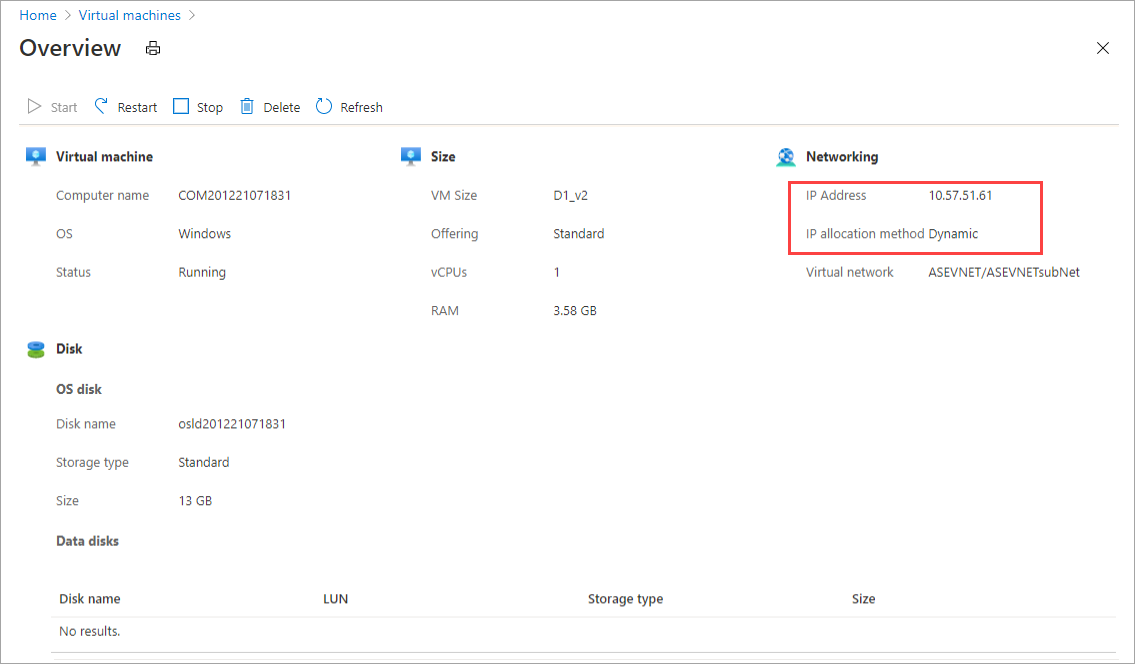
.\ArmPowershellClient.ps1 -VHDPath \\asefs\Logs\vmvhd -VHDFile ubuntu13.vhd -StorageAccountName myasesatest -OS Linux -VMSize Standard_D1_v2 -VMUserName Administrator -VMPassword Password1 -AzCopy10Path C:\Users\AzCopy10\AzCopy.exe
New-AzureRmResourceGroup -Name rg201221075546 -Location DBELocal -Force
VM が正常に作成されると、これらの VM は Azure portal 内の仮想マシンの一覧に表示されます。 VM を表示するには、Azure portal でご利用のデバイス用の Azure Stack Edge リソースで、[Edge サービス] > [仮想マシン] にアクセスします。
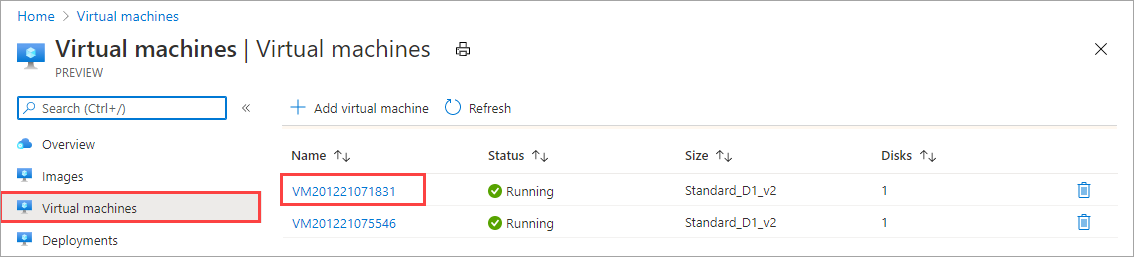
VM の詳細を表示するには、VM 名を選択します。 この VM では IP の割り当てが動的であることに注意してください。
スクリプトによって作成されたリソースをクリーンアップするには、次のコマンドを使用します。
Get-AzureRmVM | Remove-AzureRmVM -Force
Get-AzureRmNetworkInterface | Remove-AzureRmNetworkInterface -Force
Get-AzureRmImage | Remove-AzureRmImage -Force
Get-AzureRmDisk | Remove-AzureRmDisk -Force
Get-AzureRmStorageAccount | Remove-AzureRmStorageAccount -Force