Azure Notification Hubs のリッチなプッシュ
概要
手軽なリッチ コンテンツでユーザーの関心を引くために、アプリケーションはプレーン テキストを超えるべきかもしれません。 これらの通知により、ユーザー インタラクションが促進され、URL、音声、画像、クーポンといったコンテンツが表示されます。 このチュートリアルは、ユーザーへの通知に関するチュートリアルに基づいて作成されており、ペイロード (画像など) を組み込んだプッシュ通知を送信する方法について説明しています。
このチュートリアルは iOS 7 および 8 に対応しています。
![3 つのスクリーンショット: [プッシュの送信] ボタンが表示されたアプリ画面、デバイスのスタート画面、および [戻る] ボタン付きの Windows ロゴ。](media/notification-hubs-aspnet-backend-ios-rich-push/rich-push-ios-1.png)
概要:
- アプリケーションのバックエンド:
- バックエンド データベースやローカル ストレージにリッチ ペイロード (この場合は画像) を格納します。
- このリッチな通知の ID をデバイスに送信します。
- デバイス上のアプリケーション:
- バックエンドにアクセスし、受け取った ID でリッチ ペイロードを要求します。
- データ取得が完了すると、デバイス上にユーザーへの通知を送り、ユーザーが詳細を確認するためにタップするとすぐにペイロードを表示します。
Web API プロジェクト
Visual Studio で、 ユーザーへの通知 チュートリアルで作成した AppBackend プロジェクトを開きます。
ユーザーへの通知で使用する画像を取得し、プロジェクト ディレクトリの img フォルダーに置きます。
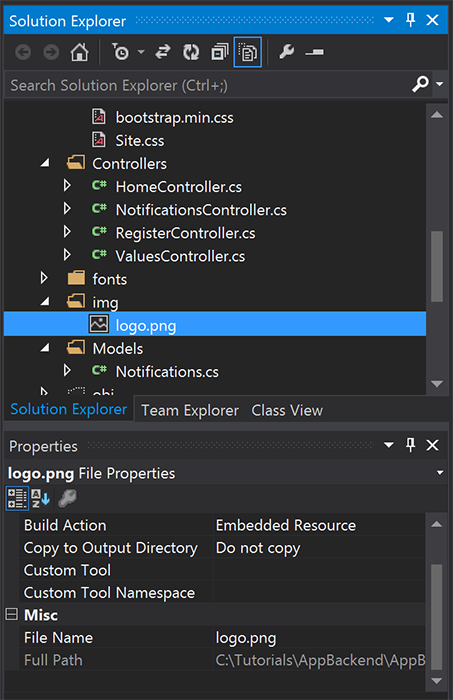
ソリューション エクスプローラーで [すべてのファイルを表示] をクリックし、フォルダーを右クリックして [プロジェクトに含める] をクリックします。
画像が選択された状態で、 [プロパティ] ウィンドウで [ビルド アクション] を [埋め込まれたリソース] に変更します。

Notifications.csで、次のusingステートメントを追加します。using System.Reflection;Notificationsクラスを次のコードで置き換えます。 必ず、プレースホルダーを通知ハブの資格情報と画像ファイルの名前に置き換えてください。public class Notification { public int Id { get; set; } // Initial notification message to display to users public string Message { get; set; } // Type of rich payload (developer-defined) public string RichType { get; set; } public string Payload { get; set; } public bool Read { get; set; } } public class Notifications { public static Notifications Instance = new Notifications(); private List<Notification> notifications = new List<Notification>(); public NotificationHubClient Hub { get; set; } private Notifications() { // Placeholders: replace with the connection string (with full access) for your notification hub and the hub name from the Azure Classics Portal Hub = NotificationHubClient.CreateClientFromConnectionString("{conn string with full access}", "{hub name}"); } public Notification CreateNotification(string message, string richType, string payload) { var notification = new Notification() { Id = notifications.Count, Message = message, RichType = richType, Payload = payload, Read = false }; notifications.Add(notification); return notification; } public Stream ReadImage(int id) { var assembly = Assembly.GetExecutingAssembly(); // Placeholder: image file name (for example, logo.png). return assembly.GetManifestResourceStream("AppBackend.img.{logo.png}"); } }NotificationsController.csで、次のコードを使用してNotificationsControllerを再定義します。 これによりデバイスに最初のリッチなサイレント通知の ID が送信され、クライアント側で画像の取得が可能になります。// Return http response with image binary public HttpResponseMessage Get(int id) { var stream = Notifications.Instance.ReadImage(id); var result = new HttpResponseMessage(HttpStatusCode.OK); result.Content = new StreamContent(stream); // Switch in your image extension for "png" result.Content.Headers.ContentType = new System.Net.Http.Headers.MediaTypeHeaderValue("image/{png}"); return result; } // Create rich notification and send initial silent notification (containing id) to client public async Task<HttpResponseMessage> Post() { // Replace the placeholder with image file name var richNotificationInTheBackend = Notifications.Instance.CreateNotification("Check this image out!", "img", "{logo.png}"); var usernameTag = "username:" + HttpContext.Current.User.Identity.Name; // Silent notification with content available var aboutUser = "{\"aps\": {\"content-available\": 1, \"sound\":\"\"}, \"richId\": \"" + richNotificationInTheBackend.Id.ToString() + "\", \"richMessage\": \"" + richNotificationInTheBackend.Message + "\", \"richType\": \"" + richNotificationInTheBackend.RichType + "\"}"; // Send notification to apns await Notifications.Instance.Hub.SendAppleNativeNotificationAsync(aboutUser, usernameTag); return Request.CreateResponse(HttpStatusCode.OK); }次に、このアプリを Azure Web サイトにもう一度デプロイして、すべてのデバイスからアクセスできるようにします。 AppBackend プロジェクトを右クリックして [発行] を選択します。
発行先として Azure Web サイトを選択します。 Azure アカウントでサインインし、既存または新規の Web サイトを選択します。 [接続] タブの [宛先 URL] プロパティをメモしておきます。この URL は、このチュートリアルの後半で "バックエンド エンドポイント" として参照します。 [発行] を選びます。
iOS プロジェクトを変更する
アプリ バックエンドを通知の ID だけを送信するように変更したので、iOS アプリをその ID を処理してバックエンドからリッチ メッセージを取得するように変更します。
iOS プロジェクトを開き、 [Targets] セクションのメイン アプリケーション ターゲットに移動して、リモート通知を有効にします。
[Capabilities](機能) を選択し、 [Background Modes](バックグラウンド モード) を有効にし、 [Remote Notifications](リモート通知) チェックボックスをオンにします。
![[Capabilities] (機能) 画面が表示されている iOS プロジェクトのスクリーンショット。[バックグラウンド モード] がオンになっていると、[リモート通知] チェック ボックスがオンになります。](media/notification-hubs-aspnet-backend-ios-rich-push/rich-push-ios-3.png)
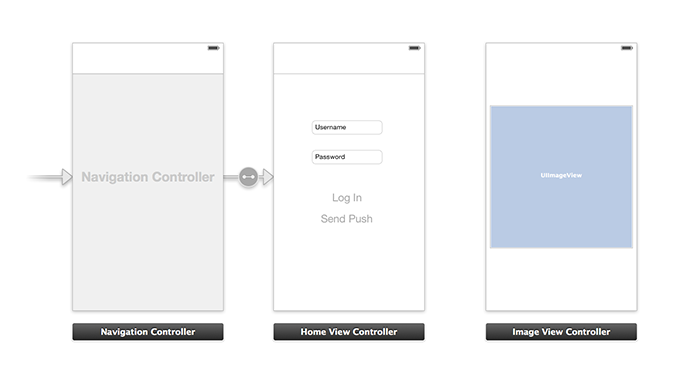
Main.storyboardを開き、ユーザーへの通知に関するチュートリアルの View Controller (このチュートリアルでは Home View Controller) があることを確認します。Navigation Controller をストーリーボードに追加し、Home View Controller を Control キーを押しながらドラッグして、ナビゲーションのルート ビューにします。 Attributes inspector の [Is Initial View Controller] が選択されているのが、Navigation Controller のみであることを確認します。
View Controller をストーリボードに追加し、Image View を追加します。 これは、ユーザーが情報を得るために通知をクリックすると表示されるページです。 ストーリーボードは次のようになります。

ストーリーボードの [Home View Controller] をクリックし、Custom Class として homeViewController があることと、Identity inspector 内に Storyboard ID があることを確認します。
Image View Controller について、imageViewController として同じ確認をします。
その後、作成した UI を扱うために imageViewController という新しい View Controller クラスを作成します。
imageViewController.h で、コントローラーのインターフェイス宣言に次のコードを追加します。 ストーリー ボードのイメージ ビューから、これらのプロパティに Control を押しながらドラッグして、この 2 つをリンクさせます。
@property (weak, nonatomic) IBOutlet UIImageView *myImage; @property (strong) UIImage* imagePayload;imageViewController.mで、viewDidloadの末尾に次のコードを追加します。// Display the UI Image in UI Image View [self.myImage setImage:self.imagePayload];AppDelegate.mで、作成したイメージ コントローラーをインポートします。#import "imageViewController.h"次の宣言を使用して interface セクションを追加します。
@interface AppDelegate () @property UIImage* imagePayload; @property NSDictionary* userInfo; @property BOOL iOS8; // Obtain content from backend with notification id - (void)retrieveRichImageWithId:(int)richId completion: (void(^)(NSError*)) completion; // Redirect to Image View Controller after notification interaction - (void)redirectToImageViewWithImage: (UIImage *)img; @endAppDelegateで、アプリがapplication: didFinishLaunchingWithOptionsのサイレント通知に登録されていることを確認します。// Software version self.iOS8 = [[UIApplication sharedApplication] respondsToSelector:@selector(registerUserNotificationSettings:)] && [[UIApplication sharedApplication] respondsToSelector:@selector(registerForRemoteNotifications)]; // Register for remote notifications for iOS8 and previous versions if (self.iOS8) { NSLog(@"This device is running with iOS8."); // Action UIMutableUserNotificationAction *richPushAction = [[UIMutableUserNotificationAction alloc] init]; richPushAction.identifier = @"richPushMore"; richPushAction.activationMode = UIUserNotificationActivationModeForeground; richPushAction.authenticationRequired = NO; richPushAction.title = @"More"; // Notification category UIMutableUserNotificationCategory* richPushCategory = [[UIMutableUserNotificationCategory alloc] init]; richPushCategory.identifier = @"richPush"; [richPushCategory setActions:@[richPushAction] forContext:UIUserNotificationActionContextDefault]; // Notification categories NSSet* richPushCategories = [NSSet setWithObjects:richPushCategory, nil]; UIUserNotificationSettings *settings = [UIUserNotificationSettings settingsForTypes:UIUserNotificationTypeSound | UIUserNotificationTypeAlert | UIUserNotificationTypeBadge categories:richPushCategories]; [[UIApplication sharedApplication] registerUserNotificationSettings:settings]; [[UIApplication sharedApplication] registerForRemoteNotifications]; } else { // Previous iOS versions NSLog(@"This device is running with iOS7 or earlier versions."); [[UIApplication sharedApplication] registerForRemoteNotificationTypes: UIRemoteNotificationTypeAlert | UIRemoteNotificationTypeBadge | UIRemoteNotificationTypeSound | UIRemoteNotificationTypeNewsstandContentAvailability]; } return YES;ストーリーボード UI の変更を考慮するために、次の実装を
application:didRegisterForRemoteNotificationsWithDeviceTokenの代わりに使用します。// Access navigation controller which is at the root of window UINavigationController *nc = (UINavigationController *)self.window.rootViewController; // Get home view controller from stack on navigation controller homeViewController *hvc = (homeViewController *)[nc.viewControllers objectAtIndex:0]; hvc.deviceToken = deviceToken;その後、次のメソッドを
AppDelegate.mに追加してエンドポイントから画像を取得し、取得の完了時にローカル通知を送信します。 必ずプレースホルダー{backend endpoint}をバックエンド エンドポイントに置き換えます。NSString *const GetNotificationEndpoint = @"{backend endpoint}/api/notifications"; // Helper: retrieve notification content from backend with rich notification id - (void)retrieveRichImageWithId:(int)richId completion: (void(^)(NSError*)) completion { UINavigationController *nc = (UINavigationController *)self.window.rootViewController; homeViewController *hvc = (homeViewController *)[nc.viewControllers objectAtIndex:0]; NSString* authenticationHeader = hvc.registerClient.authenticationHeader; // Check if authenticated if (!authenticationHeader) return; NSURLSession* session = [NSURLSession sessionWithConfiguration:[NSURLSessionConfiguration defaultSessionConfiguration] delegate:nil delegateQueue:nil]; NSURL* requestURL = [NSURL URLWithString:[NSString stringWithFormat:@"%@/%d", GetNotificationEndpoint, richId]]; NSMutableURLRequest* request = [NSMutableURLRequest requestWithURL:requestURL]; [request setHTTPMethod:@"GET"]; NSString* authorizationHeaderValue = [NSString stringWithFormat:@"Basic %@", authenticationHeader]; [request setValue:authorizationHeaderValue forHTTPHeaderField:@"Authorization"]; NSURLSessionDataTask* dataTask = [session dataTaskWithRequest:request completionHandler:^(NSData *data, NSURLResponse *response, NSError *error) { NSHTTPURLResponse* httpResponse = (NSHTTPURLResponse*) response; if (!error && httpResponse.statusCode == 200) { // From NSData to UIImage self.imagePayload = [UIImage imageWithData:data]; completion(nil); } else { NSLog(@"Error status: %ld, request: %@", (long)httpResponse.statusCode, error); if (error) completion(error); else { completion([NSError errorWithDomain:@"APICall" code:httpResponse.statusCode userInfo:nil]); } } }]; [dataTask resume]; } // Handle silent push notifications when id is sent from backend - (void)application:(UIApplication *)application didReceiveRemoteNotification:(NSDictionary *)userInfo fetchCompletionHandler:(void (^)(UIBackgroundFetchResult result))handler { self.userInfo = userInfo; int richId = [[self.userInfo objectForKey:@"richId"] intValue]; NSString* richType = [self.userInfo objectForKey:@"richType"]; // Retrieve image data if ([richType isEqualToString:@"img"]) { [self retrieveRichImageWithId:richId completion:^(NSError* error) { if (!error){ // Send local notification UILocalNotification* localNotification = [[UILocalNotification alloc] init]; // "5" is arbitrary here to give you enough time to quit out of the app and receive push notifications localNotification.fireDate = [NSDate dateWithTimeIntervalSinceNow:5]; localNotification.userInfo = self.userInfo; localNotification.alertBody = [self.userInfo objectForKey:@"richMessage"]; localNotification.timeZone = [NSTimeZone defaultTimeZone]; // iOS8 categories if (self.iOS8) { localNotification.category = @"richPush"; } [[UIApplication sharedApplication] scheduleLocalNotification:localNotification]; handler(UIBackgroundFetchResultNewData); } else{ handler(UIBackgroundFetchResultFailed); } }]; } // Add "else if" here to handle more types of rich content such as url, sound files, etc. }次のメソッドで
AppDelegate.m内のイメージ ビュー コントローラーを開き、前述のローカル通知を処理します。// Helper: redirect users to image view controller - (void)redirectToImageViewWithImage: (UIImage *)img { UINavigationController *navigationController = (UINavigationController*) self.window.rootViewController; UIStoryboard *mainStoryboard = [UIStoryboard storyboardWithName:@"Main" bundle: nil]; imageViewController *imgViewController = [mainStoryboard instantiateViewControllerWithIdentifier: @"imageViewController"]; // Pass data/image to image view controller imgViewController.imagePayload = img; // Redirect [navigationController pushViewController:imgViewController animated:YES]; } // Handle local notification sent above in didReceiveRemoteNotification - (void)application:(UIApplication *)application didReceiveLocalNotification:(UILocalNotification *)notification { if (application.applicationState == UIApplicationStateActive) { // Show in-app alert with an extra "more" button UIAlertView *alert = [[UIAlertView alloc] initWithTitle:@"Notification" message:notification.alertBody delegate:self cancelButtonTitle:@"OK" otherButtonTitles:@"More", nil]; [alert show]; } // App becomes active from user's tap on notification else { [self redirectToImageViewWithImage:self.imagePayload]; } } // Handle buttons in in-app alerts and redirect with data/image - (void)alertView:(UIAlertView *)alertView clickedButtonAtIndex:(NSInteger)buttonIndex { // Handle "more" button if (buttonIndex == 1) { [self redirectToImageViewWithImage:self.imagePayload]; } // Add "else if" here to handle more buttons } // Handle notification setting actions in iOS8 - (void)application:(UIApplication *)application handleActionWithIdentifier:(NSString *)identifier forLocalNotification:(UILocalNotification *)notification completionHandler:(void (^)())completionHandler { // Handle richPush related buttons if ([identifier isEqualToString:@"richPushMore"]) { [self redirectToImageViewWithImage:self.imagePayload]; } completionHandler(); }
アプリケーションの実行
- XCode を使用して、物理 iOS デバイスでアプリケーションを実行します (プッシュ通知はシミュレーターでは機能しません)。
- iOS アプリケーション UI で、認証に同じ値のユーザー名とパスワードを入力し、 [Log In] をクリックします。
- [Send push] をクリックすると、アプリ内アラートが表示されます。 [More] をクリックすると、アプリケーション バックエンドに含めるために選択した画像が表示されます。
- [Send push] をクリックし、すぐにデバイスのホーム ボタンを押すこともできます。 少し待つと、プッシュ通知が届きます。 タップするか、[More] をクリックすれば、アプリケーションとリッチな画像コンテンツが現れます。