チュートリアル: .NET Service Fabric アプリケーションをビルドする
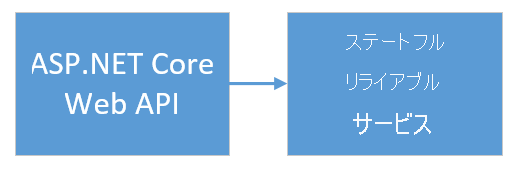
このチュートリアルは、シリーズの "パート 1" です。 このチュートリアルでは、ASP.NET Core Web API フロントエンドと、データを格納するためのステートフル バックエンド サービスを備えた Azure Service Fabric アプリケーションを作成する方法について説明します。 最後まで読み進めると、クラスター内のステートフル バックエンド サービスに投票結果を保存する ASP.NET Core Web フロントエンドを備えた投票アプリケーションが完成します。
このチュートリアル シリーズには、Windows 開発者用コンピューターが必要です。 投票アプリケーションを手動で作成しない場合は、完成したアプリケーションのソース コードをダウンロードし、「投票のサンプル アプリケーションの概要」に進むことができます。 また、このチュートリアルのビデオ チュートリアルを視聴することもできます。
このチュートリアルでは、次の作業を行う方法について説明します。
- ASP.NET Core Web API サービスをステートフル リライアブル サービスとして作成する
- ASP.NET Core Web アプリケーション サービスをステートレス Web サービスとして作成する
- リバース プロキシを使用してステートフル サービスと通信する
このチュートリアル シリーズでは、次の操作方法について説明します。
- NET Service Fabric アプリケーションをビルドする ("このチュートリアル")
- アプリケーションをリモート クラスターにデプロイする
- ASP.NET Core フロントエンド サービスに HTTPS エンドポイントを追加する
- Azure Pipelines を使用して CI/CD を構成する
- アプリケーションの監視と診断を設定する
前提条件
このチュートリアルを開始する前に
- Azure サブスクリプションをお持ちでない場合は、無料アカウントを作成してください。
- Azure 開発ワークロード、ASP.NET、Web 開発ワークロードを含むバージョン 15.5 以降の Visual Studio 2019 をインストールします。
- Service Fabric SDK をインストールします。
ASP.NET Web API サービスをリライアブル サービスとして作成する
まず、ASP.NET Core を使用して、投票アプリケーションの Web フロントエンドを作成します。 ASP.NET Core は軽量のクロスプラットフォーム Web 開発フレームワークであり、これを使用すると、最新の Web UI と Web API を作成できます。
ASP.NET Core を Service Fabric と統合する方法を十分に理解するには、「Azure Service Fabric Reliable Services での ASP.NET Core」を確認することを強くお勧めします。 ここでは、このチュートリアルに従って、すぐに開始することができます。 ASP.NET Core の詳細については、ASP.NET Core のドキュメントを参照してください。
サービスを作成するには:
[管理者として実行] オプションを使用して、Visual Studio を開きます。
[ファイル]>[新規]>[プロジェクト] の順に選択して新しいプロジェクトを作成します。
[新しいプロジェクトの作成] で、[クラウド]>[Service Fabric アプリケーション] の順に選択します。 [次へ] を選択します。
![Visual Studio の [新しいプロジェクトの作成] ダイアログを示すスクリーンショット。](media/service-fabric-tutorial-create-dotnet-app/new-project-dialog.png)
新しいプロジェクトの種類として [ASP.NET Core] を選択し、サービスに「VotingWeb」という名前を付けて、[作成] を選択します。
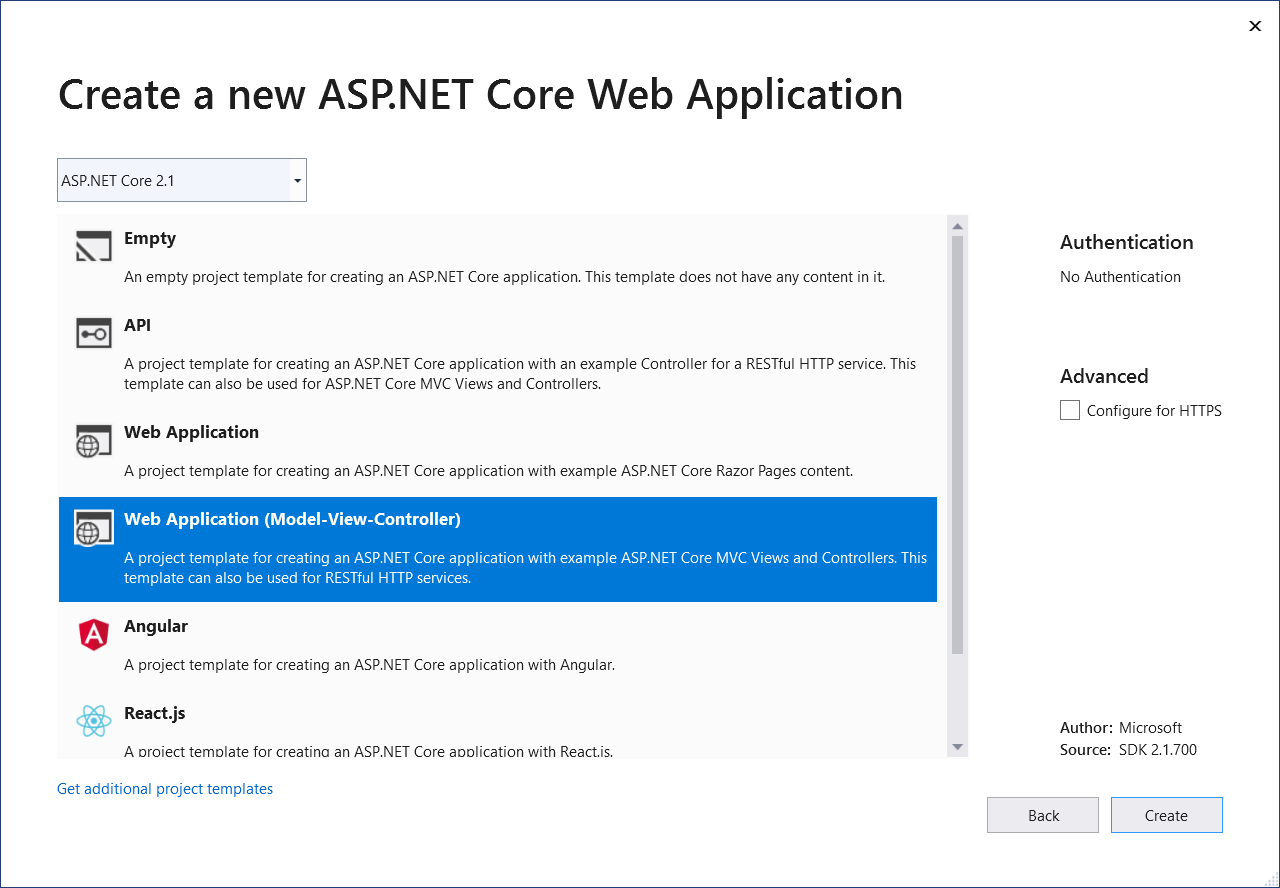
次のペインに、一連の ASP.NET Core プロジェクト テンプレートが表示されます。 このチュートリアルでは、[Web アプリケーション (Model-View-Controller)] を選択し、[OK] を選択します。
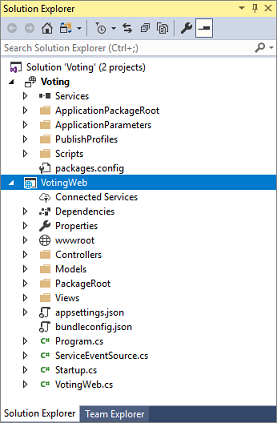
Visual Studio によって、アプリケーションとサービス プロジェクトが作成され、Visual Studio ソリューション エクスプローラーに表示されます。
site.js ファイルを更新する
wwwroot/js/site.js に移動し、ファイルを開きます。 ファイルの内容を、ホーム ビューで使用される次の JavaScript に置き換えて、変更を保存します。
var app = angular.module('VotingApp', ['ui.bootstrap']);
app.run(function () { });

app.controller('VotingAppController', ['$rootScope', '$scope', '$http', '$timeout', function ($rootScope, $scope, $http, $timeout) {

    $scope.refresh = function () {
        $http.get('api/Votes?c=' + new Date().getTime())
            .then(function (data, status) {
                $scope.votes = data;
            }, function (data, status) {
                $scope.votes = undefined;
            });
    };

    $scope.remove = function (item) {
        $http.delete('api/Votes/' + item)
            .then(function (data, status) {
                $scope.refresh();
            })
    };

    $scope.add = function (item) {
        var fd = new FormData();
        fd.append('item', item);
        $http.put('api/Votes/' + item, fd, {
            transformRequest: angular.identity,
            headers: { 'Content-Type': undefined }
        })
            .then(function (data, status) {
                $scope.refresh();
                $scope.item = undefined;
            })
    };
}]);
Index.cshtml ファイルを更新する
Views/Home/Index.cshtml に移動し、ファイルを開きます。 このファイルには、ホーム コントローラー固有のビューが含まれています。 その内容を次のコードに置き換えて、変更を保存します。
@{
    ViewData["Title"] = "Service Fabric Voting Sample";
}

<div ng-controller="VotingAppController" ng-init="refresh()">
    <div class="container-fluid">
        <div class="row">
            <div class="col-xs-8 col-xs-offset-2 text-center">
                <h2>Service Fabric Voting Sample</h2>
            </div>
        </div>

        <div class="row">
            <div class="col-xs-8 col-xs-offset-2">
                <form class="col-xs-12 center-block">
                    <div class="col-xs-6 form-group">
                        <input id="txtAdd" type="text" class="form-control" placeholder="Add voting option" ng-model="item"/>
                    </div>
                    <button id="btnAdd" class="btn btn-default" ng-click="add(item)">
                        <span class="glyphicon glyphicon-plus" aria-hidden="true"></span>
                        Add
                    </button>
                </form>
            </div>
        </div>

        <hr/>

        <div class="row">
            <div class="col-xs-8 col-xs-offset-2">
                <div class="row">
                    <div class="col-xs-4">
                        Click to vote
                    </div>
                </div>
                <div class="row top-buffer" ng-repeat="vote in votes.data">
                    <div class="col-xs-8">
                        <button class="btn btn-success text-left btn-block" ng-click="add(vote.Key)">
                            <span class="pull-left">
                                {{vote.key}}
                            </span>
                            <span class="badge pull-right">
                                {{vote.value}} Votes
                            </span>
                        </button>
                    </div>
                    <div class="col-xs-4">
                        <button class="btn btn-danger pull-right btn-block" ng-click="remove(vote.Key)">
                            <span class="glyphicon glyphicon-remove" aria-hidden="true"></span>
                            Remove
                        </button>
                    </div>
                </div>
            </div>
        </div>
    </div>
</div>
_Layout.cshtml ファイルを更新する
Views/Shared/_Layout.cshtml に移動し、ファイルを開きます。 このファイルには、ASP.NET アプリの既定のレイアウトが含まれています。 その内容を次のコードに置き換えて、変更を保存します。
<!DOCTYPE html>
<html ng-app="VotingApp" xmlns:ng="https://angularjs.org">
<head>
    <meta charset="utf-8"/>
    <meta name="viewport" content="width=device-width, initial-scale=1.0"/>
    <title>@ViewData["Title"]</title>

    <link href="~/lib/bootstrap/dist/css/bootstrap.css" rel="stylesheet"/>
    <link href="~/css/site.css" rel="stylesheet"/>

</head>
<body>
<div class="container body-content">
    @RenderBody()
</div>

<script src="~/lib/jquery/dist/jquery.js"></script>
<script src="~/lib/bootstrap/dist/js/bootstrap.js"></script>
<script src="https://cdnjs.cloudflare.com/ajax/libs/angular.js/1.7.2/angular.min.js"></script>
<script src="https://cdnjs.cloudflare.com/ajax/libs/angular-ui-bootstrap/2.5.0/ui-bootstrap-tpls.js"></script>
<script src="~/js/site.js"></script>

@RenderSection("Scripts", required: false)
</body>
</html>
VotingWeb.cs ファイルを更新する
VotingWeb.cs ファイルを開きます。 このファイルにより、WebListener Web サーバーを使用してステートレス サービス内に ASP.NET Core WebHost が作成されます。
ファイルの先頭に、using System.Net.Http; ディレクティブを追加します。
CreateServiceInstanceListeners() 関数を次のコードに置き換えて、変更を保存します。
protected override IEnumerable<ServiceInstanceListener> CreateServiceInstanceListeners()
{
    return new ServiceInstanceListener[]
    {
        new ServiceInstanceListener(
            serviceContext =>
                new KestrelCommunicationListener(
                    serviceContext,
                    "ServiceEndpoint",
                    (url, listener) =>
                    {
                        ServiceEventSource.Current.ServiceMessage(serviceContext, $"Starting Kestrel on {url}");

                        return new WebHostBuilder()
                            .UseKestrel()
                            .ConfigureServices(
                                services => services
                                    .AddSingleton<HttpClient>(new HttpClient())
                                    .AddSingleton<FabricClient>(new FabricClient())
                                    .AddSingleton<StatelessServiceContext>(serviceContext))
                            .UseContentRoot(Directory.GetCurrentDirectory())
                            .UseStartup<Startup>()
                            .UseServiceFabricIntegration(listener, ServiceFabricIntegrationOptions.None)
                            .UseUrls(url)
                            .Build();
                    }))
    };
}
次に、CreateServiceInstanceListeners() の後に次の GetVotingDataServiceName メソッドを追加して、変更を保存します。 GetVotingDataServiceName は、ポーリングされるとサービス名を返します。
internal static Uri GetVotingDataServiceName(ServiceContext context)
{
    return new Uri($"{context.CodePackageActivationContext.ApplicationName}/VotingData");
}
VotesController.cs ファイルを追加する
投票アクションを定義するコントローラーを追加します。 Controllers フォルダーを右クリックし、[追加]>[新しい項目]>[Visual C#]>[ASP.NET Core]>[クラス] の順に選択します。 ファイルに「VotesController.cs」という名前を付けて、[追加] を選択します。
VotesController.cs ファイルの内容を次のコードに置き換えて、変更を保存します。 後の「VotesController.cs ファイルを更新する」では、バックエンド サービスで投票データの読み取りと書き込みを行うように、このファイルを変更します。 ここでは、コントローラーから静的文字列データをビューに返します。
namespace VotingWeb.Controllers
{
    using System;
    using System.Collections.Generic;
    using System.Fabric;
    using System.Fabric.Query;
    using System.Linq;
    using System.Net.Http;
    using System.Net.Http.Headers;
    using System.Text;
    using System.Threading.Tasks;
    using Microsoft.AspNetCore.Mvc;
    using Newtonsoft.Json;

    [Produces("application/json")]
    [Route("api/Votes")]
    public class VotesController : Controller
    {
        private readonly HttpClient httpClient;

        public VotesController(HttpClient httpClient)
        {
            this.httpClient = httpClient;
        }

        // GET: api/Votes
        [HttpGet]
        public async Task<IActionResult> Get()
        {
            List<KeyValuePair<string, int>> votes= new List<KeyValuePair<string, int>>();
            votes.Add(new KeyValuePair<string, int>("Pizza", 3));
            votes.Add(new KeyValuePair<string, int>("Ice cream", 4));

            return Json(votes);
        }
     }
}
リスニング ポートを構成する
VotingWeb フロントエンド サービスが作成されると、Visual Studio は、リッスンするサービスのポートをランダムに選択します。 VotingWeb サービスは、このアプリケーションのフロントエンドとして機能し、外部トラフィックを受け入れます。 このセクションでは、このサービスを固定の既知のポートにバインドします。 サービス マニフェストは、サービス エンドポイントを宣言します。
ソリューション エクスプローラーで、VotingWeb/PackageRoot/ServiceManifest.xml を開きます。 Resources セクションで、Endpoint 要素を見つけて、Port の値を 8080 に設定します。
アプリケーションをローカルでデプロイして実行するには、アプリケーションのリスニング ポートをコンピューター上で開いて、使用できるようにする必要があります。
<Resources>
    <Endpoints>
      <!-- This endpoint is used by the communication listener to obtain the port on which to
           listen. Please note that if your service is partitioned, this port is shared with
           replicas of different partitions that are placed in your code. -->
      <Endpoint Protocol="http" Name="ServiceEndpoint" Type="Input" Port="8080" />
    </Endpoints>
  </Resources>
次に、Voting プロジェクトの Application URL プロパティ値を更新して、アプリケーションをデバッグするときに Web ブラウザーが正しいポートに対して開くようにします。 ソリューション エクスプローラーで、Voting プロジェクトを選択し、Application URL プロパティを 8080 に更新します。
Voting アプリケーションをローカルにデプロイして実行する
これで、Voting アプリケーションを実行してデバッグできるようになりました。 Visual Studio で F5 キーを押して、アプリケーションをローカルの Service Fabric クラスターにデバッグ モードでデプロイします。 先ほど [管理者として実行] オプションを使用して Visual Studio を開いていない場合、アプリケーションは失敗します。
Note
初めてアプリケーションをローカルで実行してデプロイすると、Visual Studio によって、デバッグに使用するローカルの Service Fabric クラスターが作成されます。 クラスターを作成するプロセスには時間がかかる場合があります。 クラスターの作成状態は、Visual Studio の出力ウィンドウに表示されます。
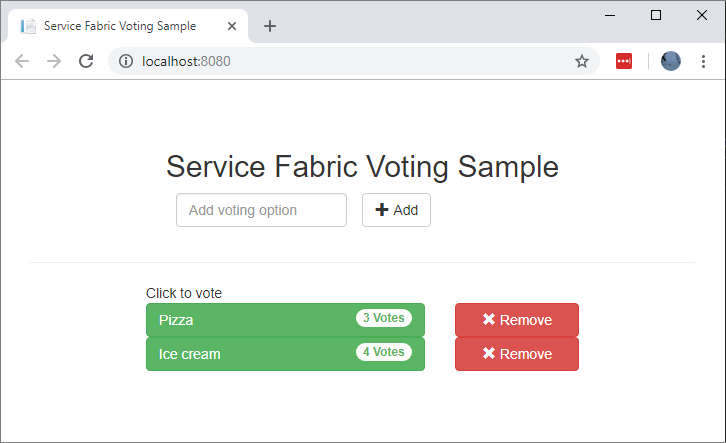
Voting アプリケーションがローカルの Service Fabric クラスターにデプロイされると、Web アプリがブラウザー タブで自動的に開きます。これは、次の例のようになります。
アプリケーションのデバッグを停止するには、Visual Studio に戻り、Shift + F5 キーを押します。
アプリケーションにステートフルなバックエンド サービスを追加する
ASP.NET Web API サービスがアプリケーションで実行されるようになったので、ステートフル リライアブル サービスを追加して、データをアプリケーションに格納します。
Service Fabric を使用すると、リライアブル コレクションを使用してデータをサービス内に一貫して確実に格納できます。 リライアブル コレクションは、C# コレクションを使用したことがあるユーザーには馴染みのある可用性が高く信頼性のある一連のコレクション クラスです。
リライアブル コレクションにカウンター値を格納するサービスを作成するには、次の手順を行います。
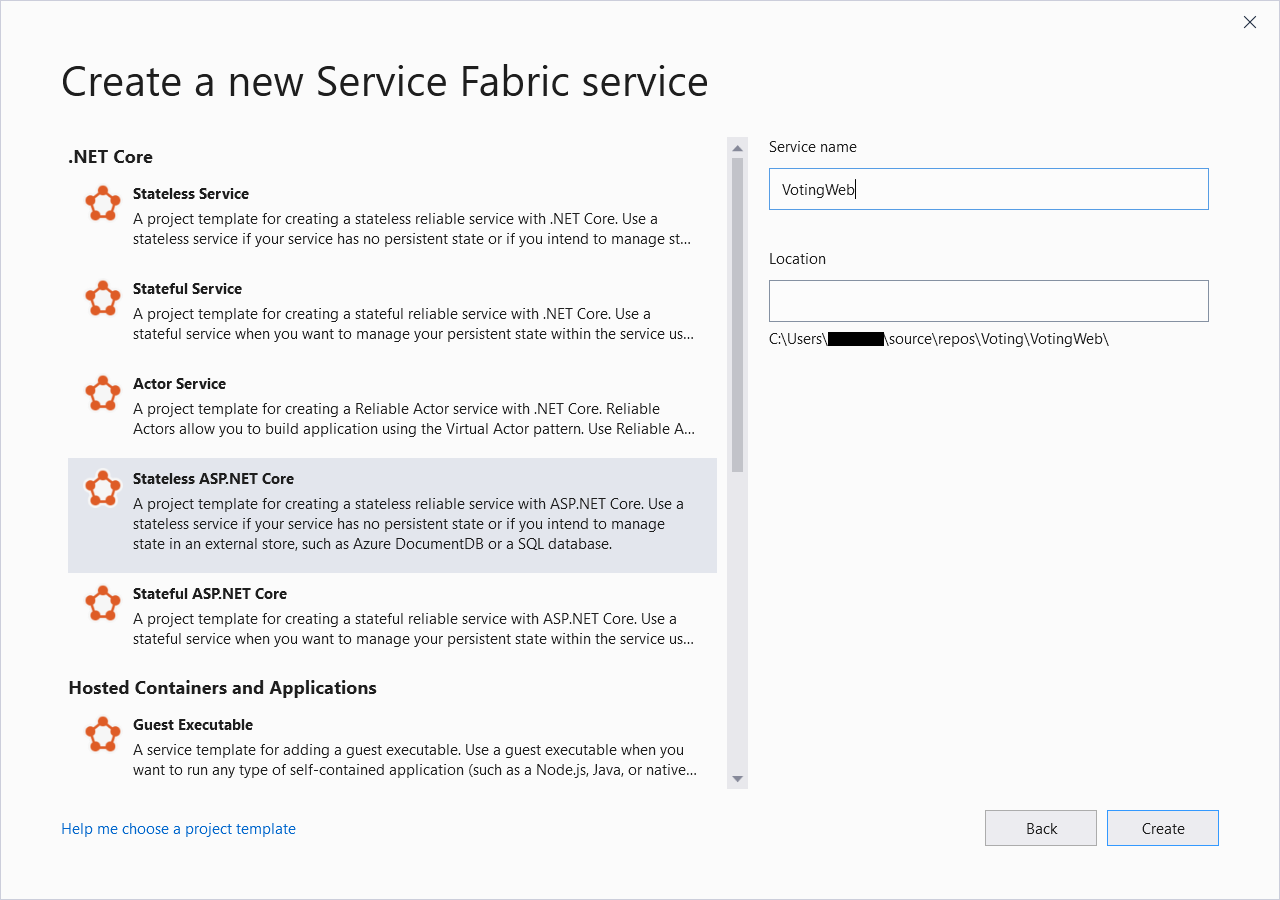
ソリューション エクスプローラーで、Voting アプリケーション プロジェクトの [サービス] を右クリックし、[追加]>[新しい Service Fabric サービス] の順に選択します。
[新しい Service Fabric サービス] ダイアログで、[ステートフル ASP.NET Core] を選択し、サービスに「VotingData」という名前を付けて、[OK] をクリックします。
サービス プロジェクトが作成されると、アプリケーションに 2 つのサービスが含まれます。 アプリケーションのビルドを続けるに従って、同じ方法でさらにサービスを追加することができます。 サービスごとに個別にバージョン管理とアップグレードを行うことができます。
次のペインに、一連の ASP.NET Core プロジェクト テンプレートが表示されます。 このチュートリアルでは、[API] を選択します。
Visual Studio によって VotingData サービス プロジェクトが作成され、ソリューション エクスプローラーに表示されます。
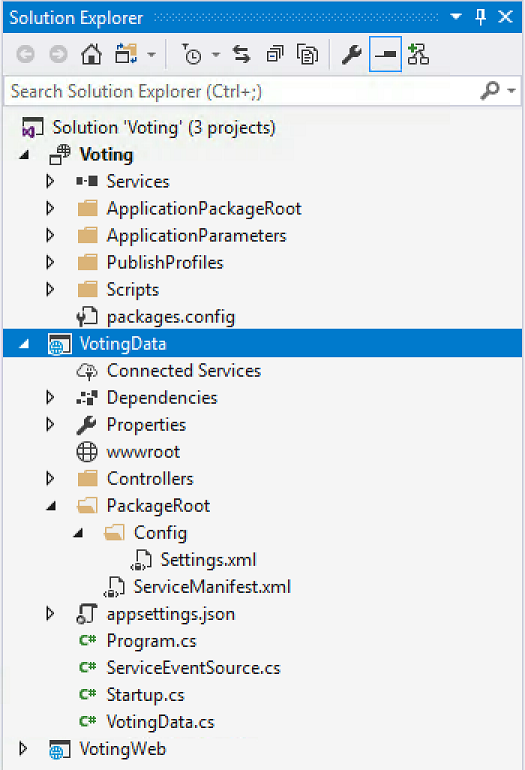
VoteDataController.cs ファイルを追加する
VotingData プロジェクトで、Controllers フォルダーを右クリックし、[追加]>[新しい項目]>[クラス] の順に選択します。 ファイルに「VoteDataController.cs」という名前を付けて、[追加] を選択します。 ファイルの内容を次のコードに置き換えて、変更を保存します。
namespace VotingData.Controllers
{
    using System.Collections.Generic;
    using System.Threading;
    using System.Threading.Tasks;
    using Microsoft.AspNetCore.Mvc;
    using Microsoft.ServiceFabric.Data;
    using Microsoft.ServiceFabric.Data.Collections;

    [Route("api/[controller]")]
    public class VoteDataController : Controller
    {
        private readonly IReliableStateManager stateManager;

        public VoteDataController(IReliableStateManager stateManager)
        {
            this.stateManager = stateManager;
        }

        // GET api/VoteData
        [HttpGet]
        public async Task<IActionResult> Get()
        {
            CancellationToken ct = new CancellationToken();

            IReliableDictionary<string, int> votesDictionary = await this.stateManager.GetOrAddAsync<IReliableDictionary<string, int>>("counts");

            using (ITransaction tx = this.stateManager.CreateTransaction())
            {
                Microsoft.ServiceFabric.Data.IAsyncEnumerable<KeyValuePair<string, int>> list = await votesDictionary.CreateEnumerableAsync(tx);

                Microsoft.ServiceFabric.Data.IAsyncEnumerator<KeyValuePair<string, int>> enumerator = list.GetAsyncEnumerator();

                List<KeyValuePair<string, int>> result = new List<KeyValuePair<string, int>>();

                while (await enumerator.MoveNextAsync(ct))
                {
                    result.Add(enumerator.Current);
                }

                return this.Json(result);
            }
        }

        // PUT api/VoteData/name
        [HttpPut("{name}")]
        public async Task<IActionResult> Put(string name)
        {
            IReliableDictionary<string, int> votesDictionary = await this.stateManager.GetOrAddAsync<IReliableDictionary<string, int>>("counts");

            using (ITransaction tx = this.stateManager.CreateTransaction())
            {
                await votesDictionary.AddOrUpdateAsync(tx, name, 1, (key, oldvalue) => oldvalue + 1);
                await tx.CommitAsync();
            }

            return new OkResult();
        }

        // DELETE api/VoteData/name
        [HttpDelete("{name}")]
        public async Task<IActionResult> Delete(string name)
        {
            IReliableDictionary<string, int> votesDictionary = await this.stateManager.GetOrAddAsync<IReliableDictionary<string, int>>("counts");

            using (ITransaction tx = this.stateManager.CreateTransaction())
            {
                if (await votesDictionary.ContainsKeyAsync(tx, name))
                {
                    await votesDictionary.TryRemoveAsync(tx, name);
                    await tx.CommitAsync();
                    return new OkResult();
                }
                else
                {
                    return new NotFoundResult();
                }
            }
        }
    }
}
サービスへの接続
このセクションでは、2 つのサービスを接続します。 フロントエンド Web アプリケーションでバックエンド サービスから投票情報を取得し、その情報をアプリケーションで設定できるようにします。
Service Fabric を使用すると、完全な柔軟性のある方法でリライアブル サービスと通信できます。 1 つのアプリケーション内に、TCP、HTTP REST API、または WebSocket プロトコル経由でアクセスできるサービスが含まれる場合があります。 使用可能なオプションとそれらのトレードオフについては、サービスとの通信に関する記事を参照してください。
このチュートリアルでは、ASP.NET Core Web API と Service Fabric リバース プロキシを使用して、VotingWeb フロントエンド Web サービスがバックエンドの VotingData サービスと通信できるようにします。 既定では、リバース プロキシはポート 19081 を使用するように構成されます。 リバース プロキシ ポートは、クラスターを設定する Azure Resource Manager テンプレートで設定されます。 どのポートが使用されているかを確認するには、Microsoft.ServiceFabric/clusters リソースのクラスター テンプレートを調べます。
"nodeTypes": [
          {
            ...
            "httpGatewayEndpointPort": "[variables('nt0fabricHttpGatewayPort')]",
            "isPrimary": true,
            "vmInstanceCount": "[parameters('nt0InstanceCount')]",
            "reverseProxyEndpointPort": "[parameters('SFReverseProxyPort')]"
          }
        ],
ローカル開発クラスターで使用されているリバース プロキシ ポートを確認するには、ローカル Service Fabric クラスター マニフェスト内の HttpApplicationGatewayEndpoint 要素を確認します。
- Service Fabric Explorer ツールを開くには、ブラウザーを開き、
http://localhost:19080に移動します。 - [クラスター]>[マニフェスト] の順に選択します。
HttpApplicationGatewayEndpoint要素のポートをメモします。 既定では、このポートは 19081 です。 19081 ではない場合、次のセクションで説明するように、VotesController.cs コードのGetProxyAddressメソッドのポートを変更します。
VotesController.cs ファイルを更新する
VotingWeb プロジェクトで、Controllers/VotesController.cs ファイルを開きます。 VotesController クラス定義の内容を次のコードに置き換えて、変更を保存します。 前の手順で確認したリバース プロキシ ポートが 19081 ではない場合、GetProxyAddress メソッドのポートを、19081 から、確認したポートに変更します。
public class VotesController : Controller
{
    private readonly HttpClient httpClient;
    private readonly FabricClient fabricClient;
    private readonly StatelessServiceContext serviceContext;

    public VotesController(HttpClient httpClient, StatelessServiceContext context, FabricClient fabricClient)
    {
        this.fabricClient = fabricClient;
        this.httpClient = httpClient;
        this.serviceContext = context;
    }

    // GET: api/Votes
    [HttpGet("")]
    public async Task<IActionResult> Get()
    {
        Uri serviceName = VotingWeb.GetVotingDataServiceName(this.serviceContext);
        Uri proxyAddress = this.GetProxyAddress(serviceName);

        ServicePartitionList partitions = await this.fabricClient.QueryManager.GetPartitionListAsync(serviceName);

        List<KeyValuePair<string, int>> result = new List<KeyValuePair<string, int>>();

        foreach (Partition partition in partitions)
        {
            string proxyUrl =
                $"{proxyAddress}/api/VoteData?PartitionKey={((Int64RangePartitionInformation) partition.PartitionInformation).LowKey}&PartitionKind=Int64Range";

            using (HttpResponseMessage response = await this.httpClient.GetAsync(proxyUrl))
            {
                if (response.StatusCode != System.Net.HttpStatusCode.OK)
                {
                    continue;
                }

                result.AddRange(JsonConvert.DeserializeObject<List<KeyValuePair<string, int>>>(await response.Content.ReadAsStringAsync()));
            }
        }

        return this.Json(result);
    }

    // PUT: api/Votes/name
    [HttpPut("{name}")]
    public async Task<IActionResult> Put(string name)
    {
        Uri serviceName = VotingWeb.GetVotingDataServiceName(this.serviceContext);
        Uri proxyAddress = this.GetProxyAddress(serviceName);
        long partitionKey = this.GetPartitionKey(name);
        string proxyUrl = $"{proxyAddress}/api/VoteData/{name}?PartitionKey={partitionKey}&PartitionKind=Int64Range";

        StringContent putContent = new StringContent($"{{ 'name' : '{name}' }}", Encoding.UTF8, "application/json");
        putContent.Headers.ContentType = new MediaTypeHeaderValue("application/json");

        using (HttpResponseMessage response = await this.httpClient.PutAsync(proxyUrl, putContent))
        {
            return new ContentResult()
            {
                StatusCode = (int) response.StatusCode,
                Content = await response.Content.ReadAsStringAsync()
            };
        }
    }

    // DELETE: api/Votes/name
    [HttpDelete("{name}")]
    public async Task<IActionResult> Delete(string name)
    {
        Uri serviceName = VotingWeb.GetVotingDataServiceName(this.serviceContext);
        Uri proxyAddress = this.GetProxyAddress(serviceName);
        long partitionKey = this.GetPartitionKey(name);
        string proxyUrl = $"{proxyAddress}/api/VoteData/{name}?PartitionKey={partitionKey}&PartitionKind=Int64Range";

        using (HttpResponseMessage response = await this.httpClient.DeleteAsync(proxyUrl))
        {
            if (response.StatusCode != System.Net.HttpStatusCode.OK)
            {
                return this.StatusCode((int) response.StatusCode);
            }
        }

        return new OkResult();
    }


    /// <summary>
    /// Constructs a reverse proxy URL for a given service.
    /// Example: http://localhost:19081/VotingApplication/VotingData/
    /// </summary>
    /// <param name="serviceName"></param>
    /// <returns></returns>
    private Uri GetProxyAddress(Uri serviceName)
    {
        return new Uri($"http://localhost:19081{serviceName.AbsolutePath}");
    }

    /// <summary>
    /// Creates a partition key from the given name.
    /// Uses the zero-based numeric position in the alphabet of the first letter of the name (0-25).
    /// </summary>
    /// <param name="name"></param>
    /// <returns></returns>
    private long GetPartitionKey(string name)
    {
        return Char.ToUpper(name.First()) - 'A';
    }
}
投票のサンプル アプリケーションの概要
この投票アプリケーションは次の 2 つのサービスから成ります。
- Web フロントエンド サービス (VotingWeb): Web ページを表示し、Web API を公開してバックエンド サービスと通信する ASP.NET Core Web フロントエンド サービス。
- バックエンド サービス (VotingData): ディスクに保存されているリライアブル ディクショナリに投票結果を保存する API を公開する ASP.NET Core Web サービス。
アプリケーションで票を投じると、次のイベントが発生します。
JavaScript ファイルが、投票要求を HTTP PUT 要求として Web フロントエンド サービスの Web API に送信します。
Web フロントエンド サービスがプロキシを使用して HTTP PUT 要求を検出し、バックエンド サービスに転送します。
バックエンド サービスが、受信要求を受け取り、更新された結果をリライアブル ディクショナリに保存します。 ディクショナリがクラスター内の複数のノードにレプリケートされ、ディスクに保存されます。 アプリケーションのデータはすべてクラスターに保存されるため、データベースは必要ありません。
Visual Studio でのデバッグ
Visual Studio でアプリケーションをデバッグする場合、ローカルの Service Fabric 開発クラスターを使用します。 デバッグのエクスペリエンスは実際のシナリオに合わせて調整できます。
このアプリケーションでは、リライアブル ディクショナリを使用してバックエンド サービスにデータを格納します。 既定では、デバッガーを停止すると、Visual Studio によってアプリケーションが削除されます。 アプリケーションが削除されると、バックエンド サービス内のデータも削除されます。 デバッグ セッションの終了後もデータを維持するには、Visual Studio の Voting プロジェクトのプロパティで、 [アプリケーション デバッグ モード] を変更してください。
コードでどのような処理が実行されているのかを確認するには、次の手順を行います。
VotingWeb\VotesController.cs ファイルを開き、Web API の
Putメソッド (72 行目) にブレークポイントを設定します。VotingData\VoteDataController.cs ファイルを開き、この Web API の
Putメソッド (54 行目) にブレークポイントを設定します。F5 キーを押して、デバッグ モードでアプリケーションを起動します。
ブラウザーに戻り、投票オプションを選択するか、新しい投票オプションを追加します。 Web フロントエンドの API コントローラーで 1 つ目のブレークポイントに到達します。
ブラウザーの JavaScript がフロントエンド サービスの Web API コントローラーに要求を送信します。
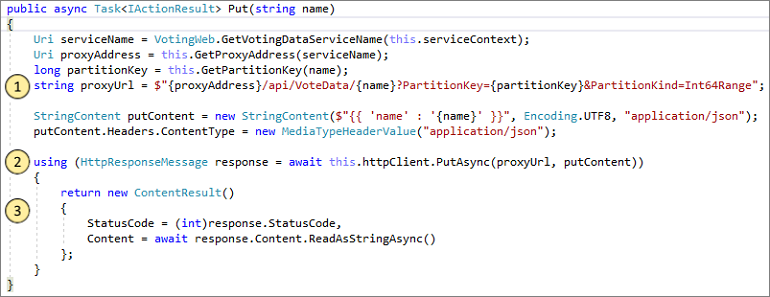
- まず、バックエンド サービスのリバース プロキシへの URL を構築します。 (1)
- 次に、HTTP PUT 要求をリバース プロキシに送信します。 (2)
- 最後に、バックエンド サービスからクライアントに応答を返します。 (3)
F5 キーを押して続行します。
今度は、バックエンド サービスのブレークポイントに到達します。
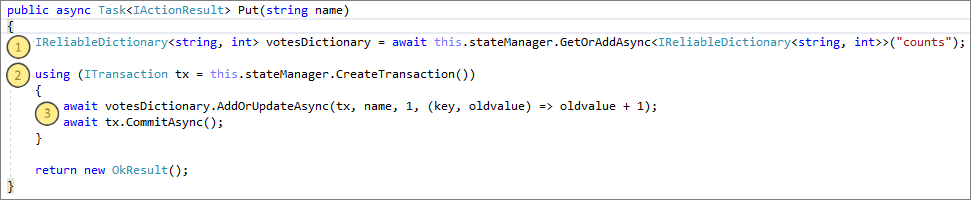
- メソッドの最初の行で、
stateManagerを使用して、countsという名前のリライアブル ディクショナリを取得または追加します。 (1) - リライアブル ディクショナリ内の値を含むすべてのやり取りには、トランザクションが必要です。 この
usingステートメントは、そのトランザクションを作成します。 (2) - トランザクションでは、投票オプションに関連するキーの値を更新し、操作をコミットします。
commitメソッドに戻ると、ディクショナリ内のデータが更新されます。 その後、データはクラスター内の他のノードにレプリケートされます。 これでデータはクラスターに安全に保存され、バックエンド サービスは他のノードにフェールオーバーでき、データの可用性が引き続き保持されます。 (3)
- メソッドの最初の行で、
F5 キーを押して続行します。
デバッグ セッションを停止するには、Shift + F5 キーを押します。
次のステップ
次のチュートリアルに進みます。