Azure Virtual Desktop 用に Azure Automation と Azure Logic Apps を使用してスケーリング ツールを設定する
この記事では、Azure Automation Runbook と Azure Logic App を使用して、Azure Virtual Desktop 環境でセッション ホスト VM を自動的にスケーリングするスケーリング ツールについて説明します。 スケーリング ツールの詳細については、Azure Automation と Azure Logic Apps を使用したセッション ホストのスケーリングに関する記事を参照してください。
Note
Azure Virtual Desktop のネイティブ自動スケーリング ソリューションは、プールされたおよび個人用のホスト プールで一般提供されており、スケーリング スケジュールに基づいてセッション ホスト VM を自動的にスケールインまたはスケールアウトします。 構成を容易にするために自動スケーリングを使用することをお勧めします。 詳細については、自動スケーリングの計画に関するページを参照してください。
Azure Automation と Azure Logic Apps を使用してセッション ホストをスケーリングし、かつ同じホスト プールで自動スケーリング機能を使用することはできません。 どちらか一方を使用する必要があります。
前提条件
スケーリング ツールの設定を開始する前に、次の準備ができていることを確認してください。
- Azure Virtual Desktop ホスト プール。
- 構成されて Azure Virtual Desktop サービスに登録されたセッション ホスト プール VM。
- リソースを作成するために Azure サブスクリプションで割り当てられた共同作成者ロールベースのアクセス制御 (RBAC) ロールを持つユーザー。 マネージド ID を作成するには、"アプリケーション管理者" または "所有者" RBAC ロールも必要です。
- Log Analytics ワークスペース (オプション)。
ツールのデプロイに使用するマシンには、次のものが必要です。
- PowerShell 5.1 以降。
- Azure Az PowerShell モジュール
すべての準備が整ったら、始めましょう。
Azure Automation アカウントを作成または更新する
注意
以前のバージョンのスケーリング スクリプトを実行している Runbook を持つ Azure Automation アカウントが既にある場合は、以下の手順に従って更新されていることを確認するだけで済みます。
まず、PowerShell Runbook を実行するために、Azure Automation アカウントが必要です。 このセクションで説明するプロセスは、PowerShell Runbook の設定に使用するつもりの既存の Azure Automation アカウントがある場合でも有効です。 以下に、設定の方法を説明します。
PowerShell を開きます。
次のコマンドレットを実行して、Azure アカウントにサインインします。
Login-AzAccount注意
アカウントには、スケーリング ツールをデプロイする Azure サブスクリプションに対する共同作成者の権限が必要です。
次のコマンドレットを実行して、Azure Automation アカウントを作成するためのスクリプトをダウンロードします。
New-Item -ItemType Directory -Path "C:\Temp" -Force
Set-Location -Path "C:\Temp"
$Uri = "https://raw.githubusercontent.com/Azure/RDS-Templates/master/wvd-templates/wvd-scaling-script/CreateOrUpdateAzAutoAccount.ps1"
# Download the script
Invoke-WebRequest -Uri $Uri -OutFile ".\CreateOrUpdateAzAutoAccount.ps1"
次のコマンドレットを実行してスクリプトを実行し、Azure Automation アカウントを作成します。 パラメーターの値を入力するか、既定値を使用するようにコメントを付けることができます。
$Params = @{
     "AADTenantId"           = "<Azure_Active_Directory_tenant_ID>"   # Optional. If not specified, it will use the current Azure context
     "SubscriptionId"        = "<Azure_subscription_ID>"              # Optional. If not specified, it will use the current Azure context
     "UseARMAPI"             = $true
     "ResourceGroupName"     = "<Resource_group_name>"                # Optional. Default: "WVDAutoScaleResourceGroup"
     "AutomationAccountName" = "<Automation_account_name>"            # Optional. Default: "WVDAutoScaleAutomationAccount"
     "Location"              = "<Azure_region_for_deployment>"
     "WorkspaceName"         = "<Log_analytics_workspace_name>"       # Optional. If specified, Log Analytics will be used to configure the custom log table that the runbook PowerShell script can send logs to
}

.\CreateOrUpdateAzAutoAccount.ps1 @Params
Note
ポリシーによって、特定のリージョンでスケーリング スクリプト リソースを作成できない場合は、ポリシー割り当てを更新し、使用可能なリージョンの一覧に目的のリージョンを追加します。
以前に automation アカウントを作成したことがない場合、コマンドレットの出力には、暗号化された webhook URI が automation アカウント変数に含まれます。 Azure Logic Appsの実行スケジュールを設定するときにパラメーターとして使用するため、必ずこの URI を記録しておいてください。 既存の automation アカウントを更新している場合は、PowerShell を使用して、変数にアクセスするwebhook URI を取得できます。
Log Analytics に WorkspaceName パラメーターを指定した場合、コマンドレットの出力には、Log Analytics ワークスペース ID とその主キーも含まれます。 ワークスペース ID と主キーをメモしておきます。後で Azure Logic App の実行スケジュールを設定するときに、パラメーターで再度使用する必要があるためです。
Azure Automation アカウントの設定が完了したら、Azure サブスクリプションにサインインし、次の図に示すように、指定のリソースグループに Azure Automation アカウントと関連する Runbook が表示されていることを確認します。

Webhook が必要な場所にあるかどうかを確認するには、Runbook の名前を選択します。 次に、Runbook の Resources セクションに移動して、 [Webhooks] を選択します。
マネージド ID の作成
Azure Automation アカウントが作成されたので、まだ設定していない場合は、マネージド ID も設定する必要があります。 マネージド ID は、Runbook で他の Microsoft Entra 関連リソースにアクセスしたり、重要な自動化プロセスを認証したりするのに役立ちます。
マネージド ID を設定するには、「Azure Automation アカウントのシステム割り当てマネージド ID を使用する」の指示に従います。 マネージド ID を作成したら、それにホスト プール、VM などの Azure Virtual Desktop リソースに対する適切な共同作成者アクセス許可を割り当てます。完了したらこの記事に戻り、Azure ロジック アプリと実行スケジュールを作成して、初期セットアップ プロセスを完了します。
Azure Logic Apps と実行スケジュールを作成する
最後に、Azure Logic Apps を作成し、新しいスケーリング ツールの実行スケジュールを設定する必要があります。 まず、PowerShell セッション内で使用する Desktop Virtualization PowerShell モジュールをダウンロードしてインポートします (まだ行っていない場合)。
PowerShell を開きます。
次のコマンドレットを実行して、Azure アカウントにサインインします。
Login-AzAccount次のコマンドレットを実行して、Azure Logic Apps を作成するためのスクリプトをダウンロードします。
New-Item -ItemType Directory -Path "C:\Temp" -Force
Set-Location -Path "C:\Temp"
$Uri = "https://raw.githubusercontent.com/Azure/RDS-Templates/master/wvd-templates/wvd-scaling-script/CreateOrUpdateAzLogicApp.ps1"
# Download the script
Invoke-WebRequest -Uri $Uri -OutFile ".\CreateOrUpdateAzLogicApp.ps1"
次の PowerShell スクリプトを実行して、ホスト プール用の Azure Logic Apps と実行スケジュールを作成します。
注意
このスクリプトは、自動スケーリングするホスト プールごとに実行する必要がありますが、必要な Azure Automation アカウントは 1 つだけです。
$AADTenantId = (Get-AzContext).Tenant.Id

$AzSubscription = Get-AzSubscription | Out-GridView -OutputMode:Single -Title "Select your Azure Subscription"
Select-AzSubscription -Subscription $AzSubscription.Id

$ResourceGroup = Get-AzResourceGroup | Out-GridView -OutputMode:Single -Title "Select the resource group for the new Azure Logic App"

$WVDHostPool = Get-AzResource -ResourceType "Microsoft.DesktopVirtualization/hostpools" | Out-GridView -OutputMode:Single -Title "Select the host pool you'd like to scale"

$LogAnalyticsWorkspaceId = Read-Host -Prompt "If you want to use Log Analytics, enter the Log Analytics Workspace ID returned by when you created the Azure Automation account, otherwise leave it blank"
$LogAnalyticsPrimaryKey = Read-Host -Prompt "If you want to use Log Analytics, enter the Log Analytics Primary Key returned by when you created the Azure Automation account, otherwise leave it blank"
$RecurrenceInterval = Read-Host -Prompt "Enter how often you'd like the job to run in minutes, e.g. '15'"
$BeginPeakTime = Read-Host -Prompt "Enter the start time for peak hours in local time, e.g. 9:00"
$EndPeakTime = Read-Host -Prompt "Enter the end time for peak hours in local time, e.g. 18:00"
$TimeDifference = Read-Host -Prompt "Enter the time difference between local time and UTC in hours, e.g. +5:30"
$SessionThresholdPerCPU = Read-Host -Prompt "Enter the maximum number of sessions per CPU that will be used as a threshold to determine when new session host VMs need to be started during peak hours"
$MinimumNumberOfRDSH = Read-Host -Prompt "Enter the minimum number of session host VMs to keep running during off-peak hours"
$MaintenanceTagName = Read-Host -Prompt "Enter the name of the Tag associated with VMs you don't want to be managed by this scaling tool"
$LimitSecondsToForceLogOffUser = Read-Host -Prompt "Enter the number of seconds to wait before automatically signing out users. If set to 0, any session host VM that has user sessions, will be left untouched"
$LogOffMessageTitle = Read-Host -Prompt "Enter the title of the message sent to the user before they are forced to sign out"
$LogOffMessageBody = Read-Host -Prompt "Enter the body of the message sent to the user before they are forced to sign out"

$WebhookURI = Read-Host -Prompt "Enter the webhook URI that has already been generated for this Azure Automation account. The URI is stored as encrypted in the above Automation Account variable. To retrieve the value, see https://video2.skills-academy.com/azure/automation/shared-resources/variables?tabs=azure-powershell#powershell-cmdlets-to-access-variables"

$Params = @{
     "AADTenantId"                   = $AADTenantId                             # Optional. If not specified, it will use the current Azure context
     "SubscriptionID"                = $AzSubscription.Id                       # Optional. If not specified, it will use the current Azure context
     "ResourceGroupName"             = $ResourceGroup.ResourceGroupName         # Optional. Default: "WVDAutoScaleResourceGroup"
     "Location"                      = $ResourceGroup.Location                  # Optional. Default: "West US2"
     "UseARMAPI"                     = $true
     "HostPoolName"                  = $WVDHostPool.Name
     "HostPoolResourceGroupName"     = $WVDHostPool.ResourceGroupName           # Optional. Default: same as ResourceGroupName param value
     "LogAnalyticsWorkspaceId"       = $LogAnalyticsWorkspaceId                 # Optional. If not specified, script will not log to the Log Analytics
     "LogAnalyticsPrimaryKey"        = $LogAnalyticsPrimaryKey                  # Optional. If not specified, script will not log to the Log Analytics
     "RecurrenceInterval"            = $RecurrenceInterval                      # Optional. Default: 15
     "BeginPeakTime"                 = $BeginPeakTime                           # Optional. Default: "09:00"
     "EndPeakTime"                   = $EndPeakTime                             # Optional. Default: "17:00"
     "TimeDifference"                = $TimeDifference                          # Optional. Default: "-7:00"
     "SessionThresholdPerCPU"        = $SessionThresholdPerCPU                  # Optional. Default: 1
     "MinimumNumberOfRDSH"           = $MinimumNumberOfRDSH                     # Optional. Default: 1
     "MaintenanceTagName"            = $MaintenanceTagName                      # Optional.
     "LimitSecondsToForceLogOffUser" = $LimitSecondsToForceLogOffUser           # Optional. Default: 1
     "LogOffMessageTitle"            = $LogOffMessageTitle                      # Optional. Default: "Machine is about to shutdown."
     "LogOffMessageBody"             = $LogOffMessageBody                       # Optional. Default: "Your session will be logged off. Please save and close everything."
     "WebhookURI"                    = $WebhookURI
}

.\CreateOrUpdateAzLogicApp.ps1 @Params
スクリプトを実行すると、次の図に示すように、Azure Logic Appsがリソース グループに表示されます。

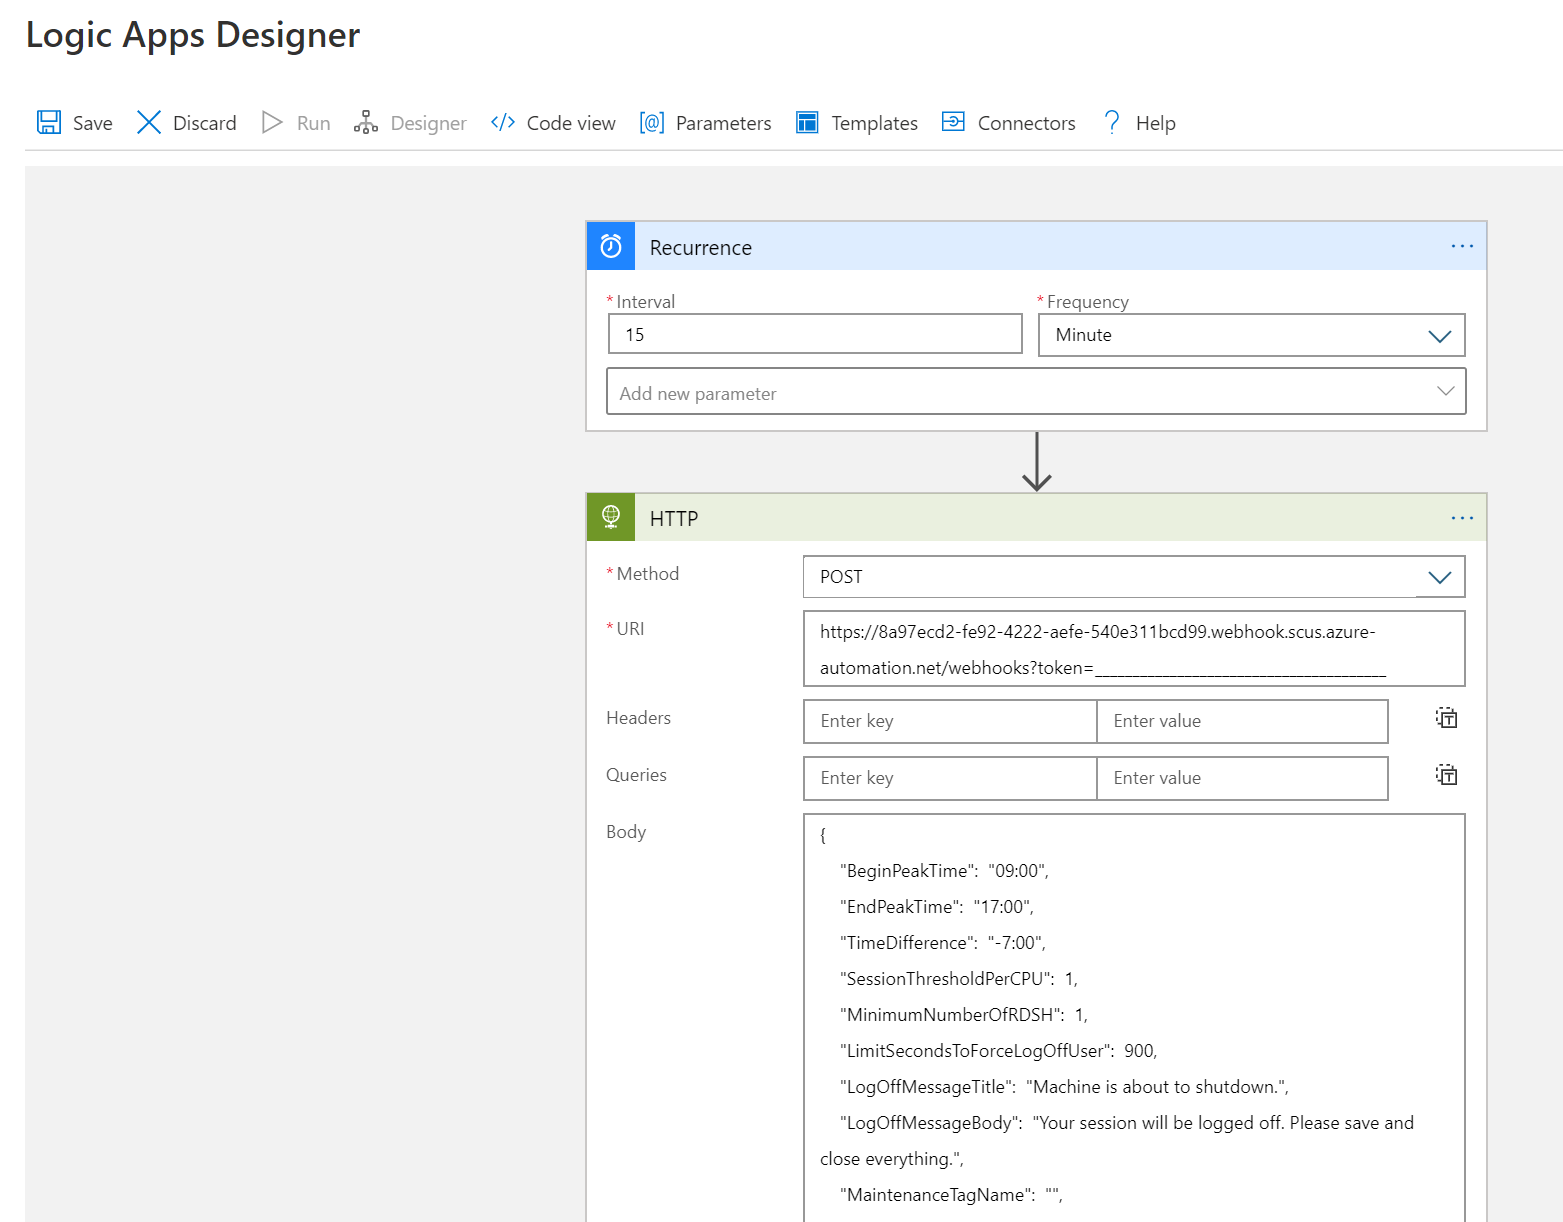
繰り返し間隔やタイム ゾーンを変更するなど、実行スケジュールに変更を加えるには、Azure Logic Appsの自動スケーリングのスケジューラにアクセスし、 [編集] を選択して Azure Logic Apps デザイナーに移動します。

スケーリング ツールを管理する
スケーリング ツールの作成が完了したので、その出力にアクセスできます。 ここでは、役に立つと思われるいくつかの機能について説明します。
ジョブの状態を見る
すべての Runbook ジョブの状態の概要を表示したり、Azure portal で特定の Runbook ジョブの詳細な状態を表示したりできます。
選択した Azure Automation アカウントの右側にある [ジョブの統計情報] で、すべての Runbook ジョブの概要の一覧を表示できます。 ウィンドウの左側にある [ジョブ] ページを開くと、現在のジョブの状態、開始時刻、完了時刻が表示されます。

ログとスケーリング ツールの出力を見る
スケールアウト操作やスケールイン操作のログを表示するには、Runbook を開いて、ジョブを選択します。
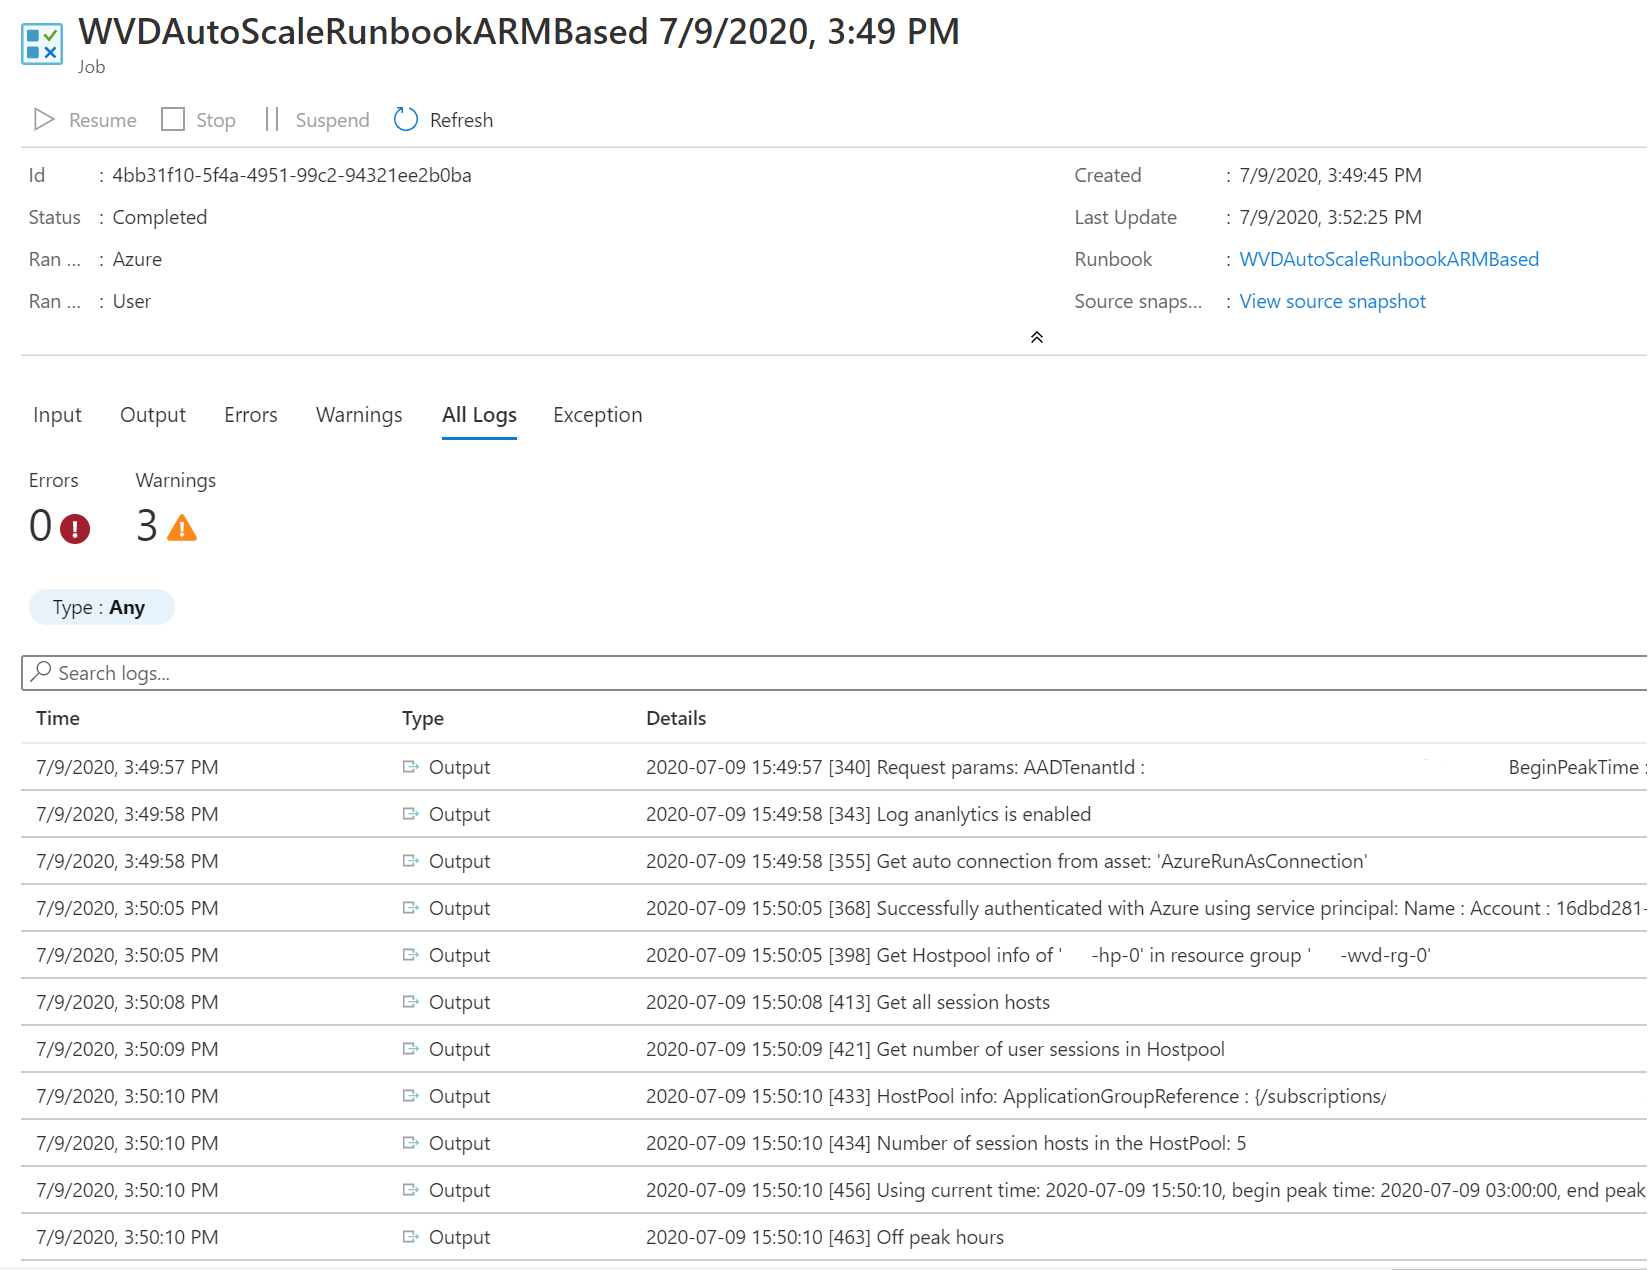
Azure Automation アカウントをホストしているリソース グループの Runbook に移動して、 [概要] を選択します。 [概要] ページで、 [最近のジョブ] の下にあるジョブを選択すると、次の図に示すようなスケーリング ツールの出力が表示されます。

Runbook スクリプトのバージョン番号を確認する
使用している Runbook スクリプトのバージョンを確認するには、Azure Automation アカウントで Runbook ファイルを開き、 [表示] を選択します。 Runbook のスクリプトが画面の右側に表示されます。 このスクリプトでは、SYNOPSIS セクションにバージョン番号が v#.#.# 形式で表示されます。 最新のバージョン番号はこちらで入手できます。 Runbook スクリプトにバージョン番号が表示されない場合は、以前のバージョンのスクリプトが実行されているということなので、すぐに更新する必要があります。 Runbook スクリプトを更新する必要がある場合は、「Azure Automation アカウントを作成または更新する」の手順に従ってください。
問題の報告
問題を報告する際には、トラブルシューティングに役立つ次の情報を提供する必要があります。
問題の原因となったジョブの [すべてのログ] タブのすべてのログ。 ログを取得する方法については、「ログとスケーリング ツールの出力を見る」の手順に従ってください。 機密または非公開の情報がログに含まれている場合は、問題を Microsoft にお送りいただく前に削除することができます。
使用している Runbook スクリプトのバージョン。 バージョン番号を取得する方法については、「Runbook スクリプトのバージョン番号を確認する」を参照してください。
Azure Automation アカウントにインストールされている次の PowerShell モジュールのそれぞれのバージョン番号。 これらのモジュールを確認するには、Azure Automation アカウントを開き、ウィンドウの左側のペインの [共有リソース] セクションで [モジュール] を選択し、モジュールの名前を検索します。
- Az.Accounts
- Az.Compute
- Az.Resources
- Az.Automation
- OMSIngestionAPI
- Az.DesktopVirtualization
Log Analytics
Log Analytics を使用することにした場合、Log Analytics ワークスペースの [ログ] ビューの [カスタム ログ] の下にある WVDTenantScale_CL という名前のカスタム ログですべてのログ データを表示できます。 役に立ちそうなサンプル クエリをいくつか示しました。
ホスト プールのすべてのログを表示するには、次のクエリを入力してください。
WVDTenantScale_CL
| where hostpoolName_s == "<host_pool_name>"
| project TimeStampUTC = TimeGenerated, TimeStampLocal = TimeStamp_s, HostPool = hostpoolName_s, LineNumAndMessage = logmessage_s, AADTenantId = TenantId
ホスト プールで現在実行中のセッション ホスト VM とアクティブ ユーザー セッションの合計数を表示するには、次のクエリを入力してください
WVDTenantScale_CL
| where logmessage_s contains "Number of running session hosts:"
     or logmessage_s contains "Number of user sessions:"
     or logmessage_s contains "Number of user sessions per Core:"
| where hostpoolName_s == "<host_pool_name>"
| project TimeStampUTC = TimeGenerated, TimeStampLocal = TimeStamp_s, HostPool = hostpoolName_s, LineNumAndMessage = logmessage_s, AADTenantId = TenantId
ホスト プール内のすべてのセッション ホスト VM の状態を表示するには、次のクエリを入力してください。
WVDTenantScale_CL
| where logmessage_s contains "Session host:"
| where hostpoolName_s == "<host_pool_name>"
| project TimeStampUTC = TimeGenerated, TimeStampLocal = TimeStamp_s, HostPool = hostpoolName_s, LineNumAndMessage = logmessage_s, AADTenantId = TenantId
エラーと警告を表示するには、次のクエリを入力してください。
WVDTenantScale_CL
| where logmessage_s contains "ERROR:" or logmessage_s contains "WARN:"
| project TimeStampUTC = TimeGenerated, TimeStampLocal = TimeStamp_s, HostPool = hostpoolName_s, LineNumAndMessage = logmessage_s, AADTenantId = TenantId
制限事項
このスケーリング スクリプトを使用したセッション ホスト VM のスケーリングに関するいくつかの制限事項を次に示します。
- スケーリング スクリプトでは、標準時間と夏時間の間の時間の変更は考慮されません。