方法: カラー行列を使用して単一色を変換する
GDI+ には、画像を格納および操作するための、Image クラスと Bitmap クラスが用意されています。 Image オブジェクトと Bitmap オブジェクトには、各ピクセルの色が32 ビットの数値として格納されます (赤、緑、青、およびアルファにそれぞれ 8 ビットずつ)。 4 つの要素はそれぞれ、0 から 255 までの数値になります。0 は明度を表し、255 が最大の明度を表します。 アルファ要素では、色の透明度を指定します。0 は完全に透明で、255 は完全に不透明です。
カラー ベクターは、4 タプルの形式となります (赤、緑、青、アルファ)。 たとえば、カラー ベクター (0, 255, 0, 255) は、赤や青を表示せず、緑を最大明度で表示する、不透明の色を表します。
色を表すためのもう 1 つの規則として、最大輝度を数値 1 で指定する方法もあります。 この規則を使った場合、前の段落で説明した色は、ベクター (0, 1, 0, 1) で表されます。 GDI+ では、色変換を実行する際、最大強度を 1 で表すこちらの規則が使用されます。
線形変換 (回転、拡大縮小など) は、カラー ベクターに 4×4 の行列を乗算することで適用できます。 ただし、4×4 の行列を使用して平行移動 (非線形) を実行することはできません。 5 つ目の座標 (たとえば、数値 1) をダミーとして各カラー ベクターに追加した場合は、5×5 の行列を使用して、線形変換と平行移動の任意の組み合わせを適用することができます。 線形変換とそれに続く平行移動で構成された変換は、アフィン変換と呼ばれます。
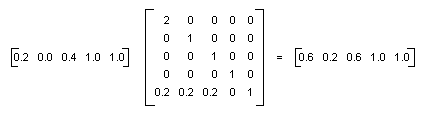
たとえば、(0.2, 0.0, 0.4, 1.0) の色で開始し、次の変換を適用したとします。
赤の要素を 2 倍にする
赤、緑、および青の要素に 0.2 を加算する
次の行列の乗算では、変換のペアが列挙順に実行されます。
カラー行列の要素には、行、列の順でインデックス (0 から開始) が付けられます。 たとえば、行列 M の 5 行目の 3 列目にあるエントリは、M[4][2] で示されます。
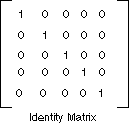
次の図に示す 5×5 の単位行列では、対角線上に 1 が並び、他のすべての場所は 0 になっています。 この単位行列でカラー ベクターを乗算した場合、カラー ベクターに変化は起こりません。 色変換の行列を形成する際には、最初に単位行列を作り、その後小さな変更を加えて必要な変換を行うやり方が便利です。
行列と変換の詳細については、「座標系と変換」を参照してください。
例
次の例では、1 つの色 (0.2、0.0、0.4、1.0) の画像を使用し、前の段落で説明した変換を適用しています。
次の図は、左側に元の画像、右側に変換後の画像を示したものです。

次のコード例では、以下の手順を使って色変更を実行しています。
ColorMatrix オブジェクトを初期化します。
ImageAttributes オブジェクトを作成し、その ImageAttributes オブジェクトの SetColorMatrix メソッドに ColorMatrix オブジェクトを渡します。
ImageAttributes オブジェクトを、Graphics オブジェクトの DrawImage メソッドに渡します。
Image image = new Bitmap("InputColor.bmp");
ImageAttributes imageAttributes = new ImageAttributes();
int width = image.Width;
int height = image.Height;

float[][] colorMatrixElements = {
   new float[] {2,  0,  0,  0, 0},        // red scaling factor of 2
   new float[] {0,  1,  0,  0, 0},        // green scaling factor of 1
   new float[] {0,  0,  1,  0, 0},        // blue scaling factor of 1
   new float[] {0,  0,  0,  1, 0},        // alpha scaling factor of 1
   new float[] {.2f, .2f, .2f, 0, 1}};    // three translations of 0.2

ColorMatrix colorMatrix = new ColorMatrix(colorMatrixElements);

imageAttributes.SetColorMatrix(
   colorMatrix,
   ColorMatrixFlag.Default,
   ColorAdjustType.Bitmap);

e.Graphics.DrawImage(image, 10, 10);

e.Graphics.DrawImage(
   image,
   new Rectangle(120, 10, width, height),  // destination rectangle
   0, 0,        // upper-left corner of source rectangle
   width,       // width of source rectangle
   height,      // height of source rectangle
   GraphicsUnit.Pixel,
   imageAttributes);
Dim image As New Bitmap("InputColor.bmp")
Dim imageAttributes As New ImageAttributes()
Dim width As Integer = image.Width
Dim height As Integer = image.Height

' The following matrix consists of the following transformations:
' red scaling factor of 2
' green scaling factor of 1
' blue scaling factor of 1
' alpha scaling factor of 1
' three translations of 0.2
Dim colorMatrixElements As Single()() = { _
   New Single() {2, 0, 0, 0, 0}, _
   New Single() {0, 1, 0, 0, 0}, _
   New Single() {0, 0, 1, 0, 0}, _
   New Single() {0, 0, 0, 1, 0}, _
   New Single() {0.2F, 0.2F, 0.2F, 0, 1}}

Dim colorMatrix As New ColorMatrix(colorMatrixElements)

imageAttributes.SetColorMatrix(colorMatrix, ColorMatrixFlag.Default, ColorAdjustType.Bitmap)

e.Graphics.DrawImage(image, 10, 10)

e.Graphics.DrawImage( _
   image, _
   New Rectangle(120, 10, width, height), _
   0, _
   0, _
   width, _
   height, _
   GraphicsUnit.Pixel, _
   imageAttributes)
コードのコンパイル
前の例は、Windows フォームで使用するために設計されていて、Paint イベント ハンドラーのパラメーターである PaintEventArgs e を必要とします。
関連項目
.NET Desktop feedback