チュートリアル: WPF での Windows フォーム複合コントロールのホスト
Windows Presentation Foundation (WPF) では、アプリケーションを作成するための充実した環境が提供されます。 ただし、Windows フォーム コードに多大な投資をしている場合、コードを最初から書き直すよりも、WPF アプリケーションでそのコードの少なくとも一部を再利用する方が効率的な場合があります。 最も一般的なシナリオは、既存の Windows フォーム コントロールがある場合です。 場合によっては、これらのコントロールのソース コードにアクセスできないこともあります。 WPF には、WPF アプリケーションでそのようなコントロールをホストするための簡単な手順が用意されています。 たとえば、特殊な DataGridView コントロールをホストしながら、ほとんどのプログラミングに WPF を使用できます。
このチュートリアルでは、WPF アプリケーション内で Windows フォーム複合コントロールをホストしてデータ エントリを実行するアプリケーションについて、順を追って説明します。 複合コントロールは DLL にパッケージ化されています。 この一般的な手順は、より複雑なアプリケーションやコントロールに拡張することができます。 このチュートリアルは、「チュートリアル:Windows フォームでの WPF 複合コントロールのホスト」とほぼ同じ外観と機能になるように設計されています。 主な違いは、ホストする側とされる側が逆であることです。
このチュートリアルは、2 つのセクションに分かれています。 最初のセクションでは、Windows フォーム複合コントロールの実装について簡単に説明します。 2 番目のセクションでは、WPF アプリケーションで複合コントロールをホストし、コントロールからイベントを受け取って、コントロールのプロパティの一部にアクセスする方法について詳しく説明します。
このチュートリアルでは、以下のタスクを行います。
Windows フォーム複合コントロールの実装。
WPF ホスト アプリケーションの実装。
このチュートリアルで示されているタスクの完全なコード一覧については、WPF での Windows フォーム複合コントロールのホストのサンプルを参照してください。
必須コンポーネント
このチュートリアルを完了するには Visual Studio が必要です。
Windows フォーム複合コントロールの実装
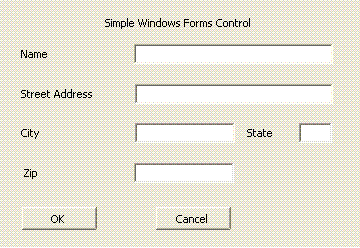
この例で使用されている Windows フォーム複合コントロールは、簡単なデータ入力フォームです。 このフォームでは、ユーザーの名前とアドレスを受け取り、カスタム イベントを使用してその情報をホストに返します。 次の図はレンダリングされたコントロールを示しています。
次の図は Windows フォーム複合コントロールを示しています。

プロジェクトの作成
プロジェクトを開始するには
Visual Studio を起動し、 [新しいプロジェクト] ダイアログ ボックスを開きます。
[ウィンドウ] カテゴリで、 [Windows フォーム コントロール ライブラリ] テンプレートを選択します。
新しいプロジェクトに
MyControlsという名前を付けます。配置場所として、
WpfHostingWindowsFormsControlなど、わかりやすい名前を付けた最上位フォルダーを指定します。 このフォルダーには後でホスト アプリケーションも配置します。[OK] をクリックして、プロジェクトを作成します。 既定のプロジェクトには、
UserControl1という名前の 1 つのコントロールが含まれます。ソリューション エクスプローラーで、
UserControl1をMyControl1という名前に変更します。
プロジェクトは、以下のシステム DLL を参照している必要があります。 これらの DLL のいずれかが既定で含まれていない場合は、プロジェクトに追加します。
システム
System.Data
System.Drawing
System.Windows.Forms
System.Xml
フォームへのコントロールの追加
フォームにコントロールを追加するには
- デザイナーで
MyControl1を開きます。
5 つの Label コントロールとそれに対応するTextBox コントロールを、前の図と同じサイズと配置でフォームに追加します。 この例では、TextBox コントロールに次の名前が付けられています。
txtNametxtAddresstxtCitytxtStatetxtZip
[OK] と [キャンセル] というラベルの 2 つの Button コントロールを追加します。 この例では、ボタン名はそれぞれ btnOK と btnCancel です。
サポート コードの実装
コード ビューでフォームを開きます。 このコントロールでは、カスタム OnButtonClick イベントを発生させることによって収集されたデータをホストに返します。 データは、イベント引数オブジェクトに格納されます。 次のコードは、イベントとデリゲートの宣言を示しています。
MyControl1 クラスに次のコードを追加します。
public delegate void MyControlEventHandler(object sender, MyControlEventArgs args);
public event MyControlEventHandler OnButtonClick;
Public Delegate Sub MyControlEventHandler(ByVal sender As Object, ByVal args As MyControlEventArgs)
Public Event OnButtonClick As MyControlEventHandler
MyControlEventArgs クラスには、ホストに返される情報が含まれています。
次のクラスをフォームに追加します。
public class MyControlEventArgs : EventArgs
{
    private string _Name;
    private string _StreetAddress;
    private string _City;
    private string _State;
    private string _Zip;
    private bool _IsOK;

    public MyControlEventArgs(bool result,
                                   string name,
                                   string address,
                                   string city,
                                   string state,
                                   string zip)
    {
        _IsOK = result;
        _Name = name;
        _StreetAddress = address;
        _City = city;
        _State = state;
        _Zip = zip;
    }

    public string MyName
    {
        get { return _Name; }
        set { _Name = value; }
    }
    public string MyStreetAddress
    {
        get { return _StreetAddress; }
        set { _StreetAddress = value; }
    }
    public string MyCity
    {
        get { return _City; }
        set { _City = value; }
    }
    public string MyState
    {
        get { return _State; }
        set { _State = value; }
    }
    public string MyZip
    {
        get { return _Zip; }
        set { _Zip = value; }
    }
    public bool IsOK
    {
        get { return _IsOK; }
        set { _IsOK = value; }
    }
}
Public Class MyControlEventArgs
    Inherits EventArgs
    Private _Name As String
    Private _StreetAddress As String
    Private _City As String
    Private _State As String
    Private _Zip As String
    Private _IsOK As Boolean


    Public Sub New(ByVal result As Boolean, ByVal name As String, ByVal address As String, ByVal city As String, ByVal state As String, ByVal zip As String)
        _IsOK = result
        _Name = name
        _StreetAddress = address
        _City = city
        _State = state
        _Zip = zip

    End Sub


    Public Property MyName() As String
        Get
            Return _Name
        End Get
        Set
            _Name = value
        End Set
    End Property

    Public Property MyStreetAddress() As String
        Get
            Return _StreetAddress
        End Get
        Set
            _StreetAddress = value
        End Set
    End Property

    Public Property MyCity() As String
        Get
            Return _City
        End Get
        Set
            _City = value
        End Set
    End Property

    Public Property MyState() As String
        Get
            Return _State
        End Get
        Set
            _State = value
        End Set
    End Property

    Public Property MyZip() As String
        Get
            Return _Zip
        End Get
        Set
            _Zip = value
        End Set
    End Property

    Public Property IsOK() As Boolean
        Get
            Return _IsOK
        End Get
        Set
            _IsOK = value
        End Set
    End Property
End Class
ユーザーが [OK] または [キャンセル] ボタンをクリックすると、Click イベント ハンドラーによってデータが格納された MyControlEventArgs オブジェクトが作成され、OnButtonClick イベントを発生します。 2 つのハンドラーの唯一の違いは、イベント引数の IsOK プロパティです。 このプロパティを使用すると、クリックされたボタンをホストで判別できるようになります。 [OK] ボタンの場合は true、 [キャンセル] ボタンの場合は false に設定されます。 次のコードは、2 つのボタン ハンドラーを示しています。
MyControl1 クラスに次のコードを追加します。
private void btnOK_Click(object sender, System.EventArgs e)
{

    MyControlEventArgs retvals = new MyControlEventArgs(true,
                                                         txtName.Text,
                                                         txtAddress.Text,
                                                         txtCity.Text,
                                                         txtState.Text,
                                                         txtZip.Text);
    OnButtonClick(this, retvals);
}

private void btnCancel_Click(object sender, System.EventArgs e)
{
    MyControlEventArgs retvals = new MyControlEventArgs(false,
                                                         txtName.Text,
                                                         txtAddress.Text,
                                                         txtCity.Text,
                                                         txtState.Text,
                                                         txtZip.Text);
    OnButtonClick(this, retvals);
}
Private Sub btnOK_Click(ByVal sender As Object, ByVal e As System.EventArgs) Handles btnOK.Click

    Dim retvals As New MyControlEventArgs(True, txtName.Text, txtAddress.Text, txtCity.Text, txtState.Text, txtZip.Text)
    RaiseEvent OnButtonClick(Me, retvals)

End Sub

Private Sub btnCancel_Click(ByVal sender As Object, ByVal e As System.EventArgs) Handles btnCancel.Click
    Dim retvals As New MyControlEventArgs(False, txtName.Text, txtAddress.Text, txtCity.Text, txtState.Text, txtZip.Text)
    RaiseEvent OnButtonClick(Me, retvals)

End Sub
アセンブリに厳密な名前を付け、アセンブリをビルドする
このアセンブリを WPF アプリケーションから参照するには、厳密な名前が必要です。 厳密な名前を作成するには、Sn.exe を使用してキー ファイルを作成し、プロジェクトに追加します。
Visual Studio のコマンド プロンプトを開きます。 これを行うには、 [スタート] メニューをクリックし、 [すべてのプログラム]、[Microsoft Visual Studio 2010]、[Visual Studio Tools]、[Visual Studio コマンド プロンプト] の順に選択します。 これにより、カスタマイズされた環境変数を使用してコンソール ウィンドウが起動します。
コマンド プロンプトで、
cdコマンドを使用してプロジェクト フォルダーに移動します。次のコマンドを実行して、MyControls.snk という名前のキー ファイルを生成します。
Sn.exe -k MyControls.snkプロジェクトにキー ファイルを含めるには、ソリューション エクスプローラーでプロジェクト名を右クリックし、 [プロパティ] をクリックします。 プロジェクト デザイナーで [署名] タブをクリックし、 [アセンブリに署名する] チェック ボックスをオンにして、キー ファイルを参照します。
ソリューションをビルドします。 ビルドでは、MyControls.dll という名前の DLL が生成されます。
WPF ホスト アプリケーションの実装
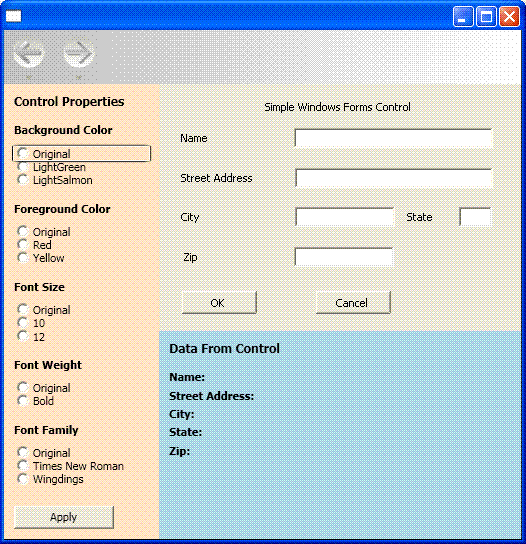
WPF ホスト アプリケーションでは、MyControl1 をホストするために WindowsFormsHost コントロールを使用します。 アプリケーションでは OnButtonClickイベントを処理して複合コントロールからデータを受け取ります。 また、オプション ボタンのコレクションもあります。これらを使うと、コントロールのプロパティの一部を WPF アプリケーションから変更できます。 完成したアプリケーションを次の図に示します。
次の図は、WPF アプリケーションに埋め込まれたコントロールを含む完全なアプリケーションを示しています。

プロジェクトの作成
プロジェクトを開始するには
Visual Studio を開いて、 [新しいプロジェクト] をクリックします。
[ウィンドウ] カテゴリで、 [WPF アプリケーション テンプレート] を選択します。
新しいプロジェクトに
WpfHostという名前を付けます。配置場所として、MyControls の配置先と同じ最上位フォルダーを指定します。
[OK] をクリックして、プロジェクトを作成します。
MyControl1 および他のアセンブリを含む DLL への参照も追加する必要があります。
ソリューション エクスプローラーで、プロジェクト名を右クリックし、 [参照の追加] を選択します。
[参照] タブをクリックし、MyControls.dll を格納しているフォルダーに移動します。 このチュートリアルの場合は、MyControls\bin\Debug フォルダーです。
MyControls.dll を選択し、 [OK] をクリックします。
WindowsFormsIntegration.dll という名前の WindowsFormsIntegration アセンブリへの参照を追加します。
基本的なレイアウトの実装
ホスト アプリケーションのユーザー インターフェイス (UI) は MainWindow.xaml に実装されています。 このファイルには、レイアウトを定義し、Windows フォーム コントロールをホストする Extensible Application Markup Language (XAML) マークアップが含まれます。 アプリケーションは 3 つの領域に分かれています。
[Control Properties](コントロールのプロパティ) パネル。ホストされているコントロールのさまざまなプロパティを変更するために使用できるオプション ボタンのコレクションが含まれています。
[Data from Control](コントロールのデータ) パネル。ホストされているコントロールから返されたデータを表示する TextBlock 要素がいくつか含まれています。
ホストされているコントロール自体。
基本的なレイアウトを次の XAML に示します。 MyControl1 をホストするために必要なマークアップはこの例では省略されていますが、後で説明します。
MainWindow.xaml の XAML を次のように置き換えます。 Visual Basic を使用している場合は、クラスを x:Class="MainWindow" に変更します。
<Window xmlns="http://schemas.microsoft.com/winfx/2006/xaml/presentation"
      xmlns:x="http://schemas.microsoft.com/winfx/2006/xaml"
      x:Class="WpfHost.MainWindow"
      xmlns:mcl="clr-namespace:MyControls;assembly=MyControls"
      Loaded="Init">
  <DockPanel>
    <DockPanel.Resources>
      <Style x:Key="inlineText" TargetType="{x:Type Inline}">
        <Setter Property="FontWeight" Value="Normal"/>
      </Style>
      <Style x:Key="titleText" TargetType="{x:Type TextBlock}">
        <Setter Property="DockPanel.Dock" Value="Top"/>
        <Setter Property="FontWeight" Value="Bold"/>
        <Setter Property="Margin" Value="10,5,10,0"/>
      </Style>
    </DockPanel.Resources>

    <StackPanel Orientation="Vertical"
                DockPanel.Dock="Left"
                Background="Bisque"
                Width="250">

      <TextBlock  Margin="10,10,10,10"
                  FontWeight="Bold"
                  FontSize="12">Control Properties</TextBlock>
      <TextBlock Style="{StaticResource titleText}">Background Color</TextBlock>
      <StackPanel Margin="10,10,10,10">
        <RadioButton Name="rdbtnOriginalBackColor"
                    IsChecked="True"
                    Click="BackColorChanged">Original</RadioButton>
        <RadioButton Name="rdbtnBackGreen"
                    Click="BackColorChanged">LightGreen</RadioButton>
        <RadioButton Name="rdbtnBackSalmon"
                    Click="BackColorChanged">LightSalmon</RadioButton>
      </StackPanel>

      <TextBlock Style="{StaticResource titleText}">Foreground Color</TextBlock>
      <StackPanel Margin="10,10,10,10">
        <RadioButton Name="rdbtnOriginalForeColor"
                    IsChecked="True"
                    Click="ForeColorChanged">Original</RadioButton>
        <RadioButton Name="rdbtnForeRed"
                    Click="ForeColorChanged">Red</RadioButton>
        <RadioButton Name="rdbtnForeYellow"
                    Click="ForeColorChanged">Yellow</RadioButton>
      </StackPanel>

      <TextBlock Style="{StaticResource titleText}">Font Family</TextBlock>
      <StackPanel Margin="10,10,10,10">
        <RadioButton Name="rdbtnOriginalFamily"
                     IsChecked="True"
                    Click="FontChanged">Original</RadioButton>
        <RadioButton Name="rdbtnTimes"
                    Click="FontChanged">Times New Roman</RadioButton>
        <RadioButton Name="rdbtnWingdings"
                    Click="FontChanged">Wingdings</RadioButton>
      </StackPanel>

      <TextBlock Style="{StaticResource titleText}">Font Size</TextBlock>
      <StackPanel Margin="10,10,10,10">
        <RadioButton Name="rdbtnOriginalSize"
                    IsChecked="True"
                    Click="FontSizeChanged">Original</RadioButton>
        <RadioButton Name="rdbtnTen"
                    Click="FontSizeChanged">10</RadioButton>
        <RadioButton Name="rdbtnTwelve"
                    Click="FontSizeChanged">12</RadioButton>
      </StackPanel>

      <TextBlock Style="{StaticResource titleText}">Font Style</TextBlock>
      <StackPanel Margin="10,10,10,10">
        <RadioButton Name="rdbtnNormalStyle"
                     IsChecked="True"
                     Click="StyleChanged">Original</RadioButton>
        <RadioButton Name="rdbtnItalic"
                     Click="StyleChanged">Italic</RadioButton>
      </StackPanel>

      <TextBlock Style="{StaticResource titleText}">Font Weight</TextBlock>
      <StackPanel Margin="10,10,10,10">
        <RadioButton Name="rdbtnOriginalWeight"
                     IsChecked="True"
                   Click="WeightChanged">
          Original
        </RadioButton>
        <RadioButton Name="rdbtnBold"
                   Click="WeightChanged">Bold</RadioButton>
      </StackPanel>
    </StackPanel>

    <WindowsFormsHost Name="wfh"
                     DockPanel.Dock="Top"
                     Height="300">
      <mcl:MyControl1 Name="mc"/>
    </WindowsFormsHost>

    <StackPanel Orientation="Vertical"
                Height="Auto"
                Background="LightBlue">
      <TextBlock Margin="10,10,10,10"
            FontWeight="Bold"
            FontSize="12">Data From Control</TextBlock>
      <TextBlock Style="{StaticResource titleText}">
        Name: <Span Name="txtName" Style="{StaticResource inlineText}"/>
      </TextBlock>
      <TextBlock Style="{StaticResource titleText}">
        Street Address: <Span Name="txtAddress" Style="{StaticResource inlineText}"/>
      </TextBlock>
      <TextBlock Style="{StaticResource titleText}">
        City: <Span Name="txtCity" Style="{StaticResource inlineText}"/>
      </TextBlock>
      <TextBlock Style="{StaticResource titleText}">
        State: <Span Name="txtState" Style="{StaticResource inlineText}"/>
      </TextBlock>
      <TextBlock Style="{StaticResource titleText}">
        Zip: <Span Name="txtZip" Style="{StaticResource inlineText}"/>
      </TextBlock>
    </StackPanel>
  </DockPanel>
</Window>
最初の StackPanel 要素には、ホストされているコントロールのさまざまな既定プロパティを変更できる RadioButton コントロールのセットがいくつか含まれています。 その後に MyControl1 をホストする WindowsFormsHost 要素が続きます。 最後の StackPanel 要素には、ホストされたコントロールから返されるデータを表示するいくつかの TextBlock 要素が含まれています。 要素の順序と、Dock および Height の属性設定により、ギャップやゆがみを生じることなく、ホストされているコントロールがウィンドウに埋め込まれます。
コントロールのホスト
前述の XAML を編集した以下のバージョンでは、MyControl1 をホストするために必要な要素に焦点を当てています。
<Window xmlns="http://schemas.microsoft.com/winfx/2006/xaml/presentation"
      xmlns:x="http://schemas.microsoft.com/winfx/2006/xaml"
      x:Class="WpfHost.MainWindow"
      xmlns:mcl="clr-namespace:MyControls;assembly=MyControls"
      Loaded="Init">
<WindowsFormsHost Name="wfh"
                 DockPanel.Dock="Top"
                 Height="300">
  <mcl:MyControl1 Name="mc"/>
</WindowsFormsHost>
xmlns 名前空間マッピング属性を使用すると、ホストされているコントロールを含む MyControls 名前空間への参照が作成されます。 このマッピングにより、XAML の MyControl1 を <mcl:MyControl1> として表すことができます。
XAML の 2 つの要素によってホスティングを処理します。
WindowsFormsHostは、WPF アプリケーションで Windows フォーム コントロールをホストできるようにする WindowsFormsHost 要素を表します。MyControl1を表すmcl:MyControl1は、WindowsFormsHost 要素の子コレクションに追加されます。 その結果、この Windows フォーム コントロールは WPF ウィンドウの一部としてレンダリングされ、アプリケーションからそのコントロールと通信できるようになります。
分離コード ファイルの実装
分離コード ファイル MainWindow.xaml.vb または MainWindow.xaml.cs には、前のセクションで説明した UI の機能を実装する手続き型コードが含まれています。 主なタスクは次のとおりです。
MyControl1のOnButtonClickイベントへのイベント ハンドラーのアタッチ。オプション ボタンのコレクションの設定方法に基づく
MyControl1のさまざまなプロパティの変更。コントロールによって収集されたデータの表示。
アプリケーションの初期化
初期化コードは、ウィンドウの Loaded イベントのイベント ハンドラーに含まれており、これを使用してコントロールの OnButtonClick イベントにイベント ハンドラーをアタッチすることができます。
MainWindow.xaml.vb または MainWindow.xaml.cs で、次のコードを MainWindow クラスに追加します。
private Application app;
private Window myWindow;
FontWeight initFontWeight;
Double initFontSize;
FontStyle initFontStyle;
SolidColorBrush initBackBrush;
SolidColorBrush initForeBrush;
FontFamily initFontFamily;
bool UIIsReady = false;

private void Init(object sender, EventArgs e)
{
    app = System.Windows.Application.Current;
    myWindow = (Window)app.MainWindow;
    myWindow.SizeToContent = SizeToContent.WidthAndHeight;
    wfh.TabIndex = 10;
    initFontSize = wfh.FontSize;
    initFontWeight = wfh.FontWeight;
    initFontFamily = wfh.FontFamily;
    initFontStyle = wfh.FontStyle;
    initBackBrush = (SolidColorBrush)wfh.Background;
    initForeBrush = (SolidColorBrush)wfh.Foreground;
    (wfh.Child as MyControl1).OnButtonClick += new MyControl1.MyControlEventHandler(Pane1_OnButtonClick);
    UIIsReady = true;
}
Private app As Application
Private myWindow As Window
Private initFontWeight As FontWeight
Private initFontSize As [Double]
Private initFontStyle As FontStyle
Private initBackBrush As SolidColorBrush
Private initForeBrush As SolidColorBrush
Private initFontFamily As FontFamily
Private UIIsReady As Boolean = False


Private Sub Init(ByVal sender As Object, ByVal e As RoutedEventArgs)
    app = System.Windows.Application.Current
    myWindow = CType(app.MainWindow, Window)
    myWindow.SizeToContent = SizeToContent.WidthAndHeight
    wfh.TabIndex = 10
    initFontSize = wfh.FontSize
    initFontWeight = wfh.FontWeight
    initFontFamily = wfh.FontFamily
    initFontStyle = wfh.FontStyle
    initBackBrush = CType(wfh.Background, SolidColorBrush)
    initForeBrush = CType(wfh.Foreground, SolidColorBrush)

    Dim mc As MyControl1 = wfh.Child

    AddHandler mc.OnButtonClick, AddressOf Pane1_OnButtonClick
    UIIsReady = True

End Sub
前述の XAML では WindowsFormsHost 要素の子要素コレクションに MyControl1 が追加されたため、WindowsFormsHost 要素の Child をキャストして MyControl1 への参照を取得できます。 これで、その参照を使用してイベント ハンドラーを OnButtonClick にアタッチできるようになります。
WindowsFormsHost では、コントロール自体に参照が提供されるだけでなく、アプリケーションから操作できるいくつかのコントロールのプロパティが公開されています。 初期化コードを使用してこれらの値をプライベート グローバル変数に割り当て、後でアプリケーションで使用できるようにします。
MyControls DLL の型に簡単にアクセスできるように、次の Imports または using ステートメントをファイルの先頭に追加します。
Imports MyControls
using MyControls;
OnButtonClick イベントの処理
MyControl1 を使用すると、ユーザーがコントロールのボタンのいずれかをクリックしたときに OnButtonClick イベントを発生させることができます。
MainWindow クラスに次のコードを追加します。
//Handle button clicks on the Windows Form control
private void Pane1_OnButtonClick(object sender, MyControlEventArgs args)
{
    txtName.Inlines.Clear();
    txtAddress.Inlines.Clear();
    txtCity.Inlines.Clear();
    txtState.Inlines.Clear();
    txtZip.Inlines.Clear();

    if (args.IsOK)
    {
        txtName.Inlines.Add( " " + args.MyName );
        txtAddress.Inlines.Add( " " + args.MyStreetAddress );
        txtCity.Inlines.Add( " " + args.MyCity );
        txtState.Inlines.Add( " " + args.MyState );
        txtZip.Inlines.Add( " " + args.MyZip );
    }
}
'Handle button clicks on the Windows Form control
Private Sub Pane1_OnButtonClick(ByVal sender As Object, ByVal args As MyControlEventArgs)
    txtName.Inlines.Clear()
    txtAddress.Inlines.Clear()
    txtCity.Inlines.Clear()
    txtState.Inlines.Clear()
    txtZip.Inlines.Clear()

    If args.IsOK Then
        txtName.Inlines.Add(" " + args.MyName)
        txtAddress.Inlines.Add(" " + args.MyStreetAddress)
        txtCity.Inlines.Add(" " + args.MyCity)
        txtState.Inlines.Add(" " + args.MyState)
        txtZip.Inlines.Add(" " + args.MyZip)
    End If

End Sub
テキスト ボックスのデータは MyControlEventArgs オブジェクトにパックされます。 ユーザーが [OK] ボタンをクリックすると、イベント ハンドラーによってデータが抽出され、そのデータがパネルの MyControl1 の下に表示されます。
コントロールのプロパティの変更
WindowsFormsHost 要素では、ホストされているコントロールの既定プロパティの一部が公開されています。 その結果、アプリケーションのスタイルに合わせてコントロールの外観を変更することができます。 ユーザーは、左側のパネルにあるオプション ボタン セットを使用して、いくつかの色とフォントのプロパティを変更できます。 各ボタン セットには Click イベントのハンドラーがあります。これによってユーザーのオプション ボタンの選択が検出され、コントロールの対応するプロパティが変更されます。
MainWindow クラスに次のコードを追加します。
private void BackColorChanged(object sender, RoutedEventArgs e)
{
    if (sender == rdbtnBackGreen)
        wfh.Background = new SolidColorBrush(Colors.LightGreen);
    else if (sender == rdbtnBackSalmon)
        wfh.Background = new SolidColorBrush(Colors.LightSalmon);
    else if (UIIsReady == true)
        wfh.Background = initBackBrush;
}

private void ForeColorChanged(object sender, RoutedEventArgs e)
{
    if (sender == rdbtnForeRed)
        wfh.Foreground = new SolidColorBrush(Colors.Red);
    else if (sender == rdbtnForeYellow)
        wfh.Foreground = new SolidColorBrush(Colors.Yellow);
    else if (UIIsReady == true)
        wfh.Foreground = initForeBrush;
}

private void FontChanged(object sender, RoutedEventArgs e)
{
    if (sender == rdbtnTimes)
        wfh.FontFamily = new FontFamily("Times New Roman");
    else if (sender == rdbtnWingdings)
        wfh.FontFamily = new FontFamily("Wingdings");
    else if (UIIsReady == true)
        wfh.FontFamily = initFontFamily;
}
private void FontSizeChanged(object sender, RoutedEventArgs e)
{
    if (sender == rdbtnTen)
        wfh.FontSize = 10;
    else if (sender == rdbtnTwelve)
        wfh.FontSize = 12;
    else if (UIIsReady == true)
        wfh.FontSize = initFontSize;
}
private void StyleChanged(object sender, RoutedEventArgs e)
{
    if (sender == rdbtnItalic)
        wfh.FontStyle = FontStyles.Italic;
    else if (UIIsReady == true)
        wfh.FontStyle = initFontStyle;
}
private void WeightChanged(object sender, RoutedEventArgs e)
{
    if (sender == rdbtnBold)
        wfh.FontWeight = FontWeights.Bold;
    else if (UIIsReady == true)
        wfh.FontWeight = initFontWeight;
}
Private Sub BackColorChanged(ByVal sender As Object, ByVal e As RoutedEventArgs)

    If sender.Equals(rdbtnBackGreen) Then
        wfh.Background = New SolidColorBrush(Colors.LightGreen)
    ElseIf sender.Equals(rdbtnBackSalmon) Then
        wfh.Background = New SolidColorBrush(Colors.LightSalmon)
    ElseIf UIIsReady = True Then
        wfh.Background = initBackBrush
    End If

End Sub

Private Sub ForeColorChanged(ByVal sender As Object, ByVal e As RoutedEventArgs)
    If sender.Equals(rdbtnForeRed) Then
        wfh.Foreground = New SolidColorBrush(Colors.Red)
    ElseIf sender.Equals(rdbtnForeYellow) Then
        wfh.Foreground = New SolidColorBrush(Colors.Yellow)
    ElseIf UIIsReady = True Then
        wfh.Foreground = initForeBrush
    End If

End Sub

Private Sub FontChanged(ByVal sender As Object, ByVal e As RoutedEventArgs)
    If sender.Equals(rdbtnTimes) Then
        wfh.FontFamily = New FontFamily("Times New Roman")
    ElseIf sender.Equals(rdbtnWingdings) Then
        wfh.FontFamily = New FontFamily("Wingdings")
    ElseIf UIIsReady = True Then
        wfh.FontFamily = initFontFamily
    End If

End Sub

Private Sub FontSizeChanged(ByVal sender As Object, ByVal e As RoutedEventArgs)
    If sender.Equals(rdbtnTen) Then
        wfh.FontSize = 10
    ElseIf sender.Equals(rdbtnTwelve) Then
        wfh.FontSize = 12
    ElseIf UIIsReady = True Then
        wfh.FontSize = initFontSize
    End If

End Sub

Private Sub StyleChanged(ByVal sender As Object, ByVal e As RoutedEventArgs)
    If sender.Equals(rdbtnItalic) Then
        wfh.FontStyle = FontStyles.Italic
    ElseIf UIIsReady = True Then
        wfh.FontStyle = initFontStyle
    End If

End Sub

Private Sub WeightChanged(ByVal sender As Object, ByVal e As RoutedEventArgs)
    If sender.Equals(rdbtnBold) Then
        wfh.FontWeight = FontWeights.Bold
    ElseIf UIIsReady = True Then
        wfh.FontWeight = initFontWeight
    End If

End Sub
アプリケーションをビルドして実行します。 Windows フォーム複合コントロールにテキストを追加し、 [OK] をクリックします。 そのテキストがラベルに表示されます。 さまざまなラジオ ボタンをクリックしてコントロールへの影響を確認します。
関連項目
.NET Desktop feedback
