パネルの概要
Panel 要素は、要素のレンダリング (サイズと寸法、位置、子コンテンツの配置) を制御するコンポーネントです。 Windows Presentation Foundation (WPF) には、定義済みの Panel 要素の数と、カスタム Panel 要素を構築する機能が用意されています。
このトピックには、次のセクションが含まれています。
パネル クラス
Panel は、Windows Presentation Foundation (WPF) でレイアウトサポートを提供するすべての要素の基本クラスです。 派生 Panel 要素は、拡張アプリケーション マークアップ言語 (XAML) とコードで要素を位置付けおよび整列するために使用されます。
WPF には、多くの複雑なレイアウトを可能にする派生パネル実装の包括的なスイートが含まれています。 これらの派生クラスは、ほとんどの標準的なユーザー インターフェイス (UI) シナリオを可能にするプロパティとメソッドを公開します。 ニーズを満たす子配置動作が見つからない開発者は、ArrangeOverride メソッドと MeasureOverride メソッドをオーバーライドすることで、新しいレイアウトを作成できます。 カスタム レイアウトの動作の詳細については、「カスタム パネル要素の
パネルの共通メンバー
すべての Panel 要素は、Height、Width、HorizontalAlignment、VerticalAlignment、Margin、LayoutTransformなど、FrameworkElementによって定義される基本サイズ設定と配置プロパティをサポートします。 FrameworkElementによって定義された配置プロパティの詳細については、「配置、余白、およびパディングの概要」を参照してください。
Panel では、レイアウトの理解と使用において重要な追加のプロパティが公開されます。 Background プロパティは、派生パネル要素の境界間の領域を Brushで塗りつぶすために使用されます。 Children は、Panel が構成される要素の子コレクションを表します。 InternalChildren は、Children コレクションの内容と、データ バインディングによって生成されたメンバーを表します。 どちらも、親 Panel内でホストされる子要素の UIElementCollection で構成されます。
パネルには、派生 Panelで階層化順序を実現するために使用できる Panel.ZIndex 添付プロパティも公開されます。 Panel.ZIndex 値が大きいパネルの Children コレクションのメンバーは、Panel.ZIndex 値が小さいもの前に表示されます。 これは、子が同じ座標空間を共有できるようにする Canvas や Grid などのパネルに特に便利です。
Panel では、Panelの既定の表示動作をオーバーライドするために使用できる OnRender メソッドも定義します。
添付プロパティ
派生パネル要素は、添付プロパティを広範に使用します。 添付プロパティは、従来の共通言語ランタイム (CLR) プロパティ "ラッパー" を持たない特殊な形式の依存関係プロパティです。 添付プロパティには、拡張アプリケーション マークアップ言語 (XAML) の特殊な構文があります。これは、次のいくつかの例で確認できます。
添付プロパティの 1 つの目的は、子要素が親要素によって実際に定義されているプロパティの一意の値を格納できるようにすることです。 この機能のアプリケーションでは、子要素がユーザー インターフェイス (UI) でどのように表示されるかを親に通知します。これは、アプリケーション レイアウトに非常に役立ちます。 詳細については、「添付プロパティの概要 」を参照してください。
派生パネル要素
多くのオブジェクトは Panelから派生していますが、それらのすべてがルート レイアウト プロバイダーとして使用されるわけではありません。 アプリケーション UI を作成するために特別に設計された 6 つの定義済みパネル クラス (Canvas、DockPanel、Grid、StackPanel、VirtualizingStackPanel、および WrapPanel) があります。
各パネル要素は、次の表に示すように、独自の特別な機能をカプセル化します。
| 要素名 | UI パネル? | 説明 |
|---|---|---|
| Canvas | はい | Canvas 領域を基準にした座標によって子要素を明示的に配置できるエリアを定義します。 |
| DockPanel | はい | 子要素を互いに相対的に水平方向または垂直方向に配置できる領域を定義します。 |
| Grid | はい | 列と行で構成される柔軟なグリッド領域を定義します。 Grid の子要素は、Margin プロパティを使用して正確に配置できます。 |
| StackPanel | はい | 子要素を、水平方向または垂直方向に配置できる単一の行に配置します。 |
| TabPanel | いいえ | TabControl内のタブ ボタンのレイアウトを処理します。 |
| ToolBarOverflowPanel | いいえ | ToolBar コントロール内にコンテンツを配置します。 |
| UniformGrid | いいえ | UniformGrid は、すべてのセル サイズが等しいグリッドに子を配置するために使用されます。 |
| VirtualizingPanel | いいえ | 子コレクションを "仮想化" できるパネルに基本クラスを提供します。 |
| VirtualizingStackPanel | はい | 水平方向または垂直方向の 1 行にコンテンツを配置および仮想化します。 |
| WrapPanel | はい | WrapPanel は、子要素を左から右に順番に配置し、コンテンツを格納ボックスの端にある次の行に分割します。 後続の順序は、Orientation プロパティの値に応じて、上から下または右から左に順番に行われます。 |
ユーザー インターフェイス パネル
UI シナリオをサポートするために最適化された WPF には、Canvas、DockPanel、Grid、StackPanel、VirtualizingStackPanel、WrapPanelの 6 つのパネル クラスがあります。 これらのパネル要素は、使いやすく、汎用性が高く、ほとんどのアプリケーションで十分に拡張可能です。
派生した各 Panel 要素は、サイズ変更の制約を異なる方法で処理します。 Panel が水平方向または垂直方向の制約をどのように処理するかを理解すると、レイアウトをより予測しやすくなります。
| パネル名 | x 方向 | y 方向 |
|---|---|---|
| Canvas | コンテンツに制限 | コンテンツに制限 |
| DockPanel | 制約あり。 | 制約された |
| StackPanel (垂直方向) | 制約あり。 | コンテンツに制限 |
| StackPanel (水平方向) | コンテンツに制限 | 制約あり。 |
| Grid | 制約あり。 | Auto が行と列に適用される場合を除き、制約付き |
| WrapPanel | コンテンツに制限 | コンテンツに制限 |
これらの各要素の詳細な説明と使用例を以下に示します。
キャンバス
Canvas 要素を使用すると、絶対 x- および y- 座標に従ってコンテンツを配置できます。 要素は一意の場所に描画できます。または、要素が同じ座標を占める場合、要素がマークアップに表示される順序によって、要素が描画される順序が決まります。
Canvas は、任意の Panelの最も柔軟なレイアウトサポートを提供します。 Height プロパティと Width プロパティはキャンバスの領域を定義するために使用され、内部の要素には親 Canvasの領域を基準にした絶対座標が割り当てられます。 Canvas.Left、Canvas.Top、Canvas.Right、Canvas.Bottomの4つの添付プロパティにより、Canvas内でのオブジェクトの配置を細かく制御でき、開発者は画面上に要素を正確に配置して配置できます。
キャンバス内の ClipToBounds
Canvas は、定義された Height や Widthの外部にある座標でも、画面上の任意の位置に子要素を配置できます。 さらに、Canvas は子のサイズによって影響を受けません。 その結果、子要素は、親 Canvasの境界矩形の外側にある他の要素を上書き描画することができます。 Canvas の既定の動作では、親 Canvasの境界外に子を描画できます。 この動作が望ましくない場合は、ClipToBounds プロパティを trueに設定できます。 これにより、Canvas は独自のサイズに切り取られます。 Canvas は、境界の外側に子要素を描画できる唯一のレイアウト要素です。
この動作は、幅プロパティ比較サンプルにグラフィカルに示されています。
キャンバスの定義と使用
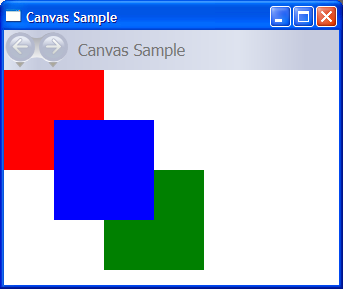
Canvas は、拡張可能なアプリケーション マークアップ言語 (XAML) またはコードを使用するだけでインスタンス化できます。 次の例では、Canvas を使用してコンテンツを絶対に配置する方法を示します。 このコードでは、3 つの 100 ピクセルの正方形が生成されます。 最初の四角形は赤で、左上 (x,y) の位置は (0, 0) として指定されます。 2 番目の正方形は緑色で、左上の位置は (100, 100) で、最初の正方形のすぐ下と右側にあります。 3 番目の四角形は青で、左上の位置は (50, 50) であるため、最初の四角形の右下クアドラントと 2 番目の左上の四分円が含まれます。 3 番目の四角形は最後にレイアウトされているため、他の 2 つの正方形の上に表示されます。つまり、重複する部分は 3 番目のボックスの色を想定しています。
// Create the application's main window
mainWindow = new Window ();
mainWindow.Title = "Canvas Sample";

// Create the Canvas
myParentCanvas = new Canvas();
myParentCanvas.Width = 400;
myParentCanvas.Height = 400;

// Define child Canvas elements
myCanvas1 = new Canvas();
myCanvas1.Background = Brushes.Red;
myCanvas1.Height = 100;
myCanvas1.Width = 100;
Canvas.SetTop(myCanvas1, 0);
Canvas.SetLeft(myCanvas1, 0);

myCanvas2 = new Canvas();
myCanvas2.Background = Brushes.Green;
myCanvas2.Height = 100;
myCanvas2.Width = 100;
Canvas.SetTop(myCanvas2, 100);
Canvas.SetLeft(myCanvas2, 100);

myCanvas3 = new Canvas();
myCanvas3.Background = Brushes.Blue;
myCanvas3.Height = 100;
myCanvas3.Width = 100;
Canvas.SetTop(myCanvas3, 50);
Canvas.SetLeft(myCanvas3, 50);

// Add child elements to the Canvas' Children collection
myParentCanvas.Children.Add(myCanvas1);
myParentCanvas.Children.Add(myCanvas2);
myParentCanvas.Children.Add(myCanvas3);

// Add the parent Canvas as the Content of the Window Object
mainWindow.Content = myParentCanvas;
mainWindow.Show ();
WindowTitle = "Canvas Sample"
'Create a Canvas as the root Panel
Dim myParentCanvas As New Canvas()
myParentCanvas.Width = 400
myParentCanvas.Height = 400

' Define child Canvas elements
Dim myCanvas1 As New Canvas()
myCanvas1.Background = Brushes.Red
myCanvas1.Height = 100
myCanvas1.Width = 100
Canvas.SetTop(myCanvas1, 0)
Canvas.SetLeft(myCanvas1, 0)

Dim myCanvas2 As New Canvas()
myCanvas2.Background = Brushes.Green
myCanvas2.Height = 100
myCanvas2.Width = 100
Canvas.SetTop(myCanvas2, 100)
Canvas.SetLeft(myCanvas2, 100)

Dim myCanvas3 As New Canvas()
myCanvas3.Background = Brushes.Blue
myCanvas3.Height = 100
myCanvas3.Width = 100
Canvas.SetTop(myCanvas3, 50)
Canvas.SetLeft(myCanvas3, 50)

' Add child elements to the Canvas' Children collection
myParentCanvas.Children.Add(myCanvas1)
myParentCanvas.Children.Add(myCanvas2)
myParentCanvas.Children.Add(myCanvas3)

' Add the parent Canvas as the Content of the Window Object
Me.Content = myParentCanvas
<Page WindowTitle="Canvas Sample" xmlns="http://schemas.microsoft.com/winfx/2006/xaml/presentation">
  <Canvas Height="400" Width="400">
    <Canvas Height="100" Width="100" Top="0" Left="0" Background="Red"/>
    <Canvas Height="100" Width="100" Top="100" Left="100" Background="Green"/>
    <Canvas Height="100" Width="100" Top="50" Left="50" Background="Blue"/>
  </Canvas>
</Page>
コンパイルされたアプリケーションは、次のような新しい UI を生成します。
DockPanel
DockPanel 要素は、子コンテンツ要素で設定されている DockPanel.Dock 添付プロパティを使用して、コンテナーの端に沿ってコンテンツを配置します。 DockPanel.Dock が Top または Bottomに設定されている場合、子要素は相互に上下に配置されます。 DockPanel.Dock が Left または Rightに設定されている場合、子要素は互いに左または右に配置されます。 LastChildFill プロパティは、DockPanelの子として追加された最終的な要素の位置を決定します。
DockPanel を使用すると、一連のボタンなど、関連するコントロールのグループを配置できます。 または、これを使用して、Microsoft Outlook のようなペイン分割された UI を作成することもできます。
コンテンツに合わせたサイズ調整
その Height プロパティと Width プロパティが指定されていない場合、DockPanel はそのコンテンツに合わせてサイズを調整します。 サイズは、子要素のサイズに合うように、増減させることができます。 ただし、これらのプロパティが指定され、次に指定された子要素のスペースがなくなった場合、DockPanel はその子要素またはその後の子要素を表示せず、後続の子要素は測定しません。
LastChildFill
既定では、DockPanel 要素の最後の子は、残りの未割り当て領域を "塗りつぶす" ことになります。 この動作が望ましくない場合は、LastChildFill プロパティを falseに設定します。
DockPanel の定義と使用
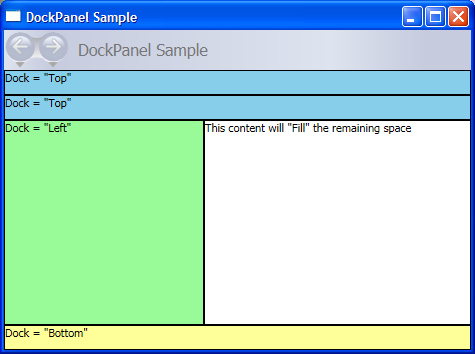
次の例では、DockPanelを使用して領域をパーティション分割する方法を示します。 親 DockPanelの子として 5 つの Border 要素が追加されます。 異なるDockPanelの配置プロパティを使用して、それぞれ空間を分割します。 最後の要素は、残りの未割り当て領域を "塗りつぶし" します。
// Create the application's main window
mainWindow = gcnew Window();
mainWindow->Title = "DockPanel Sample";

// Create the DockPanel
DockPanel^ myDockPanel = gcnew DockPanel();
myDockPanel->LastChildFill = true;

// Define the child content
Border^ myBorder1 = gcnew Border();
myBorder1->Height = 25;
myBorder1->Background = Brushes::SkyBlue;
myBorder1->BorderBrush = Brushes::Black;
myBorder1->BorderThickness = Thickness(1);
DockPanel::SetDock(myBorder1, Dock::Top);
TextBlock^ myTextBlock1 = gcnew TextBlock();
myTextBlock1->Foreground = Brushes::Black;
myTextBlock1->Text = "Dock = Top";
myBorder1->Child = myTextBlock1;

Border^ myBorder2 = gcnew Border();
myBorder2->Height = 25;
myBorder2->Background = Brushes::SkyBlue;
myBorder2->BorderBrush = Brushes::Black;
myBorder2->BorderThickness = Thickness(1);
DockPanel::SetDock(myBorder2, Dock::Top);
TextBlock^ myTextBlock2 = gcnew TextBlock();
myTextBlock2->Foreground = Brushes::Black;
myTextBlock2->Text = "Dock = Top";
myBorder2->Child = myTextBlock2;

Border^ myBorder3 = gcnew Border();
myBorder3->Height = 25;
myBorder3->Background = Brushes::LemonChiffon;
myBorder3->BorderBrush = Brushes::Black;
myBorder3->BorderThickness = Thickness(1);
DockPanel::SetDock(myBorder3, Dock::Bottom);
TextBlock^ myTextBlock3 = gcnew TextBlock();
myTextBlock3->Foreground = Brushes::Black;
myTextBlock3->Text = "Dock = Bottom";
myBorder3->Child = myTextBlock3;

Border^ myBorder4 = gcnew Border();
myBorder4->Width = 200;
myBorder4->Background = Brushes::PaleGreen;
myBorder4->BorderBrush = Brushes::Black;
myBorder4->BorderThickness = Thickness(1);
DockPanel::SetDock(myBorder4, Dock::Left);
TextBlock^ myTextBlock4 = gcnew TextBlock();
myTextBlock4->Foreground = Brushes::Black;
myTextBlock4->Text = "Dock = Left";
myBorder4->Child = myTextBlock4;

Border^ myBorder5 = gcnew Border();
myBorder5->Background = Brushes::White;
myBorder5->BorderBrush = Brushes::Black;
myBorder5->BorderThickness = Thickness(1);
TextBlock^ myTextBlock5 = gcnew TextBlock();
myTextBlock5->Foreground = Brushes::Black;
myTextBlock5->Text = "This content will Fill the remaining space";
myBorder5->Child = myTextBlock5;

// Add child elements to the DockPanel Children collection
myDockPanel->Children->Add(myBorder1);
myDockPanel->Children->Add(myBorder2);
myDockPanel->Children->Add(myBorder3);
myDockPanel->Children->Add(myBorder4);
myDockPanel->Children->Add(myBorder5);

// Add the parent Canvas as the Content of the Window Object
mainWindow->Content = myDockPanel;
mainWindow->Show();
// Create the application's main window
mainWindow = new Window ();
mainWindow.Title = "DockPanel Sample";

// Create the DockPanel
DockPanel myDockPanel = new DockPanel();
myDockPanel.LastChildFill = true;

// Define the child content
Border myBorder1 = new Border();
myBorder1.Height = 25;
myBorder1.Background = Brushes.SkyBlue;
myBorder1.BorderBrush = Brushes.Black;
myBorder1.BorderThickness = new Thickness(1);
DockPanel.SetDock(myBorder1, Dock.Top);
TextBlock myTextBlock1 = new TextBlock();
myTextBlock1.Foreground = Brushes.Black;
myTextBlock1.Text = "Dock = Top";
myBorder1.Child = myTextBlock1;

Border myBorder2 = new Border();
myBorder2.Height = 25;
myBorder2.Background = Brushes.SkyBlue;
myBorder2.BorderBrush = Brushes.Black;
myBorder2.BorderThickness = new Thickness(1);
DockPanel.SetDock(myBorder2, Dock.Top);
TextBlock myTextBlock2 = new TextBlock();
myTextBlock2.Foreground = Brushes.Black;
myTextBlock2.Text = "Dock = Top";
myBorder2.Child = myTextBlock2;

Border myBorder3 = new Border();
myBorder3.Height = 25;
myBorder3.Background = Brushes.LemonChiffon;
myBorder3.BorderBrush = Brushes.Black;
myBorder3.BorderThickness = new Thickness(1);
DockPanel.SetDock(myBorder3, Dock.Bottom);
TextBlock myTextBlock3 = new TextBlock();
myTextBlock3.Foreground = Brushes.Black;
myTextBlock3.Text = "Dock = Bottom";
myBorder3.Child = myTextBlock3;

Border myBorder4 = new Border();
myBorder4.Width = 200;
myBorder4.Background = Brushes.PaleGreen;
myBorder4.BorderBrush = Brushes.Black;
myBorder4.BorderThickness = new Thickness(1);
DockPanel.SetDock(myBorder4, Dock.Left);
TextBlock myTextBlock4 = new TextBlock();
myTextBlock4.Foreground = Brushes.Black;
myTextBlock4.Text = "Dock = Left";
myBorder4.Child = myTextBlock4;

Border myBorder5 = new Border();
myBorder5.Background = Brushes.White;
myBorder5.BorderBrush = Brushes.Black;
myBorder5.BorderThickness = new Thickness(1);
TextBlock myTextBlock5 = new TextBlock();
myTextBlock5.Foreground = Brushes.Black;
myTextBlock5.Text = "This content will Fill the remaining space";
myBorder5.Child = myTextBlock5;

// Add child elements to the DockPanel Children collection
myDockPanel.Children.Add(myBorder1);
myDockPanel.Children.Add(myBorder2);
myDockPanel.Children.Add(myBorder3);
myDockPanel.Children.Add(myBorder4);
myDockPanel.Children.Add(myBorder5);

// Add the parent Canvas as the Content of the Window Object
mainWindow.Content = myDockPanel;
mainWindow.Show ();
WindowTitle = "DockPanel Sample"
'Create a DockPanel as the root Panel
Dim myDockPanel As New DockPanel()
myDockPanel.LastChildFill = True

' Define the child content
Dim myBorder1 As New Border()
myBorder1.Height = 25
myBorder1.Background = Brushes.SkyBlue
myBorder1.BorderBrush = Brushes.Black
myBorder1.BorderThickness = New Thickness(1)
DockPanel.SetDock(myBorder1, Dock.Top)
Dim myTextBlock1 As New TextBlock()
myTextBlock1.Foreground = Brushes.Black
myTextBlock1.Text = "Dock = Top"
myBorder1.Child = myTextBlock1

Dim myBorder2 As New Border()
myBorder2.Height = 25
myBorder2.Background = Brushes.SkyBlue
myBorder2.BorderBrush = Brushes.Black
myBorder2.BorderThickness = New Thickness(1)
DockPanel.SetDock(myBorder2, Dock.Top)
Dim myTextBlock2 As New TextBlock()
myTextBlock2.Foreground = Brushes.Black
myTextBlock2.Text = "Dock = Top"
myBorder2.Child = myTextBlock2

Dim myBorder3 As New Border()
myBorder3.Height = 25
myBorder3.Background = Brushes.LemonChiffon
myBorder3.BorderBrush = Brushes.Black
myBorder3.BorderThickness = New Thickness(1)
DockPanel.SetDock(myBorder3, Dock.Bottom)
Dim myTextBlock3 As New TextBlock()
myTextBlock3.Foreground = Brushes.Black
myTextBlock3.Text = "Dock = Bottom"
myBorder3.Child = myTextBlock3

Dim myBorder4 As New Border()
myBorder4.Width = 200
myBorder4.Background = Brushes.PaleGreen
myBorder4.BorderBrush = Brushes.Black
myBorder4.BorderThickness = New Thickness(1)
DockPanel.SetDock(myBorder4, Dock.Left)
Dim myTextBlock4 As New TextBlock()
myTextBlock4.Foreground = Brushes.Black
myTextBlock4.Text = "Dock = Left"
myBorder4.Child = myTextBlock4

Dim myBorder5 As New Border()
myBorder5.Background = Brushes.White
myBorder5.BorderBrush = Brushes.Black
myBorder5.BorderThickness = New Thickness(1)
Dim myTextBlock5 As New TextBlock()
myTextBlock5.Foreground = Brushes.Black
myTextBlock5.Text = "This content will Fill the remaining space"
myBorder5.Child = myTextBlock5

' Add child elements to the DockPanel Children collection
myDockPanel.Children.Add(myBorder1)
myDockPanel.Children.Add(myBorder2)
myDockPanel.Children.Add(myBorder3)
myDockPanel.Children.Add(myBorder4)
myDockPanel.Children.Add(myBorder5)
Me.Content = myDockPanel
<Page xmlns="http://schemas.microsoft.com/winfx/2006/xaml/presentation" WindowTitle="DockPanel Sample">
  <DockPanel LastChildFill="True">
    <Border Height="25" Background="SkyBlue" BorderBrush="Black" BorderThickness="1" DockPanel.Dock="Top">
      <TextBlock Foreground="Black">Dock = "Top"</TextBlock>
    </Border>
    <Border Height="25" Background="SkyBlue" BorderBrush="Black" BorderThickness="1" DockPanel.Dock="Top">
      <TextBlock Foreground="Black">Dock = "Top"</TextBlock>
    </Border>
    <Border Height="25" Background="LemonChiffon" BorderBrush="Black" BorderThickness="1" DockPanel.Dock="Bottom">
      <TextBlock Foreground="Black">Dock = "Bottom"</TextBlock>
    </Border>
    <Border Width="200" Background="PaleGreen" BorderBrush="Black" BorderThickness="1" DockPanel.Dock="Left">
      <TextBlock Foreground="Black">Dock = "Left"</TextBlock>
    </Border>
    <Border Background="White" BorderBrush="Black" BorderThickness="1">
      <TextBlock Foreground="Black">This content will "Fill" the remaining space</TextBlock>
    </Border>
  </DockPanel>
</Page>
コンパイルされたアプリケーションは、次のような新しい UI を生成します。
グリッド
Grid 要素は、絶対配置と表形式データ コントロールの機能をマージします。 Grid を使用すると、要素を簡単に配置してスタイルを設定できます。 Grid では、柔軟な行と列のグループ化を定義できます。また、複数の Grid 要素間でサイズ情報を共有するメカニズムも提供します。
グリッドとテーブルの違い
Table と Grid は一般的な機能を共有しますが、それぞれ異なるシナリオに最適です。
列と行のサイズ変更の動作
Grid 内で定義された列と行は、残りの領域を比例的に分散するために、Star サイズ設定を利用できます。 Star 行または列の高さまたは幅として選択されている場合、その列または行は、使用可能な残りの領域の加重比率を受け取ります。 これは、列または行内のコンテンツのサイズに基づいて領域を均等に分散する Autoとは対照的です。 この値は、拡張アプリケーション マークアップ言語 (XAML) を使用する場合、* または 2* として表されます。 最初のケースでは、行または列は使用可能な領域を 1 回受け取り、2 番目のケースでは 2 回受け取ります。 この技術を使用して HorizontalAlignment と VerticalAlignment の値 Stretch を用いて空間を比例配分すると、画面の占有率に基づいてレイアウト空間を区切ることが可能です。 Grid は、この方法でスペースを分散できる唯一のレイアウト パネルです。
グリッドの定義と使用
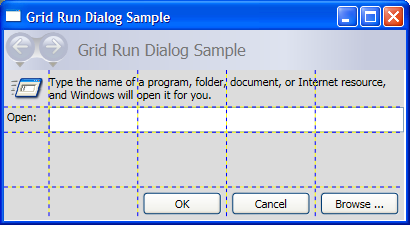
次の例では、Windows の [スタート] メニューで使用できる [実行] ダイアログに表示される UI と同様の UI を作成する方法を示します。
// Create the Grid.
grid1 = new Grid ();
grid1.Background = Brushes.Gainsboro;
grid1.HorizontalAlignment = HorizontalAlignment.Left;
grid1.VerticalAlignment = VerticalAlignment.Top;
grid1.ShowGridLines = true;
grid1.Width = 425;
grid1.Height = 165;

// Define the Columns.
colDef1 = new ColumnDefinition();
colDef1.Width = new GridLength(1, GridUnitType.Auto);
colDef2 = new ColumnDefinition();
colDef2.Width = new GridLength(1, GridUnitType.Star);
colDef3 = new ColumnDefinition();
colDef3.Width = new GridLength(1, GridUnitType.Star);
colDef4 = new ColumnDefinition();
colDef4.Width = new GridLength(1, GridUnitType.Star);
colDef5 = new ColumnDefinition();
colDef5.Width = new GridLength(1, GridUnitType.Star);
grid1.ColumnDefinitions.Add(colDef1);
grid1.ColumnDefinitions.Add(colDef2);
grid1.ColumnDefinitions.Add(colDef3);
grid1.ColumnDefinitions.Add(colDef4);
grid1.ColumnDefinitions.Add(colDef5);

// Define the Rows.
rowDef1 = new RowDefinition();
rowDef1.Height = new GridLength(1, GridUnitType.Auto);
rowDef2 = new RowDefinition();
rowDef2.Height = new GridLength(1, GridUnitType.Auto);
rowDef3 = new RowDefinition();
rowDef3.Height = new GridLength(1, GridUnitType.Star);
rowDef4 = new RowDefinition();
rowDef4.Height = new GridLength(1, GridUnitType.Auto);
grid1.RowDefinitions.Add(rowDef1);
grid1.RowDefinitions.Add(rowDef2);
grid1.RowDefinitions.Add(rowDef3);
grid1.RowDefinitions.Add(rowDef4);

// Add the Image.
img1 = new Image();
img1.Source = new System.Windows.Media.Imaging.BitmapImage(new Uri("runicon.png", UriKind.Relative));
Grid.SetRow(img1, 0);
Grid.SetColumn(img1, 0);

// Add the main application dialog.
txt1 = new TextBlock();
txt1.Text = "Type the name of a program, folder, document, or Internet resource, and Windows will open it for you.";
txt1.TextWrapping = TextWrapping.Wrap;
Grid.SetColumnSpan(txt1, 4);
Grid.SetRow(txt1, 0);
Grid.SetColumn(txt1, 1);

// Add the second text cell to the Grid.
txt2 = new TextBlock();
txt2.Text = "Open:";
Grid.SetRow(txt2, 1);
Grid.SetColumn(txt2, 0);

// Add the TextBox control.
tb1 = new TextBox();
Grid.SetRow(tb1, 1);
Grid.SetColumn(tb1, 1);
Grid.SetColumnSpan(tb1, 5);

// Add the buttons.
button1 = new Button();
button2 = new Button();
button3 = new Button();
button1.Content = "OK";
button2.Content = "Cancel";
button3.Content = "Browse ...";
Grid.SetRow(button1, 3);
Grid.SetColumn(button1, 2);
button1.Margin = new Thickness(10, 0, 10, 15);
button2.Margin = new Thickness(10, 0, 10, 15);
button3.Margin = new Thickness(10, 0, 10, 15);
Grid.SetRow(button2, 3);
Grid.SetColumn(button2, 3);
Grid.SetRow(button3, 3);
Grid.SetColumn(button3, 4);

grid1.Children.Add(img1);
grid1.Children.Add(txt1);
grid1.Children.Add(txt2);
grid1.Children.Add(tb1);
grid1.Children.Add(button1);
grid1.Children.Add(button2);
grid1.Children.Add(button3);

mainWindow.Content = grid1;
'Create a Grid as the root Panel element.
Dim myGrid As New Grid()
myGrid.Height = 165
myGrid.Width = 425
myGrid.Background = Brushes.Gainsboro
myGrid.ShowGridLines = True
myGrid.HorizontalAlignment = Windows.HorizontalAlignment.Left
myGrid.VerticalAlignment = Windows.VerticalAlignment.Top

' Define and Add the Rows and Columns.
Dim colDef1 As New ColumnDefinition
colDef1.Width = New GridLength(1, GridUnitType.Auto)
Dim colDef2 As New ColumnDefinition
colDef2.Width = New GridLength(1, GridUnitType.Star)
Dim colDef3 As New ColumnDefinition
colDef3.Width = New GridLength(1, GridUnitType.Star)
Dim colDef4 As New ColumnDefinition
colDef4.Width = New GridLength(1, GridUnitType.Star)
Dim colDef5 As New ColumnDefinition
colDef5.Width = New GridLength(1, GridUnitType.Star)
myGrid.ColumnDefinitions.Add(colDef1)
myGrid.ColumnDefinitions.Add(colDef2)
myGrid.ColumnDefinitions.Add(colDef3)
myGrid.ColumnDefinitions.Add(colDef4)
myGrid.ColumnDefinitions.Add(colDef5)

Dim rowDef1 As New RowDefinition
rowDef1.Height = New GridLength(1, GridUnitType.Auto)
Dim rowDef2 As New RowDefinition
rowDef2.Height = New GridLength(1, GridUnitType.Auto)
Dim rowDef3 As New Controls.RowDefinition
rowDef3.Height = New GridLength(1, GridUnitType.Star)
Dim rowDef4 As New RowDefinition
rowDef4.Height = New GridLength(1, GridUnitType.Auto)
myGrid.RowDefinitions.Add(rowDef1)
myGrid.RowDefinitions.Add(rowDef2)
myGrid.RowDefinitions.Add(rowDef3)
myGrid.RowDefinitions.Add(rowDef4)

' Add the Image.
Dim img1 As New Image
img1.Source = New System.Windows.Media.Imaging.BitmapImage(New Uri("runicon.png", UriKind.Relative))
Grid.SetRow(img1, 0)
Grid.SetColumn(img1, 0)
myGrid.Children.Add(img1)

' Add the main application dialog.
Dim txt1 As New TextBlock
txt1.Text = "Type the name of a program, document, or Internet resource, and Windows will open it for you."
txt1.TextWrapping = TextWrapping.Wrap
Grid.SetColumnSpan(txt1, 4)
Grid.SetRow(txt1, 0)
Grid.SetColumn(txt1, 1)
myGrid.Children.Add(txt1)

' Add the second TextBlock Cell to the Grid.
Dim txt2 As New TextBlock
txt2.Text = "Open:"
Grid.SetRow(txt2, 1)
Grid.SetColumn(txt2, 0)
myGrid.Children.Add(txt2)

' Add the TextBox control.
Dim tb1 As New TextBox
Grid.SetRow(tb1, 1)
Grid.SetColumn(tb1, 1)
Grid.SetColumnSpan(tb1, 5)
myGrid.Children.Add(tb1)

' Add the Button controls.
Dim button1 As New Button
Dim button2 As New Button
Dim button3 As New Button
button1.Content = "OK"
button1.Margin = New Thickness(10, 0, 10, 15)
button2.Content = "Cancel"
button2.Margin = New Thickness(10, 0, 10, 15)
button3.Content = "Browse ..."
button3.Margin = New Thickness(10, 0, 10, 15)

Grid.SetRow(button1, 3)
Grid.SetColumn(button1, 2)
Grid.SetRow(button2, 3)
Grid.SetColumn(button2, 3)
Grid.SetRow(button3, 3)
Grid.SetColumn(button3, 4)
myGrid.Children.Add(button1)
myGrid.Children.Add(button2)
myGrid.Children.Add(button3)

Me.Content = myGrid
コンパイルされたアプリケーションは、次のような新しい UI を生成します。
StackPanel
StackPanel を使用すると、割り当てられた方向に要素を "スタック" できます。 既定のスタック方向は垂直方向です。 Orientation プロパティを使用して、コンテンツ フローを制御できます。
StackPanel と DockPanel
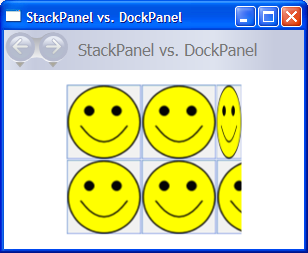
DockPanel は子要素を "スタック" することもできますが、DockPanel と StackPanel は、一部の使用シナリオでは類似した結果を生成しません。 たとえば、子要素の順序は、DockPanel のサイズに影響を与える可能性がありますが、StackPanelでは影響しません。 これは、StackPanelPositiveInfinityでの積み重ねの方向を測定するのに対し、DockPanel は使用可能なサイズのみを測定するためです。
次の例では、この主な違いを示します。
// Create the application's main window
mainWindow = gcnew Window();
mainWindow->Title = "StackPanel vs. DockPanel";

// Add root Grid
myGrid = gcnew Grid();
myGrid->Width = 175;
myGrid->Height = 150;
RowDefinition^ myRowDef1 = gcnew RowDefinition();
RowDefinition^ myRowDef2 = gcnew RowDefinition();
myGrid->RowDefinitions->Add(myRowDef1);
myGrid->RowDefinitions->Add(myRowDef2);

// Define the DockPanel
myDockPanel = gcnew DockPanel();
Grid::SetRow(myDockPanel, 0);

//Define an Image and Source
Image^ myImage = gcnew Image();
BitmapImage^ bi = gcnew BitmapImage();
bi->BeginInit();
bi->UriSource = gcnew System::Uri("smiley_stackpanel.png", UriKind::Relative);
bi->EndInit();
myImage->Source = bi;

Image^ myImage2 = gcnew Image();
BitmapImage^ bi2 = gcnew BitmapImage();
bi2->BeginInit();
bi2->UriSource = gcnew System::Uri("smiley_stackpanel.png", UriKind::Relative);
bi2->EndInit();
myImage2->Source = bi2;

Image^ myImage3 = gcnew Image();
BitmapImage^ bi3 = gcnew BitmapImage();
bi3->BeginInit();
bi3->UriSource = gcnew System::Uri("smiley_stackpanel.PNG", UriKind::Relative);
bi3->EndInit();
myImage3->Stretch = Stretch::Fill;
myImage3->Source = bi3;

// Add the images to the parent DockPanel
myDockPanel->Children->Add(myImage);
myDockPanel->Children->Add(myImage2);
myDockPanel->Children->Add(myImage3);

//Define a StackPanel
myStackPanel = gcnew StackPanel();
myStackPanel->Orientation = Orientation::Horizontal;
Grid::SetRow(myStackPanel, 1);

Image^ myImage4 = gcnew Image();
BitmapImage^ bi4 = gcnew BitmapImage();
bi4->BeginInit();
bi4->UriSource = gcnew System::Uri("smiley_stackpanel.png", UriKind::Relative);
bi4->EndInit();
myImage4->Source = bi4;

Image^ myImage5 = gcnew Image();
BitmapImage^ bi5 = gcnew BitmapImage();
bi5->BeginInit();
bi5->UriSource = gcnew System::Uri("smiley_stackpanel.png", UriKind::Relative);
bi5->EndInit();
myImage5->Source = bi5;

Image^ myImage6 = gcnew Image();
BitmapImage^ bi6 = gcnew BitmapImage();
bi6->BeginInit();
bi6->UriSource = gcnew System::Uri("smiley_stackpanel.PNG", UriKind::Relative);
bi6->EndInit();
myImage6->Stretch = Stretch::Fill;
myImage6->Source = bi6;

// Add the images to the parent StackPanel
myStackPanel->Children->Add(myImage4);
myStackPanel->Children->Add(myImage5);
myStackPanel->Children->Add(myImage6);

// Add the layout panels as children of the Grid
myGrid->Children->Add(myDockPanel);
myGrid->Children->Add(myStackPanel);

// Add the Grid as the Content of the Parent Window Object
mainWindow->Content = myGrid;
mainWindow->Show();
// Create the application's main window
mainWindow = new Window ();
mainWindow.Title = "StackPanel vs. DockPanel";

// Add root Grid
myGrid = new Grid();
myGrid.Width = 175;
myGrid.Height = 150;
RowDefinition myRowDef1 = new RowDefinition();
RowDefinition myRowDef2 = new RowDefinition();
myGrid.RowDefinitions.Add(myRowDef1);
myGrid.RowDefinitions.Add(myRowDef2);

// Define the DockPanel
myDockPanel = new DockPanel();
Grid.SetRow(myDockPanel, 0);

//Define an Image and Source
Image myImage = new Image();
BitmapImage bi = new BitmapImage();
bi.BeginInit();
bi.UriSource = new Uri("smiley_stackpanel.png", UriKind.Relative);
bi.EndInit();
myImage.Source = bi;

Image myImage2 = new Image();
BitmapImage bi2 = new BitmapImage();
bi2.BeginInit();
bi2.UriSource = new Uri("smiley_stackpanel.png", UriKind.Relative);
bi2.EndInit();
myImage2.Source = bi2;

Image myImage3 = new Image();
BitmapImage bi3 = new BitmapImage();
bi3.BeginInit();
bi3.UriSource = new Uri("smiley_stackpanel.PNG", UriKind.Relative);
bi3.EndInit();
myImage3.Stretch = Stretch.Fill;
myImage3.Source = bi3;

// Add the images to the parent DockPanel
myDockPanel.Children.Add(myImage);
myDockPanel.Children.Add(myImage2);
myDockPanel.Children.Add(myImage3);

//Define a StackPanel
myStackPanel = new StackPanel();
myStackPanel.Orientation = Orientation.Horizontal;
Grid.SetRow(myStackPanel, 1);

Image myImage4 = new Image();
BitmapImage bi4 = new BitmapImage();
bi4.BeginInit();
bi4.UriSource = new Uri("smiley_stackpanel.png", UriKind.Relative);
bi4.EndInit();
myImage4.Source = bi4;

Image myImage5 = new Image();
BitmapImage bi5 = new BitmapImage();
bi5.BeginInit();
bi5.UriSource = new Uri("smiley_stackpanel.png", UriKind.Relative);
bi5.EndInit();
myImage5.Source = bi5;

Image myImage6 = new Image();
BitmapImage bi6 = new BitmapImage();
bi6.BeginInit();
bi6.UriSource = new Uri("smiley_stackpanel.PNG", UriKind.Relative);
bi6.EndInit();
myImage6.Stretch = Stretch.Fill;
myImage6.Source = bi6;

// Add the images to the parent StackPanel
myStackPanel.Children.Add(myImage4);
myStackPanel.Children.Add(myImage5);
myStackPanel.Children.Add(myImage6);

// Add the layout panels as children of the Grid
myGrid.Children.Add(myDockPanel);
myGrid.Children.Add(myStackPanel);

// Add the Grid as the Content of the Parent Window Object
mainWindow.Content = myGrid;
mainWindow.Show ();
'Add root Grid
Dim myGrid As New Grid
myGrid.Width = 175
myGrid.Height = 150
Dim myRowDef1 As New RowDefinition
Dim myRowDef2 As New RowDefinition
myGrid.RowDefinitions.Add(myRowDef1)
myGrid.RowDefinitions.Add(myRowDef2)

'Define the DockPanel
Dim myDockPanel As New DockPanel
Grid.SetRow(myDockPanel, 0)

'Define an Image and Source.
Dim myImage As New Image
Dim bi As New BitmapImage
bi.BeginInit()
bi.UriSource = New Uri("smiley_stackpanel.png", UriKind.Relative)
bi.EndInit()
myImage.Source = bi

Dim myImage2 As New Image
Dim bi2 As New BitmapImage
bi2.BeginInit()
bi2.UriSource = New Uri("smiley_stackpanel.png", UriKind.Relative)
bi2.EndInit()
myImage2.Source = bi2

Dim myImage3 As New Image
Dim bi3 As New BitmapImage
bi3.BeginInit()
bi3.UriSource = New Uri("smiley_stackpanel.PNG", UriKind.Relative)
bi3.EndInit()
myImage3.Stretch = Stretch.Fill
myImage3.Source = bi3

'Add the images to the parent DockPanel.
myDockPanel.Children.Add(myImage)
myDockPanel.Children.Add(myImage2)
myDockPanel.Children.Add(myImage3)

'Define a StackPanel.
Dim myStackPanel As New StackPanel
myStackPanel.Orientation = Orientation.Horizontal
Grid.SetRow(myStackPanel, 1)

Dim myImage4 As New Image
Dim bi4 As New BitmapImage
bi4.BeginInit()
bi4.UriSource = New Uri("smiley_stackpanel.png", UriKind.Relative)
bi4.EndInit()
myImage4.Source = bi4

Dim myImage5 As New Image
Dim bi5 As New BitmapImage
bi5.BeginInit()
bi5.UriSource = New Uri("smiley_stackpanel.png", UriKind.Relative)
bi5.EndInit()
myImage5.Source = bi5

Dim myImage6 As New Image
Dim bi6 As New BitmapImage
bi6.BeginInit()
bi6.UriSource = New Uri("smiley_stackpanel.PNG", UriKind.Relative)
bi6.EndInit()
myImage6.Stretch = Stretch.Fill
myImage6.Source = bi6

'Add the images to the parent StackPanel.
myStackPanel.Children.Add(myImage4)
myStackPanel.Children.Add(myImage5)
myStackPanel.Children.Add(myImage6)

'Add the layout panels as children of the Grid
myGrid.Children.Add(myDockPanel)
myGrid.Children.Add(myStackPanel)
<Page xmlns="http://schemas.microsoft.com/winfx/2006/xaml/presentation"
      WindowTitle="StackPanel vs. DockPanel">
  <Grid Width="175" Height="150">
    <Grid.ColumnDefinitions>
      <ColumnDefinition />
    </Grid.ColumnDefinitions>
    <Grid.RowDefinitions>
      <RowDefinition />
      <RowDefinition />
    </Grid.RowDefinitions>

    <DockPanel Grid.Column="0" Grid.Row="0">
      <Image Source="smiley_stackpanel.png" />
      <Image Source="smiley_stackpanel.png" />
      <Image Source="smiley_stackpanel.png" Stretch="Fill"/>
    </DockPanel>

    <StackPanel Grid.Column="0" Grid.Row="1"  Orientation="Horizontal">
      <Image Source="smiley_stackpanel.png" />
      <Image Source="smiley_stackpanel.png" />
      <Image Source="smiley_stackpanel.png" Stretch="Fill"/>
    </StackPanel>
    </Grid>
</Page>
この画像では、レンダリング動作の違いを確認できます。
StackPanel の定義と使用
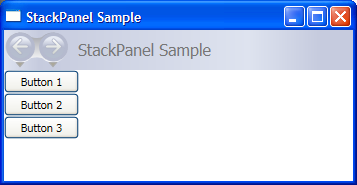
次の例では、StackPanel を使用して垂直方向に配置されたボタンのセットを作成する方法を示します。 水平方向の配置の場合は、Orientation プロパティを Horizontalに設定します。
// Create the application's main window
mainWindow = new Window ();
mainWindow.Title = "StackPanel Sample";

// Define the StackPanel
myStackPanel = new StackPanel();
myStackPanel.HorizontalAlignment = HorizontalAlignment.Left;
myStackPanel.VerticalAlignment = VerticalAlignment.Top;

// Define child content
Button myButton1 = new Button();
myButton1.Content = "Button 1";
Button myButton2 = new Button();
myButton2.Content = "Button 2";
Button myButton3 = new Button();
myButton3.Content = "Button 3";

// Add child elements to the parent StackPanel
myStackPanel.Children.Add(myButton1);
myStackPanel.Children.Add(myButton2);
myStackPanel.Children.Add(myButton3);

// Add the StackPanel as the Content of the Parent Window Object
mainWindow.Content = myStackPanel;
mainWindow.Show ();
WindowTitle = "StackPanel Sample"
' Define the StackPanel
Dim myStackPanel As New StackPanel()
myStackPanel.HorizontalAlignment = Windows.HorizontalAlignment.Left
myStackPanel.VerticalAlignment = Windows.VerticalAlignment.Top

' Define child content
Dim myButton1 As New Button()
myButton1.Content = "Button 1"
Dim myButton2 As New Button()
myButton2.Content = "Button 2"
Dim myButton3 As New Button()
myButton3.Content = "Button 3"

' Add child elements to the parent StackPanel
myStackPanel.Children.Add(myButton1)
myStackPanel.Children.Add(myButton2)
myStackPanel.Children.Add(myButton3)

Me.Content = myStackPanel
コンパイルされたアプリケーションは、次のような新しい UI を生成します。
VirtualizingStackPanel
WPF には、データ バインドされた子コンテンツを自動的に "仮想化" する StackPanel 要素のバリエーションも用意されています。 このコンテキストでは、仮想化という単語は、画面上に表示される項目に基づいて、より多くのデータ項目から要素のサブセットを生成する手法を指します。 メモリとプロセッサの両方に関しては、特定の時点で少数しか画面に表示できない場合に多数の UI 要素を生成することが集中的に行われます。 VirtualizingStackPanel (VirtualizingPanelによって提供される機能を通じて) は、表示される項目を計算し、ItemsControl (ListBox や ListViewなど) から ItemContainerGenerator を使用して、表示される項目の要素のみを作成します。
VirtualizingStackPanel 要素は、ListBoxなどのコントロールの項目ホストとして自動的に設定されます。 データ バインド コレクションをホストする場合、コンテンツが ScrollViewerの範囲内にある限り、コンテンツは自動的に仮想化されます。 これにより、多くの子項目をホストするときのパフォーマンスが大幅に向上します。
次のマークアップは、項目ホストとして VirtualizingStackPanel を使用する方法を示しています。 仮想化を実行するには、VirtualizingStackPanel.IsVirtualizingProperty 添付プロパティを true (既定値) に設定する必要があります。
<StackPanel DataContext="{Binding Source={StaticResource Leagues}}">
    <TextBlock Text="{Binding XPath=@name}" FontFamily="Arial" FontSize="18" Foreground="Black"/>
        <ListBox VirtualizingStackPanel.IsVirtualizing="True"
                 ItemsSource="{Binding XPath=Team}"
                 ItemTemplate="{DynamicResource NameDataStyle}"/>
</StackPanel>
WrapPanel
WrapPanel は、子要素を左から右に順番に配置し、親コンテナーの端に達したときにコンテンツを次の行に分割するために使用されます。 コンテンツは、水平方向または垂直方向に配置できます。 WrapPanel は、単純なフローユーザー インターフェイス (UI) シナリオに役立ちます。 また、すべての子要素に均一なサイズ設定を適用するために使用することもできます。
次の例では、コンテナーの端に達した時点でラップする Button コントロールを表示するための、WrapPanel の作成方法を示します。
// Create the application's main window
mainWindow = gcnew System::Windows::Window();
mainWindow->Title = "WrapPanel Sample";


// Instantiate a new WrapPanel and set properties
myWrapPanel = gcnew WrapPanel();
myWrapPanel->Background = Brushes::Azure;
myWrapPanel->Orientation = Orientation::Horizontal;
myWrapPanel->ItemHeight = 25;

myWrapPanel->ItemWidth = 75;
myWrapPanel->Width = 150;
myWrapPanel->HorizontalAlignment = HorizontalAlignment::Left;
myWrapPanel->VerticalAlignment = VerticalAlignment::Top;

// Define 3 button elements. Each button is sized at width of 75, so the third button wraps to the next line.
btn1 = gcnew Button();
btn1->Content = "Button 1";
btn2 = gcnew Button();
btn2->Content = "Button 2";
btn3 = gcnew Button();
btn3->Content = "Button 3";

// Add the buttons to the parent WrapPanel using the Children.Add method.
myWrapPanel->Children->Add(btn1);
myWrapPanel->Children->Add(btn2);
myWrapPanel->Children->Add(btn3);

// Add the WrapPanel to the MainWindow as Content
mainWindow->Content = myWrapPanel;
mainWindow->Show();
// Create the application's main window
mainWindow = new System.Windows.Window();
mainWindow.Title = "WrapPanel Sample";


// Instantiate a new WrapPanel and set properties
myWrapPanel = new WrapPanel();
myWrapPanel.Background = System.Windows.Media.Brushes.Azure;
myWrapPanel.Orientation = Orientation.Horizontal;
myWrapPanel.Width = 200;
myWrapPanel.HorizontalAlignment = HorizontalAlignment.Left;
myWrapPanel.VerticalAlignment = VerticalAlignment.Top;

// Define 3 button elements. The last three buttons are sized at width
// of 75, so the forth button wraps to the next line.
btn1 = new Button();
btn1.Content = "Button 1";
btn1.Width = 200;
btn2 = new Button();
btn2.Content = "Button 2";
btn2.Width = 75;
btn3 = new Button();
btn3.Content = "Button 3";
btn3.Width = 75;
btn4 = new Button();
btn4.Content = "Button 4";
btn4.Width = 75;

// Add the buttons to the parent WrapPanel using the Children.Add method.
myWrapPanel.Children.Add(btn1);
myWrapPanel.Children.Add(btn2);
myWrapPanel.Children.Add(btn3);
myWrapPanel.Children.Add(btn4);

// Add the WrapPanel to the MainWindow as Content
mainWindow.Content = myWrapPanel;
mainWindow.Show();
WindowTitle = "WrapPanel Sample"

' Instantiate a new WrapPanel and set properties
Dim myWrapPanel As New WrapPanel()
myWrapPanel.Background = Brushes.Azure
myWrapPanel.Orientation = Orientation.Horizontal

myWrapPanel.Width = 200
myWrapPanel.HorizontalAlignment = Windows.HorizontalAlignment.Left
myWrapPanel.VerticalAlignment = Windows.VerticalAlignment.Top

' Define 3 button elements. The last three buttons are sized at width
' of 75, so the forth button wraps to the next line.
Dim btn1 As New Button()
btn1.Content = "Button 1"
btn1.Width = 200
Dim btn2 As New Button()
btn2.Content = "Button 2"
btn2.Width = 75
Dim btn3 As New Button()
btn3.Content = "Button 3"
btn3.Width = 75
Dim btn4 As New Button()
btn4.Content = "Button 4"
btn4.Width = 75

' Add the buttons to the parent WrapPanel using the Children.Add method.
myWrapPanel.Children.Add(btn1)
myWrapPanel.Children.Add(btn2)
myWrapPanel.Children.Add(btn3)
myWrapPanel.Children.Add(btn4)

' Add the WrapPanel to the Page as Content
Me.Content = myWrapPanel
<Page xmlns="http://schemas.microsoft.com/winfx/2006/xaml/presentation" WindowTitle="WrapPanel Sample">
  <Border HorizontalAlignment="Left" VerticalAlignment="Top" BorderBrush="Black" BorderThickness="2">
        <WrapPanel Background="LightBlue" Width="200" Height="100">
            <Button Width="200">Button 1</Button>
            <Button>Button 2</Button>
            <Button>Button 3</Button>
            <Button>Button 4</Button>
        </WrapPanel>
  </Border>
</Page>
コンパイルされたアプリケーションは、次のような新しい UI を生成します。
一般的なWrapPanel要素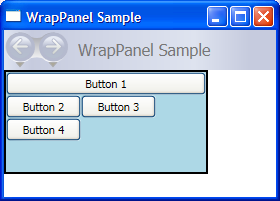
入れ子になったパネル要素
Panel 要素は、複雑なレイアウトを生成するために、相互に入れ子にすることができます。 これは、1 つの Panel が UI の一部に最適であるが、UI の別の部分のニーズを満たしていない場合に非常に役立ちます。
アプリケーションでサポートできる入れ子の量に実際的な制限はありませんが、通常は、目的のレイアウトに実際に必要なパネルのみを使用するようにアプリケーションを制限することをお勧めします。 多くの場合、レイアウト コンテナーとしての柔軟性により、入れ子になったパネルの代わりに Grid 要素を使用できます。 これにより、不要な要素をツリーから除外することで、アプリケーションのパフォーマンスを向上させることができます。
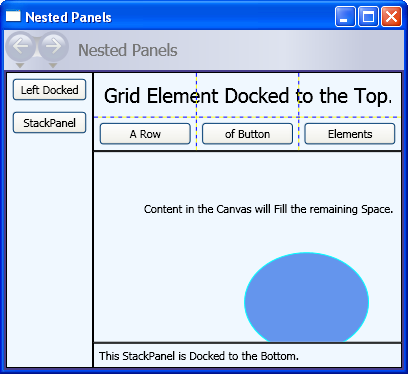
次の例では、入れ子になった Panel 要素を利用して特定のレイアウトを実現する UI を作成する方法を示します。 この特定のケースでは、DockPanel 要素を使用して UI 構造を提供し、入れ子になった StackPanel 要素、Grid、および Canvas を使用して、子要素を親 DockPanel内に正確に配置します。
// Define the DockPanel.
myDockPanel = new DockPanel();

// Add the Left Docked StackPanel
Border myBorder2 = new Border();
myBorder2.BorderThickness = new Thickness(1);
myBorder2.BorderBrush = Brushes.Black;
DockPanel.SetDock(myBorder2, Dock.Left);
StackPanel myStackPanel = new StackPanel();
Button myButton1 = new Button();
myButton1.Content = "Left Docked";
myButton1.Margin = new Thickness(5);
Button myButton2 = new Button();
myButton2.Content = "StackPanel";
myButton2.Margin = new Thickness(5);
myStackPanel.Children.Add(myButton1);
myStackPanel.Children.Add(myButton2);
myBorder2.Child = myStackPanel;

// Add the Top Docked Grid.
Border myBorder3 = new Border();
myBorder3.BorderThickness = new Thickness(1);
myBorder3.BorderBrush = Brushes.Black;
DockPanel.SetDock(myBorder3, Dock.Top);
Grid myGrid = new Grid();
myGrid.ShowGridLines = true;
RowDefinition myRowDef1 = new RowDefinition();
RowDefinition myRowDef2 = new RowDefinition();
ColumnDefinition myColDef1 = new ColumnDefinition();
ColumnDefinition myColDef2 = new ColumnDefinition();
ColumnDefinition myColDef3 = new ColumnDefinition();
myGrid.ColumnDefinitions.Add(myColDef1);
myGrid.ColumnDefinitions.Add(myColDef2);
myGrid.ColumnDefinitions.Add(myColDef3);
myGrid.RowDefinitions.Add(myRowDef1);
myGrid.RowDefinitions.Add(myRowDef2);
TextBlock myTextBlock1 = new TextBlock();
myTextBlock1.FontSize = 20;
myTextBlock1.Margin = new Thickness(10);
myTextBlock1.Text = "Grid Element Docked at the Top";
Grid.SetRow(myTextBlock1, 0);
Grid.SetColumnSpan(myTextBlock1, 3);
Button myButton3 = new Button();
myButton3.Margin = new Thickness(5);
myButton3.Content = "A Row";
Grid.SetColumn(myButton3, 0);
Grid.SetRow(myButton3, 1);
Button myButton4 = new Button();
myButton4.Margin = new Thickness(5);
myButton4.Content = "of Button";
Grid.SetColumn(myButton4, 1);
Grid.SetRow(myButton4, 1);
Button myButton5 = new Button();
myButton5.Margin = new Thickness(5);
myButton5.Content = "Elements";
Grid.SetColumn(myButton5, 2);
Grid.SetRow(myButton5, 1);
myGrid.Children.Add(myTextBlock1);
myGrid.Children.Add(myButton3);
myGrid.Children.Add(myButton4);
myGrid.Children.Add(myButton5);
myBorder3.Child = myGrid;

// Add the Bottom Docked StackPanel.
Border myBorder4 = new Border();
myBorder4.BorderBrush = Brushes.Black;
myBorder4.BorderThickness = new Thickness(1);
DockPanel.SetDock(myBorder4, Dock.Bottom);
StackPanel myStackPanel2 = new StackPanel();
myStackPanel2.Orientation = Orientation.Horizontal;
TextBlock myTextBlock2 = new TextBlock();
myTextBlock2.Text = "This StackPanel is Docked to the Bottom";
myTextBlock2.Margin = new Thickness(5);
myStackPanel2.Children.Add(myTextBlock2);
myBorder4.Child = myStackPanel2;

// Add the Canvas, that fills remaining space.
Border myBorder5 = new Border();
myBorder4.BorderBrush = Brushes.Black;
myBorder5.BorderThickness = new Thickness(1);
Canvas myCanvas = new Canvas();
myCanvas.ClipToBounds = true;
TextBlock myTextBlock3 = new TextBlock();
myTextBlock3.Text = "Content in the Canvas will Fill the remaining space.";
Canvas.SetTop(myTextBlock3, 50);
Canvas.SetLeft(myTextBlock3, 50);
Ellipse myEllipse = new Ellipse();
myEllipse.Height = 100;
myEllipse.Width = 125;
myEllipse.Fill = Brushes.CornflowerBlue;
myEllipse.Stroke = Brushes.Aqua;
Canvas.SetTop(myEllipse, 100);
Canvas.SetLeft(myEllipse, 150);
myCanvas.Children.Add(myTextBlock3);
myCanvas.Children.Add(myEllipse);
myBorder5.Child = myCanvas;

// Add child elements to the parent DockPanel.
myDockPanel.Children.Add(myBorder2);
myDockPanel.Children.Add(myBorder3);
myDockPanel.Children.Add(myBorder4);
myDockPanel.Children.Add(myBorder5);
Dim myDockPanel As New DockPanel()

Dim myBorder2 As New Border()
myBorder2.BorderThickness = New Thickness(1)
myBorder2.BorderBrush = Brushes.Black
DockPanel.SetDock(myBorder2, Dock.Left)
Dim myStackPanel As New StackPanel()
Dim myButton1 As New Button()
myButton1.Content = "Left Docked"
myButton1.Margin = New Thickness(5)
Dim myButton2 As New Button()
myButton2.Content = "StackPanel"
myButton2.Margin = New Thickness(5)
myStackPanel.Children.Add(myButton1)
myStackPanel.Children.Add(myButton2)
myBorder2.Child = myStackPanel

Dim myBorder3 As New Border()
myBorder3.BorderThickness = New Thickness(1)
myBorder3.BorderBrush = Brushes.Black
DockPanel.SetDock(myBorder3, Dock.Top)
Dim myGrid As New Grid()
myGrid.ShowGridLines = True
Dim myRowDef1 As New RowDefinition()
Dim myRowDef2 As New RowDefinition()
Dim myColDef1 As New ColumnDefinition()
Dim myColDef2 As New ColumnDefinition()
Dim myColDef3 As New ColumnDefinition()
myGrid.ColumnDefinitions.Add(myColDef1)
myGrid.ColumnDefinitions.Add(myColDef2)
myGrid.ColumnDefinitions.Add(myColDef3)
myGrid.RowDefinitions.Add(myRowDef1)
myGrid.RowDefinitions.Add(myRowDef2)
Dim myTextBlock1 As New TextBlock()
myTextBlock1.FontSize = 20
myTextBlock1.Margin = New Thickness(10)
myTextBlock1.Text = "Grid Element Docked at the Top"
Grid.SetRow(myTextBlock1, 0)
Grid.SetColumnSpan(myTextBlock1, 3)
Dim myButton3 As New Button()
myButton3.Margin = New Thickness(5)
myButton3.Content = "A Row"
Grid.SetColumn(myButton3, 0)
Grid.SetRow(myButton3, 1)
Dim myButton4 As New Button()
myButton4.Margin = New Thickness(5)
myButton4.Content = "of Button"
Grid.SetColumn(myButton4, 1)
Grid.SetRow(myButton4, 1)
Dim myButton5 As New Button()
myButton5.Margin = New Thickness(5)
myButton5.Content = "Elements"
Grid.SetColumn(myButton5, 2)
Grid.SetRow(myButton5, 1)
myGrid.Children.Add(myTextBlock1)
myGrid.Children.Add(myButton3)
myGrid.Children.Add(myButton4)
myGrid.Children.Add(myButton5)
myBorder3.Child = myGrid

Dim myBorder4 As New Border()
myBorder4.BorderBrush = Brushes.Black
myBorder4.BorderThickness = New Thickness(1)
DockPanel.SetDock(myBorder4, Dock.Bottom)
Dim myStackPanel2 As New StackPanel()
myStackPanel2.Orientation = Orientation.Horizontal
Dim myTextBlock2 As New TextBlock()
myTextBlock2.Text = "This StackPanel is Docked to the Bottom"
myTextBlock2.Margin = New Thickness(5)
myStackPanel2.Children.Add(myTextBlock2)
myBorder4.Child = myStackPanel2

Dim myBorder5 As New Border()
myBorder5.BorderBrush = Brushes.Black
myBorder5.BorderThickness = New Thickness(1)
Dim myCanvas As New Canvas()
myCanvas.ClipToBounds = True
Dim myTextBlock3 As New TextBlock()
myTextBlock3.Text = "Content in the Canvas will Fill the remaining space."
Canvas.SetTop(myTextBlock3, 50)
Canvas.SetLeft(myTextBlock3, 50)
Dim myEllipse As New Ellipse()
myEllipse.Height = 100
myEllipse.Width = 125
myEllipse.Fill = Brushes.CornflowerBlue
myEllipse.Stroke = Brushes.Aqua
Canvas.SetTop(myEllipse, 100)
Canvas.SetLeft(myEllipse, 150)
myCanvas.Children.Add(myTextBlock3)
myCanvas.Children.Add(myEllipse)
myBorder5.Child = myCanvas

myDockPanel.Children.Add(myBorder2)
myDockPanel.Children.Add(myBorder3)
myDockPanel.Children.Add(myBorder4)
myDockPanel.Children.Add(myBorder5)
コンパイルされたアプリケーションは、次のような新しい UI を生成します。
カスタム パネル要素
WPF は柔軟なレイアウト コントロールの配列を提供しますが、カスタム レイアウト動作は、ArrangeOverride メソッドと MeasureOverride メソッドをオーバーライドすることでも実現できます。 カスタムのサイズ設定と配置は、これらのオーバーライド メソッド内で新しい配置動作を定義することで実現できます。
同様に、派生クラス (Canvas や Gridなど) に基づくカスタム レイアウト動作は、ArrangeOverride メソッドと MeasureOverride メソッドをオーバーライドすることで定義できます。
次のマークアップは、カスタム Panel 要素を作成する方法を示しています。 この新しい Panelは、PlotPanelとして定義され、ハードコーディングされた x- と y- 座標を使用して子要素の配置をサポートします。 この例では、Rectangle 要素 (図示せず) はプロット ポイント 50 (x) と 50 (y) に配置されます。
public:
   ref class PlotPanel : Panel {

   public:
      PlotPanel () {};

   protected:
      // Override the default Measure method of Panel
      virtual Size MeasureOverride(Size availableSize) override
      {
          Size^ panelDesiredSize = gcnew Size();

          // In our example, we just have one child.
          // Report that our panel requires just the size of its only child.
          for each (UIElement^ child in InternalChildren)
          {
              child->Measure(availableSize);
              panelDesiredSize = child->DesiredSize;
          }
          return *panelDesiredSize ;
      }

   protected:
      virtual System::Windows::Size ArrangeOverride (Size finalSize) override
      {
         for each (UIElement^ child in InternalChildren)
         {
            double x = 50;
            double y = 50;
            child->Arrange(Rect(Point(x, y), child->DesiredSize));
         }
         return finalSize;
      };
   };
public class PlotPanel : Panel
{
    // Default public constructor
    public PlotPanel()
        : base()
    {
    }

    // Override the default Measure method of Panel
    protected override Size MeasureOverride(Size availableSize)
    {
        Size panelDesiredSize = new Size();

        // In our example, we just have one child.
        // Report that our panel requires just the size of its only child.
        foreach (UIElement child in InternalChildren)
        {
            child.Measure(availableSize);
            panelDesiredSize = child.DesiredSize;
        }

        return panelDesiredSize ;
    }
    protected override Size ArrangeOverride(Size finalSize)
    {
        foreach (UIElement child in InternalChildren)
        {
            double x = 50;
            double y = 50;

            child.Arrange(new Rect(new Point(x, y), child.DesiredSize));
        }
        return finalSize; // Returns the final Arranged size
    }
}
Public Class PlotPanel
    Inherits Panel
    'Override the default Measure method of Panel.

    Protected Overrides Function MeasureOverride(ByVal availableSize As System.Windows.Size) As System.Windows.Size
        Dim panelDesiredSize As Size = New Size()
        ' In our example, we just have one child.
        ' Report that our panel requires just the size of its only child.
        For Each child As UIElement In InternalChildren
            child.Measure(availableSize)
            panelDesiredSize = child.DesiredSize
        Next
        Return panelDesiredSize
    End Function
    Protected Overrides Function ArrangeOverride(ByVal finalSize As System.Windows.Size) As System.Windows.Size
        For Each child As UIElement In InternalChildren
            Dim x As Double = 50
            Dim y As Double = 50
            child.Arrange(New Rect(New System.Windows.Point(x, y), child.DesiredSize))
        Next
        Return finalSize
    End Function
End Class
より複雑なカスタム パネル実装を表示するには、「カスタム コンテンツ ラッピング パネルの作成 サンプル」を参照してください。
ローカリゼーション/グローバリゼーションのサポート
WPF では、ローカライズ可能な UI の作成に役立つさまざまな機能がサポートされています。
すべてのパネル要素は、FlowDirection プロパティをネイティブにサポートします。このプロパティを使用すると、ユーザーのロケールまたは言語設定に基づいてコンテンツを動的に再フローできます。 詳細については、FlowDirectionを参照してください。
SizeToContent プロパティは、アプリケーション開発者がローカライズされた UI のニーズを予測できるようにするメカニズムを提供します。 このプロパティの WidthAndHeight 値を使用すると、親 Window 常にコンテンツに合わせて動的にサイズ変更され、人為的な高さまたは幅の制限によって制限されません。
ローカライズ可能な UI には、DockPanel、Grid、StackPanel がすべて適しています。 ただし、Canvas はコンテンツを絶対に配置するため、ローカライズが困難になるため、適切な選択ではありません。
ローカライズ可能なユーザー インターフェイス (UI) を使用した WPF アプリケーションの作成の詳細については、「自動レイアウトの概要の使用」を参照してください。
関連項目
- 解説: 初めての WPF デスクトップ アプリケーション
- WPF レイアウト ギャラリーのサンプル
- レイアウト
- WPF コントロールギャラリーサンプル
- 配置、余白、パディングの概要
- カスタム コンテンツ ラッピング パネルのサンプル を作成する
- 添付プロパティの概要
- 自動レイアウトの使用の概要
- レイアウトとデザイン
.NET Desktop feedback
