チュートリアル:バックエンド サービス経由で Azure Notification Hubs を使用して .NET MAUI アプリにプッシュ通知を送信する
 サンプルを参照する
プッシュ通知は、バックエンド システムからクライアント アプリに情報を配信します。 Apple、Google、およびその他のプラットフォームにはそれぞれ独自のプッシュ通知サービス (PNS) が用意されています。 Azure Notification Hubs を使用すると、バックエンド アプリが単一のハブと通信できるように、プラットフォーム全体の通知を一元化することができます。このハブが各 PNS への通知の配信を処理します。
Azure Notification Hubs では、アプリがハブに登録し、必要に応じてテンプレートを定義したり、タグをサブスクライブしたりする必要があります。
- デバイスのインストールを実行すると、PNS ハンドルが Azure Notification Hub の識別子にリンクされます。 登録の詳細については、「登録管理」を参照してください。
- テンプレートを使用すると、デバイスで、パラメーター化されたメッセージ テンプレートを指定できます。 受信メッセージはデバイスごとにカスタマイズできます。 詳細については、「通知ハブのテンプレート」を参照してください。
- タグを使用して、ニュース、スポーツ、天気などのメッセージ カテゴリをサブスクライブできます。 詳細については、「ルーティングとタグ式」を参照してください。
このチュートリアルでは、Azure Notification Hubs を使用して、Android と iOS を対象とする NET Multi-Platform App UI (.NET MAUI) アプリにプッシュ通知を送信します。 ASP.NET Core Web API バックエンドは、クライアントのデバイス登録を処理し、プッシュ通知を開始するために使用されます。 これらの操作は、Microsoft.Azure.NotificationHubs NuGet パッケージを使用して処理されます。 全体的なアプローチの詳細については、「バックエンドからの登録管理」を参照してください。
このチュートリアルでは、次の作業を行いました。
- プッシュ通知サービスと Azure Notification Hubs を設定します。
- ASP.NET Core WebAPI バックエンド アプリを作成します。
- .NET MAUI アプリを作成します。
- プッシュ通知用に Android アプリを構成します。
- プッシュ通知用に iOS アプリを構成します。
- アプリをテストします。
- 設定と構成に関する問題をトラブルシューティングします。
前提条件
このチュートリアルを完了するには、次のものが必要です。
- アクティブなサブスクリプションがある Azure アカウント。
- .NET Multi-platform App UI 開発ワークロードと、ASP.NET および Web 開発ワークロードがインストールされている最新バージョンの Visual Studio/Visual Studio Code を実行している PC または Mac。
Android の場合は次のものが必要です。
- API 26 以降を実行していて Google Play 開発者サービスがインストールされている開発者用のロック解除済みの物理デバイスまたはエミュレーター。
iOS の場合は次のものが必要です。
- アクティブな Apple 開発者アカウント。
- Xcode を実行しており、有効な開発者証明書がキーチェーンにインストールされている Mac。
次に、iOS では次のいずれかが必要です。
Apple シリコンまたは T2 プロセッサを搭載した Mac コンピューター上の macOS 13 以降で実行される iOS 16 以降のシミュレーター。
OR
開発者アカウントに登録されている物理 iOS デバイス (iOS 13.0 以降を実行しているもの)。
Apple 開発者アカウントに登録され、証明書に関連付けられている物理デバイス。
重要
iOS シミュレーターは、Apple シリコンまたは T2 プロセッサを搭載した Mac コンピューターで macOS 13 以降で実行されている場合、iOS 16 以降でリモート通知をサポートします。 これらのハードウェア要件を満たしていない場合は、アクティブな Apple 開発者アカウントと物理デバイスが必要です。
このチュートリアルを実施するには、次の知識が必要です。
このチュートリアルは Visual Studio を対象としていますが、PC または Mac の Visual Studio Code を使用して実施することもできます。 ただし、相違点がいくつかあるため、調整する必要があります。 たとえば、ユーザー インターフェイスとワークフローの説明、テンプレート名、環境構成などです。
プッシュ通知サービスと Azure Notification Hubs の設定
このセクションでは、Firebase Cloud Messaging と Apple Push Notification Services (APNS) を設定します。 次に、これらのサービスと連携する Azure Notification Hub を作成し、構成します。
Firebase プロジェクトの作成
Firebase プロジェクトを作成するには、次の手順を実施してください。
Web ブラウザーで、Firebase コンソールにサインインします。
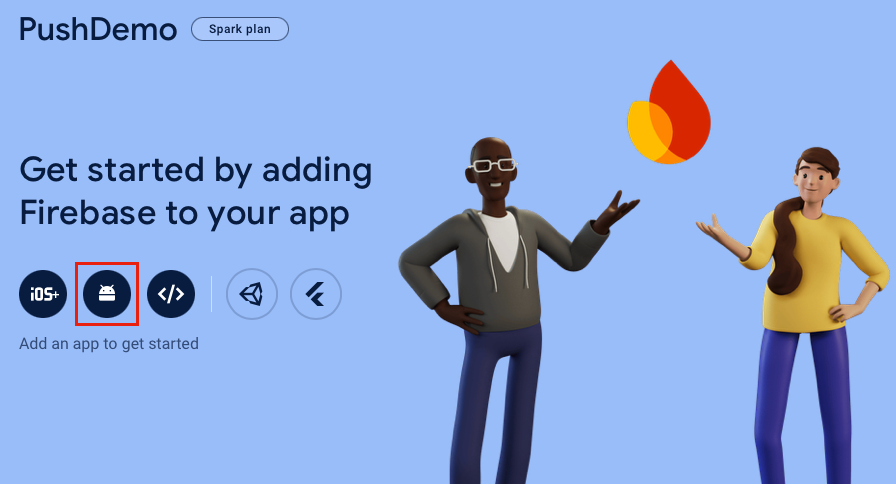
Firebase コンソールで、[プロジェクトの追加] ボタンを選択し、新しい Firebase プロジェクトを作成し、プロジェクト名として「PushDemo」と入力します。
Note
一意の名前が生成されます。 既定では、指定した名前を小文字にしたものと生成された数値がダッシュで区切られます。 編集内容がグローバルに一意である場合は、必要に応じて変更できます。
プロジェクトが作成されたら、Android ロゴを選択して、Firebase を Android アプリに追加します。
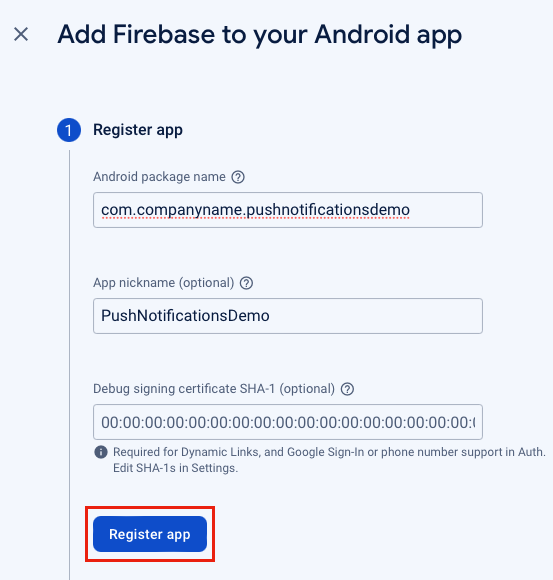
[Firebase を Android アプリに追加する] ページで、パッケージの名前 (必要に応じてアプリのニックネーム) を入力し、 [アプリの登録] ボタンを選択します。
[Firebase を Android アプリに追加する] ページで [google-services.json のダウンロード] ボタンを選択し、ファイルをローカル フォルダーに保存してから [次へ] ボタンを選択します。
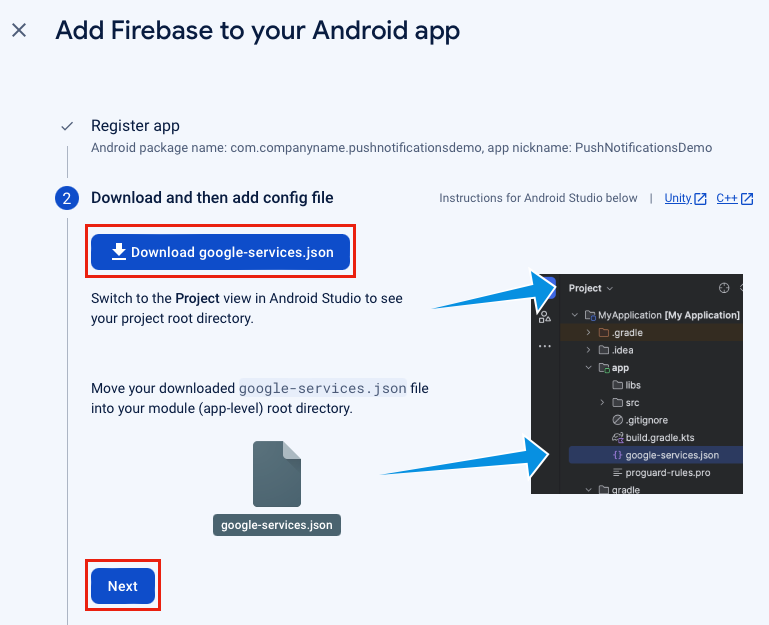
[Firebase を Android アプリに追加する] ページで、 [次へ] ボタンを選択します。
[Firebase を Android アプリに追加する] ページで、[コンソールに進む] ボタンを選択します。
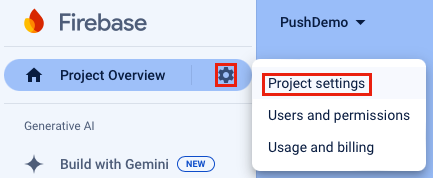
Firebase コンソールで、[プロジェクトの概要] アイコンを選択し、[プロジェクト設定] を選択します。
[プロジェクト設定] で、[Cloud Messaging] タブを選択します。Firebase Cloud Messaging API (V1) が有効になっていることが確認できます。

[プロジェクト設定] で、 [サービス アカウント] タブを選択し、[新しい秘密キーの生成] ボタンを選択します。
[新しい秘密キーの生成] ダイアログで、[キーの生成] ボタンを選択します。
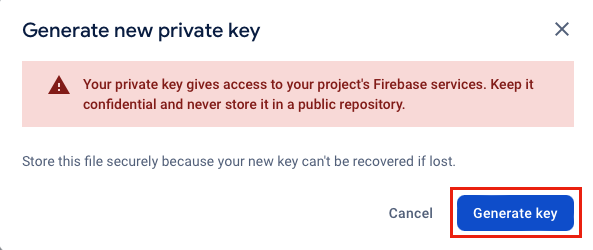
JSON ファイルがダウンロードされます。このファイルには、Azure Notification Hub に入力する値が含まれます。
iOS アプリをプッシュ通知に登録する
プッシュ通知を iOS アプリに送信するには、アプリを Apple に登録すると共に、プッシュ通知にも登録する必要があります。 これを実現するには、次の Azure Notification Hub ドキュメントの手順を実施します。
物理デバイスでプッシュ通知を受信する場合は、さらにプロビジョニング プロファイルを作成する必要があります。
重要
iOS でバックグラウンド通知を受信するには、リモート通知のバックグラウンド モードをアプリに追加する必要があります。 詳細については、developer.apple.com の「リモート通知機能を有効にする」を参照してください。
Azure Notification Hub の作成
Azure portal 内で通知ハブを作成するには、次の手順を実施してください。
- Web ブラウザーで、Azure portal にサインインします。
- Azure portal で、[リソースの作成] ボタンをクリックし、[通知ハブ] を検索して選択してから、[作成] ボタンを選択します。
- [通知ハブ] ページで、次の手順を実施します。
[サブスクリプション] フィールドで、使用する Azure サブスクリプションの名前を選択し、既存のリソース グループを選択するか、新しいリソース グループを作成します。
[名前空間の詳細] フィールドに、新しい名前空間の一意の名前を入力します。
[通知ハブの詳細] フィールドに、通知ハブの名前を入力します。 これは、名前空間に 1 つ以上の通知ハブが含まれているために必要です。
[場所] ドロップダウンで、通知ハブを作成する場所を指定する値を選択します。
Availability Zones オプションをレビューします。 可用性ゾーンを持つリージョンを選択した場合は、既定でチェック ボックスがオンになっています。
Note
可用性ゾーンは有料機能であるため、追加料金がレベルに追加されます。
[ディザスター リカバリー] オプション (なし、ペア リカバリ リージョン、またはフレキシブル リカバリ リージョン) を選択します。 Paired recovery region (ペアリングされた復旧リージョン) を選択すると、フェールオーバー リージョンが表示されます。 Flexible recovery region (柔軟な復旧リージョン) を選択した場合は、ドロップダウンを使用して復旧リージョンの一覧から選択します。
[作成] ボタンを選択します。 通知ハブが作成されます。
- Azure portal で、新しく作成した通知ハブを参照し、[管理] > [アクセス ポリシー] ブレードに移動します。
- [アクセス ポリシー] ブレードで、
DefaultFullSharedAccessSignatureポリシーの接続文字列をメモします。 これは、後で通知ハブと通信するバックエンド サービスを構築するときに必要になります。
通知ハブの作成の詳細については、「Azure portal で Azure Notification Hub を作成する」を参照してください。
通知ハブでの Firebase Cloud Messaging の構成
Firebase Cloud Messaging と通信するように通知ハブを構成するには、次の手順を実施してください。
Azure portal で通知ハブを参照し、[設定] > [Google (FCM v1)] ブレードを選択します。
[Google (FCM v1)] ブレードで、[秘密キー]、[クライアント メール]、[プロジェクト ID] フィールドの値を入力します。 これらの値は、Firebase Cloud Messaging からダウンロードした秘密キーの JSON ファイルにあります。
Azure フィールド JSON キー JSON 値の例 秘密キー private_keyこの値は -----BEGIN PRIVATE KEY-----\nで始まり、-----END PRIVATE KEY-----\nで終わる必要があります。クライアントのメールアドレス client_emailfirebase-adminsdk-55sfg@pushdemo-d6ab2.iam.gserviceaccount.comプロジェクト ID project_idpushdemo-d6ab2[Google (FCM v1)] ブレードで、[保存] ボタンを選択します。
通知ハブでの Apple Push Notification Service の構成
Azure portal で通知ハブを参照し、[設定] > [Apple (APNS)] ブレードを選択します。 次に、通知ハブの証明書を作成するときに選択したアプローチに基づいて、適切な手順に従います。
重要
[アプリケーション モード] を設定する場合、ストアからアプリを購入したユーザーにプッシュ通知を送信する場合のみ [Production] を選択してください。
オプション 1 - .p12 プッシュ証明書を使用する
- [Apple (APNS)] ブレードで、証明書の認証モードを選択します。
- [Apple (APNS)] ブレードで、[証明書のアップロード] フィールドの横にあるファイル アイコンを選択します。 次に、先ほどエクスポートした .p12 ファイルを選択し、アップロードします。
- [Apple (APNS)] ブレードで、必要に応じて証明書のパスワードを [パスワード] フィールドに入力します。
- [Apple (APNS)] ブレードで、サンドボックス アプリケーション モードを選択します。
- [Apple (APNS)] ブレードで、[保存] ボタンを選択します。
オプション 2 - トークンベースの認証を使用する
- [Apple (APNS)] ブレードで、トークンの認証モードを選択します。
- [Apple (APNS)] ブレードで、[キー ID]、[バンドル ID]、[チーム ID]、および [トークン] フィールドに対して先ほど取得した値を入力します。
- [Apple (APNS)] ブレードで、サンドボックス アプリケーション モードを選択します。
- [Apple (APNS)] ブレードで、[保存] ボタンを選択します。
ASP.NET Core Web API バックエンド アプリケーションの作成
このセクションでは、デバイスのインストールと .NET MAUI アプリへの通知送信を処理する ASP.NET Core Web API バックエンドを作成します。
Web API プロジェクトを作成する
Web API プロジェクトを作成するには、次の手順を実施してください。
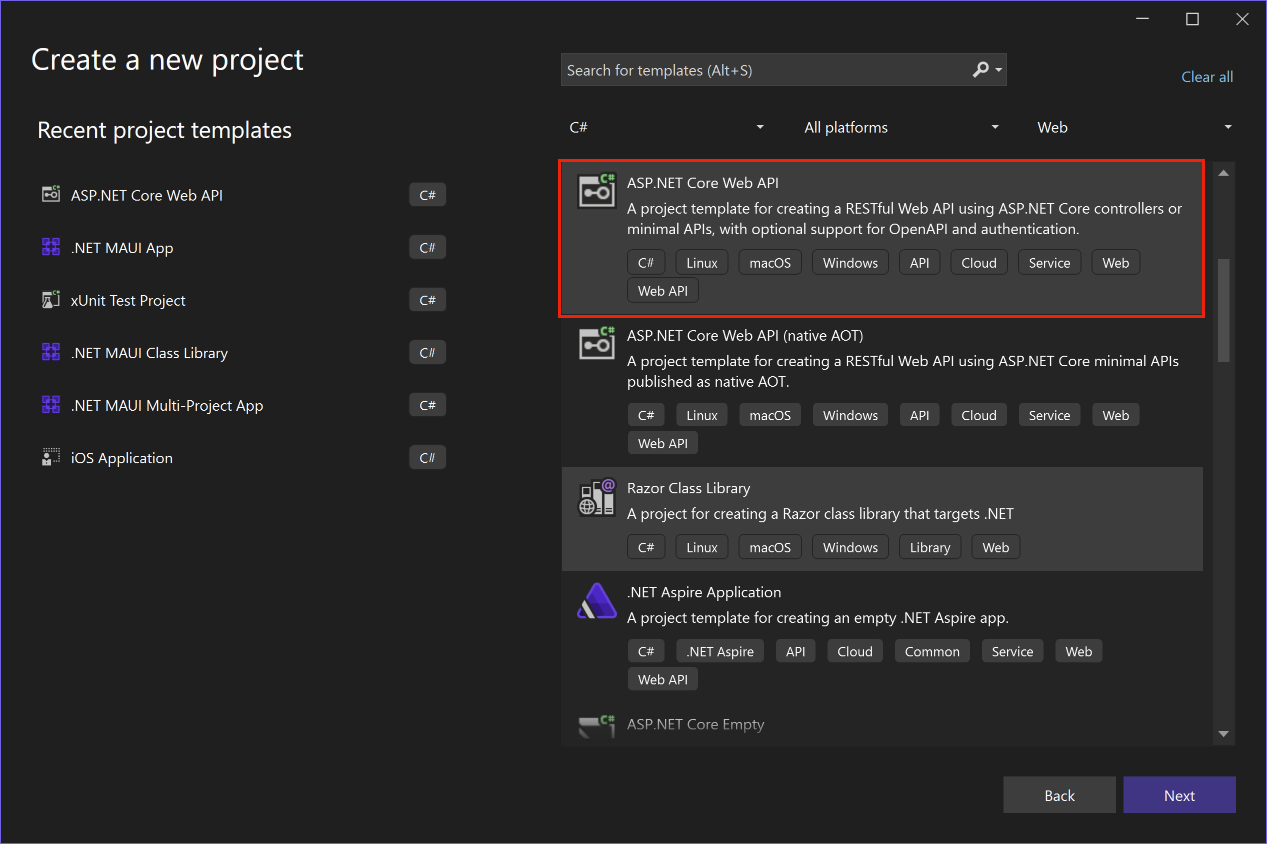
Visual Studio で、ASP.NET Core Web API プロジェクトを作成します。
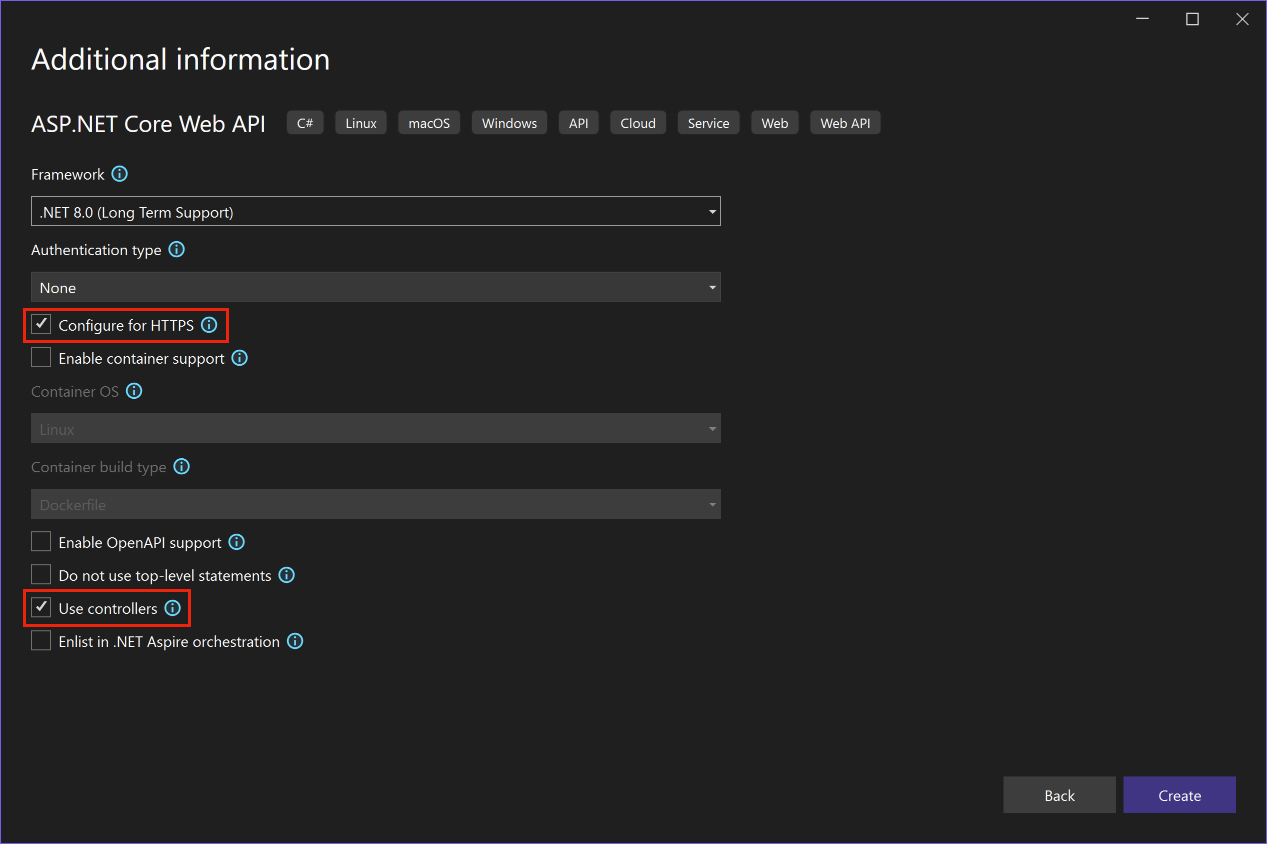
[新しいプロジェクトの構成] ダイアログで、プロジェクトに PushNotificationsAPI という名前を付けます。
[追加情報] ダイアログで、[HTTPS を構成する] および [コントローラーを使用する] チェックボックスがオンになっていることを確認します。
新しいプロジェクトが作成されたら、F5 キーを押してプロジェクトを実行します。
アプリは現在
WeatherForecastControllerをlaunchUrlとして使用するように構成されています。これは、Properties\launchSettings.json ファイルで設定されています。 アプリは Web ブラウザーで起動し、いくつかの JSON データを表示します。重要
HTTPS を使用する ASP.NET Core プロジェクトを実行すると、Visual Studio は、ASP.NET Core HTTPS 開発証明書がローカル ユーザー証明書ストアにインストールされているかどうかを検出し、もし証明書が存在しない場合はインストールして信頼するよう提案します。
Web ブラウザーを閉じます。
ソリューション エクスプローラーで、Controllers フォルダーを展開し、WeatherForecastController.cs を削除します。
ソリューション エクスプローラーで、プロジェクトのルートにある WeatherForecast.cs を削除します。
コマンド ウィンドウを開き、プロジェクト ファイルを含むディレクトリに移動します。 そして、次のコマンドを実行します。
dotnet user-secrets init
dotnet user-secrets set "NotificationHub:Name" <value>
dotnet user-secrets set "NotificationHub:ConnectionString" "<value>"
プレースホルダーの値は、実際の Azure Notification Hub の名前と接続文字列の値に置き換えてください。 これらの値は、Azure Notification Hub 内の次の場所にあります。
構成値。 場所 NotificationHub:Name[概要] ページの上部にある [要点] サマリーの [名前] を参照してください。 NotificationHub:ConnectinString[アクセス ポリシー] ページの DefaultFullSharedAccessSignature を参照してください。 これは、シークレット マネージャー ツールを使用して、ローカル構成値を設定します。 これにより、Azure Notification Hub シークレットが Visual Studio ソリューションから切り離され、最終的にソース管理に残らないようになります。
ヒント
運用環境のシナリオでは、Azure KeyVault などの接続文字列を安全に格納するサービスを検討してください。
API キーを使用したクライアントの認証
API キーを使用してクライアントを認証するには、次の手順を実施してください。
コマンド ウィンドウを開き、プロジェクト ファイルを含むディレクトリに移動します。 そして、次のコマンドを実行します。
dotnet user-secrets set "Authentication:ApiKey" <value>プレースホルダーの値を API キーに置き換えます。ここには、任意の値を指定できます。
Visual Studio で、プロジェクトに Authentication という名前の新しいフォルダーを追加し、
ApiKeyAuthOptionsという名前の新しいクラスを Authentication フォルダーに追加して、そのコードを次のコードに置き換えます。using Microsoft.AspNetCore.Authentication; namespace PushNotificationsAPI.Authentication; public class ApiKeyAuthOptions : AuthenticationSchemeOptions { public const string DefaultScheme = "ApiKey"; public string Scheme => DefaultScheme; public string ApiKey { get; set; } }Visual Studio で、
ApiKeyAuthHandlerという名前の新しいクラスを Authentication フォルダーに追加して、そのコードを次のコードに置き換えます。using Microsoft.AspNetCore.Authentication; using Microsoft.Extensions.Options; using System.Security.Claims; using System.Text.Encodings.Web; namespace PushNotificationsAPI.Authentication; public class ApiKeyAuthHandler : AuthenticationHandler<ApiKeyAuthOptions> { const string ApiKeyIdentifier = "apikey"; public ApiKeyAuthHandler( IOptionsMonitor<ApiKeyAuthOptions> options, ILoggerFactory logger, UrlEncoder encoder) : base(options, logger, encoder) { } protected override Task<AuthenticateResult> HandleAuthenticateAsync() { string key = string.Empty; if (Request.Headers[ApiKeyIdentifier].Any()) { key = Request.Headers[ApiKeyIdentifier].FirstOrDefault(); } else if (Request.Query.ContainsKey(ApiKeyIdentifier)) { if (Request.Query.TryGetValue(ApiKeyIdentifier, out var queryKey)) key = queryKey; } if (string.IsNullOrWhiteSpace(key)) return Task.FromResult(AuthenticateResult.Fail("No api key provided")); if (!string.Equals(key, Options.ApiKey, StringComparison.Ordinal)) return Task.FromResult(AuthenticateResult.Fail("Invalid api key.")); var identities = new List<ClaimsIdentity> { new ClaimsIdentity("ApiKeyIdentity") }; var ticket = new AuthenticationTicket(new ClaimsPrincipal(identities), Options.Scheme); return Task.FromResult(AuthenticateResult.Success(ticket)); } }認証ハンドラーは、スキームの動作 (この場合はカスタム API キー スキーム) を実装する型です。
Visual Studio で、
AuthenticationBuilderExtensionsという名前の新しいクラスを Authentication フォルダーに追加して、そのコードを次のコードに置き換えます。using Microsoft.AspNetCore.Authentication; namespace PushNotificationsAPI.Authentication; public static class AuthenticationBuilderExtensions { public static AuthenticationBuilder AddApiKeyAuth( this AuthenticationBuilder builder, Action<ApiKeyAuthOptions> configureOptions) { return builder .AddScheme<ApiKeyAuthOptions, ApiKeyAuthHandler>( ApiKeyAuthOptions.DefaultScheme, configureOptions); } }この拡張メソッドは、Program.cs のミドルウェア構成コードを簡略化するために使用されます。
Visual Studio で Program.cs を開き、
builder.Services.AddControllersメソッドの呼び出しの下で API キー認証を構成するようにコードを更新します。using PushNotificationsAPI.Authentication; builder.Services.AddControllers(); builder.Services.AddAuthentication(options => { options.DefaultAuthenticateScheme = ApiKeyAuthOptions.DefaultScheme; options.DefaultChallengeScheme = ApiKeyAuthOptions.DefaultScheme; }).AddApiKeyAuth(builder.Configuration.GetSection("Authentication").Bind);Program.cs で、
UseRouting、UseAuthentication、およびMapControllers拡張メソッドを呼び出すように// Configure the HTTP request pipelineコメントの下にあるコードを更新します。// Configure the HTTP request pipeline. app.UseHttpsRedirection(); app.UseRouting(); app.UseAuthentication(); app.UseAuthorization(); app.MapControllers(); app.Run();UseAuthentication拡張メソッドは、以前に登録された認証スキームを使用するミドルウェアを登録します。UseAuthenticationは、認証されているユーザーに依存するミドルウェアの前に呼び出す必要があります。Note
API キーはトークンほど安全ではありませんが、このチュートリアルでは十分であり、ASP.NET ミドルウェアで簡単に構成できます。
サービスの追加と構成
Web API バックエンド アプリでサービスを追加して構成するには、次の手順を実施してください。
Visual Studio で、Microsoft.Azure.NotificationHubs NuGet パッケージをプロジェクトに追加します。 この NuGet パッケージは、サービス内にカプセル化された通知ハブにアクセスするために使用されます。
Visual Studio で、プロジェクトに Models という名前の新しいフォルダーを追加し、
PushTemplatesという名前の新しいクラスを Models フォルダーに追加して、そのコードを次のコードに置き換えます。namespace PushNotificationsAPI.Models; public class PushTemplates { public class Generic { public const string Android = "{ \"message\" : { \"notification\" : { \"title\" : \"PushDemo\", \"body\" : \"$(alertMessage)\"}, \"data\" : { \"action\" : \"$(alertAction)\" } } }"; public const string iOS = "{ \"aps\" : {\"alert\" : \"$(alertMessage)\"}, \"action\" : \"$(alertAction)\" }"; } public class Silent { public const string Android = "{ \"message\" : { \"data\" : {\"message\" : \"$(alertMessage)\", \"action\" : \"$(alertAction)\"} } }"; public const string iOS = "{ \"aps\" : {\"content-available\" : 1, \"apns-priority\": 5, \"sound\" : \"\", \"badge\" : 0}, \"message\" : \"$(alertMessage)\", \"action\" : \"$(alertAction)\" }"; } }PushTemplatesクラスには、汎用プッシュ通知とサイレント プッシュ通知のためにトークン化された通知ペイロードが含まれています。 これらのペイロードはインストールの外部で定義されます。これにより、サービスを介して既存のインストールを更新しなくても実験を行うことができます。 この方法でのインストールに対する変更の処理については、この記事では扱いません。 運用環境のシナリオでは、カスタム テンプレートの使用を検討してください。Visual Studio で、
DeviceInstallationという名前の新しいクラスを Models フォルダーに追加して、そのコードを次のコードに置き換えます。using System.ComponentModel.DataAnnotations; namespace PushNotificationsAPI.Models; public class DeviceInstallation { [Required] public string InstallationId { get; set; } [Required] public string Platform { get; set; } [Required] public string PushChannel { get; set; } public IList<string> Tags { get; set; } = Array.Empty<string>(); }Visual Studio で、
NotificationRequestという名前の新しいクラスを Models フォルダーに追加して、そのコードを次のコードに置き換えます。namespace PushNotificationsAPI.Models; public class NotificationRequest { public string Text { get; set; } public string Action { get; set; } public string[] Tags { get; set; } = Array.Empty<string>(); public bool Silent { get; set; } }Visual Studio で、
NotificationHubOptionsという名前の新しいクラスを Models フォルダーに追加して、そのコードを次のコードに置き換えます。using System.ComponentModel.DataAnnotations; namespace PushNotificationsAPI.Models; public class NotificationHubOptions { [Required] public string Name { get; set; } [Required] public string ConnectionString { get; set; } }Visual Studio で、プロジェクトに Services という名前の新しいフォルダーを追加し、
INotificationServiceという名前の新しいインターフェイスを Services フォルダーに追加して、そのコードを次のコードに置き換えます。using PushNotificationsAPI.Models; namespace PushNotificationsAPI.Services; public interface INotificationService { Task<bool> CreateOrUpdateInstallationAsync(DeviceInstallation deviceInstallation, CancellationToken token); Task<bool> DeleteInstallationByIdAsync(string installationId, CancellationToken token); Task<bool> RequestNotificationAsync(NotificationRequest notificationRequest, CancellationToken token); }Visual Studio で、
NotificationHubServiceという名前の新しいクラスを Services フォルダーに追加して、そのコードを次のコードに置き換えます。using Microsoft.Extensions.Options; using Microsoft.Azure.NotificationHubs; using PushNotificationsAPI.Models; namespace PushNotificationsAPI.Services; public class NotificationHubService : INotificationService { readonly NotificationHubClient _hub; readonly Dictionary<string, NotificationPlatform> _installationPlatform; readonly ILogger<NotificationHubService> _logger; public NotificationHubService(IOptions<NotificationHubOptions> options, ILogger<NotificationHubService> logger) { _logger = logger; _hub = NotificationHubClient.CreateClientFromConnectionString(options.Value.ConnectionString, options.Value.Name); _installationPlatform = new Dictionary<string, NotificationPlatform> { { nameof(NotificationPlatform.Apns).ToLower(), NotificationPlatform.Apns }, { nameof(NotificationPlatform.FcmV1).ToLower(), NotificationPlatform.FcmV1 } }; } public async Task<bool> CreateOrUpdateInstallationAsync(DeviceInstallation deviceInstallation, CancellationToken token) { if (string.IsNullOrWhiteSpace(deviceInstallation?.InstallationId) || string.IsNullOrWhiteSpace(deviceInstallation?.Platform) || string.IsNullOrWhiteSpace(deviceInstallation?.PushChannel)) return false; var installation = new Installation() { InstallationId = deviceInstallation.InstallationId, PushChannel = deviceInstallation.PushChannel, Tags = deviceInstallation.Tags }; if (_installationPlatform.TryGetValue(deviceInstallation.Platform, out var platform)) installation.Platform = platform; else return false; try { await _hub.CreateOrUpdateInstallationAsync(installation, token); } catch { return false; } return true; } public async Task<bool> DeleteInstallationByIdAsync(string installationId, CancellationToken token) { if (string.IsNullOrWhiteSpace(installationId)) return false; try { await _hub.DeleteInstallationAsync(installationId, token); } catch { return false; } return true; } public async Task<bool> RequestNotificationAsync(NotificationRequest notificationRequest, CancellationToken token) { if ((notificationRequest.Silent && string.IsNullOrWhiteSpace(notificationRequest?.Action)) || (!notificationRequest.Silent && (string.IsNullOrWhiteSpace(notificationRequest?.Text)) || string.IsNullOrWhiteSpace(notificationRequest?.Action))) return false; var androidPushTemplate = notificationRequest.Silent ? PushTemplates.Silent.Android : PushTemplates.Generic.Android; var iOSPushTemplate = notificationRequest.Silent ? PushTemplates.Silent.iOS : PushTemplates.Generic.iOS; var androidPayload = PrepareNotificationPayload( androidPushTemplate, notificationRequest.Text, notificationRequest.Action); var iOSPayload = PrepareNotificationPayload( iOSPushTemplate, notificationRequest.Text, notificationRequest.Action); try { if (notificationRequest.Tags.Length == 0) { // This will broadcast to all users registered in the notification hub await SendPlatformNotificationsAsync(androidPayload, iOSPayload, token); } else if (notificationRequest.Tags.Length <= 20) { await SendPlatformNotificationsAsync(androidPayload, iOSPayload, notificationRequest.Tags, token); } else { var notificationTasks = notificationRequest.Tags .Select((value, index) => (value, index)) .GroupBy(g => g.index / 20, i => i.value) .Select(tags => SendPlatformNotificationsAsync(androidPayload, iOSPayload, tags, token)); await Task.WhenAll(notificationTasks); } return true; } catch (Exception e) { _logger.LogError(e, "Unexpected error sending notification"); return false; } } string PrepareNotificationPayload(string template, string text, string action) => template .Replace("$(alertMessage)", text, StringComparison.InvariantCulture) .Replace("$(alertAction)", action, StringComparison.InvariantCulture); Task SendPlatformNotificationsAsync(string androidPayload, string iOSPayload, CancellationToken token) { var sendTasks = new Task[] { _hub.SendFcmV1NativeNotificationAsync(androidPayload, token), _hub.SendAppleNativeNotificationAsync(iOSPayload, token) }; return Task.WhenAll(sendTasks); } Task SendPlatformNotificationsAsync(string androidPayload, string iOSPayload, IEnumerable<string> tags, CancellationToken token) { var sendTasks = new Task[] { _hub.SendFcmV1NativeNotificationAsync(androidPayload, tags, token), _hub.SendAppleNativeNotificationAsync(iOSPayload, tags, token) }; return Task.WhenAll(sendTasks); } }SendTemplateNotificationsAsyncメソッドに提供されるタグ式は、OR のみを含む場合、20 個のタグに制限されます。 それ以外の場合は、タグは 6 つまでです。 詳細については、「 ルーティングとタグ式」を参照してください。Visual Studio で、Program.cs を開き、
builder.Services.AddAuthenticationメソッドの呼び出しの下に、INotificationServiceのシングルトン実装としてNotificationHubServiceを追加するようにコードを更新します。using PushNotificationsAPI.Authentication; using PushNotificationsAPI.Services; using PushNotificationsAPI.Models; var builder = WebApplication.CreateBuilder(args); // Add services to the container. builder.Services.AddControllers(); builder.Services.AddAuthentication(options => { options.DefaultAuthenticateScheme = ApiKeyAuthOptions.DefaultScheme; options.DefaultChallengeScheme = ApiKeyAuthOptions.DefaultScheme; }).AddApiKeyAuth(builder.Configuration.GetSection("Authentication").Bind); builder.Services.AddSingleton<INotificationService, NotificationHubService>(); builder.Services.AddOptions<NotificationHubOptions>() .Configure(builder.Configuration.GetSection("NotificationHub").Bind) .ValidateDataAnnotations(); var app = builder.Build();
通知 REST API の作成
通知 REST API を作成するには、次の手順を実施してください。
Visual Studio で、
NotificationsControllerという名前の新しい コントローラーを Controllers フォルダーに追加します。ヒント
[読み取り/書き込みアクションがある API コントローラー] テンプレートを選択します
NotificationsController.cs ファイルの先頭に、次の
usingステートメントを追加します。using System.ComponentModel.DataAnnotations; using System.Net; using Microsoft.AspNetCore.Authorization; using Microsoft.AspNetCore.Mvc; using PushNotificationsAPI.Models; using PushNotificationsAPI.Services;NotificationsController.cs ファイルで、
Authorize属性をNotificationsControllerクラスに追加します。[Authorize] [ApiController] [Route("api/[controller]")] public class NotificationsController : ControllerBaseNotificationsController.cs ファイルで、
NotificationsContollerコンストラクターを更新して、INotificationServiceの登録済みインスタンスを引数として受け取り、それを読み取り専用メンバーに割り当てます。readonly INotificationService _notificationService; public NotificationsController(INotificationService notificationService) { _notificationService = notificationService; }NotificationsContoller.cs ファイルのすべてのメソッドを次のコードに置き換えます。
[HttpPut]
[Route("installations")]
[ProducesResponseType((int)HttpStatusCode.OK)]
[ProducesResponseType((int)HttpStatusCode.BadRequest)]
[ProducesResponseType((int)HttpStatusCode.UnprocessableEntity)]
public async Task<IActionResult> UpdateInstallation(
    [Required] DeviceInstallation deviceInstallation)
{
    var success = await _notificationService
        .CreateOrUpdateInstallationAsync(deviceInstallation, HttpContext.RequestAborted);

    if (!success)
        return new UnprocessableEntityResult();

    return new OkResult();
}

[HttpDelete()]
[Route("installations/{installationId}")]
[ProducesResponseType((int)HttpStatusCode.OK)]
[ProducesResponseType((int)HttpStatusCode.BadRequest)]
[ProducesResponseType((int)HttpStatusCode.UnprocessableEntity)]
public async Task<ActionResult> DeleteInstallation(
    [Required][FromRoute] string installationId)
{
    // Probably want to ensure deletion even if the connection is broken
    var success = await _notificationService
        .DeleteInstallationByIdAsync(installationId, CancellationToken.None);

    if (!success)
        return new UnprocessableEntityResult();

    return new OkResult();
}

[HttpPost]
[Route("requests")]
[ProducesResponseType((int)HttpStatusCode.OK)]
[ProducesResponseType((int)HttpStatusCode.BadRequest)]
[ProducesResponseType((int)HttpStatusCode.UnprocessableEntity)]
public async Task<IActionResult> RequestPush(
    [Required] NotificationRequest notificationRequest)
{
    if ((notificationRequest.Silent &&
        string.IsNullOrWhiteSpace(notificationRequest?.Action)) ||
        (!notificationRequest.Silent &&
        string.IsNullOrWhiteSpace(notificationRequest?.Text)))
        return new BadRequestResult();

    var success = await _notificationService
        .RequestNotificationAsync(notificationRequest, HttpContext.RequestAborted);

    if (!success)
        return new UnprocessableEntityResult();

    return new OkResult();
}
Properties/launchSettings.json ファイルで、各プロファイルの
launchUrlプロパティをweatherforecastからapi/notificationsに変更します。
API アプリの作成
次に、バックエンド サービスをホストするために、Azure App Service に API アプリ を作成します。 これは、Azure CLI、Azure PowerShell、Azure Developer CLI、および Azure portal を使用して、Visual Studio または Visual Studio Code から直接実行できます。 詳細については、「Web アプリを公開する」を参照してください。
Azure portal で API アプリを作成するには、次の手順を実施してください。
Web ブラウザーで、Azure portal にサインインします。
Azure portal で、[リソースの作成] ボタンをクリックし、[API アプリ] を検索して選択してから、[作成] ボタンを選択します。
[API アプリの作成] ページで、[作成] ボタンを選択する前に、次のフィールドを更新します。
フィールド アクション サブスクリプション 通知ハブを作成したのと同じターゲット サブスクリプションを選択します。 リソース グループ 通知ハブを作成したのと同じリソース グループを選択します。 Name グローバルに一意な名前を入力します。 ランタイム スタック 最新バージョンの .NET が選択されていることを確認します。 API アプリがプロビジョニングされたら、そのリソースに移動します。
[概要] ページで、既定のドメイン値をメモします。 この URL は、.NET MAUI アプリから使用されるバックエンド エンドポイントです。 URL には、指定した API アプリ名が
https://<app_name>.azurewebsites.netの形式で使用されます。Azure portal で、[設定] > [環境変数] ブレードを参照し、[アプリケーション設定] タブが選択されていることを確認します。 次に、[追加] ボタンを使用して、次の設定を追加します。
名前 値 Authentication:ApiKey <api_key_value> NotificationHub:Name <hub_name_value> NotificationHub:ConnectionString <hub_connection_string_value> 重要
わかりやすくするために、
Authentication:ApiKeyアプリケーション設定が追加されました。 運用環境のシナリオでは、Azure KeyVault などの接続文字列を安全に格納するサービスを検討してください。これらの設定をすべて入力したら、[適用] ボタンを選択し、[確認] ボタンを選択します。
バックエンド サービスの発行
バックエンド サービスを Azure App Service に公開するには、次の手順を実施してください。
- Visual Studio で、プロジェクトを右クリックし、[公開] を選択します。
- [公開] ウィザードで [Azure] を選択し、[次へ] ボタンを選択します。
- [公開] ウィザードで [Azure App Service (Windows)] を選択し、[次へ] ボタンを選択します。
- [公開] ウィザードで、認証フローに従って Visual Studio を Azure サブスクリプションに接続し、アプリを公開します。
Visual Studio によってアプリのビルド、パッケージ化、および Azure への発行が行われた後、既定のブラウザーでアプリが起動されます。 詳細については、「ASP.NET Web アプリを公開する」を参照してください。
ヒント
Azure portal で API アプリの [概要] ブレードからアプリの公開プロファイルをダウンロードし、Visual Studio でそのプロファイルを使用してアプリを公開できます。
公開された API の検証
API アプリが正しく公開されたことを確認するには、選択した REST ツールを使用して、次のアドレスに POST 要求を送信する必要があります。
https://<app_name>.azurewebsites.net/api/notifications/requests
Note
ベース アドレスは https://<app_name>.azurewebsites.net です。
キー apikey とその値を含むように要求ヘッダーを構成し、本文を raw に設定し、次のプレースホルダー JSON コンテンツを使用していることを確認します。
{}
サービスから 400 Bad Request 応答を受け取る必要があります。
Note
有効な要求データを使用して API をテストすることはできません。これは、.NET MAUI アプリからのプラットフォーム固有の情報が必要になるためです。
REST API の呼び出しの詳細については、「Visual Studio で .http ファイルを 使用する」、および「Http Repl を使用して Web API を テストする」を参照してください。 Visual Studio Code では、REST Client を使用して REST API をテストできます。
.NET MAUI アプリを作成する
このセクションでは、.NET Multi-platform App UI (.NET MAUI) アプリを構築します。このアプリでは、バックエンド サービスを介して通知ハブからプッシュ通知を受信するための登録および登録解除が可能です。
.NET MAUI アプリを作成するには、次の手順を実施してください。
Visual Studio で、.NET MAUI アプリ プロジェクト テンプレートを使用して、PushNotificationsDemo という名前の新しい .NET MAUI アプリを作成します。
Visual Studio で、.NET MAUI プロジェクトに Models という名前の新しいフォルダーを追加し、
DeviceInstallationという名前の新しいクラスを Models フォルダーに追加して、そのコードを次のコードに置き換えます。using System.Text.Json.Serialization; namespace PushNotificationsDemo.Models; public class DeviceInstallation { [JsonPropertyName("installationId")] public string InstallationId { get; set; } [JsonPropertyName("platform")] public string Platform { get; set; } [JsonPropertyName("pushChannel")] public string PushChannel { get; set; } [JsonPropertyName("tags")] public List<string> Tags { get; set; } = new List<string>(); }Visual Studio で、
PushDemoActionという名前の列挙型を Models フォルダーに追加して、そのコードを次のコードに置き換えます。namespace PushNotificationsDemo.Models; public enum PushDemoAction { ActionA, ActionB }Visual Studio で、.NET MAUI プロジェクトに Services という名前の新しいフォルダーを追加し、
IDeviceInstallationServiceという名前の新しいインターフェイスを Services フォルダーに追加して、そのコードを次のコードに置き換えます。using PushNotificationsDemo.Models; namespace PushNotificationsDemo.Services; public interface IDeviceInstallationService { string Token { get; set; } bool NotificationsSupported { get; } string GetDeviceId(); DeviceInstallation GetDeviceInstallation(params string[] tags); }このインターフェイスは、バックエンド サービスが必要とする
DeviceInstallation情報を提供するために、後で各プラットフォームに実装されます。Visual Studio で、
INotificationRegistrationServiceという名前のインターフェイスを Services フォルダーに追加して、そのコードを次のコードに置き換えます。namespace PushNotificationsDemo.Services; public interface INotificationRegistrationService { Task DeregisterDeviceAsync(); Task RegisterDeviceAsync(params string[] tags); Task RefreshRegistrationAsync(); }このインターフェイスは、クライアントとバックエンド サービス間の相互作用を処理します。
Visual Studio で、
INotificationActionServiceという名前のインターフェイスを Services フォルダーに追加して、そのコードを次のコードに置き換えます。namespace PushNotificationsDemo.Services; public interface INotificationActionService { void TriggerAction(string action); }このインターフェイスは、通知アクションの処理を一元化する簡単なメカニズムとして使用されます。
Visual Studio で、
IPushDemoNotificationActionServiceという名前のインターフェイスを Services フォルダーに追加して、そのコードを次のコードに置き換えます。using PushNotificationsDemo.Models; namespace PushNotificationsDemo.Services; public interface IPushDemoNotificationActionService : INotificationActionService { event EventHandler<PushDemoAction> ActionTriggered; }IPushDemoNotificationActionService型はこのアプリに固有であり、PushDemoAction列挙型を使用して、厳密に型指定されたアプローチを使用してトリガーされるアクションを識別します。Visual Studio で、
NotificationRegistrationServiceという名前のクラスを Services フォルダーに追加して、そのコードを次のコードに置き換えます。using System.Text; using System.Text.Json; using PushNotificationsDemo.Models; namespace PushNotificationsDemo.Services; public class NotificationRegistrationService : INotificationRegistrationService { const string RequestUrl = "api/notifications/installations"; const string CachedDeviceTokenKey = "cached_device_token"; const string CachedTagsKey = "cached_tags"; string _baseApiUrl; HttpClient _client; IDeviceInstallationService _deviceInstallationService; IDeviceInstallationService DeviceInstallationService => _deviceInstallationService ?? (_deviceInstallationService = Application.Current.MainPage.Handler.MauiContext.Services.GetService<IDeviceInstallationService>()); public NotificationRegistrationService(string baseApiUri, string apiKey) { _client = new HttpClient(); _client.DefaultRequestHeaders.Add("Accept", "application/json"); _client.DefaultRequestHeaders.Add("apikey", apiKey); _baseApiUrl = baseApiUri; } public async Task DeregisterDeviceAsync() { var cachedToken = await SecureStorage.GetAsync(CachedDeviceTokenKey) .ConfigureAwait(false); if (cachedToken == null) return; var deviceId = DeviceInstallationService?.GetDeviceId(); if (string.IsNullOrWhiteSpace(deviceId)) throw new Exception("Unable to resolve an ID for the device."); await SendAsync(HttpMethod.Delete, $"{RequestUrl}/{deviceId}") .ConfigureAwait(false); SecureStorage.Remove(CachedDeviceTokenKey); SecureStorage.Remove(CachedTagsKey); } public async Task RegisterDeviceAsync(params string[] tags) { var deviceInstallation = DeviceInstallationService?.GetDeviceInstallation(tags); await SendAsync<DeviceInstallation>(HttpMethod.Put, RequestUrl, deviceInstallation) .ConfigureAwait(false); await SecureStorage.SetAsync(CachedDeviceTokenKey, deviceInstallation.PushChannel) .ConfigureAwait(false); await SecureStorage.SetAsync(CachedTagsKey, JsonSerializer.Serialize(tags)); } public async Task RefreshRegistrationAsync() { var cachedToken = await SecureStorage.GetAsync(CachedDeviceTokenKey) .ConfigureAwait(false); var serializedTags = await SecureStorage.GetAsync(CachedTagsKey) .ConfigureAwait(false); if (string.IsNullOrWhiteSpace(cachedToken) || string.IsNullOrWhiteSpace(serializedTags) || string.IsNullOrWhiteSpace(_deviceInstallationService.Token) || cachedToken == DeviceInstallationService.Token) return; var tags = JsonSerializer.Deserialize<string[]>(serializedTags); await RegisterDeviceAsync(tags); } async Task SendAsync<T>(HttpMethod requestType, string requestUri, T obj) { string serializedContent = null; await Task.Run(() => serializedContent = JsonSerializer.Serialize(obj)) .ConfigureAwait(false); await SendAsync(requestType, requestUri, serializedContent); } async Task SendAsync(HttpMethod requestType, string requestUri, string jsonRequest = null) { var request = new HttpRequestMessage(requestType, new Uri($"{_baseApiUrl}{requestUri}")); if (jsonRequest != null) request.Content = new StringContent(jsonRequest, Encoding.UTF8, "application/json"); var response = await _client.SendAsync(request).ConfigureAwait(false); response.EnsureSuccessStatusCode(); } }Visual Studio で、
PushDemoNotificationActionServiceという名前のクラスを Services フォルダーに追加して、そのコードを次のコードに置き換えます。using PushNotificationsDemo.Models; namespace PushNotificationsDemo.Services; public class PushDemoNotificationActionService : IPushDemoNotificationActionService { readonly Dictionary<string, PushDemoAction> _actionMappings = new Dictionary<string, PushDemoAction> { { "action_a", PushDemoAction.ActionA }, { "action_b", PushDemoAction.ActionB } }; public event EventHandler<PushDemoAction> ActionTriggered = delegate { }; public void TriggerAction(string action) { if (!_actionMappings.TryGetValue(action, out var pushDemoAction)) return; List<Exception> exceptions = new List<Exception>(); foreach (var handler in ActionTriggered?.GetInvocationList()) { try { handler.DynamicInvoke(this, pushDemoAction); } catch (Exception ex) { exceptions.Add(ex); } } if (exceptions.Any()) throw new AggregateException(exceptions); } }Visual Studio で、
Configという名前のクラスをプロジェクトのルートに追加し、そのコードを次のコードに置き換えます。namespace PushNotificationsDemo; public static partial class Config { public static string ApiKey = "API_KEY"; public static string BackendServiceEndpoint = "BACKEND_SERVICE_ENDPOINT"; }Configクラスは、機密をソース管理の対象外にしておくための簡単な方法として利用されます。 これらの値は、自動化されたビルドの一部として置き換えることも、ローカルの部分クラスを使用してオーバーライドすることもできます。重要
.NET MAUI アプリでベース アドレスを指定する場合は、
/で終了するようにしてください。Visual Studio で、
Config.local_secretsという名前のクラスをプロジェクトのルートに追加します。 次に、Config.local_secrets.cs ファイル内のコードを次のコードに置き換えます。namespace PushNotificationsDemo; public static partial class Config { static Config() { ApiKey = "<your_api_key>"; BackendServiceEndpoint = "<your_api_app_url>"; } }プレースホルダーの値を、バックエンド サービスの作成時に選択した値に置き換えます。
BackendServiceEndpointURL は、https://<api_app_name>.azurewebsites.net/の形式を使用する必要があります。ヒント
このファイルがソース管理にコミットされないように、
.gitignoreファイルに必ず*.local_secrets.*を追加してください。
UI を作成する
アプリケーションの UI を作成するには、次の手順を実施してください。
Visual Studio で MainPage.xaml を開き、
VerticalStackLayoutとその子を次の XAML に置き換えます。<VerticalStackLayout Margin="20" Spacing="6"> <Button x:Name="registerButton" Text="Register" Clicked="OnRegisterButtonClicked" /> <Button x:Name="deregisterButton" Text="Deregister" Clicked="OnDeregisterButtonClicked" /> </VerticalStackLayout>Visual Studio で MainPage.xaml.cs を開き、
PushNotificationsDemo.Services名前空間のusingステートメントを追加します。using PushNotificationsDemo.Services;MainPage.xaml.cs で
readonlyバッキング フィールドを追加して、INotificationRegistrationService実装への参照を格納します。readonly INotificationRegistrationService _notificationRegistrationService;MainPageコンストラクターでINotificationRegistrationService実装を解決し、_notificationRegistrationServiceバッキング フィールドに割り当てます。public MainPage(INotificationRegistrationService service) { InitializeComponent(); _notificationRegistrationService = service; }MainPageクラスで、OnRegisterButtonClickedイベント ハンドラーとOnDeregisterButtonClickedイベント ハンドラーを実装し、INotificationRegistrationServiceオブジェクトの対応する register メソッドと deregister メソッドを呼び出します。void OnRegisterButtonClicked(object sender, EventArgs e) { _notificationRegistrationService.RegisterDeviceAsync() .ContinueWith((task) => { ShowAlert(task.IsFaulted ? task.Exception.Message : $"Device registered"); }); } void OnDeregisterButtonClicked(object sender, EventArgs e) { _notificationRegistrationService.DeregisterDeviceAsync() .ContinueWith((task) => { ShowAlert(task.IsFaulted ? task.Exception.Message : $"Device deregistered"); }); } void ShowAlert(string message) { MainThread.BeginInvokeOnMainThread(() => { DisplayAlert("Push notifications demo", message, "OK") .ContinueWith((task) => { if (task.IsFaulted) throw task.Exception; }); }); }重要
このアプリでは、登録と登録解除はユーザー入力に応じて実行され、この機能をより簡単に調査およびテストできるようになっています。 運用アプリでは、通常、明示的なユーザー入力を必要とせずに、アプリのライフサイクルの適切なタイミングで登録アクションと登録解除アクションを実行します。
Visual Studio で App.xaml.cs を開き、次の
usingステートメントを追加します。using PushNotificationsDemo.Models; using PushNotificationsDemo.Services;App.xaml.cs で
readonlyバッキング フィールドを追加して、IPushDemoNotificationActionService実装への参照を格納します。readonly IPushDemoNotificationActionService _actionService;AppコンストラクターでIPushDemoNotificationActionService実装を解決し、_actionServiceバッキング フィールドに割り当てて、IPushDemoNotificationActionService.ActionTriggeredイベントをサブスクライブします。public App(IPushDemoNotificationActionService service) { InitializeComponent(); _actionService = service; _actionService.ActionTriggered += NotificationActionTriggered; MainPage = new AppShell(); }Appクラスで、IPushDemoNotificationActionService.ActionTriggeredイベントのイベント ハンドラーを実装します。void NotificationActionTriggered(object sender, PushDemoAction e) { ShowActionAlert(e); } void ShowActionAlert(PushDemoAction action) { MainThread.BeginInvokeOnMainThread(() => { MainPage?.DisplayAlert("Push notifications demo", $"{action} action received.", "OK") .ContinueWith((task) => { if (task.IsFaulted) throw task.Exception; }); }); }ActionTriggeredイベントのイベント ハンドラーは、プッシュ通知アクションの受信と伝達を示します。 これらは通常、この例のようにアラートを表示するのではなく、暗黙のうちに処理されます。たとえば、特定のビューへの移動や、一部のデータの更新などです。
Android アプリの構成
プッシュ通知を受信して処理するように Android で .NET MAUI アプリを構成するには、次の手順を実施してください。
Visual Studio で、Xamarin.Firebase.Messaging NuGet パッケージを .NET MAUI アプリ プロジェクトに追加します。
Visual Studio で、.NET MAUI アプリ プロジェクトの Platforms/Android フォルダーに google-services.json ファイルを追加します。 ファイルがプロジェクトに追加されたら、
GoogleServicesJsonのビルド アクションで追加されているはずです。<ItemGroup Condition="'$(TargetFramework)' == 'net8.0-android'"> <GoogleServicesJson Include="Platforms\Android\google-services.json" /> </ItemGroup>ヒント
このファイルがソース管理にコミットされないように、
.gitignoreファイルに必ずgoogle-services.jsonを追加してください。Visual Studio でプロジェクト ファイル (*.csproj) を編集し、Android の
SupportedOSPlatformVersionを 26.0 に設定します。<SupportedOSPlatformVersion Condition="$([MSBuild]::GetTargetPlatformIdentifier('$(TargetFramework)')) == 'android'">26.0</SupportedOSPlatformVersion>Google は API 26 で Android 通知チャネルに変更ました。 詳しくは、developer.android.com の「通知チャネル」をご覧ください。
プロジェクトの Platforms/Android フォルダーに、
DeviceInstallationServiceという名前の新しいクラスを追加し、そのコードを次のコードに置き換えます。using Android.Gms.Common; using PushNotificationsDemo.Models; using PushNotificationsDemo.Services; using static Android.Provider.Settings; namespace PushNotificationsDemo.Platforms.Android; public class DeviceInstallationService : IDeviceInstallationService { public string Token { get; set; } public bool NotificationsSupported => GoogleApiAvailability.Instance.IsGooglePlayServicesAvailable(Platform.AppContext) == ConnectionResult.Success; public string GetDeviceId() => Secure.GetString(Platform.AppContext.ContentResolver, Secure.AndroidId); public DeviceInstallation GetDeviceInstallation(params string[] tags) { if (!NotificationsSupported) throw new Exception(GetPlayServicesError()); if (string.IsNullOrWhiteSpace(Token)) throw new Exception("Unable to resolve token for FCMv1."); var installation = new DeviceInstallation { InstallationId = GetDeviceId(), Platform = "fcmv1", PushChannel = Token }; installation.Tags.AddRange(tags); return installation; } string GetPlayServicesError() { int resultCode = GoogleApiAvailability.Instance.IsGooglePlayServicesAvailable(Platform.AppContext); if (resultCode != ConnectionResult.Success) return GoogleApiAvailability.Instance.IsUserResolvableError(resultCode) ? GoogleApiAvailability.Instance.GetErrorString(resultCode) : "This device isn't supported."; return "An error occurred preventing the use of push notifications."; } }このクラスでは、
Secure.AndroidId値を使用した一意の ID と通知ハブの登録ペイロードが提供されます。プロジェクトの Platforms/Android フォルダーに、
PushNotificationFirebaseMessagingServiceという名前の新しいクラスを追加し、そのコードを次のコードに置き換えます。using Android.App; using Firebase.Messaging; using PushNotificationsDemo.Services; namespace PushNotificationsDemo.Platforms.Android; [Service(Exported = false)] [IntentFilter(new[] { "com.google.firebase.MESSAGING_EVENT" })] public class PushNotificationFirebaseMessagingService : FirebaseMessagingService { IPushDemoNotificationActionService _notificationActionService; INotificationRegistrationService _notificationRegistrationService; IDeviceInstallationService _deviceInstallationService; int _messageId; IPushDemoNotificationActionService NotificationActionService => _notificationActionService ?? (_notificationActionService = IPlatformApplication.Current.Services.GetService<IPushDemoNotificationActionService>()); INotificationRegistrationService NotificationRegistrationService => _notificationRegistrationService ?? (_notificationRegistrationService = IPlatformApplication.Current.Services.GetService<INotificationRegistrationService>()); IDeviceInstallationService DeviceInstallationService => _deviceInstallationService ?? (_deviceInstallationService = IPlatformApplication.Current.Services.GetService<IDeviceInstallationService>()); public override void OnNewToken(string token) { DeviceInstallationService.Token = token; NotificationRegistrationService.RefreshRegistrationAsync() .ContinueWith((task) => { if (task.IsFaulted) throw task.Exception; }); } public override void OnMessageReceived(RemoteMessage message) { base.OnMessageReceived(message); if (message.Data.TryGetValue("action", out var messageAction)) NotificationActionService.TriggerAction(messageAction); } }このクラスは、
com.google.firebase.MESSAGING_EVENTフィルターを含むIntentFilter属性を持っています。 このフィルターを使用すると、Android は受信メッセージをこのクラスに渡して処理できるようになります。Firebase Cloud Messaging メッセージ形式の詳細については、developer.android.com の「FCM メッセージについて」を参照してください。
Visual Studio で Platforms/Android フォルダー内の MainActivity.cs ファイルを開き、次の
usingステートメントを追加します。using Android.App; using Android.Content; using Android.Content.PM; using Android.OS; using PushNotificationsDemo.Services; using Firebase.Messaging;MainActivityクラスでMainActivityを開いたときに再度作成されないように、LaunchModeをSingleTopに設定します。[Activity( Theme = "@style/Maui.SplashTheme", MainLauncher = true, LaunchMode = LaunchMode.SingleTop, ConfigurationChanges = ConfigChanges.ScreenSize | ConfigChanges.Orientation | ConfigChanges.UiMode | ConfigChanges.ScreenLayout | ConfigChanges.SmallestScreenSize | ConfigChanges.Density)]MainActivityクラスにIPushDemoNotificationActionServiceおよびIDeviceInstallationServiceの実装への参照を格納するためのバッキング フィールドを追加します。IPushDemoNotificationActionService _notificationActionService; IDeviceInstallationService _deviceInstallationService;MainActivityクラスで、アプリの依存性注入コンテナーから具体的な実装を取得するNotificationActionServiceおよびDeviceInstallationServiceのプライベート プロパティを追加します。IPushDemoNotificationActionService NotificationActionService => _notificationActionService ?? (_notificationActionService = IPlatformApplication.Current.Services.GetService<IPushDemoNotificationActionService>()); IDeviceInstallationService DeviceInstallationService => _deviceInstallationService ?? (_deviceInstallationService = IPlatformApplication.Current.Services.GetService<IDeviceInstallationService>());MainActivityクラスで、Firebase トークンを取得して格納するAndroid.Gms.Tasks.IOnSuccessListenerインターフェイスを実装します。public class MainActivity : MauiAppCompatActivity, Android.Gms.Tasks.IOnSuccessListener { public void OnSuccess(Java.Lang.Object result) { DeviceInstallationService.Token = result.ToString(); } }MainActivityクラスで、指定されたIntentにactionという追加の値があるかどうかをチェックし、条件付きでactionをIPushDemoNotificationActionService実装を使用してトリガーするProcessNotificationActionsメソッドを追加します。void ProcessNotificationsAction(Intent intent) { try { if (intent?.HasExtra("action") == true) { var action = intent.GetStringExtra("action"); if (!string.IsNullOrEmpty(action)) NotificationActionService.TriggerAction(action); } } catch (Exception ex) { System.Diagnostics.Debug.WriteLine(ex.Message); } }MainActivityクラスでOnNewIntentメソッドをオーバーライドして、ProcessNotificationActionsメソッドを呼び出します。protected override void OnNewIntent(Intent? intent) { base.OnNewIntent(intent); ProcessNotificationsAction(intent); }ActivityのLaunchModeがSingleTopに設定されているため、IntentはOnCreateメソッドではなくOnNewIntentオーバーライドを介して既存のActivityインスタンスに送信されます。 そのため、OnNewIntentとOnCreateの両方で受信するインテントを処理する必要があります。MainActivityクラスでOnCreateメソッドをオーバーライドしてProcessNotificationActionsメソッドを呼び出し、Firebase からトークンを取得し、IOnSuccessListenerとしてMainActivityを追加します。protected override void OnCreate(Bundle? savedInstanceState) { base.OnCreate(savedInstanceState); if (DeviceInstallationService.NotificationsSupported) FirebaseMessaging.Instance.GetToken().AddOnSuccessListener(this); ProcessNotificationsAction(Intent); }Note
プッシュ通知を受信し続けるには、アプリを実行して停止するたびにデバッグ セッションからアプリを再登録する必要があります。
Visual Studio で、Platforms/Android フォルダー内の AndroidManifest.xml ファイルに
POST_NOTIFICATIONSアクセス許可を追加します。<uses-permission android:name="android.permission.POST_NOTIFICATIONS" />このアクセス許可について詳しくは、developer.android.com の「通知に関する実行時の権限」をご覧ください。
Visual Studio で MainPage.xaml.cs を開き、次のコードを
MainPageクラスに追加します。#if ANDROID protected override async void OnAppearing() { base.OnAppearing(); PermissionStatus status = await Permissions.RequestAsync<Permissions.PostNotifications>(); } #endifこのコードは
MainPageが表示されたときに Android で実行され、POST_NOTIFICATIONSのアクセス許可をユーザーに付与するように要求します。 .NET MAUI のアクセス許可について詳しくは、「アクセス許可」をご覧ください。
iOS アプリの構成
iOS シミュレーターは、Apple シリコンまたは T2 プロセッサを搭載した Mac コンピューターで macOS 13 以降で実行されている場合、iOS 16 以降でリモート通知をサポートします。 各シミュレーターは、そのシミュレーターとそれが実行されている Mac ハードウェアの組み合わせに固有の登録トークンを生成します。
重要
シミュレーターは、Apple Push Notification Service のサンドボックス環境をサポートしています。
次の手順では、iOS シミュレーターでのリモート通知の受信をサポートするハードウェアを使用していることを前提としています。 そうでない場合は、物理デバイスで iOS アプリを実行する必要があり、プッシュ通知機能を含むアプリのプロビジョニング プロファイルを作成する必要があります。 その後、証明書とプロビジョニング プロファイルを使用してアプリがビルドされていることを確認する必要があります。 これを行う方法の詳細については、「Azure Notification Hubs で動作するように iOS アプリを設定する」を参照し、その後、次の手順に従ってください。
プッシュ通知を受信して処理するように iOS で .NET MAUI アプリを構成するには、次の手順を実施してください。
Visual Studio でプロジェクト ファイル (*.csproj) を編集し、iOS の
SupportedOSPlatformVersionを 13.0 に設定します。<SupportedOSPlatformVersion Condition="$([MSBuild]::GetTargetPlatformIdentifier('$(TargetFramework)')) == 'ios'">13.0</SupportedOSPlatformVersion>Apple は iOS 13 でプッシュ サービスを変更しました。 詳細については、「iOS 13 向け Azure Notification Hubs アップデート」を参照してください。
Visual Studio で、プロジェクトの Platforms/iOS フォルダーに Entitlements.plist ファイルを追加し、そのファイルに次の XML を追加します。
<?xml version="1.0" encoding="UTF-8"?>
<!DOCTYPE plist PUBLIC "-//Apple//DTD PLIST 1.0//EN" "http://www.apple.com/DTDs/PropertyList-1.0.dtd">
<plist version="1.0">
<dict>
  <key>aps-environment</key>
  <string>development</string>
</dict>
</plist>
これにより、APS 環境エンタイトルメントが設定され、開発用の Apple Push Notification サービス環境を使用するように指定されます。 運用アプリでは、このエンタイトルメント値を
productionに設定する必要があります。 このエンタイトルメントの詳細については、developer.apple.com の「APS 環境エンタイトルメント」を参照してください。エンタイトルメント ファイルの追加の詳細については、「iOS エンタイトルメント」を参照してください。
Visual Studio で、プロジェクトの Platforms/iOS フォルダーに
DeviceInstallationServiceという名前の新しいクラスを追加し、次のコードをファイルに追加します。using PushNotificationsDemo.Services; using PushNotificationsDemo.Models; using UIKit; namespace PushNotificationsDemo.Platforms.iOS; public class DeviceInstallationService : IDeviceInstallationService { const int SupportedVersionMajor = 13; const int SupportedVersionMinor = 0; public string Token { get; set; } public bool NotificationsSupported => UIDevice.CurrentDevice.CheckSystemVersion(SupportedVersionMajor, SupportedVersionMinor); public string GetDeviceId() => UIDevice.CurrentDevice.IdentifierForVendor.ToString(); public DeviceInstallation GetDeviceInstallation(params string[] tags) { if (!NotificationsSupported) throw new Exception(GetNotificationsSupportError()); if (string.IsNullOrWhiteSpace(Token)) throw new Exception("Unable to resolve token for APNS"); var installation = new DeviceInstallation { InstallationId = GetDeviceId(), Platform = "apns", PushChannel = Token }; installation.Tags.AddRange(tags); return installation; } string GetNotificationsSupportError() { if (!NotificationsSupported) return $"This app only supports notifications on iOS {SupportedVersionMajor}.{SupportedVersionMinor} and above. You are running {UIDevice.CurrentDevice.SystemVersion}."; if (Token == null) return $"This app can support notifications but you must enable this in your settings."; return "An error occurred preventing the use of push notifications"; } }このクラスでは、
UIDevice.IdentifierForVendor値を使用した一意の ID と通知ハブの登録ペイロードが提供されます。Visual Studio で、プロジェクトの Platforms/iOS フォルダーに
NSDataExtensionsという名前の新しいクラスを追加し、次のコードをファイルに追加します。using Foundation; using System.Text; namespace PushNotificationsDemo.Platforms.iOS; internal static class NSDataExtensions { internal static string ToHexString(this NSData data) { var bytes = data.ToArray(); if (bytes == null) return null; StringBuilder sb = new StringBuilder(bytes.Length * 2); foreach (byte b in bytes) sb.AppendFormat("{0:x2}", b); return sb.ToString().ToUpperInvariant(); } }ToHexString拡張メソッドは、取得したデバイス トークンを解析するために追加するコードによって使用されます。Visual Studio で Platforms/iOS フォルダー内の AppDelegate.cs ファイルを開き、次の
usingステートメントを追加します。using System.Diagnostics; using Foundation; using PushNotificationsDemo.Platforms.iOS; using PushNotificationsDemo.Services; using UIKit; using UserNotifications;AppDelegateクラスにIPushDemoNotificationActionService、INotificationRegistrationServiceおよびIDeviceInstallationService実装への参照を格納するためのバッキング フィールドを追加します。IPushDemoNotificationActionService _notificationActionService; INotificationRegistrationService _notificationRegistrationService; IDeviceInstallationService _deviceInstallationService;AppDelegateクラスで、アプリの依存性注入コンテナーから具体的な実装を取得するNotificationActionService、NotificationRegistrationServiceおよびDeviceInstallationServiceのプライベート プロパティを追加します。IPushDemoNotificationActionService NotificationActionService => _notificationActionService ?? (_notificationActionService = IPlatformApplication.Current.Services.GetService<IPushDemoNotificationActionService>()); INotificationRegistrationService NotificationRegistrationService => _notificationRegistrationService ?? (_notificationRegistrationService = IPlatformApplication.Current.Services.GetService<INotificationRegistrationService>()); IDeviceInstallationService DeviceInstallationService => _deviceInstallationService ?? (_deviceInstallationService = IPlatformApplication.Current.Services.GetService<IDeviceInstallationService>());AppDelegateクラスにCompleteRegistrationAsyncメソッドを追加して、IDeviceInstallationService.Tokenプロパティ値を設定します。Task CompleteRegistrationAsync(NSData deviceToken) { DeviceInstallationService.Token = deviceToken.ToHexString(); return NotificationRegistrationService.RefreshRegistrationAsync(); }また、このメソッドは登録を更新し、最後に保存されてから更新されている場合は、デバイス トークンをキャッシュします。
AppDelegateクラスにNSDictionary通知データを処理し、条件付きでNotificationActionService.TriggerActionを呼び出すためのProcessNotificationActionsメソッドを追加します。void ProcessNotificationActions(NSDictionary userInfo) { if (userInfo == null) return; try { // If your app isn't in the foreground, the notification goes to Notification Center. // If your app is in the foreground, the notification goes directly to your app and you // need to process the notification payload yourself. var actionValue = userInfo.ObjectForKey(new NSString("action")) as NSString; if (!string.IsNullOrWhiteSpace(actionValue?.Description)) NotificationActionService.TriggerAction(actionValue.Description); } catch (Exception ex) { Debug.WriteLine(ex.Message); } }AppDelegateクラスで、CompleteRegistrationAsyncメソッドにdeviceToken引数を渡すRegisteredForRemoteNotificationsメソッドを追加します。[Export("application:didRegisterForRemoteNotificationsWithDeviceToken:")] public void RegisteredForRemoteNotifications(UIApplication application, NSData deviceToken) { CompleteRegistrationAsync(deviceToken) .ContinueWith((task) => { if (task.IsFaulted) throw task.Exception; }); }このメソッドは、アプリがリモート通知を受信するために登録されたときに呼び出され、一意のデバイス トークン (実質的にはデバイス上のアプリのアドレス)を要求するために使用されます。
AppDelegateクラスで、ProcessNotificationActionsメソッドにuserInfo引数を渡すReceivedRemoteNotificationメソッドを追加します。[Export("application:didReceiveRemoteNotification:")] public void ReceivedRemoteNotification(UIApplication application, NSDictionary userInfo) { ProcessNotificationActions(userInfo); }このメソッドは、アプリがリモート通知を受信したときに呼び出され、通知の処理に使用されます。
AppDelegateクラスにエラーをログに記録するFailedToRegisterForRemoteNotificationsメソッドを追加します。[Export("application:didFailToRegisterForRemoteNotificationsWithError:")] public void FailedToRegisterForRemoteNotifications(UIApplication application, NSError error) { Debug.WriteLine(error.Description); }このメソッドは、アプリがリモート通知を受信するための登録に失敗したときに呼び出されます。 デバイスがネットワークに接続されていない場合、APNS サーバーに到達できない場合、またはアプリが正しく構成されていない場合、登録が失敗する可能性があります。
Note
運用環境のシナリオでは、
FailedToRegisterForRemoteNotificationsメソッドに適切なログ記録とエラー処理を実装する必要があります。AppDelegateクラスで、FinishedLaunchingメソッドを追加して、条件付きで通知を使用するためのアクセス許可を要求して、リモート通知の登録を行います。[Export("application:didFinishLaunchingWithOptions:")] public override bool FinishedLaunching(UIApplication application, NSDictionary launchOptions) { if (DeviceInstallationService.NotificationsSupported) { UNUserNotificationCenter.Current.RequestAuthorization( UNAuthorizationOptions.Alert | UNAuthorizationOptions.Badge | UNAuthorizationOptions.Sound, (approvalGranted, error) => { if (approvalGranted && error == null) { MainThread.BeginInvokeOnMainThread(() => { UIApplication.SharedApplication.RegisterForRemoteNotifications(); }); } }); } using (var userInfo = launchOptions?.ObjectForKey(UIApplication.LaunchOptionsRemoteNotificationKey) as NSDictionary) { ProcessNotificationActions(userInfo); } return base.FinishedLaunching(application, launchOptions); }通知を使用するためのアクセス許可を要求する方法については、developer.apple.com の「通知を使用するためのアクセス許可の要求」を参照してください。
iOS での通知の詳細については、developer.apple.com の「ユーザー通知」を参照してください。
アプリの依存性注入コンテナーへの型の登録
Visual Studio で MauiProgram.cs を開き、
PushNotificationsDemo.Services名前空間のusingステートメントを追加します。using PushNotificationsDemo.Services;MauiProgramクラスに、を各プラットフォームでDeviceInstallationServiceを登録し、クロスプラットフォームのPushDemoNotificationActionServiceとNotificationRegistrationServiceのサービスを登録し、MauiAppBuilderオブジェクトを返すRegisterServices拡張メソッドのコードを追加します。public static MauiAppBuilder RegisterServices(this MauiAppBuilder builder) { #if IOS builder.Services.AddSingleton<IDeviceInstallationService, PushNotificationsDemo.Platforms.iOS.DeviceInstallationService>(); #elif ANDROID builder.Services.AddSingleton<IDeviceInstallationService, PushNotificationsDemo.Platforms.Android.DeviceInstallationService>(); #endif builder.Services.AddSingleton<IPushDemoNotificationActionService, PushDemoNotificationActionService>(); builder.Services.AddSingleton<INotificationRegistrationService>(new NotificationRegistrationService(Config.BackendServiceEndpoint, Config.ApiKey)); return builder; }MauiProgramクラスに、MainPage型をシングルトンとして登録し、MauiAppBuilderオブジェクトを返すRegisterViews拡張メソッドのコードを追加します。public static MauiAppBuilder RegisterViews(this MauiAppBuilder builder) { builder.Services.AddSingleton<MainPage>(); return builder; }MainPage型はINotificationRegistrationService依存関係が必要であるため登録されています。また、依存関係を必要とする型はすべて依存性注入コンテナーに登録する必要があります。MauiProgramクラスでRegisterServicesおよびRegisterViews拡張メソッドを呼び出すように、CreateMauiAppメソッドを変更します。public static MauiApp CreateMauiApp() { var builder = MauiApp.CreateBuilder(); builder .UseMauiApp<App>() .ConfigureFonts(fonts => { fonts.AddFont("OpenSans-Regular.ttf", "OpenSansRegular"); fonts.AddFont("OpenSans-Semibold.ttf", "OpenSansSemibold"); }) .RegisterServices() .RegisterViews(); #if DEBUG builder.Logging.AddDebug(); #endif return builder.Build(); }
.NET MAUI での依存関係の挿入について詳しくは、「依存関係の挿入」をご覧ください。
アプリをテストする
バックエンド サービスを使用してアプリにプッシュ通知を送信するか、Azure portal を介してアプリをテストできます。
iOS シミュレーターは、Apple シリコンまたは T2 プロセッサを搭載した Mac コンピューターで macOS 13 以降で実行されている場合、iOS 16 以降でリモート通知をサポートします。 これらのハードウェア要件を満たしていない場合は、物理デバイスで iOS アプリをテストする必要があります。 Android では、開発者用にロックを解除した物理デバイスまたはエミュレーターでアプリをテストできます。
Android と iOS は、アプリがバックグラウンドで実行されているときに、アプリに代わってにプッシュ通知を表示します。 通知の受信時にアプリがフォアグラウンドで実行されている場合、アプリのコードによって動作が決まります。 たとえば、通知に含まれる新しい情報を反映するようにアプリのインターフェイスを更新できます。
バックエンド サービスを使用したテスト
Azure App Service に公開されたバックエンド サービスを介してアプリにテスト プッシュ通知を送信するには、次の手順を実施します。
Visual Studio で、Android または iOS の PushNotificationsDemo アプリを実行し、[登録] ボタンを選択します。
Note
Android でテストしている場合は、デバッグ構成を使用して実行していないことを確認します。 または、アプリが以前にデプロイされていた場合は、アプリが強制終了されていることを確認し、その後、ランチャーから再度起動します。
選択した REST ツールで、次のアドレスに
POST要求を送信します。https://<app_name>.azurewebsites.net/api/notifications/requestsキー
apikeyとその値を含むように要求ヘッダーを構成し、本文を raw に設定し、次の JSON コンテンツを使用していることを確認します。{ "text": "Message from REST tooling!", "action": "action_a" }全体的な要求は、次の例のようになります。
POST /api/notifications/requests HTTP/1.1
Host: https://<app_name>.azurewebsites.net
apikey: <your_api_key>
Content-Type: application/json

{
    "text": "Message from REST tooling!",
    "action": "action_a"
}
選択した REST ツールで、200 OK 応答を受信したことを検証します。
Android または iOS のアプリで、ActionA アクションを受信したことを示すアラートが表示されるはずです。
REST API の呼び出しの詳細については、「Visual Studio で .http ファイルを 使用する」、および「Http Repl を使用して Web API を テストする」を参照してください。 Visual Studio Code では、REST Client を使用して REST API をテストできます。
Azure portal を使用したテスト
Azure Notification Hubs を使用すると、アプリがプッシュ通知を受信できることを確認できます。
Azure portal を介してアプリにテスト プッシュ通知を送信するには、次の手順を実施してください。
Visual Studio で、Android または iOS の PushNotificationsDemo アプリを実行し、[登録] ボタンを選択します。
Note
Android でテストしている場合は、デバッグ構成を使用して実行していないことを確認します。 または、アプリが以前にデプロイされていた場合は、アプリが強制終了されていることを確認し、その後、ランチャーから再度起動します。
Azure portal で通知ハブを参照し、[概要] ブレードの [テスト送信] ボタンを選択します。
[テスト送信] ブレードで、必要なプラットフォームを選択し ペイロードを変更します。
Apple の場合は、次のペイロードを使用します。
{
  "aps": {
    "alert": "Message from Notification Hub!"
  },
  "action": "action_a"
}
Android の場合は、次のペイロードを使用します。
{
  "message": {
    "notification": {
      "title": "PushDemo",
      "body": "Message from Notification Hub!"
    },
    "data": {
      "action": "action_a"
    }
  }
}
Azure portal は、通知が正常に送信されたことを示すはずです。
Firebase Cloud Messaging メッセージ形式の詳細については、developer.android.com の「FCM メッセージについて」を参照してください。
Android または iOS のアプリで、ActionA アクションを受信したことを示すアラートが表示されるはずです。
トラブルシューティング
次のセクションでは、クライアント アプリでプッシュ通知を使用しようとしたときに発生する一般的な問題について説明します。
バックエンド サービスからの応答がない
ローカルでテストしている場合は、バックエンド サービスが実行されており、正しいポートを使用していることを確認します。
Azure API アプリに対してテストしている場合は、サービスが実行中であること、デプロイ済みであること、エラーなく起動されていることを確認してください。
REST ツールまたは .NET MAUI アプリ構成でベース アドレスが正しく指定されていることを確認してください。 ローカルでテストする場合は、ベース アドレスは https://<api_name>.azurewebsites.net または https://localhost:7020 である必要があります。
バックエンド サービスから 401 状態コードを受信する
apikey 要求ヘッダーが正しく設定されていること、そしてこの値がバックエンド サービス用に構成したものと一致することを確認します。
ローカルでのテスト時にこのエラーが発生した場合は、.NET MAUI アプリで定義したキー値が、バックエンド サービスで使用されている Authentication:ApiKey ユーザーシークレットの値と一致していることを確認します。
Azure API アプリを使用してテストしている場合は、.NET MAUI アプリで定義されているキー値が、Azure portal で定義されている Authentication:ApiKey アプリ設定値と一致していることを確認します。 バックエンド サービスをデプロイした後にこの設定を作成または変更した場合は、その値が反映されるようにサービスを再起動する必要があります。
バックエンド サービスから 404 状態コードを受信する
エンドポイントと HTTP 要求メソッドが正しいことを確認します。
- PUT -
https://<api_name>.azurewebsites.net/api/notifications/installations - DELETE -
https://<api_name>.azurewebsites.net/api/notifications/installations/<installation_id> - POST -
https://<api_name>.azurewebsites.net/api/notifications/requests
また、ローカルでテストする場合は次のようになります。
- PUT -
https://localhost:7020/api/notifications/installations - DELETE -
https://localhost:7020/api/notifications/installations/<installation_id> - POST -
https://localhost:7020/api/notifications/requests
重要
.NET MAUI アプリでベース アドレスを指定する場合は、/ で終了するようにしてください。 ローカルでテストする場合は、ベース アドレスは https://<api_name>.azurewebsites.net または https://localhost:7020/ である必要があります。
デバッグ セッションの開始または停止後、Android で通知を受信できない
デバッグ セッションを開始するたびに登録してください。 デバッガーによって新しい Firebase トークンが生成されるため、通知ハブのインストールを更新する必要があります。
登録できず、通知ハブのエラー メッセージが表示される
テスト デバイスがネットワーク接続を備えていることを確認します。 次に、HttpResponse で StatusCode プロパティを検査するようにブレークポイントを設定して、HTTP 応答の状態コードを確認します。
状態コードに基づいて、該当する場合は前のトラブルシューティングの推奨事項を確認します。
各 API の特定の状態コードを返す行にブレークポイントを設定します。 次に、ローカルでデバッグするときにバックエンド サービスを呼び出します。
選択した REST ツールによってバックエンド サービスが期待どおりに動作していることを検証し、選択したプラットフォームに対して .NET MAUI アプリで作成したペイロードを使用します。
プラットフォーム固有の構成セクションを確認して、実行されなかったステップがないことを確認します。 適切な値が、選択したプラットフォームの InstallationId および Token 変数に対して解決されていることを確認します。
デバイスの ID を解決できませんというデバイス エラー メッセージ
プラットフォーム固有の構成セクションを確認して、実行されなかったステップがないことを確認します。
.NET MAUI