カスタム レイアウト
 サンプルを参照する
.NET マルチプラットフォーム アプリ UI (.NET MAUI) では、それぞれが異なる方法で子を配置する複数のレイアウト クラスが定義されています。 レイアウトは、レイアウト内でこれらのビューを配置する方法を定義するルールとプロパティを持つビューのリストと考えることができます。 レイアウトの例としては、Grid、AbsoluteLayout、VerticalStackLayout などがあります。
.NET MAUI レイアウト クラスは抽象 Layout クラスから派生します。 このクラスは、クロスプラットフォーム レイアウトと測定をレイアウト マネージャー クラスに委任します。 この Layout クラスには、レイアウト マネージャーを指定するために派生レイアウトで使用できるオーバーライド可能な CreateLayoutManager() メソッドも含まれています。
各レイアウト マネージャー クラスは ILayoutManager インターフェイスを実装します。このインターフェイスは、Measure と ArrangeChildren 実装を指定する必要があることを示します。
- Measure 実装は、レイアウト内の各ビューに対して IView.Measure を呼び出し、制約を受けたレイアウトの合計サイズを返します。
- ArrangeChildren 実装では、各ビューをレイアウトの境界内に配置する場所を決定し、適切な境界を持つ各ビューに対して Arrange を呼び出します。 戻り値は、レイアウトの実際のサイズです。
.NET MAUI のレイアウトには、レイアウトを処理するための定義済みのレイアウト マネージャーがあります。 ただし、.NET MAUI で提供されていないレイアウトを使用してページ コンテンツを整理することが必要な場合があります。 これを実現するには、独自のカスタム レイアウトを作成します。そのためには、.NET MAUI のクロスプラットフォーム レイアウト プロセスのしくみを理解する必要があります。
レイアウト プロセス
.NET MAUI のクロスプラットフォーム レイアウト プロセスは、各プラットフォームのネイティブ レイアウト プロセスに基づいています。 一般に、レイアウト プロセスはネイティブ レイアウト システムによって開始されます。 クロスプラットフォーム プロセスは、ネイティブ レイアウト システムによって測定または配置された結果として、レイアウトまたはコンテンツ コントロールによって開始されたときに実行されます。
Note
各プラットフォームは、レイアウトを若干異なる方法で処理します。 ただし、.NET MAUI のクロスプラットフォーム レイアウト プロセスは、可能な限りプラットフォームに依存しないようにすることを目的としています。
次の図は、ネイティブ レイアウト システムがレイアウト測定を開始するプロセスを示しています:
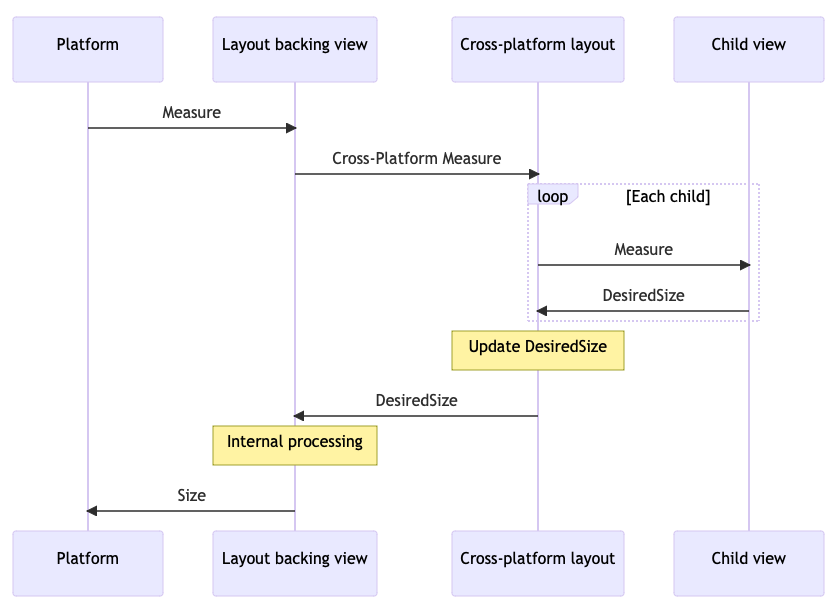
すべての .NET MAUI レイアウトには、各プラットフォームで 1 つのバッキング ビューがあります:
- Android では、このバッキング ビューは
LayoutViewGroupです。 - iOS および Mac Catalyst では、このバッキング ビューは
LayoutViewです。 - Windows では、このバッキング ビューは
LayoutPanelです。
プラットフォームのネイティブ レイアウト システムがこれらのバッキング ビューの 1 つの測定を要求すると、そのバッキング ビューは Layout.CrossPlatformMeasure メソッドを呼び出します。 これは、コントロールがネイティブ レイアウト システムから .NET MAUI のレイアウト システムに渡されるポイントです。 Layout.CrossPlatformMeasure はレイアウト マネージャーの Measure メソッドを呼び出します。 このメソッドは、レイアウト内の各ビューに対して IView.Measure を呼び出すことによって子ビューを測定します。 ビューはネイティブ コントロールを測定し、その DesiredSize プロパティをその測定に基づいて更新します。 この値は、CrossPlatformMeasure メソッドの結果としてバッキング ビューに返されます。 バッキング ビューは、必要な内部処理を実行し、測定されたサイズをプラットフォームに返します。
次の図は、ネイティブ レイアウト システムがレイアウト配置を開始するプロセスを示しています:
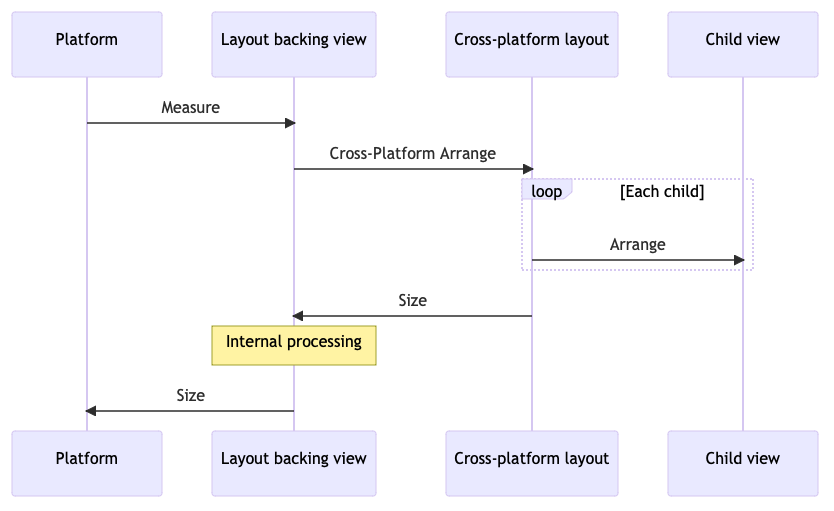
プラットフォームのネイティブ レイアウト システムが、これらのバッキング ビューのうちの 1 つの配置またはレイアウトを要求すると、そのバッキング ビューは Layout.CrossPlatformArrange メソッドを呼び出します。 これは、コントロールがネイティブ レイアウト システムから .NET MAUI のレイアウト システムに渡されるポイントです。 Layout.CrossPlatformArrange はレイアウト マネージャーの ArrangeChildren メソッドを呼び出します。 このメソッドは、各ビューをレイアウトの境界内に配置する場所を決定し、各ビューに対して Arrange を呼び出して場所を設定します。 レイアウトのサイズが、CrossPlatformArrange メソッドの結果としてバッキング ビューに返されます。 バッキング ビューは、必要な内部処理を実行し、実際のサイズをプラットフォームに返します。
Note
ILayoutManager.Measure は、 ArrangeChildren が呼び出される前に複数回呼び出される場合があります。これは、プラットフォームがビューを配置する前にいくつかの投機的な測定を実行する必要があるためです。
カスタム レイアウトのアプローチ
カスタム レイアウトを作成するには、次の 2 つのメイン方法があります:
- カスタム レイアウト型を作成します。これは通常、既存のレイアウト型または Layout のサブクラスであり、カスタム レイアウト型で CreateLayoutManager() をオーバーライドします。 次に、カスタム レイアウト ロジックを含む ILayoutManager 実装を行います。 詳細については、「カスタム レイアウト型の作成」を参照してください。
- ILayoutManagerFactory を実装する型を作成して、既存のレイアウト型の動作を変更します。 次に、このレイアウト マネージャー ファクトリを使用して、既存のレイアウトに対する .NET MAUI の既定のレイアウト マネージャーを、カスタム レイアウト ロジックを含む独自の ILayoutManager 実装に置き換えます。 詳細については、「既存のレイアウトの動作を変更する」を参照してください。
カスタム レイアウト型の作成
カスタム レイアウト型を作成するプロセスは次のとおりです:
既存のレイアウト型または Layout クラスをサブクラス化するクラスを作成し、カスタム レイアウト型で CreateLayoutManager() をオーバーライドします。 詳細については、「レイアウトのサブクラス化」を参照してください。
既存のレイアウト マネージャーから派生した、または ILayoutManager インターフェイスを直接実装するレイアウト マネージャー クラスを作成します。 レイアウト マネージャー クラスでは、次の手順を実行する必要があります:
- 制約を受けてレイアウトの合計サイズを計算する Measure メソッドをオーバーライドまたは実装します。
- レイアウト内のすべての子をサイズ変更して配置する ArrangeChildren メソッドをオーバーライドまたは実装します。
詳細については、「レイアウト マネージャーの作成」を参照してください。
カスタム レイアウトの種類を使用するには、カスタム レイアウトの種類を Page に追加し、レイアウトに子を追加します。 詳細については、「レイアウト型の使用」を参照してください。
このプロセスのデモンストレーションには、向きに依存する HorizontalWrapLayout が使用されます。 HorizontalWrapLayout は、子をページ全体に水平方向に配置するという点で HorizontalStackLayout に似ています。 ただし、コンテナーの右端に達すると、子の表示が新しい行にラップされます
Note
このサンプルでは、カスタム レイアウトを生成する方法を理解するために使用できる追加のカスタム レイアウトを定義します。
レイアウトのサブクラス化
カスタム レイアウト型を作成するには、まず既存のレイアウト型または Layout クラスをサブクラス化する必要があります。 次に、レイアウト型で CreateLayoutManager() をオーバーライドし、レイアウト型のレイアウト マネージャーの新しいインスタンスを返します:
using Microsoft.Maui.Layouts;

public class HorizontalWrapLayout : HorizontalStackLayout
{
    protected override ILayoutManager CreateLayoutManager()
    {
        return new HorizontalWrapLayoutManager(this);
    }
}
HorizontalWrapLayout は、そのレイアウト機能を使用するために HorizontalStackLayout から派生します。 .NET MAUI は、クロスプラットフォーム レイアウトと測定をレイアウト マネージャー クラスに委任します。 したがって、CreateLayoutManager() オーバーライドは HorizontalWrapLayoutManager クラスの新しいインスタンスを返します。これは、次のセクションで説明するレイアウト マネージャーです。
レイアウト マネージャーの作成
レイアウト マネージャー クラスは、カスタム レイアウト型に対してクロスプラットフォーム レイアウトと測定を実行するために使用されます。 既存のレイアウト マネージャーから派生するか、ILayoutManager インターフェイスを直接実装する必要があります。 HorizontalWrapLayoutManager は、基になる機能を使用し、継承階層内のメンバーにアクセスできるように、HorizontalStackLayoutManager から派生します:
using Microsoft.Maui.Layouts;
using HorizontalStackLayoutManager = Microsoft.Maui.Layouts.HorizontalStackLayoutManager;

public class HorizontalWrapLayoutManager : HorizontalStackLayoutManager
{
    HorizontalWrapLayout _layout;

    public HorizontalWrapLayoutManager(HorizontalWrapLayout horizontalWrapLayout) : base(horizontalWrapLayout)
    {
        _layout = horizontalWrapLayout;
    }

    public override Size Measure(double widthConstraint, double heightConstraint)
    {
    }

    public override Size ArrangeChildren(Rect bounds)
    {
    }
}
HorizontalWrapLayoutManager コンストラクターは、レイアウト マネージャー全体でアクセスできるように、HorizontalWrapLayout 型のインスタンスをフィールドに格納します。 レイアウト マネージャーは、HorizontalStackLayoutManager クラスの Measure メソッドと ArrangeChildren メソッドもオーバーライドします。 これらのメソッドでは、カスタム レイアウトを実装するロジックを定義します。
レイアウト サイズの測定
ILayoutManager.Measure 実装の目的は、レイアウトの合計サイズを計算することです。 これは、レイアウト内の各子に対して IView.Measure を呼び出すことによって行う必要があります。 その後、このデータを使用して、制約がある場合にレイアウトの合計サイズを計算して返す必要があります。
次の例は、HorizontalWrapLayoutManager クラスの Measure 実装を示しています:
public override Size Measure(double widthConstraint, double heightConstraint)
{
    var padding = _layout.Padding;

    widthConstraint -= padding.HorizontalThickness;

    double currentRowWidth = 0;
    double currentRowHeight = 0;
    double totalWidth = 0;
    double totalHeight = 0;

    for (int n = 0; n < _layout.Count; n++)
    {
        var child = _layout[n];
        if (child.Visibility == Visibility.Collapsed)
        {
            continue;
        }

        var measure = child.Measure(double.PositiveInfinity, heightConstraint);

        // Will adding this IView put us past the edge?
        if (currentRowWidth + measure.Width > widthConstraint)
        {
            // Keep track of the width so far
            totalWidth = Math.Max(totalWidth, currentRowWidth);
            totalHeight += currentRowHeight;

            // Account for spacing
            totalHeight += _layout.Spacing;

            // Start over at 0
            currentRowWidth = 0;
            currentRowHeight = measure.Height;
        }
        currentRowWidth += measure.Width;
        currentRowHeight = Math.Max(currentRowHeight, measure.Height);

        if (n < _layout.Count - 1)
        {
            currentRowWidth += _layout.Spacing;
        }
    }

    // Account for the last row
    totalWidth = Math.Max(totalWidth, currentRowWidth);
    totalHeight += currentRowHeight;

    // Account for padding
    totalWidth += padding.HorizontalThickness;
    totalHeight += padding.VerticalThickness;

    // Ensure that the total size of the layout fits within its constraints
    var finalWidth = ResolveConstraints(widthConstraint, Stack.Width, totalWidth, Stack.MinimumWidth, Stack.MaximumWidth);
    var finalHeight = ResolveConstraints(heightConstraint, Stack.Height, totalHeight, Stack.MinimumHeight, Stack.MaximumHeight);

    return new Size(finalWidth, finalHeight);
}
Measure メソッドは、レイアウトに表示されているすべての子を列挙し、各子に対して IView.Measure メソッドを呼び出します。 次に、Padding と Spacing プロパティの制約と値を考慮して、レイアウトの合計サイズを返します。 この ResolveConstraints メソッドは、レイアウトの合計サイズがその制約内に収まるようにするために呼び出されます。
重要
ILayoutManager.Measure 実装で子を列挙する場合は、Visibility プロパティが Collapsed に設定されている子をスキップします。 これにより、非表示の子の領域がカスタム レイアウトに残らないようにします。
レイアウトで子を配置する
ArrangeChildren 実装の目的は、レイアウト内のすべての子をサイズ設定して配置することです。 各子をレイアウトの境界内のどこに配置するかを決定するには、適切な境界を持つ各子に対して Arrange を呼び出す必要があります。 その後、レイアウトの実際のサイズを表す値を返す必要があります。
警告
レイアウト内の各子に対して ArrangeChildren メソッドを呼び出さないと、子が正しいサイズや位置を受け取らないため、子はページに表示されなくなります。
次の例は、HorizontalWrapLayoutManager クラスの ArrangeChildren 実装を示しています:
public override Size ArrangeChildren(Rect bounds)
{
    var padding = Stack.Padding;
    double top = padding.Top + bounds.Top;
    double left = padding.Left + bounds.Left;

    double currentRowTop = top;
    double currentX = left;
    double currentRowHeight = 0;

    double maxStackWidth = currentX;

    for (int n = 0; n < _layout.Count; n++)
    {
        var child = _layout[n];
        if (child.Visibility == Visibility.Collapsed)
        {
            continue;
        }

        if (currentX + child.DesiredSize.Width > bounds.Right)
        {
            // Keep track of our maximum width so far
            maxStackWidth = Math.Max(maxStackWidth, currentX);

            // Move down to the next row
            currentX = left;
            currentRowTop += currentRowHeight + _layout.Spacing;
            currentRowHeight = 0;
        }

        var destination = new Rect(currentX, currentRowTop, child.DesiredSize.Width, child.DesiredSize.Height);
        child.Arrange(destination);

        currentX += destination.Width + _layout.Spacing;
        currentRowHeight = Math.Max(currentRowHeight, destination.Height);
    }

    var actual = new Size(maxStackWidth, currentRowTop + currentRowHeight);

    // Adjust the size if the layout is set to fill its container
    return actual.AdjustForFill(bounds, Stack);
}
ArrangeChildren メソッドは、レイアウト内で表示されているすべての子を列挙して、サイズを変更し、レイアウト内に配置します。 これは、基になるレイアウトの Padding と Spacing を考慮して、適切な境界を持つ各子に対して Arrange を呼び出すことによって行われます。 そうするとレイアウトの実際のサイズが返されます。 AdjustForFill メソッドが呼び出され、レイアウトの HorizontalLayoutAlignment プロパティと VerticalLayoutAlignment プロパティが LayoutOptions.Fill に設定されているかどうかが、サイズによって考慮されます。
重要
ArrangeChildren 実装で子を列挙する場合は、Visibility プロパティが Collapsed に設定されている子をスキップします。 これにより、非表示の子の領域がカスタム レイアウトに残らないようにします。
レイアウト型の使用
HorizontalWrapLayout クラスは、Page 派生型に配置することで使用できます:
<ContentPage xmlns="http://schemas.microsoft.com/dotnet/2021/maui"
             xmlns:x="http://schemas.microsoft.com/winfx/2009/xaml"
             xmlns:layouts="clr-namespace:CustomLayoutDemos.Layouts"
             x:Class="CustomLayoutDemos.Views.HorizontalWrapLayoutPage"
             Title="Horizontal wrap layout">
    <ScrollView Margin="20">
        <layouts:HorizontalWrapLayout Spacing="20">
            <Image Source="img_0074.jpg"
                   WidthRequest="150" />
            <Image Source="img_0078.jpg"
                   WidthRequest="150" />
            <Image Source="img_0308.jpg"
                   WidthRequest="150" />
            <Image Source="img_0437.jpg"
                   WidthRequest="150" />
            <Image Source="img_0475.jpg"
                   WidthRequest="150" />
            <Image Source="img_0613.jpg"
                   WidthRequest="150" />
            <!-- More images go here -->
        </layouts:HorizontalWrapLayout>
    </ScrollView>
</ContentPage>
必要に応じてコントロールを HorizontalWrapLayout に追加できます。 この例では、HorizontalWrapLayout を含むページが表示されると、Image コントロールが表示されます:
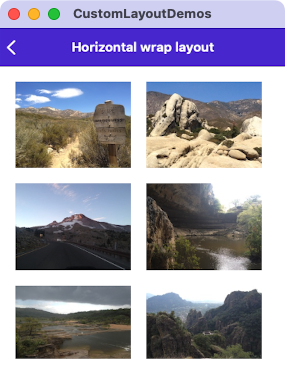
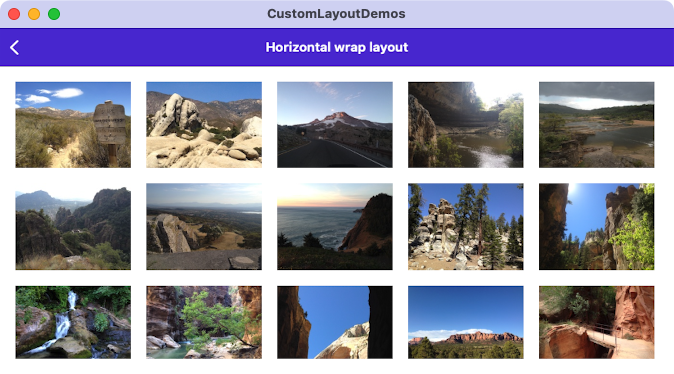
各行の列数は、画像のサイズ、ページの幅、デバイスに依存しない単位あたりのピクセル数によって異なります:
Note
ScrollView で HorizontalWrapLayout をラップすることで、スクロールがサポートされます。
既存のレイアウトの動作を変更する
一部のシナリオでは、カスタム レイアウト型を作成しなくても、既存のレイアウト型の動作を変更できます。 これらのシナリオでは、ILayoutManagerFactory を実装する型を作成し、それを使用して、既存のレイアウトの .NET MAUI の既定のレイアウト マネージャーを独自の ILayoutManager 実装に置き換えることができます。 これにより、既存のレイアウト用の新しいレイアウト マネージャーを定義できます。たとえば、Grid のカスタム レイアウト マネージャーを提供できます。 これは、レイアウトに新しい動作を追加するが、アプリで広く使用されている既存のレイアウトの種類を更新したくないシナリオで役に立ちます。
レイアウト マネージャー ファクトリを使用して、既存のレイアウトの動作を変更するプロセスは次のとおりです:
- .NET MAUI のレイアウト マネージャーの種類の 1 つから派生したレイアウト マネージャーを作成します。 詳細については、「カスタム レイアウト マネージャーの作成」を参照してください。
- ILayoutManagerFactory を実装する型を作成します。 詳細については、「レイアウト マネージャー ファクトリの作成」を参照してください。
- レイアウト マネージャー ファクトリをアプリのサービス プロバイダーに登録します。 詳細については、「レイアウト マネージャー ファクトリの登録」を参照してください。
カスタム レイアウト マネージャーの作成
レイアウト マネージャーは、レイアウトのクロスプラットフォーム レイアウトと測定を実行するために使用されます。 既存のレイアウトの動作を変更するには、そのレイアウトのレイアウト マネージャーから派生するカスタム レイアウト マネージャーを作成する必要があります:
using Microsoft.Maui.Layouts;

public class CustomGridLayoutManager : GridLayoutManager
{
    public CustomGridLayoutManager(IGridLayout layout) : base(layout)
    {
    }

    public override Size Measure(double widthConstraint, double heightConstraint)
    {
        EnsureRows();
        return base.Measure(widthConstraint, heightConstraint);
    }

    void EnsureRows()
    {
        if (Grid is not Grid grid)
        {
            return;
        }

        // Find the maximum row value from the child views
        int maxRow = 0;
        foreach (var child in grid)
        {
            maxRow = Math.Max(grid.GetRow(child), maxRow);
        }

        // Add more rows if we need them
        for (int n = grid.RowDefinitions.Count; n <= maxRow; n++)
        {
            grid.RowDefinitions.Add(new RowDefinition(GridLength.Star));
        }
    }
}
この例では、CustomGridLayoutManager は .NET MAUI の GridLayoutManager クラスから派生し、その Measure メソッドをオーバーライドします。 このカスタム レイアウト マネージャーにより、実行時に Grid の RowDefinitions に、子ビューに設定された各 Grid.Row 添付プロパティを考慮するのに十分な行が含まれていることが保証されます。 この変更を行わないと、デザイン時に Grid の RowDefinitions を指定する必要があります。
重要
既存のレイアウト マネージャーの動作を変更するときは、必ず Measure 実装から base.Measure メソッドを呼び出してください。
レイアウト マネージャー ファクトリの作成
カスタム レイアウト マネージャーは、レイアウト マネージャー ファクトリで作成する必要があります。 これは、ILayoutManagerFactory インターフェイスを実装する型を作成することによって実現されます:
using Microsoft.Maui.Layouts;

public class CustomLayoutManagerFactory : ILayoutManagerFactory
{
    public ILayoutManager CreateLayoutManager(Layout layout)
    {
        if (layout is Grid)
        {
            return new CustomGridLayoutManager(layout as IGridLayout);
        }
        return null;
    }
}
この例では、レイアウトが Grid の場合 CustomGridLayoutManager インスタンスが返されます。
レイアウト マネージャー ファクトリの登録
レイアウト マネージャー ファクトリは、MauiProgram クラスでアプリのサービス プロバイダーに登録する必要があります:
public static class MauiProgram
{
    public static MauiApp CreateMauiApp()
    {
        var builder = MauiApp.CreateBuilder();
        builder
            .UseMauiApp<App>()
            .ConfigureFonts(fonts =>
            {
                fonts.AddFont("OpenSans-Regular.ttf", "OpenSansRegular");
                fonts.AddFont("OpenSans-Semibold.ttf", "OpenSansSemibold");
            });

        // Setup a custom layout manager so the default manager for the Grid can be replaced.
        builder.Services.Add(new ServiceDescriptor(typeof(ILayoutManagerFactory), new CustomLayoutManagerFactory()));

        return builder.Build();
    }
}
次に、アプリが Grid をレンダリングするときに、カスタム レイアウト マネージャーを使用して、実行時に Grid の RowDefinitions に、子ビューに設定された各 Grid.Row 添付プロパティを考慮するのに十分な行が含まれていることを確認します。
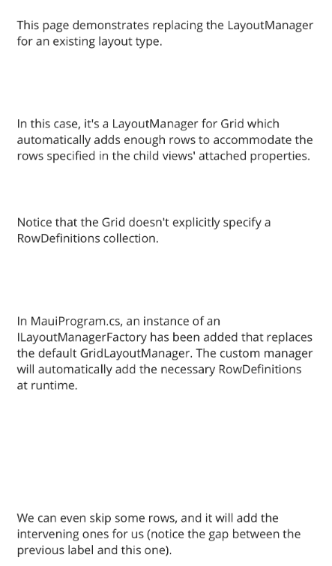
次の例は、子ビューで Grid.Row 添付プロパティを設定するが、RowDefinitions プロパティは設定しない Grid を示しています:
<Grid>
    <Label Text="This Grid demonstrates replacing the LayoutManager for an existing layout type." />
    <Label Grid.Row="1"
           Text="In this case, it's a LayoutManager for Grid which automatically adds enough rows to accommodate the rows specified in the child views' attached properties." />
    <Label Grid.Row="2"
           Text="Notice that the Grid doesn't explicitly specify a RowDefinitions collection." />
    <Label Grid.Row="3"
           Text="In MauiProgram.cs, an instance of an ILayoutManagerFactory has been added that replaces the default GridLayoutManager. The custom manager will automatically add the necessary RowDefinitions at runtime." />
    <Label Grid.Row="5"
           Text="We can even skip some rows, and it will add the intervening ones for us (notice the gap between the previous label and this one)." />
</Grid>
レイアウト マネージャー ファクトリでは、カスタム レイアウト マネージャーを使用して、RowDefinitions プロパティが設定されていないにもかかわらず、この例の Grid が正しく表示されるようにします:
.NET MAUI