自律追跡エンティティのチュートリアル
重要
自己追跡エンティティ テンプレートの使用は現在お勧めしていません。 既存のアプリケーションをサポートするためにのみ引き続き使用できます。 アプリケーションで、エンティティの切断されたグラフを操作する必要がある場合は、代替の方法を検討してください。たとえば、コミュニティによってより積極的に開発された自己追跡エンティティに似たテクノロジである追跡可能なエンティティを使用するか、または、低レベルの変更追跡 API を使用してカスタム コードを記述してください。
このチュートリアルでは、Windows Communication Foundation (WCF) サービスで、エンティティ グラフを返す操作を公開するシナリオについて説明します。 次に、クライアント アプリケーションでそのグラフを操作し、Entity Framework を使用してデータベースの更新を検証および保存するサービス操作に変更内容を送信します。
このチュートリアルを実行する前に、自律追跡エンティティに関するページを必ずお読みください。
このチュートリアルでは次の操作を行います。
- アクセスするデータベースを作成します。
- モデルを含むクラス ライブラリを作成します。
- 自律追跡エンティティ ジェネレーター テンプレートに切り替えます。
- エンティティ クラスを別のプロジェクトに移動します。
- エンティティのクエリを実行する操作とエンティティを保存する操作を公開する WCF サービスを作成します。
- サービスを使用するクライアント アプリケーション (コンソールと WPF) を作成します。
このチュートリアルでは Database First を使用しますが、同じ手法が Model First にも同様に適用されます。
前提条件
このチュートリアルを実行するには、最新バージョンの Visual Studio が必要です。
データベースの作成
Visual Studio と共にインストールされるデータベース サーバーは、インストールされている Visual Studio のバージョンによって異なります。
- Visual Studio 2012 を使っている場合は、LocalDB データベースを作成します。
- Visual Studio 2010 を使用している場合は、SQL Express データベースを作成します。
それではデータベースを生成しましょう。
- Visual Studio を開きます
- [表示] -> [サーバー エクスプローラー]
- [データ接続] を右クリックし、[接続の追加] を選択します。
- これまでサーバー エクスプローラーからデータベースに接続したことがない場合は、データ ソースとして Microsoft SQL Server を選択する必要があります。
- インストールされているものに応じて、LocalDB または SQL Express のいずれかに接続します。
- データベース名として「STESample」と入力します。
- [OK] を選択すると、新しいデータベースを作成するかどうかを確認するメッセージが表示されます。[はい] を選択します。
- サーバー エクスプローラーに新しいデータベースが表示されます。
- Visual Studio 2012 を使用している場合
- サーバー エクスプローラーでこのデータベースを右クリックし、[新しいクエリ] を選択します
- 次の SQL を新しいクエリにコピーし、クエリを右クリックして [実行] を選択します。
- Visual Studio 2010 を使用している場合
- [データ] -> [Transact-SQL エディター] -> [新しいクエリ接続] の順に選択します。
- サーバー名として「.\SQLEXPRESS」と入力し、[OK] をクリックします。
- クエリ エディターの上部にあるドロップダウンから [STESample] データベースを選択します。
- 次の SQL を新しいクエリにコピーし、クエリを右クリックして [SQL の実行] を選択します。
    CREATE TABLE [dbo].[Blogs] (
        [BlogId] INT IDENTITY (1, 1) NOT NULL,
        [Name] NVARCHAR (200) NULL,
        [Url]  NVARCHAR (200) NULL,
        CONSTRAINT [PK_dbo.Blogs] PRIMARY KEY CLUSTERED ([BlogId] ASC)
    );

    CREATE TABLE [dbo].[Posts] (
        [PostId] INT IDENTITY (1, 1) NOT NULL,
        [Title] NVARCHAR (200) NULL,
        [Content] NTEXT NULL,
        [BlogId] INT NOT NULL,
        CONSTRAINT [PK_dbo.Posts] PRIMARY KEY CLUSTERED ([PostId] ASC),
        CONSTRAINT [FK_dbo.Posts_dbo.Blogs_BlogId] FOREIGN KEY ([BlogId]) REFERENCES [dbo].[Blogs] ([BlogId]) ON DELETE CASCADE
    );

    SET IDENTITY_INSERT [dbo].[Blogs] ON
    INSERT INTO [dbo].[Blogs] ([BlogId], [Name], [Url]) VALUES (1, N'ADO.NET Blog', N'blogs.msdn.com/adonet')
    SET IDENTITY_INSERT [dbo].[Blogs] OFF
    INSERT INTO [dbo].[Posts] ([Title], [Content], [BlogId]) VALUES (N'Intro to EF', N'Interesting stuff...', 1)
    INSERT INTO [dbo].[Posts] ([Title], [Content], [BlogId]) VALUES (N'What is New', N'More interesting stuff...', 1)
モデルを作成する
まず、モデルを配置するプロジェクトが必要です。
- [ファイル] -> [新規作成] -> [プロジェクト]
- 左ペインで [Visual C#] を選択し、[クラス ライブラリ] を選択します。
- 名前として「STESample」と入力し、[OK] をクリックします。
次に、EF Designer で単純なモデルを作成してデータベースにアクセスします。
- [プロジェクト] -> [新しい項目の追加]
- 左ペインで [データ] を選択し、[ADO.NET Entity Data Model] を選択します。
- 名前として「BloggingModel」と入力し、[OK] をクリックします。
- [データベースから生成] を選択し、[次へ] をクリックします。
- 前のセクションで作成したデータベースの接続情報を入力します。
- 接続文字列の名前として「BloggingContext」と入力し、[次へ] をクリックします。
- [テーブル] の横のボックスをオンにし、[完了] をクリックします。
STE コード生成に切り替える
次に、既定のコード生成を無効にし、自律追跡エンティティに切り替える必要があります。
Visual Studio 2012 を使用している場合
- ソリューション エクスプローラーで BloggingModel.edmx を展開し、BloggingModel.tt と BloggingModel.Context.tt を削除します。"これにより、既定のコード生成が無効になります。"
- EF Designer 画面で空の領域を右クリックし、[コード生成項目の追加] を選択します。
- 左ペインで [オンライン] を選択し、STE ジェネレーターを検索します。
- [STE Generator for C#]\(C# 用 STE ジェネレーター\) テンプレートを選択し、名前として「STETemplate」と入力して、[追加] をクリックします。
- STETemplate.tt および STETemplate.Context.tt ファイルが、BloggingModel.edmx ファイルの下に入れ子になって追加されます。
Visual Studio 2010 を使用している場合
- EF Designer 画面で空の領域を右クリックし、[コード生成項目の追加] を選択します。
- 左ペインの [コード] を選択し、[ADO.NET 自律追跡エンティティ ジェネレーター] を選択します。
- 名前として「STETemplate」と入力し、[追加] をクリックします。
- STETemplate.tt および STETemplate.Context.tt ファイルがプロジェクトに直接追加されます。
エンティティ型を別のプロジェクトに移動する
自律追跡エンティティを使用するには、クライアント アプリケーションが、モデルから生成されたエンティティ クラスにアクセスする必要があります。 モデル全体をクライアント アプリケーションに公開する必要はないため、エンティティ クラスを別のプロジェクトに移動します。
まず、既存のプロジェクトでのエンティティ クラスの生成を停止します。
- ソリューション エクスプローラーで STETemplate.tt を右クリックし、[プロパティ] を選択します。
- [プロパティ] ウィンドウで、CustomTool プロパティの TextTemplatingFileGenerator をクリアします。
- ソリューション エクスプローラーで STETemplate.tt を展開し、その下に入れ子になっているすべてのファイルを削除します。
次に、新しいプロジェクトを追加し、そこにエンティティ クラスを生成します。
[ファイル] -> [追加] -> [プロジェクト]
左ペインで [Visual C#] を選択し、[クラス ライブラリ] を選択します。
名前として「STESample.Entities」と入力し、[OK] をクリックします。
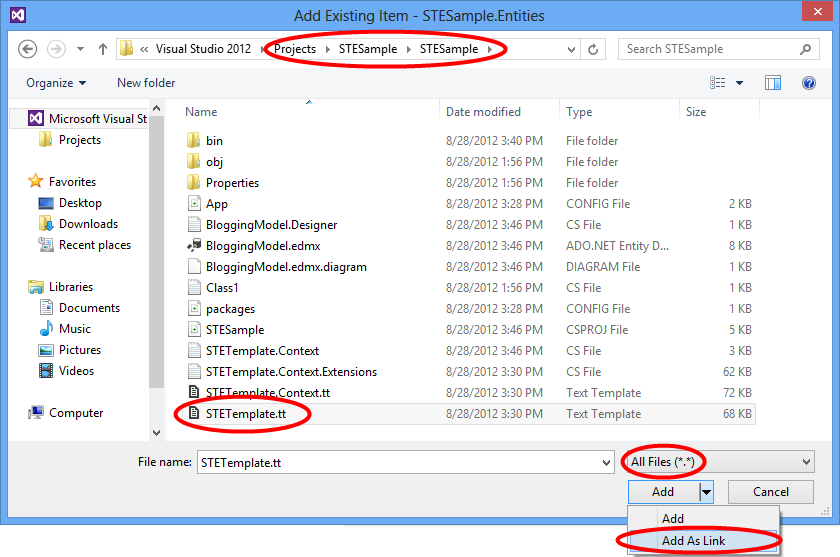
[プロジェクト] -> [既存の項目の追加]
STESample プロジェクト フォルダーに移動します。
[すべてのファイル(*.*)] を選択します。
STETemplate.tt ファイルを選択します。
[追加] ボタンの横のドロップダウン矢印をクリックし、[リンクとして追加] を選択します。
必ず、コンテキストと同じ名前空間にエンティティ クラスが生成されるようにします。 これにより、アプリケーション全体で追加する必要がある using ステートメントの数が減ります。
- ソリューション エクスプローラーで、リンクされた STETemplate.tt を右クリックし、[プロパティ] を選択します。
- [プロパティ] ウィンドウで、[カスタム ツールの名前空間] を [STESample] に設定します。
STE テンプレートによって生成されるコードでは、コンパイルするために、System.Runtime.Serialization への参照が必要となります。 このライブラリは、シリアル化可能なエンティティ型で使用される、WCF の DataContract 属性と DataMember 属性に必要です。
- ソリューション エクスプローラーで STESample.Entities プロジェクトを右クリックし、[参照の追加] を選択します。
- Visual Studio 2012 の場合 - [System.Runtime.Serialization] の横のボックスをオンにし、[OK] をクリックします。
- Visual Studio 2010 の場合 - [System.Runtime.Serialization] を選択し、[OK] をクリックします。
最後に、コンテキストが含まれているプロジェクトにエンティティ型への参照が必要です。
- ソリューション エクスプローラーで STESample プロジェクトを右クリックし、[参照の追加] を選択します。
- Visual Studio 2012 の場合 - 左ペインで [ソリューション] を選択し、[STESample.Entities] の横のボックスをオンにして、[OK] をクリックします。
- Visual Studio 2010 の場合 - [プロジェクト] タブを選択し、[STESample.Entities] を選択して、[OK] をクリックします。
Note
エンティティ型を別のプロジェクトに移動するもう 1 つの方法として、テンプレート ファイルを既定の場所からリンクするのではなく移動します。 これを行う場合は、テンプレートの inputFile 変数を更新して、edmx ファイルへの相対パスを指定する必要があります (この例では、...\BloggingModel.edmx になります)。
WCF サービスを作成する
次に、データを公開する WCF サービスを追加ます。まず、プロジェクトを作成します。
- [ファイル] -> [追加] -> [プロジェクト]
- 左ペインで [Visual C#] を選択し、[WCF サービス アプリケーション] を選択します。
- 名前として「STESample.Service」と入力し、[OK] をクリックします。
- System.Data.Entity アセンブリへの参照を追加します。
- STESample および STESample.Entities プロジェクトへの参照を追加します。
EF 接続文字列をこのプロジェクトにコピーして、実行時に検出されるようにする必要があります。
- **STESample **プロジェクトの App.Config ファイルを開き、connectionStrings 要素をコピーします
- connectionStrings 要素を、STESample.Service プロジェクトの Web.Config ファイルの configuration 要素の子要素として貼り付けます。
次に、実際のサービスを実装します。
- IService1.cs を開き、内容を次のコードに置き換えます。
    using System.Collections.Generic;
    using System.ServiceModel;

    namespace STESample.Service
    {
        [ServiceContract]
        public interface IService1
        {
            [OperationContract]
            List<Blog> GetBlogs();

            [OperationContract]
            void UpdateBlog(Blog blog);
        }
    }
- Service1.svc を開き、内容を次のコードに置き換えます。
    using System;
    using System.Collections.Generic;
    using System.Data;
    using System.Linq;

    namespace STESample.Service
    {
        public class Service1 : IService1
        {
            /// <summary>
            /// Gets all the Blogs and related Posts.
            /// </summary>
            public List<Blog> GetBlogs()
            {
                using (BloggingContext context = new BloggingContext())
                {
                    return context.Blogs.Include("Posts").ToList();
                }
            }

            /// <summary>
            /// Updates Blog and its related Posts.
            /// </summary>
            public void UpdateBlog(Blog blog)
            {
                using (BloggingContext context = new BloggingContext())
                {
                    try
                    {
                        // TODO: Perform validation on the updated order before applying the changes.

                        // The ApplyChanges method examines the change tracking information
                        // contained in the graph of self-tracking entities to infer the set of operations
                        // that need to be performed to reflect the changes in the database.
                        context.Blogs.ApplyChanges(blog);
                        context.SaveChanges();

                    }
                    catch (UpdateException)
                    {
                        // To avoid propagating exception messages that contain sensitive data to the client tier
                        // calls to ApplyChanges and SaveChanges should be wrapped in exception handling code.
                        throw new InvalidOperationException("Failed to update. Try your request again.");
                    }
                }
            }
        }
    }
コンソール アプリケーションからサービスを使用する
サービスを使用するコンソール アプリケーションを作成しましょう。
- [ファイル] -> [新規作成] -> [プロジェクト]
- 左ペインで [Visual C#] を選択し、[コンソール アプリケーション] を選択します。
- 名前として「STESample.ConsoleTest」と入力し、[OK] をクリックします。
- STESample.Entities プロジェクトへの参照を追加します。
WCF サービスへのサービス参照が必要です。
- ソリューション エクスプローラーで STESample.ConsoleTest プロジェクトを右クリックし、[サービス参照の追加] を選択します。
- [検出] をクリックします。
- 名前空間として「BloggingService」と入力し、[OK] をクリックします。
これで、サービスを使用するためのコードを記述できます。
- Program.cs を開き、その内容を次のコードに置き換えます。
    using STESample.ConsoleTest.BloggingService;
    using System;
    using System.Linq;

    namespace STESample.ConsoleTest
    {
        class Program
        {
            static void Main(string[] args)
            {
                // Print out the data before we change anything
                Console.WriteLine("Initial Data:");
                DisplayBlogsAndPosts();

                // Add a new Blog and some Posts
                AddBlogAndPost();
                Console.WriteLine("After Adding:");
                DisplayBlogsAndPosts();

                // Modify the Blog and one of its Posts
                UpdateBlogAndPost();
                Console.WriteLine("After Update:");
                DisplayBlogsAndPosts();

                // Delete the Blog and its Posts
                DeleteBlogAndPost();
                Console.WriteLine("After Delete:");
                DisplayBlogsAndPosts();

                Console.WriteLine("Press any key to exit...");
                Console.ReadKey();
            }

            static void DisplayBlogsAndPosts()
            {
                using (var service = new Service1Client())
                {
                    // Get all Blogs (and Posts) from the service
                    // and print them to the console
                    var blogs = service.GetBlogs();
                    foreach (var blog in blogs)
                    {
                        Console.WriteLine(blog.Name);
                        foreach (var post in blog.Posts)
                        {
                            Console.WriteLine(" - {0}", post.Title);
                        }
                    }
                }

                Console.WriteLine();
                Console.WriteLine();
            }

            static void AddBlogAndPost()
            {
                using (var service = new Service1Client())
                {
                    // Create a new Blog with a couple of Posts
                    var newBlog = new Blog
                    {
                        Name = "The New Blog",
                        Posts =
                        {
                            new Post { Title = "Welcome to the new blog"},
                            new Post { Title = "What's new on the new blog"}
                        }
                    };

                    // Save the changes using the service
                    service.UpdateBlog(newBlog);
                }
            }

            static void UpdateBlogAndPost()
            {
                using (var service = new Service1Client())
                {
                    // Get all the Blogs
                    var blogs = service.GetBlogs();

                    // Use LINQ to Objects to find The New Blog
                    var blog = blogs.First(b => b.Name == "The New Blog");

                    // Update the Blogs name
                    blog.Name = "The Not-So-New Blog";

                    // Update one of the related posts
                    blog.Posts.First().Content = "Some interesting content...";

                    // Save the changes using the service
                    service.UpdateBlog(blog);
                }
            }

            static void DeleteBlogAndPost()
            {
                using (var service = new Service1Client())
                {
                    // Get all the Blogs
                    var blogs = service.GetBlogs();

                    // Use LINQ to Objects to find The Not-So-New Blog
                    var blog = blogs.First(b => b.Name == "The Not-So-New Blog");

                    // Mark all related Posts for deletion
                    // We need to call ToList because each Post will be removed from the
                    // Posts collection when we call MarkAsDeleted
                    foreach (var post in blog.Posts.ToList())
                    {
                        post.MarkAsDeleted();
                    }

                    // Mark the Blog for deletion
                    blog.MarkAsDeleted();

                    // Save the changes using the service
                    service.UpdateBlog(blog);
                }
            }
        }
    }
アプリケーションを実行して動作を確認できるようになりました。
- ソリューション エクスプローラーで STESample.ConsoleTest プロジェクトを右クリックし、[デバッグ] -> [新しいインスタンスを開始] の順に選択します。
アプリケーションを実行すると、次の出力が表示されます。
Initial Data:
ADO.NET Blog
- Intro to EF
- What is New

After Adding:
ADO.NET Blog
- Intro to EF
- What is New
The New Blog
- Welcome to the new blog
- What's new on the new blog

After Update:
ADO.NET Blog
- Intro to EF
- What is New
The Not-So-New Blog
- Welcome to the new blog
- What's new on the new blog

After Delete:
ADO.NET Blog
- Intro to EF
- What is New

Press any key to exit...
WPF アプリケーションからサービスを使用する
サービスを使用する WPF アプリケーションを作成しましょう。
- [ファイル] -> [新規作成] -> [プロジェクト]
- 左ペインで [Visual C#] を選択し、[WPF アプリケーション] を選択します。
- 名前として「STESample.WPFTest」と入力し、[OK] をクリックします。
- STESample.Entities プロジェクトへの参照を追加します。
WCF サービスへのサービス参照が必要です。
- ソリューション エクスプローラーで STESample.WPFTest プロジェクトを右クリックし、[サービス参照の追加] を選択します。
- [検出] をクリックします。
- 名前空間として「BloggingService」と入力し、[OK] をクリックします。
これで、サービスを使用するためのコードを記述できます。
- MainWindow.xaml を開き、内容を次のコードに置き換えます。
    <Window
        xmlns="http://schemas.microsoft.com/winfx/2006/xaml/presentation"
        xmlns:x="http://schemas.microsoft.com/winfx/2006/xaml"
        xmlns:d="http://schemas.microsoft.com/expression/blend/2008"
        xmlns:mc="http://schemas.openxmlformats.org/markup-compatibility/2006"
        xmlns:STESample="clr-namespace:STESample;assembly=STESample.Entities"
        mc:Ignorable="d" x:Class="STESample.WPFTest.MainWindow"
        Title="MainWindow" Height="350" Width="525" Loaded="Window_Loaded">

        <Window.Resources>
            <CollectionViewSource
                x:Key="blogViewSource"
                d:DesignSource="{d:DesignInstance {x:Type STESample:Blog}, CreateList=True}"/>
            <CollectionViewSource
                x:Key="blogPostsViewSource"
                Source="{Binding Posts, Source={StaticResource blogViewSource}}"/>
        </Window.Resources>

        <Grid DataContext="{StaticResource blogViewSource}">
            <DataGrid AutoGenerateColumns="False" EnableRowVirtualization="True"
                      ItemsSource="{Binding}" Margin="10,10,10,179">
                <DataGrid.Columns>
                    <DataGridTextColumn Binding="{Binding BlogId}" Header="Id" Width="Auto" IsReadOnly="True" />
                    <DataGridTextColumn Binding="{Binding Name}" Header="Name" Width="Auto"/>
                    <DataGridTextColumn Binding="{Binding Url}" Header="Url" Width="Auto"/>
                </DataGrid.Columns>
            </DataGrid>
            <DataGrid AutoGenerateColumns="False" EnableRowVirtualization="True"
                      ItemsSource="{Binding Source={StaticResource blogPostsViewSource}}" Margin="10,145,10,38">
                <DataGrid.Columns>
                    <DataGridTextColumn Binding="{Binding PostId}" Header="Id" Width="Auto"  IsReadOnly="True"/>
                    <DataGridTextColumn Binding="{Binding Title}" Header="Title" Width="Auto"/>
                    <DataGridTextColumn Binding="{Binding Content}" Header="Content" Width="Auto"/>
                </DataGrid.Columns>
            </DataGrid>
            <Button Width="68" Height="23" HorizontalAlignment="Right" VerticalAlignment="Bottom"
                    Margin="0,0,10,10" Click="buttonSave_Click">Save</Button>
        </Grid>
    </Window>
- MainWindow (MainWindow.xaml.cs) のコードビハインドを開き、内容を次のコードに置き換えます。
    using STESample.WPFTest.BloggingService;
    using System.Collections.Generic;
    using System.Linq;
    using System.Windows;
    using System.Windows.Data;

    namespace STESample.WPFTest
    {
        public partial class MainWindow : Window
        {
            public MainWindow()
            {
                InitializeComponent();
            }

            private void Window_Loaded(object sender, RoutedEventArgs e)
            {
                using (var service = new Service1Client())
                {
                    // Find the view source for Blogs and populate it with all Blogs (and related Posts)
                    // from the Service. The default editing functionality of WPF will allow the objects
                    // to be manipulated on the screen.
                    var blogsViewSource = (CollectionViewSource)this.FindResource("blogViewSource");
                    blogsViewSource.Source = service.GetBlogs().ToList();
                }
            }

            private void buttonSave_Click(object sender, RoutedEventArgs e)
            {
                using (var service = new Service1Client())
                {
                    // Get the blogs that are bound to the screen
                    var blogsViewSource = (CollectionViewSource)this.FindResource("blogViewSource");
                    var blogs = (List<Blog>)blogsViewSource.Source;

                    // Save all Blogs and related Posts
                    foreach (var blog in blogs)
                    {
                        service.UpdateBlog(blog);
                    }

                    // Re-query for data to get database-generated keys etc.
                    blogsViewSource.Source = service.GetBlogs().ToList();
                }
            }
        }
    }
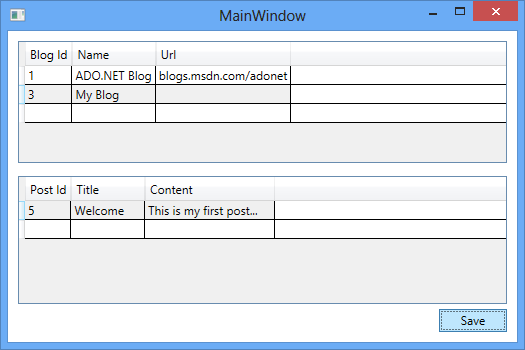
アプリケーションを実行して動作を確認できるようになりました。
- ソリューション エクスプローラーで STESample.WPFTest プロジェクトを右クリックし、[デバッグ] -> [新しいインスタンスを開始] の順に選択します。
- 画面を使用してデータを操作し、[保存] ボタンを使用してサービス経由で保存できます。
.NET