import { LiveShareHost } from "@microsoft/teams-js";
import {
  LiveShareProvider,
  useLiveShareContext,
} from "@microsoft/live-share-react";
import { useState } from "react";

export const App = () => {
  // Create the host as React state so that it doesn't get reset on mount
  const [host] = useState(LiveShareHost.create());

  // Live Share for React does not require that you define a custom Fluid schema
  return (
    <LiveShareProvider host={host} joinOnLoad>
      <LiveShareLoading />
    </LiveShareProvider>
  );
};

const LiveShareLoading = () => {
  // Any live-share-react hook (e.g., useLiveShareContext, useLiveState, etc.) must be a child of <LiveShareProvider>
  const { joined } = useLiveShareContext();
  if (joined) {
    return <p>{"Loading..."}</p>;
  }
  return <p>{"Your app here..."}</p>;
};
import {
  LiveShareClient,
  LivePresence,
  PresenceState,
} from "@microsoft/live-share";
import { LiveShareHost } from "@microsoft/teams-js";

// Join the Fluid container
const host = LiveShareHost.create();
const liveShare = new LiveShareClient(host);
const schema = {
  initialObjects: {
    presence: LivePresence,
  },
};
const { container } = await liveShare.joinContainer(schema);
const presence = container.initialObjects.presence;

// Register listener for changes to each user's presence.
// This should be done before calling `.initialize()`.
presence.on("presenceChanged", (user, local) => {
  console.log("A user presence changed:");
  console.log("- display name:", user.displayName);
  console.log("- state:", user.state);
  console.log("- custom data:", user.data);
  console.log("- change from local client", local);
  console.log("- change impacts local user", user.isLocalUser);
});

// Define the initial custom data for the local user (optional).
const customUserData = {
  picture: "DEFAULT_PROFILE_PICTURE_URL",
  readyToStart: false,
};
// Start receiving incoming presence updates from the session.
// This will also broadcast the user's `customUserData` to others in the session.
await presence.initialize(customUserData);

// Send a presence update, in this case once a user is ready to start an activity.
// If using role verification, this will throw an error if the user doesn't have the required role.
await presence.update({
  ...customUserData,
  readyToStart: true,
});
import {
  LiveShareClient,
  LivePresence,
  PresenceState,
  LivePresenceUser,
} from "@microsoft/live-share";
import { LiveShareHost } from "@microsoft/teams-js";

// Declare interface for type of custom data for user
interface ICustomUserData {
  picture: string;
  readyToStart: boolean;
}

// Join the Fluid container
const host = LiveShareHost.create();
const liveShare = new LiveShareClient(host);
const schema = {
  initialObjects: {
    presence: LivePresence<ICustomUserData>,
  },
};
const { container } = await liveShare.joinContainer(schema);
// Force casting is necessary because Fluid does not maintain type recognition for `container.initialObjects`.
// Casting here is always safe, as the `initialObjects` is constructed based on the schema you provide to `.joinContainer`.
const presence = container.initialObjects.presence as unknown as LivePresence<ICustomUserData>;

// Register listener for changes to each user's presence.
// This should be done before calling `.initialize()`.
presence.on("presenceChanged", (user: LivePresenceUser<ICustomUserData>, local: boolean) => {
  console.log("A user presence changed:")
  console.log("- display name:", user.displayName);
  console.log("- custom data:", user.data);
  console.log("- state:", user.state);
  console.log("- roles", user.roles);
  console.log("- change from local client", local);
  console.log("- change impacts local user", user.isLocalUser);
});

// Define the initial custom data for the local user (optional).
const customUserData: ICustomUserData = {
  picture: "DEFAULT_PROFILE_PICTURE_URL",
  readyToStart: false,
};
// Start receiving incoming presence updates from the session.
// This will also broadcast the user's `customUserData` to others in the session.
await presence.initialize(customUserData);

// Send a presence update, in this case once a user is ready to start an activity.
// If using role verification, this will throw an error if the user doesn't have the required role.
await presence.update({
  ...initialData,
  readyToStart: true,
});
import { useLivePresence } from "@microsoft/live-share-react";

// Define a unique key that differentiates this usage of `useLivePresence` from others in your app
const MY_UNIQUE_KEY = "presence-key";

// Example component for using useLivePresence
export const MyCustomPresence = () => {
    const { allUsers, localUser, updatePresence } = useLivePresence(MY_UNIQUE_KEY, {
        picture: "DEFAULT_PROFILE_PICTURE_URL",
        readyToStart: false,
    });

    // Callback to update the user's presence
    const onToggleReady = () => {
        updatePresence({
            ...localUser.data,
            readyToStart: !localUser.data.readyToStart,
        });
    }

    // Render UI
    return (
        {allUsers.map((user) => (
            <div key={user.userId}>
                <div>
                    {user.displayName}
                </div>
                <div>
                    {`Ready: ${user.data.readyToStart}`}
                </div>
                {user.isLocalUser && (
                    <button onClick={onToggleReady}>
                        {"Toggle ready"}
                    </button>
                )}
            </div>
        ))}
    );
}
import { LiveShareClient, LiveState } from "@microsoft/live-share";
import { LiveShareHost } from "@microsoft/teams-js";

// Join the Fluid container
const host = LiveShareHost.create();
const liveShare = new LiveShareClient(host);
const schema = {
  initialObjects: { appState: LiveState },
};
const { container } = await liveShare.joinContainer(schema);
const { appState } = container.initialObjects;

// Register listener for changes to the state.
// This should be done before calling `.initialize()`.
appState.on("stateChanged", (planetName, local, clientId) => {
  // Update app with newly selected planet.
  // See which user made the change (optional)
  const clientInfo = await appState.getClientInfo(clientId);
});

// Set a default value and start listening for changes.
// This default value will not override existing for others in the session.
const defaultState = "Mercury";
await appState.initialize(defaultState);

// `.set()` will change the state for everyone in the session.
// If using role verification, this will throw an error if the user doesn't have the required role.
await appState.set("Earth");
import { LiveShareClient, LiveState } from "@microsoft/live-share";
import { LiveShareHost } from "@microsoft/teams-js";

enum PlanetName {
  MERCURY = "Mercury",
  VENUS = "Venus",
  EARTH = "Earth",
  MARS = "Mars",
  JUPITER = "Jupiter",
  SATURN = "Saturn",
  URANUS = "Uranus",
  NEPTUNE = "Neptune",
}

// Join the Fluid container
const host = LiveShareHost.create();
const liveShare = new LiveShareClient(host);
const schema = {
  initialObjects: {
    appState: LiveState<PlanetName>,
  },
};
const { container } = await liveShare.joinContainer(schema);
// Force casting is necessary because Fluid does not maintain type recognition for `container.initialObjects`.
// Casting here is always safe, as the `initialObjects` is constructed based on the schema you provide to `.joinContainer`.
const appState = container.initialObjects.appState as unknown as LiveState<PlanetName>;

// Register listener for changes to the state.
// This should be done before calling `.initialize()`.
appState.on("stateChanged", async (planetName: PlanetName, local: boolean, clientId: string) => {
  // Update app with newly selected planet
  // See which user made the change (optional)
  const clientInfo = await appState.getClientInfo(clientId);
});

// Set a default value and start listening for changes.
// This default value will not override existing for others in the session.
const defaultState = PlanetName.MERCURY;
await appState.initialize(defaultState);

// `.set()` will change the state for everyone in the session.
// If using role verification, this will throw an error if the user doesn't have the required role.
await appState.set(PlanetName.EARTH);
import { useLiveState } from "@microsoft/live-share-react";

const planets = [
  "Mercury",
  "Venus",
  "Earth",
  "Mars",
  "Jupiter",
  "Saturn",
  "Uranus",
  "Neptune",
];

// Define a unique key that differentiates this usage of `useLiveState` from others in your app
const MY_UNIQUE_KEY = "selected-planet-key";

// Example component for using useLiveState
export const MyCustomState = () => {
  const [planet, setPlanet] = useLiveState(MY_UNIQUE_KEY, planets[0]);

  // Render UI
  return (
    <div>
      {`Current planet: ${planet}`}
      {"Select a planet below:"}
      {planets.map((planet) => (
        <button
          key={planet}
          onClick={() => {
            setPlanet(planet);
          }}
        >
          {planet}
        </button>
      ))}
    </div>
  );
};
import { LiveEvent, LiveShareClient } from "@microsoft/live-share";
import { LiveShareHost } from "@microsoft/teams-js";

// Join the Fluid container
const host = LiveShareHost.create();
const liveShare = new LiveShareClient(host);
const schema = {
  initialObjects: { customReactionEvent: LiveEvent },
};
const { container } = await liveShare.joinContainer(schema);
const { customReactionEvent } = container.initialObjects;

// Register listener to receive events sent through this object.
// This should be done before calling `.initialize()`.
customReactionEvent.on("received", async (kudosReaction, local, clientId) => {
  console.log("Received reaction:", kudosReaction, "from clientId", clientId);
  // See which user made the change (optional)
  const clientInfo = await customReactionEvent.getClientInfo(clientId);
  // Display notification in your UI
});

// Start listening for incoming events
await customReactionEvent.initialize();

// `.send()` will send your event value to everyone in the session.
// If using role verification, this will throw an error if the user doesn't have the required role.
const kudosReaction = {
  emoji: "❤️",
  forUserId: "SOME_OTHER_USER_ID",
};
await customReactionEvent.send(kudosReaction);
import { LiveShareClient, LiveEvent } from "@microsoft/live-share";
import { LiveShareHost } from "@microsoft/teams-js";

// Declare interface for type of custom data for user
interface ICustomReaction {
  emoji: string,
  forUserId: "SOME_OTHER_USER_ID",
}

// Join the Fluid container
const host = LiveShareHost.create();
const liveShare = new LiveShareClient(host);
const schema = {
  initialObjects: {
    customReactionEvent: LiveEvent<ICustomEvent>,
  },
};
const { container } = await liveShare.joinContainer(schema);
// Force casting is necessary because Fluid does not maintain type recognition for `container.initialObjects`.
// Casting here is always safe, as the `initialObjects` is constructed based on the schema you provide to `.joinContainer`.
const customReactionEvent = container.initialObjects.customReactionEvent as unknown as LiveEvent<ICustomReaction>;

// Register listener to receive events sent through this object.
// This should be done before calling `.initialize()`.
customReactionEvent.on("received", async (event: ICustomReaction, local: boolean, clientId: string) => {
  console.log("Received reaction:", kudosReaction, "from clientId", clientId);
  // See which user made the change (optional)
  const clientInfo = await customReactionEvent.getClientInfo(clientId);
  // Display notification in your UI
});

// Start listening for incoming events
await customReactionEvent.initialize();

// `.send()` will send your event value to everyone in the session.
// If using role verification, this will throw an error if the user doesn't have the required role.
const kudosReaction: ICustomReaction = {
  emoji: "❤️",
  forUserId: "SOME_OTHER_USER_ID",
};
await customReactionEvent.send(kudosReaction);
import { useLiveEvent } from "@microsoft/live-share-react";

const emojis = ["❤️", "😂", "👍", "👎"];

// Define a unique key that differentiates this usage of `useLiveEvent` from others in your app
const MY_UNIQUE_KEY = "event-key";

// Example component for using useLiveEvent
export const MyCustomEvent = () => {
  const { latestEvent, sendEvent } = useLiveEvent(MY_UNIQUE_KEY);

  // Render UI
  return (
    <div>
      {`Latest event: ${latestEvent?.value}, from local user: ${latestEvent?.local}`}
      {"Select a planet below:"}
      {emojis.map((emoji) => (
        <button
          key={emoji}
          onClick={() => {
            sendEvent(emoji);
          }}
        >
          {emoji}
        </button>
      ))}
    </div>
  );
};
import { LiveShareClient, LiveTimer } from "@microsoft/live-share";
import { LiveShareHost } from "@microsoft/teams-js";

// Join the Fluid container
const host = LiveShareHost.create();
const liveShare = new LiveShareClient(host);
const schema = {
  initialObjects: { timer: LiveTimer },
};
const { container } = await liveShare.joinContainer(schema);
const { timer } = container.initialObjects;

// Register listeners for timer changes
// This should be done before calling `.initialize()`.

// Register listener for when the timer starts its countdown
timer.on("started", (config, local) => {
  // Update UI to show timer has started
});

// Register listener for when a paused timer has resumed
timer.on("played", (config, local) => {
  // Update UI to show timer has resumed
});

// Register listener for when a playing timer has paused
timer.on("paused", (config, local) => {
  // Update UI to show timer has paused
});

// Register listener for when a playing timer has finished
timer.on("finished", (config) => {
  // Update UI to show timer is finished
});

// Register listener for the timer progressed by 20 milliseconds
timer.on("onTick", (milliRemaining) => {
  // Update UI to show remaining time
});

// Start synchronizing timer events for users in session
await timer.initialize();

// Start a 60 second timer for users in the session.
// If using role verification, this will throw an error if the user doesn't have the required role.
const durationInMilliseconds = 1000 * 60;
await timer.start(durationInMilliseconds);

// Pause the timer for users in session
// If using role verification, this will throw an error if the user doesn't have the required role.
await timer.pause();

// Resume the timer for users in session
// If using role verification, this will throw an error if the user doesn't have the required role.
await timer.play();
import {
  LiveShareClient,
  LiveTimer,
  LiveTimerEvents,
  ITimerConfig,
} from "@microsoft/live-share";
import { LiveShareHost } from "@microsoft/teams-js";

// Join the Fluid container
const host = LiveShareHost.create();
const liveShare = new LiveShareClient(host);
const schema = {
  initialObjects: { timer: LiveTimer },
};
const { container } = await liveShare.joinContainer(schema);
// Force casting is necessary because Fluid does not maintain type recognition for `container.initialObjects`.
// Casting here is always safe, as the `initialObjects` is constructed based on the schema you provide to `.joinContainer`.
const timer = container.initialObjects.timer as unknown as LiveTimer;

// Register listeners for timer changes
// This should be done before calling `.initialize()`.

// Register listener for when the timer starts its countdown
timer.on(LiveTimerEvents.started, (config: ITimerConfig, local: boolean) => {
  // Update UI to show timer has started
});

// Register listener for when a paused timer has resumed
timer.on(LiveTimerEvents.played, (config: ITimerConfig, local: boolean) => {
  // Update UI to show timer has resumed
});

// Register listener for when a playing timer has paused
timer.on(LiveTimerEvents.paused, (config: ITimerConfig, local: boolean) => {
  // Update UI to show timer has paused
});

// Register listener for when a playing timer has finished
timer.on(LiveTimerEvents.finished, (config: ITimerConfig) => {
  // Update UI to show timer is finished
});

// Register listener for the timer progressed by 20 milliseconds
timer.on(LiveTimerEvents.onTick, (milliRemaining: number) => {
  // Update UI to show remaining time
});

// Start synchronizing timer events
await timer.initialize();

// Start a 60 second timer for users in session
// If using role verification, this will throw an error if the user doesn't have the required role.
const durationInMilliseconds = 1000 * 60;
await timer.start(durationInMilliseconds);

// Pause the timer for users in session
// If using role verification, this will throw an error if the user doesn't have the required role.
await timer.pause();

// Resume the timer for users in session
// If using role verification, this will throw an error if the user doesn't have the required role.
await timer.play();
import { useLiveTimer } from "@microsoft/live-share-react";

// Define a unique key that differentiates this usage of `useLiveTimer` from others in your app
const MY_UNIQUE_KEY = "timer-key";

// Example component for using useLiveTimer
export function CountdownTimer() {
  const { milliRemaining, timerConfig, start, pause, play } =
    useLiveTimer("TIMER-ID");

  return (
    <div>
      <button
        onClick={() => {
          start(60 * 1000);
        }}
      >
        {timerConfig === undefined ? "Start" : "Reset"}
      </button>
      {timerConfig !== undefined && (
        <button
          onClick={() => {
            if (timerConfig.running) {
              pause();
            } else {
              play();
            }
          }}
        >
          {timerConfig.running ? "Pause" : "Play"}
        </button>
      )}
      {milliRemaining !== undefined && (
        <p>
          {`${Math.round(milliRemaining / 1000)} / ${
            Math.round(timerConfig.duration) / 1000
          }`}
        </p>
      )}
    </div>
  );
}
import {
LiveShareClient,
LiveFollowMode,
FollowModeType,
} from "@microsoft/live-share";
import { LiveShareHost } from "@microsoft/teams-js";
// Join the Fluid container
const host = LiveShareHost.create();
const liveShare = new LiveShareClient(host);
const schema = {
initialObjects: {
followMode: LiveFollowMode,
},
};
const { container } = await liveShare.joinContainer(schema);
const followMode = container.initialObjects.followMode;
// As an example, we will assume there is a button in the application document
const button = document.getElementById("action-button");
// As an example, we will assume there is a div with text showing the follow state
const infoText = document.getElementById("info-text");
// Register listener for changes to the `state` value to use in your app.
// This should be done before calling `.initialize()`.
followMode.on("stateChanged", (state, local, clientId) => {
console.log("The state changed:");
console.log("- state value:", state.value);
console.log("- follow mode type:", state.type);
console.log("- following user id:", state.followingUserId);
console.log(
"- count of other users also following user",
state.otherUsersCount
);
console.log(
"- state.value references local user's stateValue",
state.isLocalValue
);
// Can optionally get the relevant user's presence object
const followingUser = followMode.getUserForClient(clientId);
switch (state.type) {
case FollowModeType.local: {
// Update app to reflect that the user isn't following anyone and there is no presenter.
infoText.innerHTML = "";
// Show a "Start presenting" button in your app.
button.innerHTML = "Start presenting";
button.onclick = followMode.startPresenting;
// Note: state.isLocalValue will be true.
break;
}
case FollowModeType.activeFollowers: {
// Update app to reflect that the local user is being followed by other users.
infoText.innerHTML = `${state.otherUsersCount} users are following you`;
// Does not mean that the local user is presenting to everyone, so you can still show the "Start presenting" button.
button.innerHTML = "Present to all";
button.onclick = followMode.startPresenting;
// Note: state.isLocalValue will be true.
break;
}
case FollowModeType.activePresenter: {
// Update app to reflect that the local user is actively presenting to everyone.
infoText.innerHTML = `You are actively presenting to everyone`;
// Show a "Stop presenting" button in your app.
button.innerHTML = "Stop presenting";
button.onclick = followMode.stopPresenting;
// Note: state.isLocalValue will be true.
break;
}
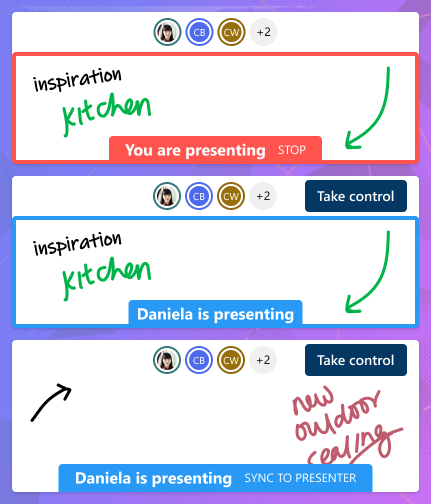
case FollowModeType.followPresenter: {
// The local user is following a remote presenter.
infoText.innerHTML = `${followingUser?.displayName} is presenting to everyone`;
// Show a "Take control" button in your app.
button.innerHTML = "Take control";
button.onclick = followMode.startPresenting;
// Note: state.isLocalValue will be false.
break;
}
case FollowModeType.suspendFollowPresenter: {
// The local user is following a remote presenter but has an active suspension.
infoText.innerHTML = `${followingUser?.displayName} is presenting to everyone`;
// Show a "Sync to presenter" button in your app.
button.innerHTML = "Sync to presenter";
button.onclick = followMode.endSuspension;
// Note: state.isLocalValue will be true.
break;
}
case FollowModeType.followUser: {
// The local user is following a specific remote user.
infoText.innerHTML = `You are following ${followingUser?.displayName}`;
// Show a "Stop following" button in your app.
button.innerHTML = "Stop following";
button.onclick = followMode.stopFollowing;
// Note: state.isLocalValue will be false.
break;
}
case FollowModeType.suspendFollowUser: {
// The local user is following a specific remote user but has an active suspension.
infoText.innerHTML = `You were following ${followingUser?.displayName}`;
// Show a "Resume following" button in your app.
button.innerHTML = "Resume following";
button.onclick = followMode.endSuspension;
// Note: state.isLocalValue will be true.
break;
}
default: {
break;
}
}
const newCameraPosition = state.value;
// TODO: apply new camera position
});
// Register listener for changes to each user's personal state updates.
// This should be done before calling `.initialize()`.
followMode.on("presenceChanged", (user, local) => {
console.log("A user presence changed:");
console.log("- display name:", user.displayName);
console.log("- state value:", user.data?.stateValue);
console.log("- user id user is following:", user.data?.followingUserId);
console.log("- change from local client", local);
console.log("- change impacts local user", user.isLocalUser);
// As an example, we will assume there is a button for each user in the session.
document.getElementById(`follow-user-${user.userId}-button`).onclick = () => {
followMode.followUser(user.userId);
};
// Update 3D scene to reflect this user's camera position (e.g., orb + display name)
const userCameraPosition = user.data?.stateValue;
});
// Define the initial stateValue for the local user (optional).
const startingCameraPosition = {
x: 0,
y: 0,
z: 0,
};
// Start receiving incoming presence updates from the session.
// This will also broadcast the user's `startingCameraPosition` to others in the session.
await followMode.initialize(startingCameraPosition);
// Example of an event listener for a camera position changed event.
// For something like a camera change event, you should use a debounce function to prevent sending updates too frequently.
// Note: it helps to distinguish changes initiated by the local user (e.g., drag mouse) separately from other change events.
function onCameraPositionChanged(position, isUserAction) {
// Broadcast change to other users so that they have their latest camera position
followMode.update(position);
// If the local user changed the position while following another user, we want to suspend.
// Note: helps to distinguish changes initiated by the local user (e.g., drag mouse) separately from other change events.
if (!isUserAction) return;
switch (state.type) {
case FollowModeType.followPresenter:
case FollowModeType.followUser: {
// This will trigger a "stateChanged" event update for the local user only.
followMode.beginSuspension();
break;
}
default: {
// No need to suspend for other types
break;
}
}
}
import {
  LiveShareClient,
  LiveFollowMode,
  FollowModeType,
  IFollowModeState,
  FollowModePresenceUser,
} from "@microsoft/live-share";
import { LiveShareHost } from "@microsoft/teams-js";

// Declare interface for custom data to synchronize with LiveFollowMode.
// In this example, we are synchronizing the camera position in a 3D scene.
interface ICameraPosition {
  x: number;
  y: number;
  z: number;
}

// Join the Fluid container
const host = LiveShareHost.create();
const liveShare = new LiveShareClient(host);
const schema = {
  initialObjects: {
    followMode: LiveFollowMode<ICameraPosition>,
  },
};
const { container } = await liveShare.joinContainer(schema);
// Force casting is necessary because Fluid does not maintain type recognition for `container.initialObjects`.
// Casting here is always safe, as the `initialObjects` is constructed based on the schema you provide to `.joinContainer`.
const followMode = container.initialObjects.followMode as unknown as LiveFollowMode<ICameraPosition>;

// As an example, we will assume there is a button in the application document
const button = document.getElementById("action-button");
// As an example, we will assume there is a div with text showing the follow state
const infoText = document.getElementById("info-text");

// Register listener for changes to the `state` value to use in your app.
// This should be done before calling `.initialize()`.
followMode.on("stateChanged", (state: IFollowModeState<ICameraPosition>, local: boolean, clientId: string) => {
  console.log("The state changed:");
  console.log("- state value:", state.value);
  console.log("- follow mode type:", state.type);
  console.log("- following user id:", state.followingUserId);
  console.log("- count of other users also following user", state.otherUsersCount);
  console.log("- state.value references local user's stateValue", state.isLocalValue);
  // Can optionally get the relevant user's presence object
  const followingUser = followMode.getUserForClient(clientId);
  switch (state.type) {
    case FollowModeType.local: {
        // Update app to reflect that the user isn't following anyone and there is no presenter.
        infoText.innerHTML = "";
        // Show a "Start presenting" button in your app.
        button.innerHTML = "Start presenting";
        button.onclick = followMode.startPresenting;
        // Note: state.isLocalValue will be true.
        break;
    }
    case FollowModeType.activeFollowers: {
        // Update app to reflect that the local user is being followed by other users.
        infoText.innerHTML = `${state.otherUsersCount} users are following you`;
        // Does not mean that the local user is presenting to everyone, so you can still show the "Start presenting" button.
        button.innerHTML = "Present to all";
        button.onclick = followMode.startPresenting;
        // Note: state.isLocalValue will be true.
        break;
    }
    case FollowModeType.activePresenter: {
        // Update app to reflect that the local user is actively presenting to everyone.
        infoText.innerHTML = `You are actively presenting to everyone`;
        // Show a "Stop presenting" button in your app.
        button.innerHTML = "Stop presenting";
        button.onclick = followMode.stopPresenting;
        // Note: state.isLocalValue will be true.
        break;
    }
    case FollowModeType.followPresenter: {
        // The local user is following a remote presenter.
        infoText.innerHTML = `${followingUser?.displayName} is presenting to everyone`;
        // Show a "Take control" button in your app.
        button.innerHTML = "Take control";
        button.onclick = followMode.startPresenting;
        // Note: state.isLocalValue will be false.
        break;
    }
    case FollowModeType.suspendFollowPresenter: {
        // The local user is following a remote presenter but has an active suspension.
        infoText.innerHTML = `${followingUser?.displayName} is presenting to everyone`;
        // Show a "Sync to presenter" button in your app.
        button.innerHTML = "Sync to presenter";
        button.onclick = followMode.endSuspension;
        // Note: state.isLocalValue will be true.
        break;
    }
    case FollowModeType.followUser: {
        // The local user is following a specific remote user.
        infoText.innerHTML = `You are following ${followingUser?.displayName}`;
        // Show a "Stop following" button in your app.
        button.innerHTML = "Stop following";
        button.onclick = followMode.stopFollowing;
        // Note: state.isLocalValue will be false.
        break;
    }
    case FollowModeType.suspendFollowUser: {
        // The local user is following a specific remote user but has an active suspension.
        infoText.innerHTML = `You were following ${followingUser?.displayName}`;
        // Show a "Resume following" button in your app.
        button.innerHTML = "Resume following";
        button.onclick = followMode.endSuspension;
        // Note: state.isLocalValue will be true.
        break;
    }
    default: {
        break;
    }
  }
  const newCameraPosition = state.value;
  // TODO: apply new camera position
});

// Optionally, you can register a listener for changes to each user's personal state updates.
// This should be done before calling `.initialize()`.
followMode.on("presenceChanged", (user: FollowModePresenceUser<ICameraPosition>, local: boolean) => {
  console.log("A user presence changed:");
  console.log("- display name:", user.displayName);
  console.log("- state value:", user.data?.stateValue);
  console.log("- userId that user is following:", user.data?.followingUserId);
  console.log("- change from local client", local);
  console.log("- change impacts local user", user.isLocalUser);
  // As an example, we will assume there is a button for each user in the session.
  document.getElementById(`follow-user-${user.userId}-button`)!.onclick = () => {
    followMode.followUser(user.userId);
  };
  // Update 3D scene to reflect this user's camera position (e.g., orb + display name)
  const userCameraPosition = user.data?.stateValue;
});

// Define the initial stateValue for the local user (optional).
const startingCameraPosition: ICameraPosition = {
  x: 0,
  y: 0,
  z: 0,
};
// Start receiving incoming presence updates from the session.
// This will also broadcast the user's `startingCameraPosition` to others in the session.
await followMode.initialize(startingCameraPosition);

// Example of an event listener for a camera position changed event.
// For something like a camera change event, you should use a debounce function to prevent sending updates too frequently.
// Note: it helps to distinguish changes initiated by the local user (e.g., drag mouse) separately from other change events.
function onCameraPositionChanged(position: ICameraPosition, isUserAction: boolean) {
    // Broadcast change to other users so that they have their latest camera position
    followMode.update(position);
    // If the local user changed the position while following another user, we want to suspend.
    // Note: helps to distinguish changes initiated by the local user (e.g., drag mouse) separately from other change events.
    if (!isUserAction) return;
    switch (state.type) {
      case FollowModeType.followPresenter:
      case FollowModeType.followUser: {
        // This will trigger a "stateChanged" event update for the local user only.
        followMode.beginSuspension();
        break;
      }
      default: {
        // No need to suspend for other types
        break;
      }
    }
}
import { FollowModeType } from "@microsoft/live-share";
import { useLiveFollowMode } from "@microsoft/live-share-react";
// As an example, we will use a fake component to denote what a 3D viewer might look like in an app
import { Example3DModelViewer } from "./components";

// Define a unique key that differentiates this usage of `useLiveFollowMode` from others in your app
const MY_UNIQUE_KEY = "follow-mode-key";

// Define the initial stateValue for the local user (optional).
const startingCameraPosition = {
  x: 0,
  y: 0,
  z: 0,
};

// Example component for using useLiveFollowMode
export const MyLiveFollowMode = () => {
  const {
    state,
    localUser,
    otherUsers,
    allUsers,
    liveFollowMode,
    update,
    startPresenting,
    stopPresenting,
    beginSuspension,
    endSuspension,
    followUser,
    stopFollowing,
  } = useLiveFollowMode(MY_UNIQUE_KEY, startingCameraPosition);

  // Example of an event listener for a camera position changed event.
  // For something like a camera change event, you should use a debounce function to prevent sending updates too frequently.
  // Note: it helps to distinguish changes initiated by the local user (e.g., drag mouse) separately from other change events.
  function onCameraPositionChanged(position, isUserAction) {
    // Broadcast change to other users so that they have their latest camera position
    update(position);
    // If the local user changed the position while following another user, we want to suspend.
    // Note: helps to distinguish changes initiated by the local user (e.g., drag mouse) separately from other change events.
    if (!isUserAction) return;
    switch (state.type) {
      case FollowModeType.followPresenter:
      case FollowModeType.followUser: {
        // This will trigger a "stateChanged" event update for the local user only.
        followMode.beginSuspension();
        break;
      }
      default: {
        // No need to suspend for other types
        break;
      }
    }
  }

  // Can optionally get the relevant user's presence object
  const followingUser = liveFollowMode?.getUser(state.followingUserId);

  // Render UI
  return (
    <div>
      {state.type === FollowModeType.local && (
        <div>
          <p>{""}</p>
          <button onClick={startPresenting}>{"Start presenting"}</button>
        </div>
      )}
      {state.type === FollowModeType.activeFollowers && (
        <div>
          <p>{`${state.otherUsersCount} users are following you`}</p>
          <button onClick={startPresenting}>{"Present to all"}</button>
        </div>
      )}
      {state.type === FollowModeType.activePresenter && (
        <div>
          <p>{`You are actively presenting to everyone`}</p>
          <button onClick={stopPresenting}>{"Stop presenting"}</button>
        </div>
      )}
      {state.type === FollowModeType.followPresenter && (
        <div>
          <p>{`${followingUser?.displayName} is presenting to everyone`}</p>
          <button onClick={startPresenting}>{"Take control"}</button>
        </div>
      )}
      {state.type === FollowModeType.suspendFollowPresenter && (
        <div>
          <p>{`${followingUser?.displayName} is presenting to everyone`}</p>
          <button onClick={endSuspension}>{"Sync to presenter"}</button>
        </div>
      )}
      {state.type === FollowModeType.followUser && (
        <div>
          <p>{`You are following ${followingUser?.displayName}`}</p>
          <button onClick={stopFollowing}>{"Stop following"}</button>
        </div>
      )}
      {state.type === FollowModeType.suspendFollowUser && (
        <div>
          <p>{`You were following ${followingUser?.displayName}`}</p>
          <button onClick={stopFollowing}>{"Resume following"}</button>
        </div>
      )}
      <div>
        <p>{"Follow a specific user:"}</p>
        {otherUsers.map((user) => (
          <button
            onClick={() => {
              followUser(user.userId);
            }}
            key={user.userId}
          >
            {user.displayName}
          </button>
        ))}
      </div>
      <Example3DModelViewer
        cameraPosition={state.value}
        onCameraPositionChanged={onCameraPositionChanged}
      />
    </div>
  );
};
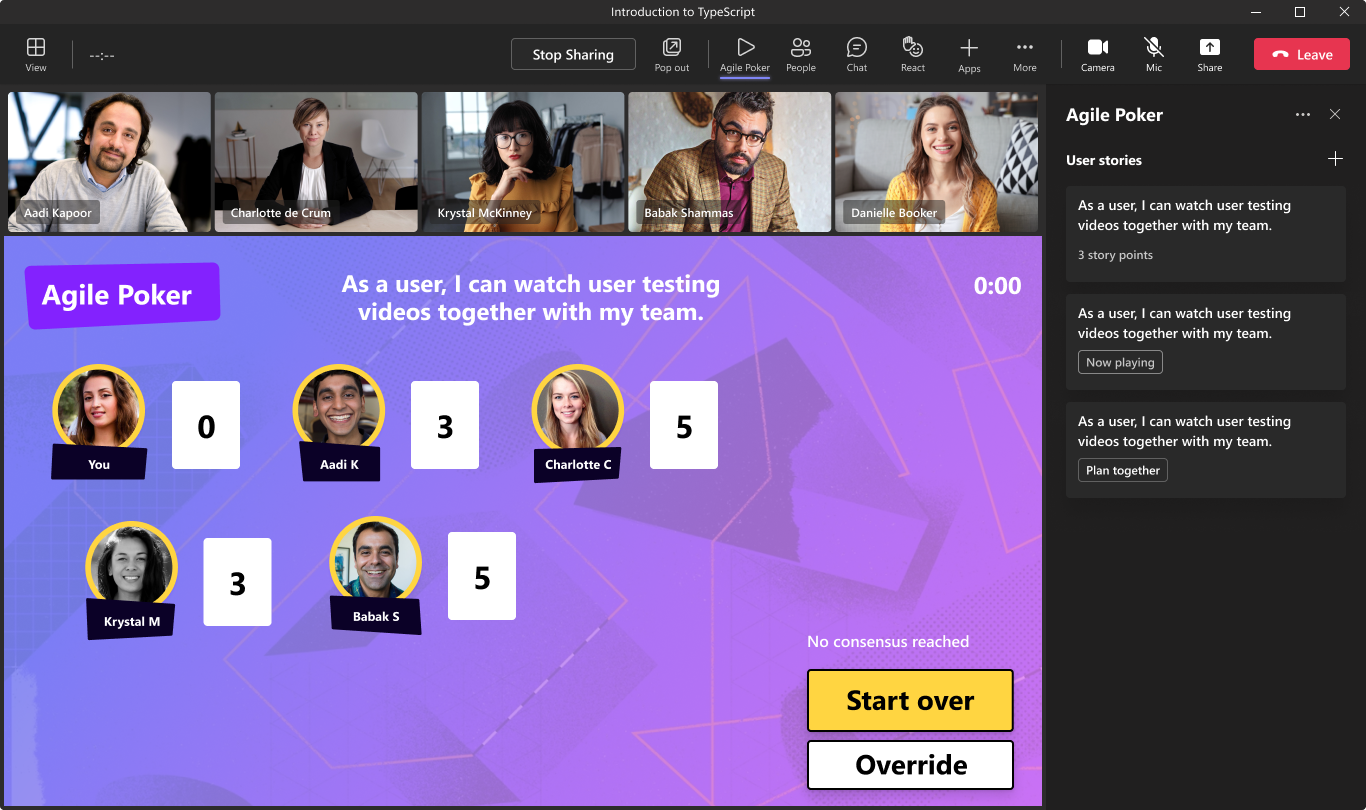
meetingStageコンテキストでは、ユーザーは共同作業を行い、より生産的なディスカッションを容易にするために同期的に発表しています。 ユーザーが会議ステージにコンテンツを提示する場合は、最初の発表者の startPresenting() API を呼び出す必要があります。 コラボレーション ステージビューのような content コンテキストでは、コンテンツは最も一般的に非同期的に使用されます。 この場合は、[フォロー] ボタンなど、ユーザーがリアルタイムコラボレーションをオプトインできるようにすることが最善です。 Teams JavaScript SDK の teamsJs.app.getContext() API を使用すると、それに応じて簡単に機能を調整できます。
import {
  LiveShareClient,
  LiveFollowMode,
  FollowModeType,
} from "@microsoft/live-share";
import {
  app,
  meeting,
  FrameContexts,
  LiveShareHost,
} from "@microsoft/teams-js";

// Join the Fluid container
const host = LiveShareHost.create();
const liveShare = new LiveShareClient(host);
const schema = {
  initialObjects: {
    followMode: LiveFollowMode,
  },
};
const { container } = await liveShare.joinContainer(schema);
const followMode = container.initialObjects.followMode;

// Get teamsJs context
const context = await app.getContext();
// Take control if in meetingStage context and local user is initial presenter
if (context.page?.frameContext === FrameContexts.meetingStage) {
  // Take control if in meetingStage context and local user is initial presenter
  meeting.getAppContentStageSharingState((error, state) => {
    const isShareInitiator = state?.isShareInitiator;
    if (!isShareInitiator) return;
    // The user is the initial presenter, so we "take control"
    await followMode.startPresenting();
  });
}
// TODO: rest of app logic
import {
  LiveShareClient,
  LiveFollowMode,
  FollowModeType,
  IFollowModeState,
  FollowModePresenceUser,
} from "@microsoft/live-share";
import {
  app,
  meeting,
  FrameContexts,
  LiveShareHost,
} from "@microsoft/teams-js";

// Join the Fluid container
const host = LiveShareHost.create();
const liveShare = new LiveShareClient(host);
const schema = {
  initialObjects: {
    followMode: LiveFollowMode,
  },
};
const { container } = await liveShare.joinContainer(schema);
// Force casting is necessary because Fluid does not maintain type recognition for `container.initialObjects`.
// Casting here is always safe, as the `initialObjects` is constructed based on the schema you provide to `.joinContainer`.
const followMode = container.initialObjects.followMode as unknown as LiveFollowMode;

// Get teamsJs context
const context: app.Context = await app.getContext();
// Take control if in meetingStage context and local user is initial presenter
if (context.page?.frameContext === FrameContexts.meetingStage) {
  // Check if user is initial presenter
  meeting.getAppContentStageSharingState((error, state) => {
    // isShareInitiator isn't declared in the typedocs in the SDK, so we cast as any
    const isShareInitiator = (state as any)?.isShareInitiator;
    if (!isShareInitiator) return;
    // The user is the initial presenter, so we "take control"
    await followMode.startPresenting();
  });
}
// TODO: rest of app logic
import { FollowModeType, LiveDataObjectInitializeState } from "@microsoft/live-share";
import { useLiveFollowMode } from "@microsoft/live-share-react";
import { useRef, useEffect, useState } from "react";
// As an example, we will use a fake component to denote what a 3D viewer might look like in an app
import { Example3DModelViewer } from "./components";

// Define a unique key that differentiates this usage of `useLiveFollowMode` from others in your app
const MY_UNIQUE_KEY = "follow-mode-key";

// Example component for using useLiveFollowMode
export const MyLiveFollowMode = () => {
  const {
    liveFollowMode,
    startPresenting,
  } = useLiveFollowMode(MY_UNIQUE_KEY, undefined);

  const [isShareInitiator, setIsShareInitiator] = useState(false);

  // Check if user is using app in meeting stage and is the initial presenter
  useEffect(() => {
    // Get teamsJs context
    app.getContext()
      .then(async (context: app.Context) => {
        if (context.page?.frameContext !== FrameContexts.meetingStage) return;
        meeting.getAppContentStageSharingState((error, state) => {
          // isShareInitiator isn't declared in the typedocs in the SDK, so we cast as any
          const isShareInitiator = (state as any)?.isShareInitiator;
          if (!isShareInitiator) return;
          setIsShareInitiator(true);
        });
      });
  }, []);

  // Take control if in meetingStage context and local user is initial presenter
  useEffect(() => {
    // Wait for liveFollowMode to be initialized
    if (liveFollowMode?.initializeState !== LiveDataObjectInitializeState.succeeded) return;
    // Skip if user is not the initial presenter
    if (!isShareInitiator) return;
    startPresenting();
  }, [liveFollowMode, startPresenting, isShareInitiator])

  // TODO: proceed with rest of app setup
  return (
    <></>
  );
};
import {
  LiveShareClient,
  TestLiveShareHost,
  LiveState,
} from "@microsoft/live-share";
import { LiveShareHost } from "@microsoft/teams-js";
import { SharedMap } from "fluid-framework";

/**
 * Detect whether you are in Teams or local environment using your preferred method.
 * Options for this include: environment variables, URL params, Teams FX, etc.
 */
const inTeams = process.env.IN_TEAMS;
// Join the Fluid container
const host = inTeams ? LiveShareHost.create() : TestLiveShareHost.create();
const liveShare = new LiveShareClient(host);
const schema = {
  initialObjects: {
    liveState: LiveState,
    sharedMap: SharedMap,
  },
};
const { container } = await liveShare.joinContainer(schema);

// ... ready to start app sync logic
import {
  LiveShareClient,
  TestLiveShareHost,
  LiveState,
  ILiveShareHost,
} from "@microsoft/live-share";
import { LiveShareHost } from "@microsoft/teams-js";
import { ContainerSchema, SharedMap } from "fluid-framework";

/**
 * Detect whether you are in Teams or local environment using your preferred method.
 * Options for this include: environment variables, URL params, Teams FX, etc.
 */
const inTeams = process.env.IN_TEAMS;
// Join the Fluid container
const host: ILiveShareHost = inTeams
  ? LiveShareHost.create()
  : TestLiveShareHost.create();
const liveShare = new LiveShareClient(host);
const schema: ContainerSchema = {
  initialObjects: {
    exampleMap: SharedMap,
    liveState: LiveState,
  },
};
const { container } = await liveShare.joinContainer(schema);

// ... ready to start app sync logic
import { TestLiveShareHost } from "@microsoft/live-share";
import { LiveShareHost } from "@microsoft/teams-js";
import {
  LiveShareProvider,
  useLiveShareContext,
} from "@microsoft/live-share-react";
import { useState } from "react";

/**
 * Detect whether you are in Teams or local environment using your preferred method.
 * Options for this include: environment variables, URL params, Teams FX, etc.
 */
const inTeams = process.env.IN_TEAMS;

export const App = () => {
  // Create the host as React state so that it doesn't get reset on mount
  const [host] = useState(
    inTeams ? LiveShareHost.create() : TestLiveShareHost.create()
  );

  // Live Share for React does not require that you define a custom Fluid schema
  return (
    <LiveShareProvider host={host} joinOnLoad>
      <LiveShareLoading />
    </LiveShareProvider>
  );
};

const LiveShareLoading = () => {
  // Any live-share-react hook (e.g., useLiveShareContext, useLiveState, etc.) must be a child of <LiveShareProvider>
  const { joined } = useLiveShareContext();
  if (joined) {
    return <p>{"Loading..."}</p>;
  }
  return <p>{"Your app here..."}</p>;
};