Teams で RAG ボットを構築する
高度な Q&チャットボットは、大規模言語モデル (LLM) の助けを借りて構築された強力なアプリです。 チャットボットは、取得拡張生成 (RAG) というメソッドを使用して特定のソースから情報をプルすることで、質問に回答します。 RAG アーキテクチャには、次の 2 つの主要なフローがあります。
データ インジェスト: ソースからデータを取り込み、インデックスを作成するためのパイプライン。 これは通常、オフラインで発生します。
取得と生成: 実行時にユーザー クエリを受け取り、関連するデータをインデックスから取得し、モデルに渡す RAG チェーン。
Microsoft Teamsを使用すると、RAG を使用して会話型ボットを構築し、生産性を最大化するための強化されたエクスペリエンスを作成できます。 Teams Toolkit では、Azure AI 検索、Microsoft 365 SharePoint、およびカスタム API の機能を異なるデータ ソースと LLM として組み合わせて、Teams で会話型検索エクスペリエンスを作成する一連の準備が整ったアプリ テンプレートが [データと チャット ] カテゴリに用意されています。
前提条件
| インストール | 使用するには... |
|---|---|
| Visual Studio Code | JavaScript、TypeScript、または Python ビルド環境。 最新バージョンを使用します。 |
| Teams ツールキット | アプリのプロジェクト スキャフォールディングを作成する Microsoft Visual Studio Code 拡張機能。 最新バージョンを使用します。 |
| Node.js | バックエンド JavaScript ランタイム環境。 詳細については、「 プロジェクトの種類Node.js バージョン互換性テーブル」を参照してください。 |
| Microsoft Teams | Microsoft Teams、チャット、会議、通話のアプリを通じて作業するすべてのユーザーと 1 か所で共同作業を行うことができます。 |
| Azure OpenAI | 最初に OpenAI API キーを作成して、OpenAI の生成済み事前トレーニングトランスフォーマー (GPT) を使用します。 アプリをホストする場合、または Azure でリソースにアクセスする場合は、Azure OpenAI サービスを作成する必要があります。 |
新しい基本的な AI チャットボット プロジェクトを作成する
Visual Studio Code を開きます。
Visual Studio Code アクティビティ バーの [Teams Toolkit
 ] アイコンを選択します。
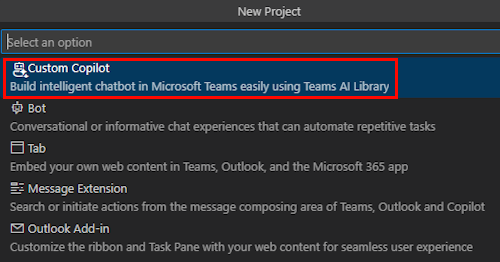
[ 新しいアプリの作成] を選択します。
![Teams Toolkit サイドバーの [Create New Project]\(新しいプロジェクトの作成\) リンクの場所を示すスクリーンショット。](../assets/images/teams-toolkit-v2/custom-copilot/create-new-app.png)
[ カスタム Copilot] を選択します。
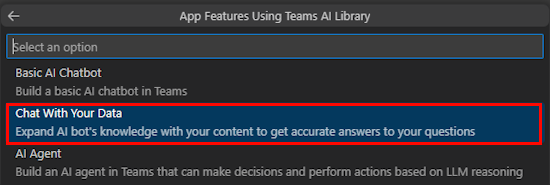
[ データとチャット] を選択します。
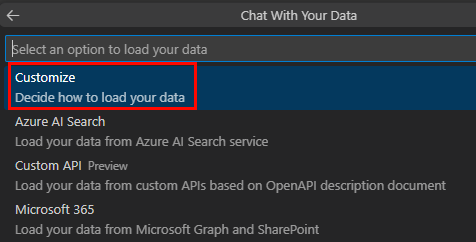
[ カスタマイズ] を選択します。
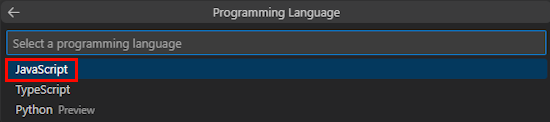
[ JavaScript] を選択します。
[ Azure OpenAI ] または [OpenAI] を選択します。
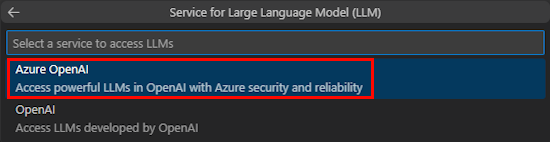
選択したサービスに基づいて 、Azure OpenAI または OpenAI の資格情報を入力します。 Enter キーを押します。

[ 既定のフォルダー] を選択します。

既定の場所を変更するには、次の手順に従います。
- [ 参照] を選択します。
- プロジェクト ワークスペースの場所を選択します。
- [ フォルダーの選択] を選択します。
アプリのアプリ名を入力し、 Enter キーを選択します。

データとのチャット プロジェクト ワークスペースが正常に作成されました。
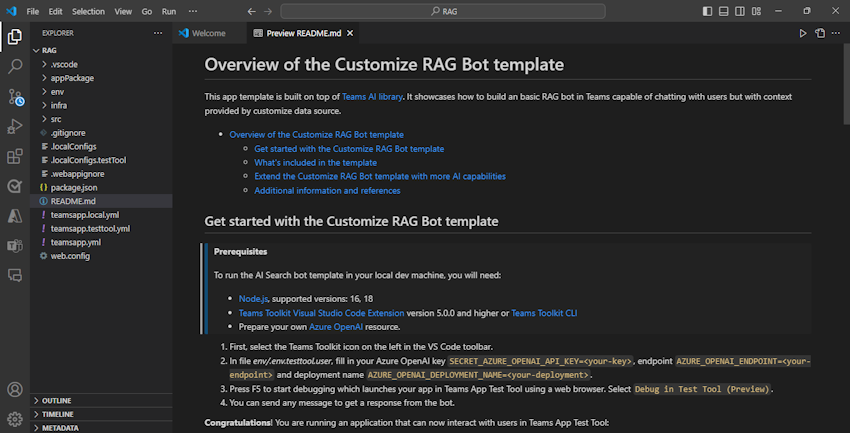
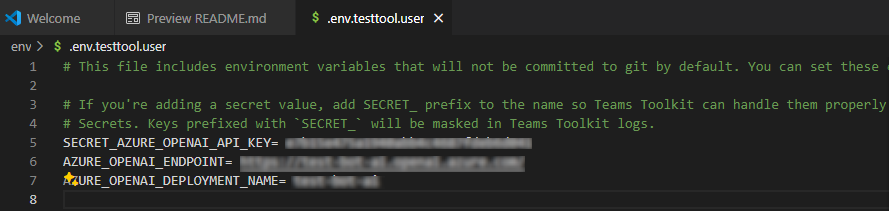
[エクスプローラー] で、env>.env.testtool.user ファイルに移動します。
次の値を更新します。
SECRET_AZURE_OPENAI_API_KEY=<your-key>AZURE_OPENAI_ENDPOINT=<your-endpoint>AZURE_OPENAI_DEPLOYMENT_NAME=<your-deployment>
アプリをデバッグするには、 F5 キーを選択するか、左側のウィンドウで [ 実行とデバッグ] (Ctrl + Shift + D) を選択し、ドロップダウン リストから [ テスト ツール (プレビュー)] で [デバッグ ] を選択します。
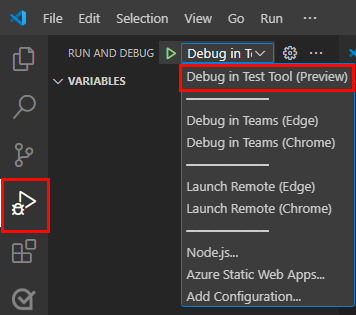
テスト ツールは、Web ページでボットを開きます。

ボット アプリのソース コードのツアーを開始する
| フォルダー | コンテンツ |
|---|---|
.vscode |
デバッグ用の Visual Studio Code ファイル。 |
appPackage |
Teams アプリ マニフェストのテンプレート。 |
env |
環境ファイル。 |
infra |
Azure リソースをプロビジョニングするためのテンプレート。 |
src |
アプリのソース コード。 |
src/index.js |
ボット アプリ サーバーを設定します。 |
src/adapter.js |
ボット アダプターを設定します。 |
src/config.js |
環境変数を定義します。 |
src/prompts/chat/skprompt.txt |
プロンプトを定義します。 |
src/prompts/chat/config.json |
プロンプトを構成します。 |
src/app/app.js |
RAG ボットのビジネス ロジックを処理します。 |
src/app/myDataSource.js |
データ ソースを定義します。 |
src/data/*.md |
生テキスト データ ソース。 |
teamsapp.yml |
これは、Teams Toolkit プロジェクト ファイルのメインです。 プロジェクト ファイルは、プロパティと構成ステージの定義を定義します。 |
teamsapp.local.yml |
これにより、ローカル実行とデバッグを有効にするアクションで teamsapp.yml がオーバーライドされます。 |
teamsapp.testtool.yml |
これにより、Teams アプリ テスト ツールでローカル実行とデバッグを有効にするアクションで teamsapp.yml がオーバーライドされます。 |
Teams AI の RAG シナリオ
AI コンテキストでは、ベクター データベースは、埋め込みデータを格納し、ベクター類似性検索を提供する RAG ストレージとして広く使用されています。 Teams AI ライブラリには、指定された入力の埋め込みを作成するのに役立つユーティリティが用意されています。
ヒント
Teams AI ライブラリにはベクター データベースの実装がないため、作成した埋め込みを処理する独自のロジックを追加する必要があります。
// create OpenAIEmbeddings instance
const model = new OpenAIEmbeddings({ ... endpoint, apikey, model, ... });

// create embeddings for the given inputs
const embeddings = await model.createEmbeddings(model, inputs);

// your own logic to process embeddings
次の図は、Teams AI ライブラリが取得と生成プロセスの各ステップを容易にする機能を提供する方法を示しています。
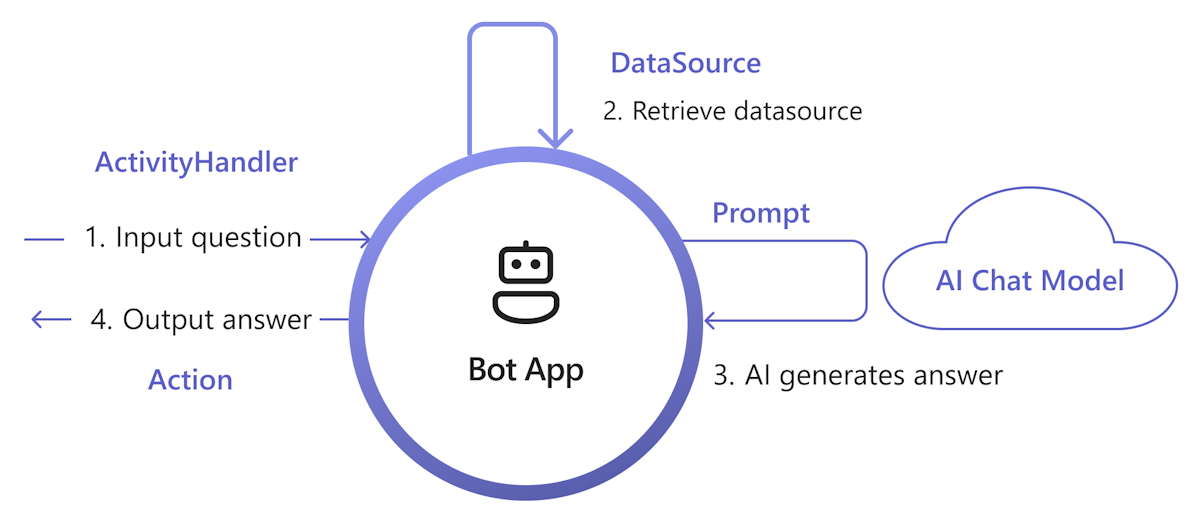
入力を処理する: 最も簡単な方法は、ユーザーの入力を変更せずに取得に渡すことです。 ただし、取得する前に入力をカスタマイズする場合は、特定の受信アクティビティに アクティビティ ハンドラー を追加できます。
データソースの取得: Teams AI ライブラリには、独自の取得ロジックを追加するための
DataSourceインターフェイスが用意されています。 独自のDataSourceインスタンスを作成する必要があり、Teams AI ライブラリはオンデマンドで呼び出します。class MyDataSource implements DataSource { /** * Name of the data source. */ public readonly name = "my-datasource"; /** * Renders the data source as a string of text. * @param context Turn context for the current turn of conversation with the user. * @param memory An interface for accessing state values. * @param tokenizer Tokenizer to use when rendering the data source. * @param maxTokens Maximum number of tokens allowed to be rendered. * @returns The text to inject into the prompt as a `RenderedPromptSection` object. */ renderData( context: TurnContext, memory: Memory, tokenizer: Tokenizer, maxTokens: number ): Promise<RenderedPromptSection<string>> { ... } }プロンプトを使用して AI を呼び出す: Teams AI プロンプト システムでは、
augmentation.data_sources構成セクションを調整することで、DataSourceを簡単に挿入できます。 これにより、プロンプトがDataSourceとライブラリ オーケストレーターに接続され、DataSourceテキストが最終的なプロンプトに挿入されます。 詳細については、「 authorprompt」を参照してください。 たとえば、プロンプトのconfig.jsonファイルでは、次のようになります。{ "schema": 1.1, ... "augmentation": { "data_sources": { "my-datasource": 1200 } } }ビルド応答: 既定では、Teams AI ライブラリは、ユーザーへのテキスト メッセージとして AI によって生成された応答に応答します。 応答をカスタマイズする場合は、既定の SAY アクション をオーバーライドするか、AI モデル を明示的に呼び出して、アダプティブ カードなどの応答を作成できます。
アプリに RAG を追加するための実装の最小セットを次に示します。 一般に、knowledgeをプロンプトに挿入するDataSourceを実装し、AI がknowledgeに基づいて応答を生成できるようにします。
DataSourceインターフェイスを実装するmyDataSource.tsファイルを作成します。export class MyDataSource implements DataSource { public readonly name = "my-datasource"; public async renderData( context: TurnContext, memory: Memory, tokenizer: Tokenizer, maxTokens: number ): Promise<RenderedPromptSection<string>> { const input = memory.getValue('temp.input') as string; let knowledge = "There's no knowledge found."; // hard-code knowledge if (input?.includes("shuttle bus")) { knowledge = "Company's shuttle bus may be 15 minutes late on rainy days."; } else if (input?.includes("cafe")) { knowledge = "The Cafe's available time is 9:00 to 17:00 on working days and 10:00 to 16:00 on weekends and holidays." } return { output: knowledge, length: knowledge.length, tooLong: false } } }app.tsファイルにDataSourceを登録します。// Register your data source to prompt manager planner.prompts.addDataSource(new MyDataSource());
prompts/qa/skprompt.txtファイルを作成し、次のテキストを追加します。The following is a conversation with an AI assistant. The assistant is helpful, creative, clever, and very friendly to answer user's question. Base your answer off the text below:prompts/qa/config.jsonファイルを作成し、次のコードを追加してデータ ソースに接続します。{ "schema": 1.1, "description": "Chat with QA Assistant", "type": "completion", "completion": { "model": "gpt-35-turbo", "completion_type": "chat", "include_history": true, "include_input": true, "max_input_tokens": 2800, "max_tokens": 1000, "temperature": 0.9, "top_p": 0.0, "presence_penalty": 0.6, "frequency_penalty": 0.0, "stop_sequences": [] }, "augmentation": { "data_sources": { "my-datasource": 1200 } } }
データ ソースを選択する
Teams Toolkit では、データまたは RAG を 使用したチャット のシナリオで、次の種類のデータ ソースが提供されます。
カスタマイズ: データ インジェストを完全に制御して、独自のベクター インデックスを作成し、データ ソースとして使用できます。 詳細については、「独自の データ インジェストを作成する」を参照してください。
また、ベクター データベースとして Azure Cosmos DB Vector Database Extension または Azure PostgreSQL Server ベクター拡張機能を使用したり、Web Search API をBingして最新の Web コンテンツを取得したりして、独自のデータ ソースに接続する任意のデータ ソース インスタンスを実装することもできます。
Azure AI Search: Azure AI Search Service にドキュメントを追加し、検索インデックスをデータ ソースとして使用するサンプルを提供します。
カスタム API: チャットボットが OpenAPI 説明ドキュメントで定義されている API を呼び出して、API サービスからドメイン データを取得できるようにします。
Microsoft Graph と SharePoint: Microsoft Graph Search API の Microsoft 365 コンテンツをデータ ソースとして使用するサンプルを提供します。
独自のデータ インジェストを構築する
データ インジェストを構築するには、次の手順に従います。
ソース ドキュメントを読み込む: 埋め込みモデルがテキストのみを入力として受け取るように、文書に意味のあるテキストがあることを確認します。
チャンクに分割する: 埋め込みモデルには入力トークンの制限が設定されるため、API 呼び出しエラーを回避するためにドキュメントを分割してください。
埋め込みモデルの呼び出し: 埋め込みモデル API を呼び出して、指定された入力の埋め込みを作成します。
埋め込みを格納する: 作成した埋め込みをベクター データベースに格納します。 さらに参照するために、有用なメタデータと生のコンテンツも含めます。
サンプル コード
loader.ts: ソース入力としてのプレーン テキスト。import * as fs from "node:fs"; export function loadTextFile(path: string): string { return fs.readFileSync(path, "utf-8"); }splitter.ts: テキストをチャンクに分割し、重複します。// split words by delimiters. const delimiters = [" ", "\t", "\r", "\n"]; export function split(content: string, length: number, overlap: number): Array<string> { const results = new Array<string>(); let cursor = 0, curChunk = 0; results.push(""); while(cursor < content.length) { const curChar = content[cursor]; if (delimiters.includes(curChar)) { // check chunk length while (curChunk < results.length && results[curChunk].length >= length) { curChunk ++; } for (let i = curChunk; i < results.length; i++) { results[i] += curChar; } if (results[results.length - 1].length >= length - overlap) { results.push(""); } } else { // append for (let i = curChunk; i < results.length; i++) { results[i] += curChar; } } cursor ++; } while (curChunk < results.length - 1) { results.pop(); } return results; }embeddings.ts: Teams AI ライブラリOpenAIEmbeddingsを使用して埋め込みを作成します。import { OpenAIEmbeddings } from "@microsoft/teams-ai"; const embeddingClient = new OpenAIEmbeddings({ azureApiKey: "<your-aoai-key>", azureEndpoint: "<your-aoai-endpoint>", azureDeployment: "<your-embedding-deployment, e.g., text-embedding-ada-002>" }); export async function createEmbeddings(content: string): Promise<number[]> { const response = await embeddingClient.createEmbeddings(content); return response.output[0]; }searchIndex.ts: Azure AI Search インデックスを作成します。import { SearchIndexClient, AzureKeyCredential, SearchIndex } from "@azure/search-documents"; const endpoint = "<your-search-endpoint>"; const apiKey = "<your-search-key>"; const indexName = "<your-index-name>"; const indexDef: SearchIndex = { name: indexName, fields: [ { type: "Edm.String", name: "id", key: true, }, { type: "Edm.String", name: "content", searchable: true, }, { type: "Edm.String", name: "filepath", searchable: true, filterable: true, }, { type: "Collection(Edm.Single)", name: "contentVector", searchable: true, vectorSearchDimensions: 1536, vectorSearchProfileName: "default" } ], vectorSearch: { algorithms: [{ name: "default", kind: "hnsw" }], profiles: [{ name: "default", algorithmConfigurationName: "default" }] }, semanticSearch: { defaultConfigurationName: "default", configurations: [{ name: "default", prioritizedFields: { contentFields: [{ name: "content" }] } }] } }; export async function createNewIndex(): Promise<void> { const client = new SearchIndexClient(endpoint, new AzureKeyCredential(apiKey)); await client.createIndex(indexDef); }searchIndexer.ts: 作成した埋め込みとその他のフィールドを Azure AI Search Index にアップロードします。import { AzureKeyCredential, SearchClient } from "@azure/search-documents"; export interface Doc { id: string, content: string, filepath: string, contentVector: number[] } const endpoint = "<your-search-endpoint>"; const apiKey = "<your-search-key>"; const indexName = "<your-index-name>"; const searchClient: SearchClient<Doc> = new SearchClient<Doc>(endpoint, indexName, new AzureKeyCredential(apiKey)); export async function indexDoc(doc: Doc): Promise<boolean> { const response = await searchClient.mergeOrUploadDocuments([doc]); return response.results.every((result) => result.succeeded); }index.ts: 上記のコンポーネントを調整します。import { createEmbeddings } from "./embeddings"; import { loadTextFile } from "./loader"; import { createNewIndex } from "./searchIndex"; import { indexDoc } from "./searchIndexer"; import { split } from "./splitter"; async function main() { // Only need to call once await createNewIndex(); // local files as source input const files = [`${__dirname}/data/A.md`, `${__dirname}/data/A.md`]; for (const file of files) { // load file const fullContent = loadTextFile(file); // split into chunks const contents = split(fullContent, 1000, 100); let partIndex = 0; for (const content of contents) { partIndex ++; // create embeddings const embeddings = await createEmbeddings(content); // upload to index await indexDoc({ id: `${file.replace(/[^a-z0-9]/ig, "")}___${partIndex}`, content: content, filepath: file, contentVector: embeddings, }); } } } main().then().finally();
データ ソースとしての Azure AI Search
このセクションでは、次の方法について説明します。
- Azure OpenAI Service を使用して Azure AI Search にドキュメントを追加します。
- RAG アプリで Azure AI Search インデックスをデータ ソースとして使用します。
Azure AI Search にドキュメントを追加する
注:
この方法では、AI モデルと呼ばれるエンド ツー エンドのチャット API が作成されます。 以前に作成したインデックスをデータ ソースとして使用し、Teams AI ライブラリを使用して取得とプロンプトをカスタマイズすることもできます。
ナレッジ ドキュメントを Azure AI Search Service に取り込み、データに対して Azure OpenAI を使用してベクター インデックスを作成できます。 インジェスト後、インデックスをデータ ソースとして使用できます。
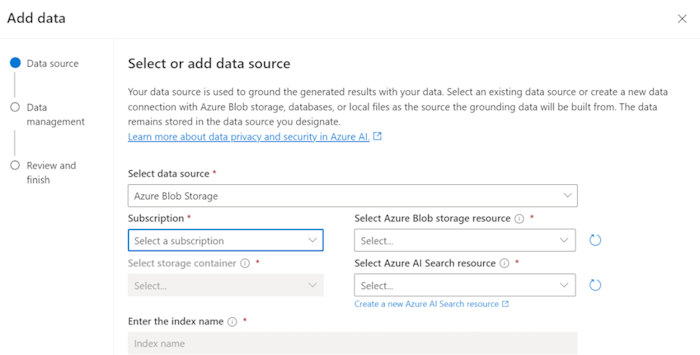
Azure Blob Storage でデータを準備します。
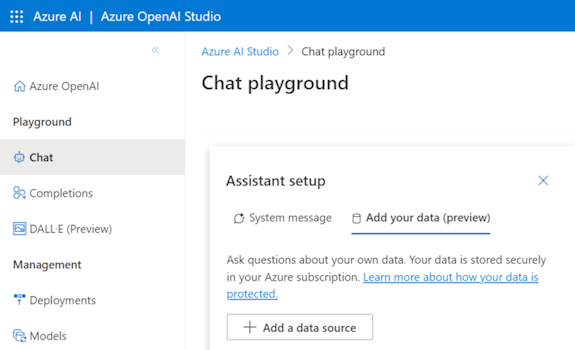
Azure OpenAI Studio で、[ データ ソースの追加] を選択します。
必要なフィールドを更新します。
[次へ] を選択します。
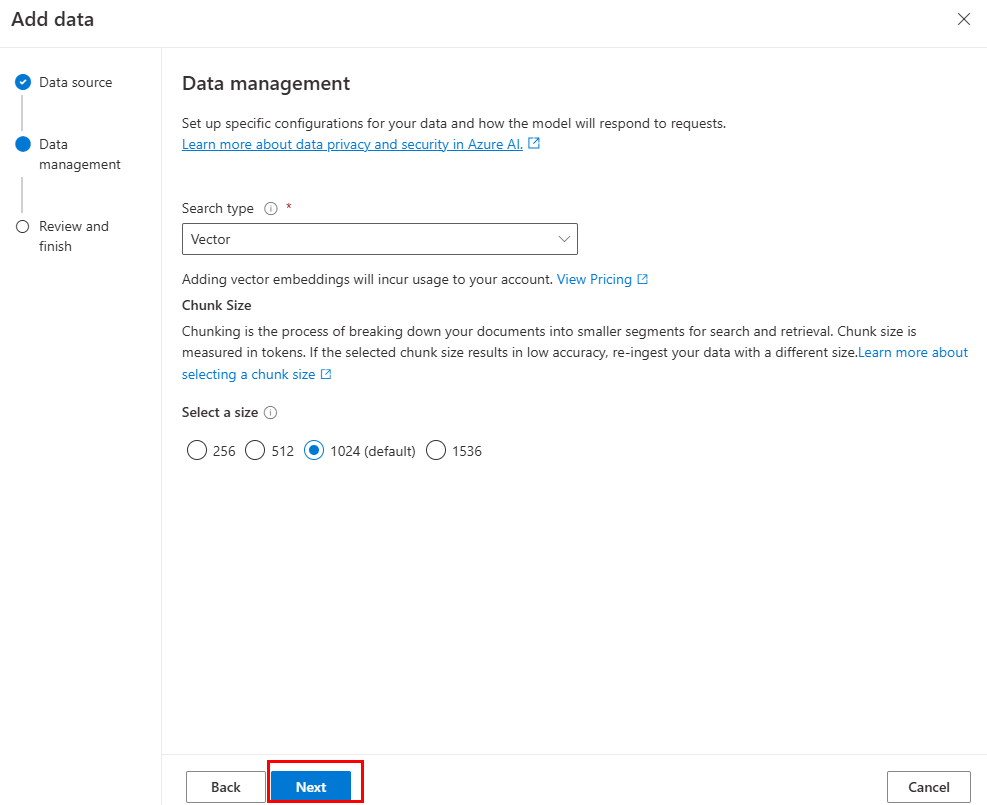
[ データ管理] ページが表示されます。
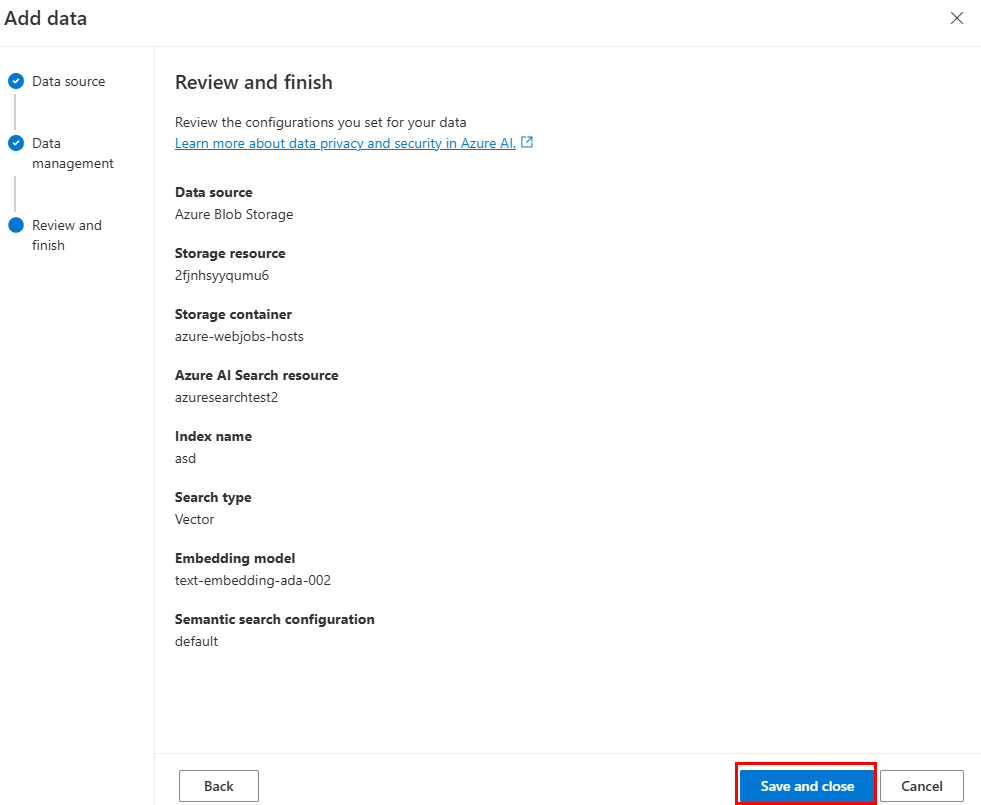
必要なフィールドを更新します。
[次へ] を選択します。
![[データ ソースの追加] を選択するオプションを示すスクリーンショット。](../assets/images/teams-toolkit-v2/custom-copilot/select-add-data-source.png)
必要なフィールドを更新します。 [次へ] を選択します。
[ 保存して閉じる] を選択します。
Azure AI Search インデックス データ ソースを使用する
Azure AI Search にデータを取り込んだ後、独自の DataSource を実装して、検索インデックスからデータを取得できます。
const { AzureKeyCredential, SearchClient } = require("@azure/search-documents");
const { DataSource, Memory, OpenAIEmbeddings, Tokenizer } = require("@microsoft/teams-ai");
const { TurnContext } = require("botbuilder");

// Define the interface for document
class Doc {
  constructor(id, content, filepath) {
    this.id = id;
    this.content = content; // searchable
    this.filepath = filepath;
  }
}

// Azure OpenAI configuration
const aoaiEndpoint = "<your-aoai-endpoint>";
const aoaiApiKey = "<your-aoai-key>";
const aoaiDeployment = "<your-embedding-deployment, e.g., text-embedding-ada-002>";

// Azure AI Search configuration
const searchEndpoint = "<your-search-endpoint>";
const searchApiKey = "<your-search-apikey>";
const searchIndexName = "<your-index-name>";

// Define MyDataSource class implementing DataSource interface
class MyDataSource extends DataSource {
  constructor() {
    super();
    this.name = "my-datasource";
    this.embeddingClient = new OpenAIEmbeddings({
      azureEndpoint: aoaiEndpoint,
      azureApiKey: aoaiApiKey,
      azureDeployment: aoaiDeployment
    });
    this.searchClient = new SearchClient(searchEndpoint, searchIndexName, new AzureKeyCredential(searchApiKey));
  }

  async renderData(context, memory, tokenizer, maxTokens) {
    // use user input as query
    const input = memory.getValue("temp.input");

    // generate embeddings
    const embeddings = (await this.embeddingClient.createEmbeddings(input)).output[0];

    // query Azure AI Search
    const response = await this.searchClient.search(input, {
      select: [ "id", "content", "filepath" ],
      searchFields: ["rawContent"],
      vectorSearchOptions: {
        queries: [{
          kind: "vector",
          fields: [ "contentVector" ],
          vector: embeddings,
          kNearestNeighborsCount: 3
        }]
      },
      queryType: "semantic",
      top: 3,
      semanticSearchOptions: {
        // your semantic configuration name
        configurationName: "default",
      }
    });

    // Add documents until you run out of tokens
    let length = 0, output = '';
    for await (const result of response.results) {
      // Start a new doc
      let doc = `${result.document.content}\n\n`;
      let docLength = tokenizer.encode(doc).length;
      const remainingTokens = maxTokens - (length + docLength);
      if (remainingTokens <= 0) {
          break;
      }

      // Append doc to output
      output += doc;
      length += docLength;
    }
    return { output, length, tooLong: length > maxTokens };
  }
}
カスタム API 用の API をデータ ソースとして追加する
カスタム API テンプレートからさらに多くの API を使用してカスタム copilot を拡張するには、次の手順に従います。
./appPackage/apiSpecificationFile/openapi.*を更新します。追加する API の対応する部分をスペックからコピーし、
./appPackage/apiSpecificationFile/openapi.*に追加します。./src/prompts/chat/actions.jsonを更新します。次のオブジェクトの API のパス、クエリ、本文に必要な情報とプロパティを更新します。
{ "name": "${{YOUR-API-NAME}}", "description": "${{YOUR-API-DESCRIPTION}}", "parameters": { "type": "object", "properties": { "query": { "type": "object", "properties": { "${{YOUR-PROPERTY-NAME}}": { "type": "${{YOUR-PROPERTY-TYPE}}", "description": "${{YOUR-PROPERTY-DESCRIPTION}}", } // You can add more query properties here } }, "path": { // Same as query properties }, "body": { // Same as query properties } } } }./src/adaptiveCardsを更新します。${{YOUR-API-NAME}}.jsonという名前の新しいファイルを作成し、API の API 応答のアダプティブ カードを入力します。./src/app/app.jsファイルを更新します。module.exports = app;の前に次のコードを追加します。app.ai.action(${{YOUR-API-NAME}}, async (context: TurnContext, state: ApplicationTurnState, parameter: any) => { const client = await api.getClient(); const path = client.paths[${{YOUR-API-PATH}}]; if (path && path.${{YOUR-API-METHOD}}) { const result = await path.${{YOUR-API-METHOD}}(parameter.path, parameter.body, { params: parameter.query, }); const card = generateAdaptiveCard("../adaptiveCards/${{YOUR-API-NAME}}.json", result); await context.sendActivity({ attachments: [card] }); } else { await context.sendActivity("no result"); } return "result"; });
データ ソースとしての Microsoft 365
Microsoft Graph Search API を利用して、RAG アプリのデータ ソースとして Microsoft 365 コンテンツにクエリを実行する方法について説明します。 Microsoft Graph Search API の詳細については、「Microsoft Search API を使用して OneDrive と SharePoint のコンテンツを検索する」を参照してください。
前提条件: Graph API クライアントを作成し、SharePoint と OneDrive のファイル、フォルダー、ページ、ニュースにアクセスするための Files.Read.All アクセス許可スコープを付与する必要があります。
データ インジェスト
SharePoint コンテンツを検索できる Microsoft Graph Search API を使用できます。 そのため、ドキュメントが SharePoint または OneDrive にアップロードされていることを確認するだけで、追加のデータ インジェストは不要です。
注:
SharePoint サーバーは、ファイル拡張子が [ファイルの種類の管理] ページに表示されている場合にのみ、ファイルのインデックスを作成します。 サポートされているファイル拡張子の完全な一覧については、Microsoft 365 の SharePoint サーバーと SharePoint の既定のインデックス付きファイル名拡張子と解析されたファイルの種類を参照してください。
データ ソースの実装
SharePoint と OneDrive でテキスト ファイルを検索する例を次に示します。
import {
  DataSource,
  Memory,
  RenderedPromptSection,
  Tokenizer,
} from "@microsoft/teams-ai";
import { TurnContext } from "botbuilder";
import { Client, ResponseType } from "@microsoft/microsoft-graph-client";

export class GraphApiSearchDataSource implements DataSource {
  public readonly name = "my-datasource";
  public readonly description =
    "Searches the graph for documents related to the input";
  public client: Client;

  constructor(client: Client) {
    this.client = client;
  }

  public async renderData(
    context: TurnContext,
    memory: Memory,
    tokenizer: Tokenizer,
    maxTokens: number
  ): Promise<RenderedPromptSection<string>> {
    const input = memory.getValue("temp.input") as string;
    const contentResults = [];
    const response = await this.client.api("/search/query").post({
      requests: [
        {
          entityTypes: ["driveItem"],
          query: {
            // Search for markdown files in the user's OneDrive and SharePoint
            // The supported file types are listed here:
            // https://video2.skills-academy.com/sharepoint/technical-reference/default-crawled-file-name-extensions-and-parsed-file-types
            queryString: `${input} filetype:txt`,
          },
          // This parameter is required only when searching with application permissions
          // https://video2.skills-academy.com/graph/search-concept-searchall
          // region: "US",
        },
      ],
    });
    for (const value of response?.value ?? []) {
      for (const hitsContainer of value?.hitsContainers ?? []) {
        contentResults.push(...(hitsContainer?.hits ?? []));
      }
    }

    // Add documents until you run out of tokens
    let length = 0,
      output = "";
    for (const result of contentResults) {
      const rawContent = await this.downloadSharepointFile(
        result.resource.webUrl
      );
      if (!rawContent) {
        continue;
      }
      let doc = `${rawContent}\n\n`;
      let docLength = tokenizer.encode(doc).length;
      const remainingTokens = maxTokens - (length + docLength);
      if (remainingTokens <= 0) {
        break;
      }

      // Append do to output
      output += doc;
      length += docLength;
    }
    return { output, length, tooLong: length > maxTokens };
  }

  // Download the file from SharePoint
  // https://docs.microsoft.com/en-us/graph/api/driveitem-get-content
  private async downloadSharepointFile(
    contentUrl: string
  ): Promise<string | undefined> {
    const encodedUrl = this.encodeSharepointContentUrl(contentUrl);
    const fileContentResponse = await this.client
      .api(`/shares/${encodedUrl}/driveItem/content`)
      .responseType(ResponseType.TEXT)
      .get();

    return fileContentResponse;
  }

  private encodeSharepointContentUrl(webUrl: string): string {
    const byteData = Buffer.from(webUrl, "utf-8");
    const base64String = byteData.toString("base64");
    return (
      "u!" + base64String.replace("=", "").replace("/", "_").replace("+", "_")
    );
  }
}
関連項目
Platform Docs
フィードバック
以下は間もなく提供いたします。2024 年を通じて、コンテンツのフィードバック メカニズムとして GitHub の issue を段階的に廃止し、新しいフィードバック システムに置き換えます。 詳細については、「https://aka.ms/ContentUserFeedback」を参照してください。
フィードバックの送信と表示