Xamarin.iOS での高度なユーザー通知
iOS 10 の新機能であるユーザー通知フレームワークにより、ローカルおよびリモート通知を配信し、処理できるようになります。 このフレームワークを使うと、アプリまたはアプリ拡張機能で場所や時刻などの一連の条件を指定して、ローカル通知の配信をスケジュールできます。
ユーザー通知について
新しいユーザー通知フレームワークにより、ローカルおよびリモート通知を配信し、処理できるようになります。 このフレームワークを使うと、アプリまたはアプリ拡張機能で場所や時刻などの一連の条件を指定して、ローカル通知の配信をスケジュールできます。
さらに、アプリまたは拡張機能は、ユーザーの iOS デバイスに配信されるローカルとリモートの通知の両方を受信 (変更も可能) できます。
新しいユーザー通知 UI フレームワークを使用すると、アプリまたはアプリ拡張機能は、ローカル通知とリモート通知がユーザーに表示されたときの両方の外観をカスタマイズできます。
このフレームワークは、アプリがユーザーに通知を配信するための次の方法を提供します。
- ビジュアル アラート - 通知がバナーとして画面の上部からロールダウンします。
- サウンドと振動 - 通知に関連付けることができます。
- アプリ アイコンのバッジ - アプリのアイコンに、新しいコンテンツが利用可能であることを示すバッジが表示されます。 たとえば、未読メール メッセージの数などです。
さらに、ユーザーの現在のコンテキストに応じて、通知を表示するさまざまな方法があります。
- デバイスのロックが解除されている場合、通知はバナーとして画面の上部からロールダウンされます。
- デバイスがロックされている場合は、ユーザーのロック画面に通知が表示されます。
- 通知を見逃したユーザーは、通知センターを開き、利用可能な待機中の通知があればそこで表示できます。
Xamarin.iOS アプリには、送信できる 2 種類のユーザー通知があります。
- ローカル通知 - これらは、ユーザー デバイスにローカルにインストールされたアプリによって送信されます。
- リモート通知 - リモート サーバーから送信される通知で、ユーザーに表示されるか、アプリのコンテンツのバックグラウンド更新がトリガーされます。
詳細については、拡張ユーザー通知に関するドキュメントを参照してください。
新しいユーザー通知インターフェイス
iOS 10 のユーザー通知は、より多くのコンテンツを搭載した、新しい UI デザインで表示されます。新たにタイトル、サブタイトル、メディア添付ファイル (オプション) などが追加され、これらはロック画面にバナーとしてデバイス上部に表示することも、通知センターに表示することもできます。
iOS 10 のどこにユーザー通知が表示されるかに関係なく、同じ外観と同じ機能で表示されます。
iOS 8 で、Apple はアクション可能な通知を導入しました。これにより、開発者がカスタム アクションを通知にアタッチすることで、アプリを起動しなくてもユーザーが通知に対してアクションを実行できるようになりました。 iOS 9 で、Apple はクイック リプライ機能によってアクション可能な通知を強化しました。これにより、ユーザーはテキスト入力で通知に応答できるようになりました。
ユーザー通知は、iOS 10 のユーザー エクスペリエンスにおいて不可欠な部分であるため、Apple は 3D Touch をサポートするようにさらにアクション可能な通知を拡張しました。これにより、ユーザーが通知を押すとカスタム ユーザー インターフェイスが表示され、通知との豊かな対話が実現できます。
カスタム ユーザー通知 UI が表示された場合、ユーザーが通知にアタッチされているアクションを操作すると、変更された内容に合わせたフィードバックでカスタム UI が即座に更新されます。
iOS 10 の新機能であるユーザー通知 UI API を使用すると、Xamarin.iOS アプリでこれらの新しいユーザー通知 UI 機能を簡単に利用できます。
メディア添付ファイルの追加
ユーザー間でよく共有されるアイテムの 1 つは写真です。そのため、iOS 10 では、メディア アイテム (写真など) を通知に直接添付する機能が追加されました。これにより、これらのアイテムを残りのコンテンツと一緒にユーザーに示し、すぐに使用できるようになります。
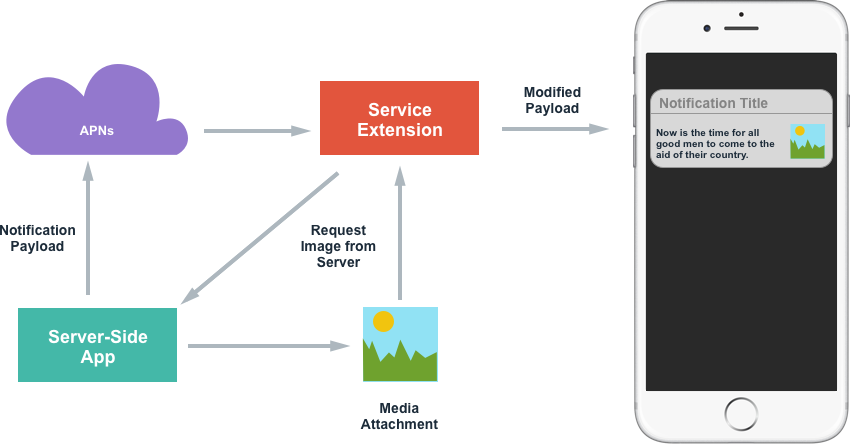
ただし、小さい画像であっても送信サイズがそれなりにあるため、リモート通知ペイロードに添付することは実用的ではありません。 このような状況に対処するために、開発者は iOS 10 の新しいサービス拡張機能を使用して、別のソース (CloudKit データストアなど) から画像をダウンロードし、通知のコンテンツに添付してからユーザーに表示することができます。
サービス拡張機能でリモート通知を変更するには、そのペイロードを変更可能としてマークする必要があります。 次に例を示します。
{
    aps : {
        alert : "New Photo Available",
        mutable-content: 1
    },
    my-attachment : "https://example.com/photo.jpg"
}
次に示すプロセスの概要を見てみましょう。
リモート通知が (APN 経由で) デバイスに送信されると、サービス拡張機能は必要な任意の方法 (NSURLSession など) を介して必要な画像をダウンロードし、画像を受信した後、通知の内容を変更してユーザーに表示できます。
このプロセスをコードで処理する方法の例を次に示します。
using System;
using Foundation;
using UIKit;
using UserNotifications;

namespace MonkeyNotification
{
    public class NotificationService : UNNotificationServiceExtension
    {
        #region Constructors
        public NotificationService (IntPtr handle) : base(handle)
        {
        }
        #endregion

        #region Override Methods
        public override void DidReceiveNotificationRequest (UNNotificationRequest request, Action<UNNotificationContent> contentHandler)
        {
            // Get file URL
            var attachementPath = request.Content.UserInfo.ObjectForKey (new NSString ("my-attachment"));
            var url = new NSUrl (attachementPath.ToString ());

            // Download the file
            var localURL = new NSUrl ("PathToLocalCopy");

            // Create attachment
            var attachmentID = "image";
            var options = new UNNotificationAttachmentOptions ();
            NSError err;
            var attachment = UNNotificationAttachment.FromIdentifier (attachmentID, localURL, options , out err);

            // Modify contents
            var content = request.Content.MutableCopy() as UNMutableNotificationContent;
            content.Attachments = new UNNotificationAttachment [] { attachment };

            // Display notification
            contentHandler (content);
        }

        public override void TimeWillExpire ()
        {
            // Handle service timing out
        }
        #endregion
    }
}
通知が APN から受信されると、画像のカスタム アドレスがコンテンツから読み取られ、ファイルがサーバーからダウンロードされます。 次に、画像の一意の ID とローカルの場所を使用して UNNotificationAttachement が作成されます (NSUrlとして)。 通知コンテンツの変更可能なコピーが作成され、メディア添付ファイルが追加されます。 最後に、contentHandler を呼び出すことによって、通知がユーザーに表示されます。
通知に添付ファイルが追加されると、システムはファイルの移動と管理を引き継ぎます。
上記に示したリモート通知に加えて、メディア添付ファイルもローカル通知からサポートされます。これにより、UNNotificationAttachement が作成され、そのコンテンツと共に通知に添付されます。
iOS 10 の通知では、メディア添付ファイルとして画像 (静的および GIF)、オーディオ、またはビデオがサポートされます。通知がユーザーに表示されると、それぞれのタイプの添付ファイルに適したカスタム UI が自動的に表示されます。
Note
注意する必要があるのは、メディア サイズと、リモート サーバーからメディアをダウンロードする (またはローカル通知用にメディアをアセンブルする) 時間の両方を最適化することです。これは、アプリのサービス拡張機能が実行される際に、システムによって両方に厳密な制限が課されるためです。 たとえば、縮小した画像やビデオのわずかな一部分を通知に表示して送信することを検討してください。
カスタム ユーザー インターフェイスの作成
ユーザー通知用のカスタム ユーザー インターフェイスを作成するには、開発者は通知コンテンツ拡張機能 (iOS 10 の新機能) をアプリのソリューションに追加する必要があります。
通知コンテンツ拡張機能を使用すると、開発者は通知 UI に独自のビューを追加し、必要なコンテンツを描画できます。 iOS 12 以降、通知コンテンツ拡張機能では、ボタンやスライダーなどの対話型 UI コントロールがサポートされています。 詳細については、iOS 12 の対話型通知に関するドキュメントを参照してください。
ユーザー通知とのユーザー操作をサポートするには、カスタム アクションを作成し、システムに登録して、通知にアタッチしてからシステムにスケジュール設定する必要があります。 通知コンテンツ拡張機能は、これらのアクションの処理を扱うために呼び出されます。 カスタム アクションの詳細については、拡張ユーザー通知のドキュメントにある、通知アクションの操作に関するセクションを参照してください。
カスタム UI を含むユーザー通知がユーザーに提示されると、次の要素が表示されます。
ユーザーがカスタム アクション (通知の下に表示) を操作すると、ユーザー インターフェイスを更新して、指定したアクションを呼び出したときに発生した内容としてユーザー フィードバックを提供できます。
通知コンテンツ拡張機能の追加
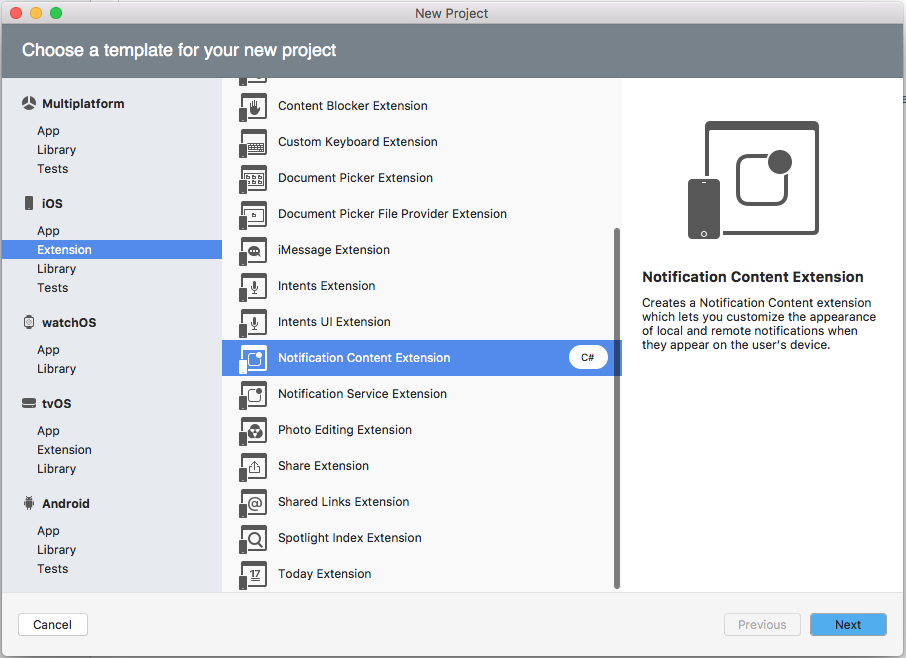
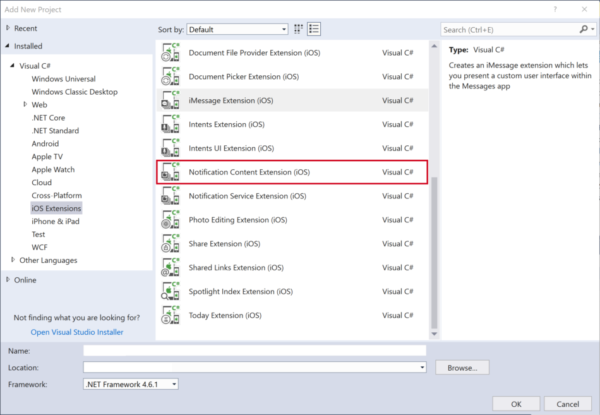
Xamarin.iOS アプリでカスタム ユーザー通知 UI を実装するには、次の操作を行います。
通知コンテンツ拡張機能がソリューションに追加されると、拡張機能のプロジェクトに次の 3 つのファイルが作成されます。
NotificationViewController.cs- 通知コンテンツ拡張機能のメイン ビュー コントローラーです。MainInterface.storyboard- 開発者が iOS Designer で通知コンテンツ拡張機能の表示 UI をレイアウトする場所です。Info.plist- 通知コンテンツ拡張機能の構成を制御します。
既定の NotificationViewController.cs ファイルは次のようになります。
using System;
using Foundation;
using UIKit;
using UserNotifications;
using UserNotificationsUI;

namespace MonkeyChatNotifyExtension
{
    public partial class NotificationViewController : UIViewController, IUNNotificationContentExtension
    {
        #region Constructors
        protected NotificationViewController (IntPtr handle) : base (handle)
        {
            // Note: this .ctor should not contain any initialization logic.
        }
        #endregion

        #region Override Methods
        public override void ViewDidLoad ()
        {
            base.ViewDidLoad ();

            // Do any required interface initialization here.
        }
        #endregion

        #region Public Methods
        [Export ("didReceiveNotification:")]
        public void DidReceiveNotification (UNNotification notification)
        {
            label.Text = notification.Request.Content.Body;

            // Grab content
            var content = notification.Request.Content;

        }
        #endregion
    }
}
DidReceiveNotification メソッドは、ユーザーが通知を展開するときに呼び出されます。これで、通知コンテンツ拡張機能がカスタム UI に UNNotification のコンテンツを設定できます。 上記の例では、ラベルがビューに追加され、label という名前でコードに公開され、通知の本文を表示するために使用されます。
通知コンテンツ拡張機能のカテゴリの設定
応答する特定のカテゴリに基づいてアプリの通知コンテンツ拡張機能を検索する方法について、システムに通知する必要があります。 次の操作を行います。
通知コンテンツ拡張機能カテゴリ (UNNotificationExtensionCategory) は、通知アクションの登録に使用されるのと同じカテゴリ値を使用します。 アプリが複数のカテゴリに同じ UI を使用する場合は、UNNotificationExtensionCategory を Array 型に切り替えて、必要なすべてのカテゴリを提供します。 次に例を示します。
既定の通知コンテンツを非表示にする
カスタム通知 UI に既定の通知と同じコンテンツが表示される (通知 UI の下部にタイトル、サブタイトル、本文が自動的に表示される) 場合は、この既定の情報を非表示にすることができます。これは、拡張機能の Info.plist ファイルで、NSExtensionAttributes キーに UNNotificationExtensionDefaultContentHidden キーをブール値の YES として追加することで行えます。
カスタム UI の設計
通知コンテンツ拡張機能のカスタム ユーザー インターフェイスを設計するには、MainInterface.storyboard ファイルをダブルクリックして iOS Designer で編集用に開き、目的のインターフェイス (UILabels や UIImageViews など) をビルドするために必要な要素をドラッグします。
Note
iOS 12 の時点で、通知コンテンツ拡張機能には、ボタンやテキスト フィールドなどの対話型コントロールを含めることができます。 詳細については、iOS 12 の対話型通知に関するドキュメントを参照してください。
UI がレイアウトされ、必要なコントロールが C# コードに公開されたら、NotificationViewController.cs を編集用に開き、ユーザーが通知を展開したときに UI を設定するように DidReceiveNotification メソッドを変更します。 次に例を示します。
using System;
using Foundation;
using UIKit;
using UserNotifications;
using UserNotificationsUI;

namespace MonkeyChatNotifyExtension
{
    public partial class NotificationViewController : UIViewController, IUNNotificationContentExtension
    {
        #region Constructors
        protected NotificationViewController (IntPtr handle) : base (handle)
        {
            // Note: this .ctor should not contain any initialization logic.
        }
        #endregion

        #region Override Methods
        public override void ViewDidLoad ()
        {
            base.ViewDidLoad ();

            // Do any required interface initialization here.
        }
        #endregion

        #region Public Methods
        [Export ("didReceiveNotification:")]
        public void DidReceiveNotification (UNNotification notification)
        {
            label.Text = notification.Request.Content.Body;

            // Grab content
            var content = notification.Request.Content;

            // Display content in the UILabels
            EventTitle.Text = content.Title;
            EventDate.Text = content.Subtitle;
            EventMessage.Text = content.Body;

            // Get location and display
            var location = content.UserInfo ["location"].ToString ();
            if (location != null) {
                Event.Location.Text = location;
            }

        }
        #endregion
    }
}
コンテンツ領域のサイズの設定
ユーザーに表示されるコンテンツ領域のサイズを調整するため、次のコードは PreferredContentSize メソッドの ViewDidLoad プロパティを目的のサイズに設定しています。 このサイズは、iOS Designer でビューに制約を適用することで調整することもできます。最適なメソッドを選ぶのは開発者の判断によります。
通知コンテンツ拡張機能が呼び出される前に通知システムが既に実行されているため、コンテンツ領域はフル サイズで開始し、ユーザーに表示されるときに、要求されたサイズに縮小してアニメーション化されます。
この効果を無効にするには、拡張機能の Info.plist ファイルを編集し、NSExtensionAttributes キーの UNNotificationExtensionInitialContentSizeRatio キーを目的の比率を表す数値型の値に設定します。 次に例を示します。
カスタム UI でのメディア添付ファイルの使用
メディア添付ファイル (上記の「メディア添付ファイルの追加」セクションで説明) は、通知ペイロードの一部であるため、既定の通知 UI の場合と同様に、通知コンテンツ拡張機能にアクセスして表示できます。
たとえば、上記のカスタム UI に、C# コードに公開された UIImageView が含まれている場合、次のコードを使用してメディア添付ファイルを設定できます。
using System;
using Foundation;
using UIKit;
using UserNotifications;
using UserNotificationsUI;

namespace MonkeyChatNotifyExtension
{
    public partial class NotificationViewController : UIViewController, IUNNotificationContentExtension
    {
        #region Constructors
        protected NotificationViewController (IntPtr handle) : base (handle)
        {
            // Note: this .ctor should not contain any initialization logic.
        }
        #endregion

        #region Override Methods
        public override void ViewDidLoad ()
        {
            base.ViewDidLoad ();

            // Do any required interface initialization here.
        }
        #endregion

        #region Public Methods
        [Export ("didReceiveNotification:")]
        public void DidReceiveNotification (UNNotification notification)
        {
            label.Text = notification.Request.Content.Body;

            // Grab content
            var content = notification.Request.Content;

            // Display content in the UILabels
            EventTitle.Text = content.Title;
            EventDate.Text = content.Subtitle;
            EventMessage.Text = content.Body;

            // Get location and display
            var location = content.UserInfo ["location"].ToString ();
            if (location != null) {
                Event.Location.Text = location;
            }

            // Get Media Attachment
            if (content.Attachements.Length > 1) {
                var attachment = content.Attachments [0];
                if (attachment.Url.StartAccessingSecurityScopedResource ()) {
                    EventImage.Image = UIImage.FromFile (attachment.Url.Path);
                    attachment.Url.StopAccessingSecurityScopedResource ();
                }
            }
        }
        #endregion
    }
}
メディア添付ファイルはシステムによって管理されるため、アプリのサンドボックスの外部にあります。 拡張機能は、StartAccessingSecurityScopedResource メソッドを呼び出すことによって、ファイルへのアクセスが必要であることをシステムに通知する必要があります。 ファイルで拡張機能が完了したら、StopAccessingSecurityScopedResource を呼び出して接続を解放する必要があります。
カスタム UI へのカスタム アクションの追加
カスタム アクション ボタンを使用して、カスタム通知 UI に対話機能を追加できます。 カスタム アクションの詳細については、拡張ユーザー通知のドキュメントにある、通知アクションの操作に関するセクションを参照してください。
カスタム アクションに加えて、通知コンテンツ拡張機能は、次の組み込みアクションにも応答できます。
- 既定のアクション - これは、ユーザーが通知をタップしてアプリを開き、指定された通知の詳細を表示した場合です。
- 終了アクション - 指定した通知をユーザーが閉じると、このアクションがアプリに送信されます。
通知コンテンツ拡張機能には、ユーザーがいずれかのカスタム アクションを呼び出したときに UI を更新する機能もあります。たとえば、ユーザーが [Accept] カスタム アクション ボタンをタップしたときに承諾済みの日付を表示するなどです。 さらに、通知コンテンツ拡張機能は、通知を閉じる前にユーザーが自分のアクションの効果を確認できるように、通知 UI の終了を遅らせるようにシステムに指示できます。
これは、完了ハンドラーを含む DidReceiveNotification メソッドの 2 番目のバージョンを実装することによって行われます。 次に例を示します。
using System;
using Foundation;
using UIKit;
using UserNotifications;
using UserNotificationsUI;
using CoreGraphics;

namespace myApp {
    public class NotificationViewController : UIViewController, UNNotificationContentExtension {

        public override void ViewDidLoad() {
            base.ViewDidLoad();

            // Adjust the size of the content area
            var size = View.Bounds.Size
            PreferredContentSize = new CGSize(size.Width, size.Width/2);
        }

        public void DidReceiveNotification(UNNotification notification) {

            // Grab content
            var content = notification.Request.Content;

            // Display content in the UILabels
            EventTitle.Text = content.Title;
            EventDate.Text = content.Subtitle;
            EventMessage.Text = content.Body;

            // Get location and display
            var location = Content.UserInfo["location"] as string;
            if (location != null) {
                Event.Location.Text = location;
            }

            // Get Media Attachment
            if (content.Attachements.Length > 1) {
                var attachment = content.Attachments[0];
                if (attachment.Url.StartAccessingSecurityScopedResource()) {
                    EventImage.Image = UIImage.FromFile(attachment.Url.Path);
                    attachment.Url.StopAccessingSecurityScopedResource();
                }
            }
        }

        [Export ("didReceiveNotificationResponse:completionHandler:")]
        public void DidReceiveNotification (UNNotificationResponse response, Action<UNNotificationContentExtensionResponseOption> completionHandler)
        {

            // Update UI when the user interacts with the
            // Notification
            Server.PostEventResponse += (response) {
                // Take action based on the response
                switch(response.ActionIdentifier){
                case "accept":
                    EventResponse.Text = "Going!";
                    EventResponse.TextColor = UIColor.Green;
                    break;
                case "decline":
                    EventResponse.Text = "Not Going.";
                    EventResponse.TextColor = UIColor.Red;
                    break;
                }

                // Close Notification
                completionHandler (UNNotificationContentExtensionResponseOption.Dismiss);
            };
        }
    }
}
通知コンテンツ拡張機能の DidReceiveNotification メソッドに Server.PostEventResponse ハンドラーを追加することで、拡張機能はすべてのカスタム アクションを処理する必要があります。 拡張機能は、UNNotificationContentExtensionResponseOption を変更することで、カスタム アクションをアプリに転送することもできます。 次に例を示します。
// Close Notification
completionHandler (UNNotificationContentExtensionResponseOption.DismissAndForwardAction);
カスタム UI でのテキスト入力アクションの操作
アプリと通知の設計によっては、ユーザーが通知にテキストを入力する必要がある場合があります (メッセージへの返信など)。 通知コンテンツ拡張機能は、標準の通知と同様に、組み込みのテキスト入力アクションにアクセスできます。
次に例を示します。
using System;
using Foundation;
using UIKit;
using UserNotifications;
using UserNotificationsUI;

namespace MonkeyChatNotifyExtension
{
    public partial class NotificationViewController : UIViewController, IUNNotificationContentExtension
    {
        #region Computed Properties
        // Allow to take input
        public override bool CanBecomeFirstResponder {
            get { return true; }
        }

        // Return the custom created text input view with the
        // required buttons and return here
        public override UIView InputAccessoryView {
            get { return InputView; }
        }
        #endregion

        #region Constructors
        protected NotificationViewController (IntPtr handle) : base (handle)
        {
            // Note: this .ctor should not contain any initialization logic.
        }
        #endregion

        #region Override Methods
        public override void ViewDidLoad ()
        {
            base.ViewDidLoad ();

            // Do any required interface initialization here.
        }
        #endregion

        #region Private Methods
        private UNNotificationCategory MakeExtensionCategory ()
        {

            // Create Accept Action
            ...

            // Create decline Action
            ...

            // Create Text Input Action
            var commentID = "comment";
            var commentTitle = "Comment";
            var textInputButtonTitle = "Send";
            var textInputPlaceholder = "Enter comment here...";
            var commentAction = UNTextInputNotificationAction.FromIdentifier (commentID, commentTitle, UNNotificationActionOptions.None, textInputButtonTitle, textInputPlaceholder);

            // Create category
            var categoryID = "event-invite";
            var actions = new UNNotificationAction [] { acceptAction, declineAction, commentAction };
            var intentIDs = new string [] { };
            var category = UNNotificationCategory.FromIdentifier (categoryID, actions, intentIDs, UNNotificationCategoryOptions.None);

            // Return new category
            return category;

        }
        #endregion

        #region Public Methods
        [Export ("didReceiveNotification:")]
        public void DidReceiveNotification (UNNotification notification)
        {
            label.Text = notification.Request.Content.Body;

            // Grab content
            var content = notification.Request.Content;

            // Display content in the UILabels
            EventTitle.Text = content.Title;
            EventDate.Text = content.Subtitle;
            EventMessage.Text = content.Body;

            // Get location and display
            var location = content.UserInfo ["location"].ToString ();
            if (location != null) {
                Event.Location.Text = location;
            }

            // Get Media Attachment
            if (content.Attachements.Length > 1) {
                var attachment = content.Attachments [0];
                if (attachment.Url.StartAccessingSecurityScopedResource ()) {
                    EventImage.Image = UIImage.FromFile (attachment.Url.Path);
                    attachment.Url.StopAccessingSecurityScopedResource ();
                }
            }
        }

        [Export ("didReceiveNotificationResponse:completionHandler:")]
        public void DidReceiveNotification (UNNotificationResponse response, Action<UNNotificationContentExtensionResponseOption> completionHandler)
        {

            // Is text input?
            if (response is UNTextInputNotificationResponse) {
                var textResponse = response as UNTextInputNotificationResponse;
                Server.Send (textResponse.UserText, () => {
                    // Close Notification
                    completionHandler (UNNotificationContentExtensionResponseOption.Dismiss);
                });
            }

            // Update UI when the user interacts with the
            // Notification
            Server.PostEventResponse += (response) {
                // Take action based on the response
                switch (response.ActionIdentifier) {
                case "accept":
                    EventResponse.Text = "Going!";
                    EventResponse.TextColor = UIColor.Green;
                    break;
                case "decline":
                    EventResponse.Text = "Not Going.";
                    EventResponse.TextColor = UIColor.Red;
                    break;
                }

                // Close Notification
                completionHandler (UNNotificationContentExtensionResponseOption.Dismiss);
            };
        }
        #endregion
    }
}
このコードは、新しいテキスト入力アクションを作成し、拡張機能のカテゴリ (MakeExtensionCategory 内) メソッドに追加します。 DidReceive オーバーライド メソッドでは、次のコードを使用してテキストを入力するユーザーを処理します。
// Is text input?
if (response is UNTextInputNotificationResponse) {
    var textResponse = response as UNTextInputNotificationResponse;
    Server.Send (textResponse.UserText, () => {
        // Close Notification
        completionHandler (UNNotificationContentExtensionResponseOption.Dismiss);
    });
}
デザインでテキスト入力フィールドにカスタム ボタンを追加する必要がある場合は、次のコードを追加して含めます。
// Allow to take input
public override bool CanBecomeFirstResponder {
    get {return true;}
}

// Return the custom created text input view with the
// required buttons and return here
public override UIView InputAccessoryView {
    get {return InputView;}
}
ユーザーがコメント アクションをトリガーした場合は、ビュー コントローラーとカスタム テキスト入力フィールドの両方をアクティブにする必要があります。
// Update UI when the user interacts with the
// Notification
Server.PostEventResponse += (response) {
    // Take action based on the response
    switch(response.ActionIdentifier){
    ...
    case "comment":
        BecomeFirstResponder();
        TextField.BecomeFirstResponder();
        break;
    }

    // Close Notification
    completionHandler (UNNotificationContentExtensionResponseOption.Dismiss);

};
まとめ
この記事では、Xamarin.iOS アプリで新しいユーザー通知フレームワークを使用する方法について詳しく説明しました。 ローカルとリモートの通知の両方にメディア添付ファイルを追加する方法と、新しいユーザー通知 UI を使用してカスタム通知 UI を作成する方法について説明しました。


