Xamarin.iOS でのアラートの表示
iOS 8 以降、UIAlertController は、どちらも非推奨になった UIActionSheet と UIAlertView の置き換えを完了しました。
それらの置き換えられたクラス (UIView のサブクラス) とは異なり、UIAlertController は UIViewController のサブクラスです。
UIAlertControllerStyle を使用して、表示するアラートの種類を示します。 これらのアラートの種類は次のとおりです。
- UIAlertControllerStyleActionSheet
- iOS 8 より前では、これは UIActionSheet でした
- UIAlertControllerStyleAlert
- iOS 8 より前では、これは UIAlertView でした
アラート コントローラーを作成する場合は、次の 3 つの手順を実行する必要があります。
次を使用してアラートを作成および構成する
- タイトル
- メッセージ
- preferredStyle
(省略可能) テキスト フィールドを追加する
必要なアクションを追加する
ビュー コントローラーを表示する
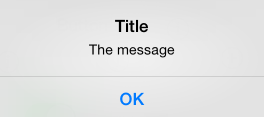
最も単純なアラートには、次のスクリーンショット内に示すように 1 つのボタンが含まれます。
単純なアラートを表示するコードは次のとおりです。
okayButton.TouchUpInside += (sender, e) => {

    //Create Alert
    var okAlertController = UIAlertController.Create ("Title", "The message", UIAlertControllerStyle.Alert);

    //Add Action
    okAlertController.AddAction (UIAlertAction.Create ("OK", UIAlertActionStyle.Default, null));

    // Present Alert
    PresentViewController (okAlertController, true, null);
};
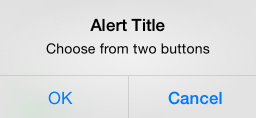
複数のオプションを含むアラートの表示は同様の方法で行いますが、2 つのアクションを追加します。 たとえば、次のスクリーンショットは、2 つのボタンを含むアラートを示しています。
okayCancelButton.TouchUpInside += ((sender, e) => {

    //Create Alert
    var okCancelAlertController = UIAlertController.Create("Alert Title", "Choose from two buttons", UIAlertControllerStyle.Alert);

    //Add Actions
    okCancelAlertController.AddAction(UIAlertAction.Create("OK", UIAlertActionStyle.Default, alert => Console.WriteLine ("Okay was clicked")));
    okCancelAlertController.AddAction(UIAlertAction.Create("Cancel", UIAlertActionStyle.Cancel, alert => Console.WriteLine ("Cancel was clicked")));

    //Present Alert
    PresentViewController(okCancelAlertController, true, null);
});
アラートには、以下のスクリーンショットのようにアクション シートを表示することもできます。
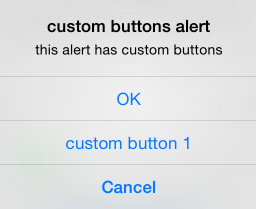
ボタンは、AddAction メソッドを使用してアラートに追加します。
actionSheetButton.TouchUpInside += ((sender, e) => {

    // Create a new Alert Controller
    UIAlertController actionSheetAlert = UIAlertController.Create("Action Sheet", "Select an item from below", UIAlertControllerStyle.ActionSheet);

    // Add Actions
    actionSheetAlert.AddAction(UIAlertAction.Create("OK",UIAlertActionStyle.Default, (action) => Console.WriteLine ("Item One pressed.")));

    actionSheetAlert.AddAction(UIAlertAction.Create("custom button 1",UIAlertActionStyle.Default, (action) => Console.WriteLine ("Item Two pressed.")));

    actionSheetAlert.AddAction(UIAlertAction.Create("Cancel",UIAlertActionStyle.Cancel, (action) => Console.WriteLine ("Cancel button pressed.")));

    // Required for iPad - You must specify a source for the Action Sheet since it is
    // displayed as a popover
    UIPopoverPresentationController presentationPopover = actionSheetAlert.PopoverPresentationController;
    if (presentationPopover!=null) {
        presentationPopover.SourceView = this.View;
        presentationPopover.PermittedArrowDirections = UIPopoverArrowDirection.Up;
    }

    // Display the alert
    this.PresentViewController(actionSheetAlert,true,null);
});