セマンティック カーネルの概要
ほんの数ステップで、Python、.NET、または Java のいずれかでセマンティック カーネルを使用して最初の AI エージェントを構築できます。 このガイドでは、その方法について説明します。...
- 必要なパッケージをインストールする
- AI を使用して前後の会話を作成する
- AI エージェントにコードを実行する機能を付与する
- AI で計画を作成する様子を見る
SDK のインストール
セマンティック カーネルには、いくつかの NuGet パッケージが用意されています。 ただし、ほとんどのシナリオでは通常、 Microsoft.SemanticKernelのみが必要です。
次のコマンドを使用してインストールできます。
dotnet add package Microsoft.SemanticKernel
Nuget パッケージの完全な一覧については、 サポートされている言語の記事を参照してください。
SemanticKernel Python パッケージにアクセスする手順については、こちら参照してください。 これは次のように簡単です。
pip install semantic-kernel
ノートブックの使用をすぐに開始する
Python または C# 開発者の場合は、ノートブックをすぐに使い始めることができます。 これらのノートブックには、セマンティック カーネルを使用して AI エージェントを構築する方法に関する詳細なガイドが用意されています。
開始するには、次の手順を実行します。
- Semantic カーネル リポジトリを複製する
- Visual Studio Code でリポジトリを開く
- _/python/samples/getting_started に移動します
- 00-getting-started.ipynb を開いて、環境の設定と最初の AI エージェントの作成を開始します。
開始するには、次の手順を実行します。
- Semantic カーネル リポジトリを複製する
- Visual Studio Code でリポジトリを開く
- _/dotnet/notebooks に移動します
- 00-getting-started.ipynb を開いて、環境の設定と最初の AI エージェントの作成を開始します。
最初のコンソール アプリの作成
// Import packages
using Microsoft.SemanticKernel;
using Microsoft.SemanticKernel.ChatCompletion;
using Microsoft.SemanticKernel.Connectors.OpenAI;

// Create a kernel with Azure OpenAI chat completion
var builder = Kernel.CreateBuilder().AddAzureOpenAIChatCompletion(modelId, endpoint, apiKey);

// Add enterprise components
builder.Services.AddLogging(services => services.AddConsole().SetMinimumLevel(LogLevel.Trace));

// Build the kernel
Kernel kernel = builder.Build();
var chatCompletionService = kernel.GetRequiredService<IChatCompletionService>();

// Add a plugin (the LightsPlugin class is defined below)
kernel.Plugins.AddFromType<LightsPlugin>("Lights");

// Enable planning
OpenAIPromptExecutionSettings openAIPromptExecutionSettings = new()
{
    ToolCallBehavior = ToolCallBehavior.AutoInvokeKernelFunctions
};

// Create a history store the conversation
var history = new ChatHistory();

// Initiate a back-and-forth chat
string? userInput;
do {
    // Collect user input
    Console.Write("User > ");
    userInput = Console.ReadLine();

    // Add user input
    history.AddUserMessage(userInput);

    // Get the response from the AI
    var result = await chatCompletionService.GetChatMessageContentAsync(
        history,
        executionSettings: openAIPromptExecutionSettings,
        kernel: kernel);

    // Print the results
    Console.WriteLine("Assistant > " + result);

    // Add the message from the agent to the chat history
    history.AddMessage(result.Role, result.Content ?? string.Empty);
} while (userInput is not null)
import asyncio

from semantic_kernel import Kernel
from semantic_kernel.functions import kernel_function
from semantic_kernel.connectors.ai.open_ai import AzureChatCompletion
from semantic_kernel.connectors.ai.function_call_behavior import FunctionCallBehavior
from semantic_kernel.connectors.ai.chat_completion_client_base import ChatCompletionClientBase
from semantic_kernel.contents.chat_history import ChatHistory
from semantic_kernel.functions.kernel_arguments import KernelArguments

from semantic_kernel.connectors.ai.open_ai.prompt_execution_settings.azure_chat_prompt_execution_settings import (
    AzureChatPromptExecutionSettings,
)

async def main():
    # Initialize the kernel
    kernel = Kernel()

    # Add Azure OpenAI chat completion
    kernel.add_service(AzureChatCompletion(
        deployment_name="your_models_deployment_name",
        api_key="your_api_key",
        base_url="your_base_url",
    ))

    # Set the logging level for  semantic_kernel.kernel to DEBUG.
    logging.basicConfig(
        format="[%(asctime)s - %(name)s:%(lineno)d - %(levelname)s] %(message)s",
        datefmt="%Y-%m-%d %H:%M:%S",
    )
    logging.getLogger("kernel").setLevel(logging.DEBUG)

    # Add a plugin (the LightsPlugin class is defined below)
    kernel.add_plugin(
        LightsPlugin(),
        plugin_name="Lights",
    )

    chat_completion : AzureChatCompletion = kernel.get_service(type=ChatCompletionClientBase)

    # Enable planning
    execution_settings = AzureChatPromptExecutionSettings(tool_choice="auto")
    execution_settings.function_call_behavior = FunctionCallBehavior.EnableFunctions(auto_invoke=True, filters={})

    # Create a history of the conversation
    history = ChatHistory()

    # Initiate a back-and-forth chat
    userInput = None
    while True:
        # Collect user input
        userInput = input("User > ")

        # Terminate the loop if the user says "exit"
        if userInput == "exit":
            break

        # Add user input to the history
        history.add_user_message(userInput)

        # Get the response from the AI
        result = (await chat_completion.get_chat_message_contents(
            chat_history=history,
            settings=execution_settings,
            kernel=kernel,
            arguments=KernelArguments(),
        ))[0]

        # Print the results
        print("Assistant > " + str(result))

        # Add the message from the agent to the chat history
        history.add_message(result)

# Run the main function
if __name__ == "__main__":
    asyncio.run(main())
次の前後のチャットは、コンソールに表示されるチャットと似ているはずです。 関数呼び出しは、AI がバックグラウンドでプラグインを活用する方法を示すために以下に追加されています。
| ロール | メッセージ |
|---|---|
| 🔵User | ライトを切り替えてください |
| 🔴アシスタント (関数呼び出し) | LightsPlugin.GetState() |
| 🟢ツール | off |
| 🔴アシスタント (関数呼び出し) | LightsPlugin.ChangeState(true) |
| 🟢ツール | on |
| 🔴アシスタント | ライトが点灯しています |
上記のコードについて詳しく理解したい場合は、次のセクションで詳しく説明します。
コードの概要
セマンティック カーネルを使用してエンタープライズ アプリの構築を簡単に開始できるように、カーネルを作成し、それを使用して AI サービスと対話するプロセスを順を追って説明する手順を作成しました。
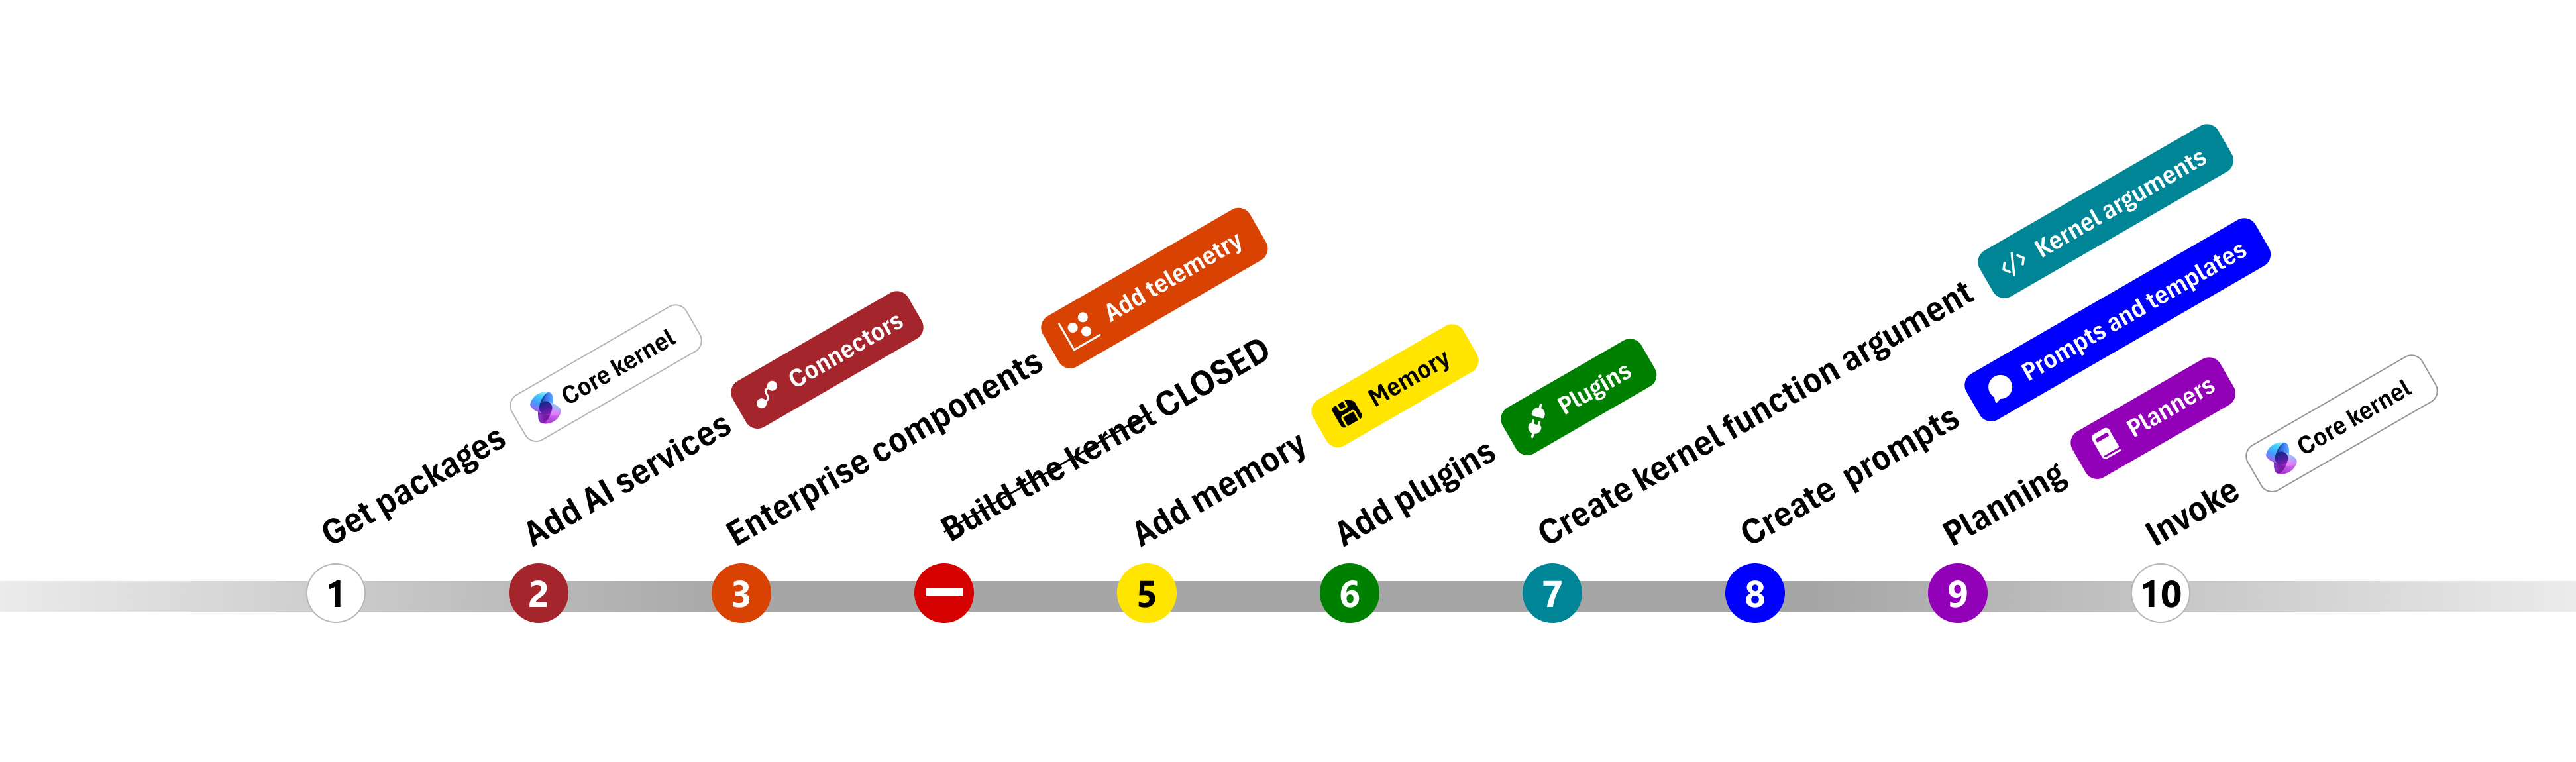
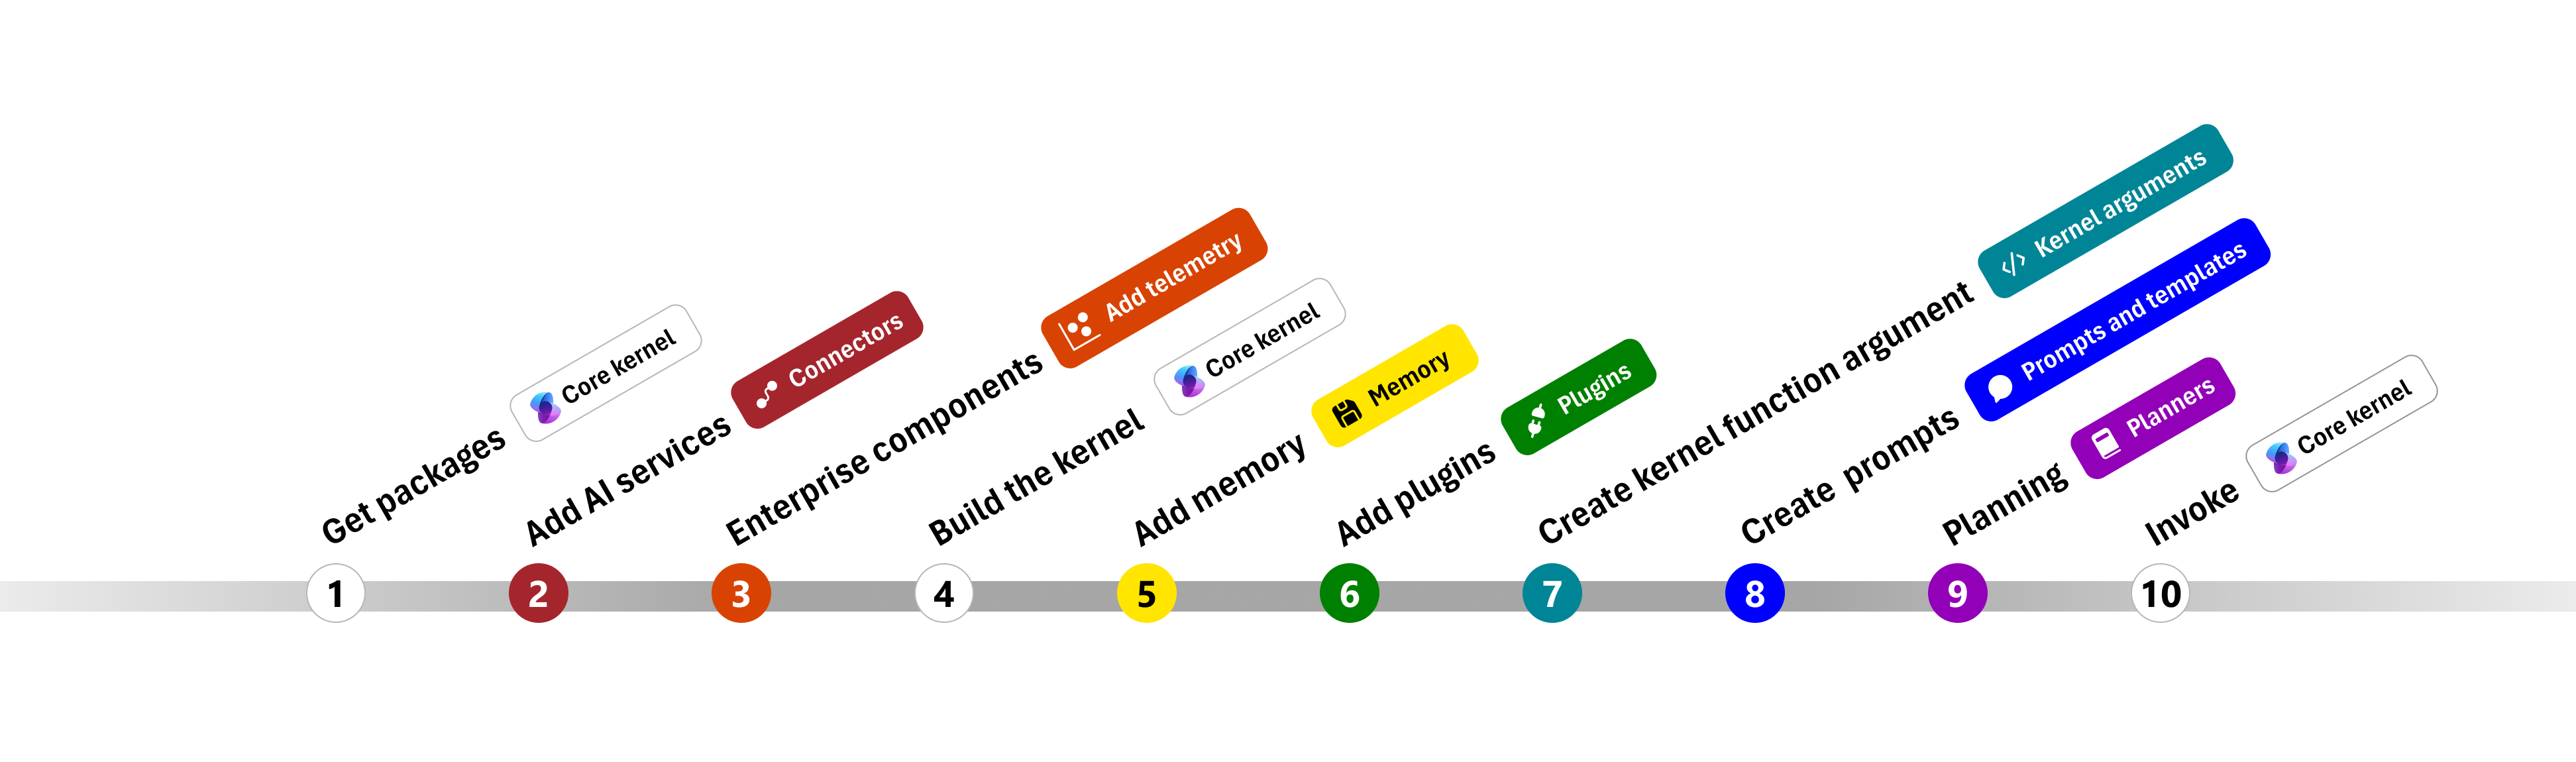
以降のセクションでは、手順 1、、 2、 3、 4、 6、 9、および 10 を順を見て、上記のサンプルをアンパックします。 AI サービスを利用し、コードを実行できる単純なエージェントを構築するために必要なものすべて。
- パッケージのインポート
- AI サービスを追加する
- エンタープライズ コンポーネント
- カーネルをビルドする
- メモリの追加 (スキップ)
- プラグインを追加する
- カーネル引数の作成 (スキップ)
- プロンプトの作成 (スキップ)
- 計画
- Invoke
1) パッケージのインポート
このサンプルでは、最初に次のパッケージをインポートすることから始めました。
using Microsoft.SemanticKernel;
using Microsoft.SemanticKernel.ChatCompletion;
using Microsoft.SemanticKernel.Connectors.OpenAI;
import asyncio

from semantic_kernel import Kernel
from semantic_kernel.connectors.ai.open_ai import AzureChatCompletion
from semantic_kernel.connectors.ai.function_call_behavior import FunctionCallBehavior
from semantic_kernel.connectors.ai.chat_completion_client_base import ChatCompletionClientBase
from semantic_kernel.contents.chat_history import ChatHistory
from semantic_kernel.functions.kernel_arguments import KernelArguments

from semantic_kernel.connectors.ai.open_ai.prompt_execution_settings.azure_chat_prompt_execution_settings import (
    AzureChatPromptExecutionSettings,
)
2) AI サービスを追加する
その後、カーネルの最も重要な部分である、使用する AI サービスを追加します。 この例では、カーネル ビルダーに Azure OpenAI チャット完了サービスを追加しました。
Note
この例では、Azure OpenAI を使用しましたが、他のチャット完了サービスを使用できます。 サポートされているサービスの完全な一覧については、 サポートされている言語に関する記事を参照してください。 別のサービスの作成に関するヘルプが必要な場合は、 AI サービスの記事を参照してください。 ここでは、OpenAI または Azure OpenAI モデルをサービスとして使用する方法に関するガイダンスを確認できます。
// Create kernel
var builder = Kernel.CreateBuilder()
builder.AddAzureOpenAIChatCompletion(modelId, endpoint, apiKey);
# Initialize the kernel
kernel = Kernel()

# Add Azure OpenAI chat completion
kernel.add_service(AzureChatCompletion(
    deployment_name="your_models_deployment_name",
    api_key="your_api_key",
    base_url="your_base_url",
))
3) エンタープライズ サービスを追加する
セマンティック カーネルを使用する主な利点の 1 つは、エンタープライズ レベルのサービスをサポートすることです。 このサンプルでは、AI エージェントのデバッグに役立つログ サービスをカーネルに追加しました。
builder.Services.AddLogging(services => services.AddConsole().SetMinimumLevel(LogLevel.Trace));
import logging

# Set the logging level for  semantic_kernel.kernel to DEBUG.
logging.basicConfig(
    format="[%(asctime)s - %(name)s:%(lineno)d - %(levelname)s] %(message)s",
    datefmt="%Y-%m-%d %H:%M:%S",
)
logging.getLogger("kernel").setLevel(logging.DEBUG)
4) カーネルをビルドしてサービスを取得する
サービスが追加されたら、カーネルをビルドし、後で使用するためにチャット完了サービスを取得します。
Kernel kernel = builder.Build();

// Retrieve the chat completion service
var chatCompletionService = kernel.Services.GetRequiredService<IChatCompletionService>();
カーネルが構成されたら、後で使用するためにチャット完了サービスを取得します。
Note
Python では、カーネルを明示的にビルドする必要はありません。 代わりに、カーネル オブジェクトから直接サービスにアクセスできます。
chat_completion : AzureChatCompletion = kernel.get_service(type=ChatCompletionClientBase)
6) プラグインを追加する
プラグインを使用すると、AI エージェントがコードを実行して外部ソースから情報を取得したり、アクションを実行したりできます。 上の例では、AI エージェントが電球と対話できるようにするプラグインを追加しました。 以下では、このプラグインを作成する方法について説明します。
ネイティブ プラグインを作成する
以下では、ネイティブ プラグインの作成は、新しいクラスを作成するのと同じくらい簡単であることがわかります。
この例では、電球を操作できるプラグインを作成しました。 これは簡単な例ですが、このプラグインは両方をサポートする方法をすばやく示しています...
- 電球の状態を AI エージェントに提供することで、検索拡張生成 (RAG)
- また、ai エージェントが電球のオンとオフを切り替えることを許可することでタスクの自動化をします。
独自のコードでは、外部サービスまたは API と対話して同様の結果を得るプラグインを作成できます。
using System.ComponentModel;
using Microsoft.SemanticKernel;

public class LightsPlugin
{
   // Mock data for the lights
   private readonly List<LightModel> lights = new()
   {
      new LightModel { Id = 1, Name = "Table Lamp", IsOn = false },
      new LightModel { Id = 2, Name = "Porch light", IsOn = false },
      new LightModel { Id = 3, Name = "Chandelier", IsOn = true }
   };

   [KernelFunction("get_lights")]
   [Description("Gets a list of lights and their current state")]
   [return: Description("An array of lights")]
   public async Task<List<LightModel>> GetLightsAsync()
   {
      return lights
   }

   [KernelFunction("change_state")]
   [Description("Changes the state of the light")]
   [return: Description("The updated state of the light; will return null if the light does not exist")]
   public async Task<LightModel?> ChangeStateAsync(int id, bool isOn)
   {
      var light = lights.FirstOrDefault(light => light.Id == id);

      if (light == null)
      {
         return null;
      }

      // Update the light with the new state
      light.IsOn = isOn;

      return light;
   }
}

public class LightModel
{
   [JsonPropertyName("id")]
   public int Id { get; set; }

   [JsonPropertyName("name")]
   public string Name { get; set; }

   [JsonPropertyName("is_on")]
   public bool? IsOn { get; set; }
}
from typing import Annotated
from semantic_kernel.functions import kernel_function

class LightsPlugin:
    lights = [
        {"id": 1, "name": "Table Lamp", "is_on": False},
        {"id": 2, "name": "Porch light", "is_on": False},
        {"id": 3, "name": "Chandelier", "is_on": True},
    ]

    @kernel_function(
        name="get_lights",
        description="Gets a list of lights and their current state",
    )
    def get_state(
        self,
    ) -> Annotated[str, "the output is a string"]:
        """Gets a list of lights and their current state."""
        return self.lights

    @kernel_function(
        name="change_state",
        description="Changes the state of the light",
    )
    def change_state(
        self,
        id: int,
        is_on: bool,
    ) -> Annotated[str, "the output is a string"]:
        """Changes the state of the light."""
        for light in self.lights:
            if light["id"] == id:
                light["is_on"] = is_on
                return light
        return None
プラグインをカーネルに追加する
プラグインを作成したら、それをカーネルに追加して、AI エージェントがアクセスできるようにします。 このサンプルでは、カーネルに LightsPlugin クラスを追加しました。
// Add the plugin to the kernel
kernel.Plugins.AddFromType<LightsPlugin>("Lights");
# Add the plugin to the kernel
kernel.add_plugin(
    LightsPlugin(),
    plugin_name="Lights",
)
9) 計画
セマンティック カーネルは、ほとんどの LLM のネイティブ機能である 関数呼び出しを利用して、 計画を提供します。 関数呼び出しでは、LLM はユーザーの要求を満たすために特定の関数を要求 (または呼び出し) できます。 セマンティック カーネルは、コードベース内の適切な関数に要求をマーシャリングし、結果を LLM に返して、AI エージェントが最終的な応答を生成できるようにします。
関数の自動呼び出しを有効にするには、まず適切な実行設定を作成して、セマンティック カーネルが AI エージェントから要求されたときにカーネル内の関数を自動的に呼び出すようにする必要があります。
OpenAIPromptExecutionSettings openAIPromptExecutionSettings = new()
{
    ToolCallBehavior = ToolCallBehavior.AutoInvokeKernelFunctions
};
execution_settings = AzureChatPromptExecutionSettings(tool_choice="auto")
execution_settings.function_call_behavior = FunctionCallBehavior.EnableFunctions(auto_invoke=True, filters={})
10) 呼び出し
最後に、プラグインを使用して AI エージェントを呼び出します。 このサンプル コードでは、非ストリーミング応答を生成する方法を示していますが、GetStreamingChatMessageContentAsync メソッドを使用してストリーミング応答を生成することもできます。
// Create chat history
var history = new ChatHistory();

// Get the response from the AI
var result = await chatCompletionService.GetChatMessageContentAsync(
    history,
    executionSettings: openAIPromptExecutionSettings,
    kernel: kernel
);
# Create a history of the conversation
history = ChatHistory()

# Get the response from the AI
result = (await chat_completion.get_chat_message_contents(
    chat_history=history,
    settings=execution_settings,
    kernel=kernel,
    arguments=KernelArguments(),
))[0]
次のステップ
このガイドでは、AI サービスと対話してコードを実行できる単純な AI エージェントを構築することで、セマンティック カーネルの使用をすばやく開始する方法について説明しました。 その他の例を確認し、より複雑な AI エージェントを構築する方法については、 詳細なサンプルを参照してください。