ユーザーによる最新ページの作成を許可する
Microsoft SharePoint でモダン ページを使用することは、画像、Office ファイル、ビデオなどを使用してアイデアを共有する優れた方法です。 ユーザーは サイトにページをすばやく簡単に追加 でき、最新のページはどのデバイスでも見栄えが良い。
Microsoft 365 のグローバル管理者または SharePoint 管理者の場合は、ユーザーがモダン ページを作成することを許可または禁止できます。 これを組織レベルで行うには、 SharePoint 管理センターの設定を変更します。 組織レベルとしてサイト ページの作成を許可する場合は、PowerShell を使用してサイト レベルで有効または無効にすることができます。 サイト所有者は、 サイト レベルでオンまたはオフにすることもできます。
注:
メンバーがサイト上の SharePoint ページを作成または変更できないようにするには、[サイト ページ] に移動し![、[設定] アイコンを選択します>](sharepointonline/media/a47a06c3-83fb-46b2-9c52-d1bad63e3e60.png) ライブラリの設定>このドキュメント ライブラリのアクセス許可を取得し、[メンバー] グループを [読み取り] に設定します。
ライブラリの設定>このドキュメント ライブラリのアクセス許可を取得し、[メンバー] グループを [読み取り] に設定します。
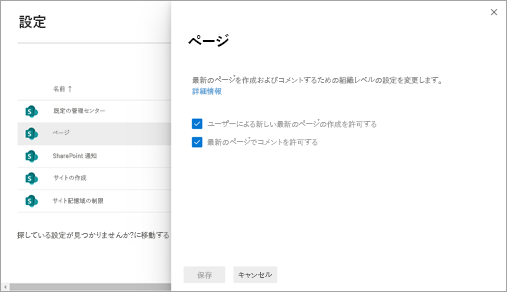
組織レベルでページ作成設定を変更する
SharePoint 管理センターの [設定] に移動し、組織の管理者権限を持つアカウントでサインインします。
注:
21Vianet (中国) によって運用されている Office 365 を使用している場合は、Microsoft 365 管理センターにサインインし、次に SharePoint 管理センターに移動して [設定] ページを開きます。
[ページ] を選択します。
[ ユーザーに新しいモダン ページの作成を許可する] を選択またはオフにします。
注:
ユーザーがモダン ページを作成できないようにすると、次のオプションが非表示になります。
- [サイト ページ] ページと [サイト コンテンツ] ページ >New>Page。
- [設定]>ページを追加します。
ユーザーは、[新しい] メニューまたはモダン Web パーツ (ニュースなど) から、他のモダン ページからページを追加できます。モダン ページでのコメントの許可または禁止を選択することもできます。 コメントを許可する場合は、ページ レベルでオンまたはオフにすることができます。
PowerShell を使用してユーザーが特定のサイトにモダン ページを作成できないようにする
組織レベルとしてサイト ページの作成を許可する場合は、PowerShell を使用してサイト レベルでサイト ページをオフにすることができます。
最新の SharePoint Online 管理シェルをダウンロードします。
注:
SharePoint Online 管理シェルの以前のバージョンがインストールされている場合は、[プログラムの追加と削除] に移動して、"SharePoint Online 管理シェル" をアンインストールします。
SharePoint Online クライアント コンポーネント SDK をインストールします。
Microsoft 365 の グローバル管理者または SharePoint 管理者として SharePoint に接続します。 方法の詳細については、「SharePoint Online 管理シェルの使用を開始する」を参照してください。
注:
「実行ポリシーについて」を参照し、SharePoint Online 管理シェルを管理者として実行し、正しい実行ポリシーを使用して署名されていないスクリプトを実行することを確認します。
以下のコードをコピーし、メモ帳などのテキスト エディターに貼り付けます。
# Load SharePoint Online Client Components SDK Module
Import-Module 'C:\Program Files\Common Files\microsoft shared\Web Server Extensions\16\ISAPI\Microsoft.SharePoint.Client.dll'

# Set script constants
$sitePagesFeatureIdString = 'B6917CB1-93A0-4B97-A84D-7CF49975D4EC'

# Set up client context
$userName = Read-Host "Username"
$password = Read-Host "Password" -AsSecureString
$siteUrl = Read-Host "Site Url"
$webUrl = Read-Host "Server-Relative Web Url"
$context = New-Object Microsoft.SharePoint.Client.ClientContext($siteUrl)
$credentials = New-Object Microsoft.SharePoint.Client.SharePointOnlineCredentials($userName, $password)
$context.Credentials = $credentials

# Get the list of existing features
$web = $context.Site.OpenWeb($webUrl)
$features = $web.Features
$context.Load($features)
$context.ExecuteQuery()

# Verify that the Site Pages feature is present in the web
if(($features | ? { $_.DefinitionId -eq $sitePagesFeatureIdString }).Count -eq 0)
{
    Write-Host "The Site Pages feature is already disabled in this web"
    return
}

# Remove the Site Pages feature from the web
$features.Remove((new-object 'System.Guid' $sitePagesFeatureIdString), $false)
$context.ExecuteQuery()

# Verify that the Site Pages feature is no longer present in the Web
$web = $context.Site.OpenWeb($webUrl)
$features = $web.Features
$context.Load($features)
$context.ExecuteQuery()
if(($features | ? { $_.DefinitionId -eq $sitePagesFeatureIdString }).Count -eq 0)
{
    Write-Host "The Site Pages feature has been successfully disabled"
}
else
{
    throw "The Site Pages feature failed to be disabled"
}
テキスト ファイルを保存し、その拡張子を変更します。 この例では、SitePagesOut.ps1 という名前を付けます。
注:
別のファイル名を使用することもできますが、ファイルは拡張子が .ps1 の ANSI 形式のテキスト ファイルとして保存する必要があります。
ファイルの保存先のディレクトリに移動します。
次のコマンドを実行します。
./SitePagesOut.ps1このスクリプトでは、 SiteUrl と WebUrl の入力を求められます。
"https://contoso.sharepoint.com/sites/marketing/northwindcompete"" などのサイトがある場合。
SiteUrl の場合は、次のように入力します。
https://contoso.sharepoint.com/sites/marketingWebUrl の場合は、「」と入力します。
sites/marketing/northwindcompete
ユーザーが PowerShell を使用して特定のサイトにモダン ページを作成できるようにする
ユーザーがサイトにモダン ページを作成できないようにした場合は、次の手順に従って再度ページを許可します。
SharePoint クライアント コンポーネント SDK をインストールします。
Microsoft 365 の グローバル管理者または SharePoint 管理者として SharePoint に接続します。 方法の詳細については、「SharePoint Online 管理シェルの使用を開始する」を参照してください。
注:
「実行ポリシーについて」を参照し、SharePoint Online 管理シェルを管理者として実行し、正しい実行ポリシーを使用して署名されていないスクリプトを実行することを確認します。
以下のコードをコピーし、メモ帳などのテキスト エディターに貼り付けます。
# Load SharePoint Online Client Components SDK Module
Import-Module 'C:\Program Files\Common Files\microsoft shared\Web Server Extensions\16\ISAPI\Microsoft.SharePoint.Client.dll'

# Set script constants
$sitePagesFeatureIdString = 'B6917CB1-93A0-4B97-A84D-7CF49975D4EC'

# Set up client context
$userName = Read-Host "Username"
$password = Read-Host "Password" -AsSecureString
$siteUrl = Read-Host "Site Url"
$webUrl = Read-Host "Server-Relative Web Url"
$context = New-Object Microsoft.SharePoint.Client.ClientContext($siteUrl)
$credentials = New-Object Microsoft.SharePoint.Client.SharePointOnlineCredentials($userName, $password)
$context.Credentials = $credentials

# Get the list of existing features
$web = $context.Site.OpenWeb($webUrl)
$features = $web.Features
$context.Load($features)
$context.ExecuteQuery()

# Verify that the Site Pages feature is not present in the web
if(($features | ? { $_.DefinitionId -eq $sitePagesFeatureIdString }).Count -gt 0)
{
    Write-Host "The Site Pages feature is already enabled in this web"
    return
}

# Add the Site Pages feature back to the web
$features.Add((new-object 'System.Guid' $sitePagesFeatureIdString), $false, [Microsoft.SharePoint.Client.FeatureDefinitionScope]::None)
$context.ExecuteQuery()

# Verify that the Site Pages feature is now present in the web
$web = $context.Site.OpenWeb($webUrl)
$features = $web.Features
$context.Load($features)
$context.ExecuteQuery()
if(($features | ? { $_.DefinitionId -eq $sitePagesFeatureIdString }).Count -gt 0)
{
    Write-Host "The Site Pages feature has been successfully enabled"
}
else
{
    throw "The Site Pages feature failed to be enabled"
}
テキスト ファイルを保存し、その拡張子を変更します。 この例では、SitePagesIn.ps1 という名前を付けます。
注:
別のファイル名を使用することもできますが、ファイルは拡張子が .ps1 の ANSI 形式のテキスト ファイルとして保存する必要があります。
ファイルの保存先のディレクトリに移動します。
次のコマンドを実行します。
./SitePagesIn.ps1このスクリプトでは、 SiteUrl と WebUrl の入力を求められます。
"https://contoso.sharepoint.com/sites/marketing/northwindcompete"" などのサイトがある場合。
SiteUrl の場合は、次のように入力します。
https://contoso.sharepoint.com/sites/marketingWebUrl の場合は、「」と入力します。
sites/marketing/northwindcompete
フィードバック
以下は間もなく提供いたします。2024 年を通じて、コンテンツのフィードバック メカニズムとして GitHub の issue を段階的に廃止し、新しいフィードバック システムに置き換えます。 詳細については、「https://aka.ms/ContentUserFeedback」を参照してください。
フィードバックの送信と表示