演習: .NET を使用して、Service Bus キューからメッセージを送受信します。
この演習では、次の方法を学習します。
- Azure CLI を使用して、Service Bus 名前空間とキューを作成します。
- キューとの間でメッセージを送受信するための .NET コンソール アプリケーションを作成します。
前提条件
- アクティブなサブスクリプションがある Azure アカウント。 アカウントを取得済みでない場合は、https://azure.com/free から無料評価版にサインアップできます。
- サポートされているプラットフォームのいずれかにインストールされた Visual Studio Code。
- Visual Studio Code 用の C# 拡張機能。
- .NET 8 は、演習用のターゲット フレームワークです。
Azure へのサインイン
このセクションでは、ターミナルを開き、演習の残りの部分で使用されるいくつかの変数を作成します。これにより、コマンド入力と一意のリソース名の作成が少し簡単になります。
Azure Cloud Shell を起動し、[Bash] と環境を選択します。
Azure CLI コマンドで使用する変数を作成します。
<myLocation>を最寄りのリージョンに置き換えます。myLocation=<myLocation> myNameSpaceName=az204svcbus$RANDOM
Azure リソースを作成する
作成する Azure リソースを保持するリソース グループを作成します。
az group create --name az204-svcbus-rg --location $myLocationService Bus メッセージング名前空間を作成します。 次のコマンドによって、前の手順で作成した変数を使用して名前空間が作成されます。 この操作は、完了するまでに数分かかります。
az servicebus namespace create \
    --resource-group az204-svcbus-rg \
    --name $myNameSpaceName \
    --location $myLocation
Service Bus キューを作成する
az servicebus queue create --resource-group az204-svcbus-rg \
    --namespace-name $myNameSpaceName \
    --name az204-queue
Service Bus 名前空間の接続文字列を取得する
Azure portal を開き、[az204-svcbus-rg] リソース グループに移動します。
作成した az204svcbus リソースを選択します。
[設定] セクションで [共有アクセス ポリシー] を選択し、[RootManageSharedAccessKey] ポリシーを選択します。
開いているダイアログ ボックスからプライマリ接続文字列をコピーし、ファイルに保存するか、ポータルを開いたままにして、必要に応じてキーをコピーします。
メッセージをキューに送信するためのコンソール アプリを作成する
ローカル ターミナルを開き、az204svcbus という名前のディレクトリを作成してそのように変更し、コマンドを実行して Visual Studio Code を起動します。
code .メニュー バーで [ターミナル] > [新しいターミナル] を選んで Visual Studio Code でターミナルを開き、次のコマンドを実行してコンソール アプリを作成し、Azure.Messaging.ServiceBus パッケージを追加します。
dotnet new console
dotnet add package Azure.Messaging.ServiceBus
Program.cs で、ファイルの先頭にある現在の
usingステートメントの後に、次のusingステートメントを追加します。using Azure.Messaging.ServiceBus;次の変数をコードに追加し、
connectionString変数を、前に取得した接続文字列に設定します。// connection string to your Service Bus namespace string connectionString = "<CONNECTION STRING>"; // name of your Service Bus topic string queueName = "az204-queue";追加した変数の下に、次のコードを追加します。 詳細については、コードのコメントを参照してください。
// the client that owns the connection and can be used to create senders and receivers
ServiceBusClient client;

// the sender used to publish messages to the queue
ServiceBusSender sender;

// Create the clients that we'll use for sending and processing messages.
client = new ServiceBusClient(connectionString);
sender = client.CreateSender(queueName);

// create a batch
using ServiceBusMessageBatch messageBatch = await sender.CreateMessageBatchAsync();

for (int i = 1; i <= 3; i++)
{
    // try adding a message to the batch
    if (!messageBatch.TryAddMessage(new ServiceBusMessage($"Message {i}")))
    {
        // if an exception occurs
        throw new Exception($"Exception {i} has occurred.");
    }
}

try
{
    // Use the producer client to send the batch of messages to the Service Bus queue
    await sender.SendMessagesAsync(messageBatch);
    Console.WriteLine($"A batch of three messages has been published to the queue.");
}
finally
{
    // Calling DisposeAsync on client types is required to ensure that network
    // resources and other unmanaged objects are properly cleaned up.
    await sender.DisposeAsync();
    await client.DisposeAsync();
}

Console.WriteLine("Follow the directions in the exercise to review the results in the Azure portal.");
Console.WriteLine("Press any key to continue");
Console.ReadKey();
ファイルを保存し、
dotnet buildコマンドを実行して、エラーがないことを確認します。dotnet runコマンドを使ってプログラムを実行し、次の確認メッセージを待ちます。 その後、任意のキーを押してプログラムを終了します。A batch of three messages has been published to the queue.
結果の確認
Azure portal にサインインし、Service Bus 名前空間に移動します。
ナビゲーション ウィンドウの [エンティティ] セクションから [キュー] を選択し、リストから [az204-queue] を選択します。
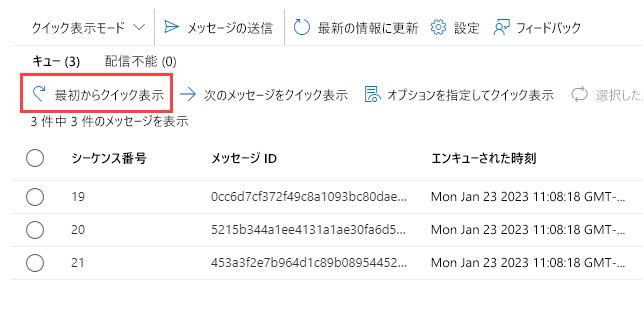
Service Bus キューのナビゲーション ウィンドウで [Service Bus エクスプローラー] を選びます。
[Peek from start] (最初からクイック表示) を選ぶと、送信された 3 つのメッセージが表示されます。
キューへのメッセージを受信するようにプロジェクトを更新する
このセクションでは、キューからメッセージを受信するようにプログラムを更新します。
既存のコードの末尾に次のコードを追加します。 詳細については、コードのコメントを参照してください。
ServiceBusProcessor processor;
client = new ServiceBusClient(connectionString);

// create a processor that we can use to process the messages
processor = client.CreateProcessor(queueName, new ServiceBusProcessorOptions());

try
{
    // add handler to process messages
    processor.ProcessMessageAsync += MessageHandler;

    // add handler to process any errors
    processor.ProcessErrorAsync += ErrorHandler;

    // start processing
    await processor.StartProcessingAsync();

    Console.WriteLine("Wait for a minute and then press any key to end the processing");
    Console.ReadKey();

    // stop processing
    Console.WriteLine("\nStopping the receiver...");
    await processor.StopProcessingAsync();
    Console.WriteLine("Stopped receiving messages");
}
finally
{
    // Calling DisposeAsync on client types is required to ensure that network
    // resources and other unmanaged objects are properly cleaned up.
    await processor.DisposeAsync();
    await client.DisposeAsync();
}

// handle received messages
async Task MessageHandler(ProcessMessageEventArgs args)
{
    string body = args.Message.Body.ToString();
    Console.WriteLine($"Received: {body}");

    // complete the message. messages is deleted from the queue.
    await args.CompleteMessageAsync(args.Message);
}

// handle any errors when receiving messages
Task ErrorHandler(ProcessErrorEventArgs args)
{
    Console.WriteLine(args.Exception.ToString());
    return Task.CompletedTask;
}
dotnet buildコマンドを使用して、エラーがないことを確認します。dotnet runコマンドを使ってアプリケーションを実行します。 さらに 3 つのメッセージがキューに送信された後、6 つのメッセージがすべて取得されます。 任意のキーを押して、受信側とアプリケーションを停止します。Wait for a minute and then press any key to end the processing Received: Message 1 Received: Message 2 Received: Message 3 Received: Message 1 Received: Message 2 Received: Message 3 Stopping the receiver... Stopped receiving messages注意
アプリケーションは取得する前にメッセージのバッチを 2 つ送信したので、出力には 3 つのメッセージの 2 つのバッチが表示されるはずです。
ポータルに戻り、[Peek from start] (最初からクイック表示) をもう一度選びます。 すべて取得したので、キューにはメッセージが表示されないことに注意してください。
リソースをクリーンアップする
リソースが不要になった場合は、Azure Cloud Shell で az group delete コマンドを使用してリソース グループを削除できます。
az group delete --name az204-svcbus-rg --no-wait