VMware HCX をデプロイしてインストールする
Azure VMware Solution を Azure にデプロイするときに、VMware HCX Advanced が既定でデプロイされることを思い出してください。 移行用にサイト ペアを構成する前に、次の手順を使用して、オンプレミスの VMware HCX コネクタをデプロイして構成します。
演習を行うには、Azure VMware Solution 環境を構成するための共同作成者権限が割り当てられた Azure サブスクリプションにアクセスする必要があります。
VMware HCX コネクタ をダウンロードする
オンプレミスの vCenter に VMware HCX コネクタをデプロイする前に、VMware HCX コネクタ OVA ファイルを Azure portal からダウンロードします。
Azure portal で、Azure VMware Solution のプライベート クラウドを検索して選びます。
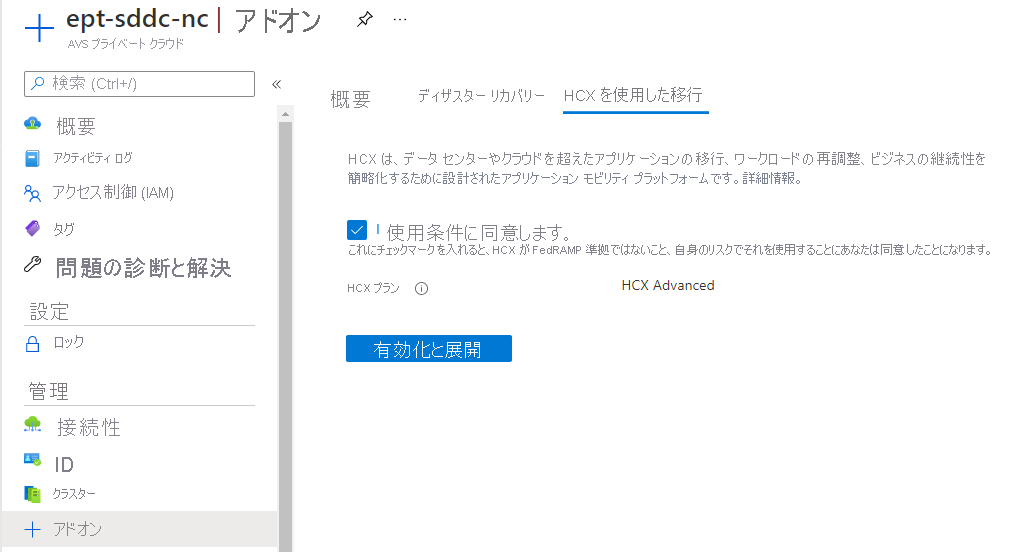
[管理] で、[アドオン] を選択します。
[Migration using HCX](HCX を使用した移行) タブを選択し、[I agree with terms and conditions](ご契約条件に同意する) をオンにし、[Enable and deploy](有効にしてデプロイする) を選択します。
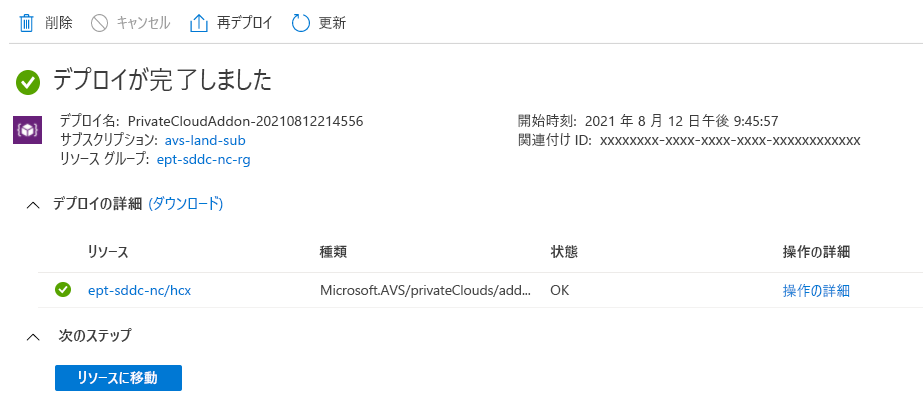
このアクションにより、Azure VMware Solution プライベート クラウド内で VMware HCX Advanced の構築がトリガーされます。
ビルドが完了すると、次の図のような画面が表示されます。
Azure VMware Solution リソース内の [管理] で、[アドオン] をもう一度選択します。
[Migration using HCX] (HCX を使用した移行) タブに [HCX plan] (HCX プラン)、[Configure HCX appliance] (HCX アプライアンスの構成)、[Connect with on-premise using HCX keys] (HCX キーを使用してオンプレミスと接続する) が表示されます。 構成に関するこれらの新しいオプションはすべて、プライベート クラウドへの HCX Advanced のデプロイ時に構築されたものです。
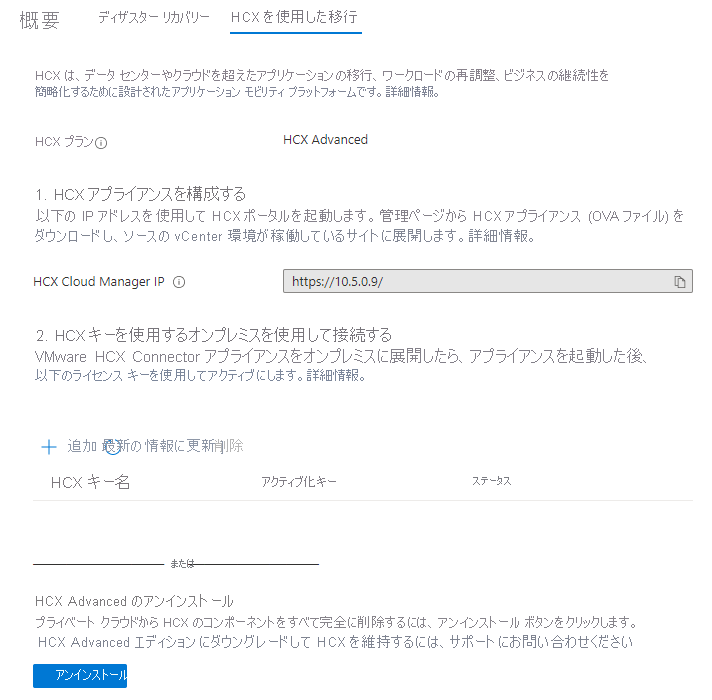
[HCX キーを使用してオンプレミスと接続する] の下にある [+ 追加] を選択して、オンプレミスの HCX コネクタのインストールに使用するキーを生成します。
VMware HCX キー名を入力すると、このペイン内にアクティブ化キーが表示されます。 このキーを使用して、オンプレミスの VMware HCX コネクタ アプライアンスをアクティブにします。

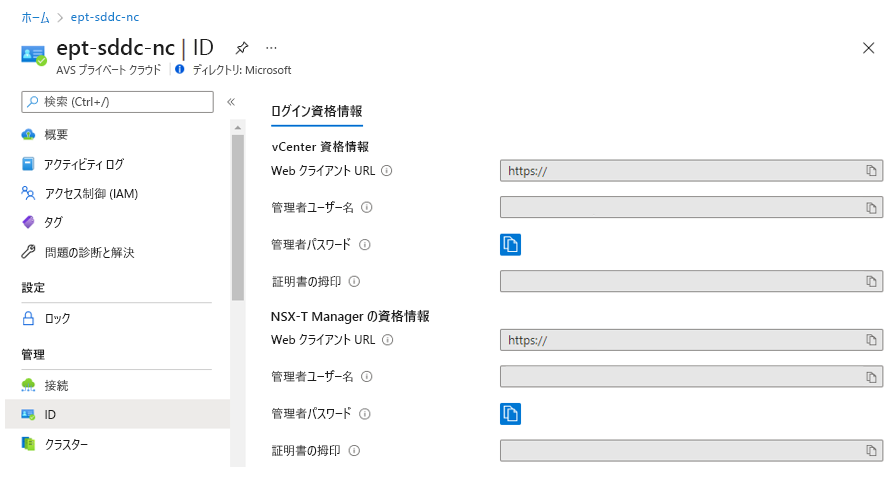
次に、Azure VMware Solution プライベート クラウドの [管理] で [ID] を選択します。
Azure VMware Solution vCenter と NSX-T Manager の URL とユーザー資格情報が表示されます。 コピー機能を使って、ジャンプ ホスト VM 上の Web ブラウザーに資格情報を貼り付けます。
Azure Bastion の背後にあるジャンプ ホスト内でブラウザー ウィンドウを開きます。 ポート 443 経由の
https://x.x.x.9で Azure VMware Solution HCX Manager にサインインします。 x は、Azure VMware Solution の構成に使用する CIDR アドレス ブロックに置き換えてください。cloudadmin@vsphere.local のユーザー資格情報を使用してサインインします。
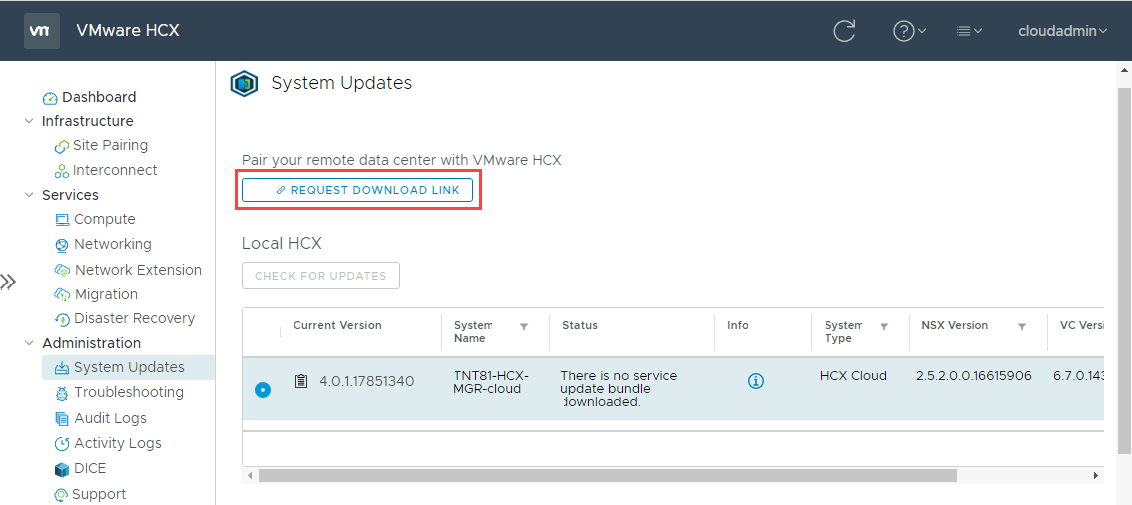
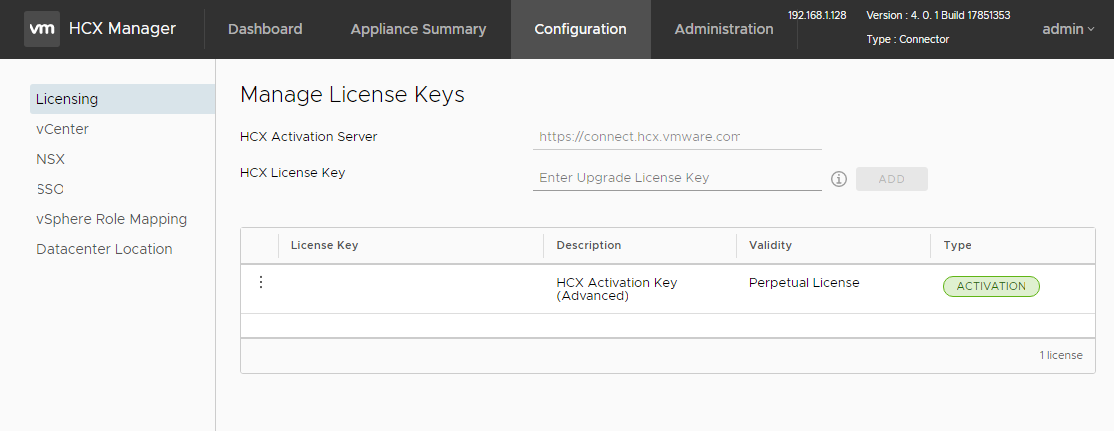
VMware HCX Cloud Manager 内で、[管理]>[システム更新]>[更新プログラムの確認] を選択します。
VMware HCX でソフトウェア更新プログラムを確認した後、[ダウンロード リンクを要求] を選択します。
[VMware HCX] を選択して VMware HCX コネクタ OVA ファイルをダウンロードします。
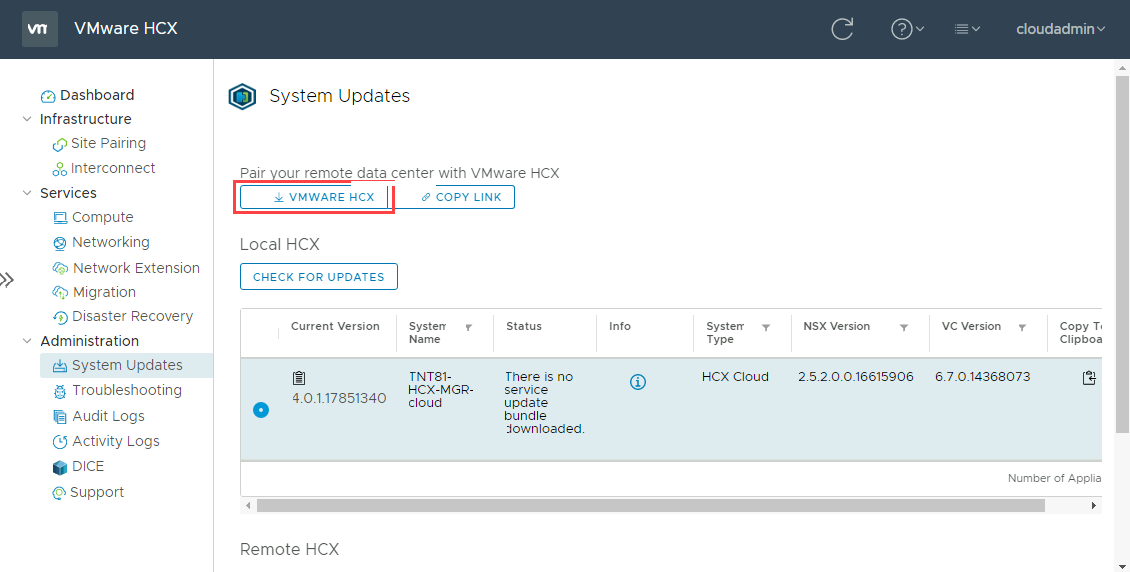
使用することを選択した Web ブラウザーにステータス バーが表示されます。 このステータス バーには、OVA ファイルのダウンロードにかかる時間が強調表示されます。
VMware HCX コネクタ OVA をオンプレミスにデプロイする
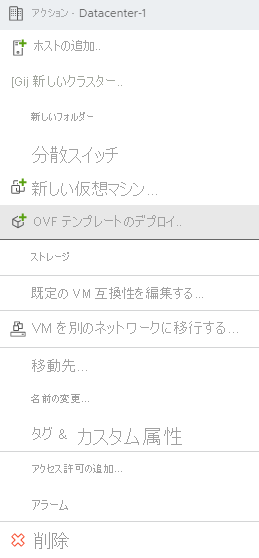
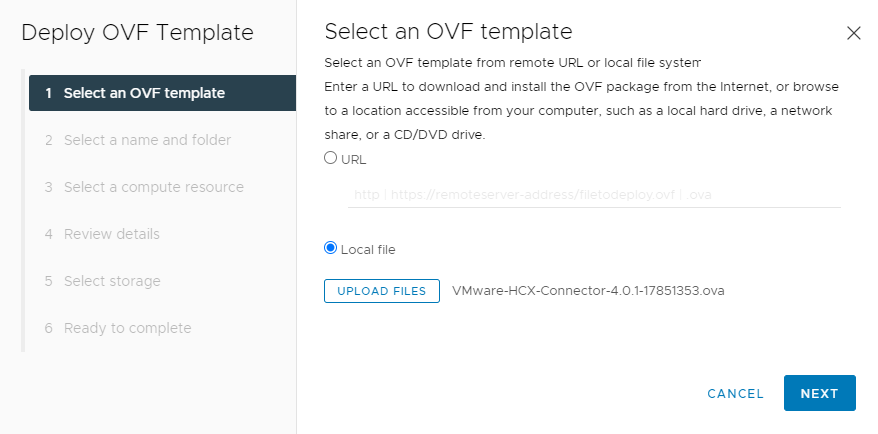
次に、VMware HCX コネクタ OVA ファイルをオンプレミスの VMware 環境にインストールする必要があります。 vCenter の Web GUI にサインインし、OVA ファイルのオンプレミスでのデプロイを開始します。
vCenter データセンターを右クリックし、[Deploy OVF Template] (OVF テンプレートのデプロイ) を選びます。
Azure portal で、既にダウンロードされているローカルの VMware HCX コネクタ OVA ファイルを選択します。
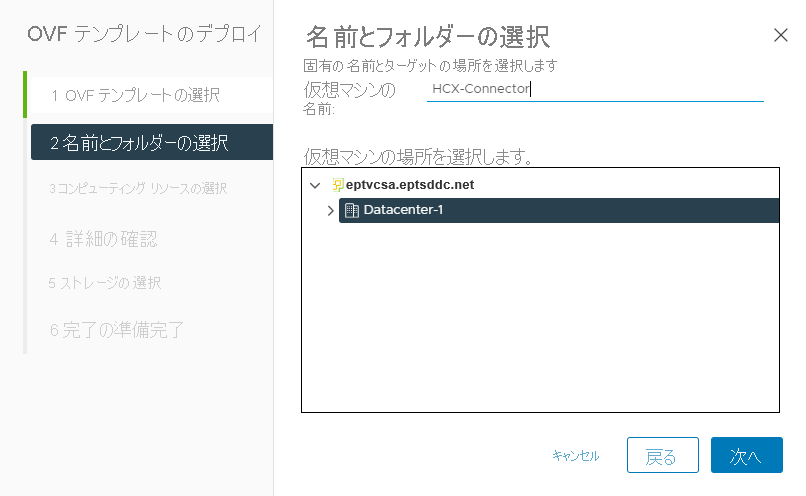
[名前とフォルダーの選択] で、VMware HCX コネクタ アプライアンスの名前を指定し、データセンター リソースを選択して、[次へ] を選択します。
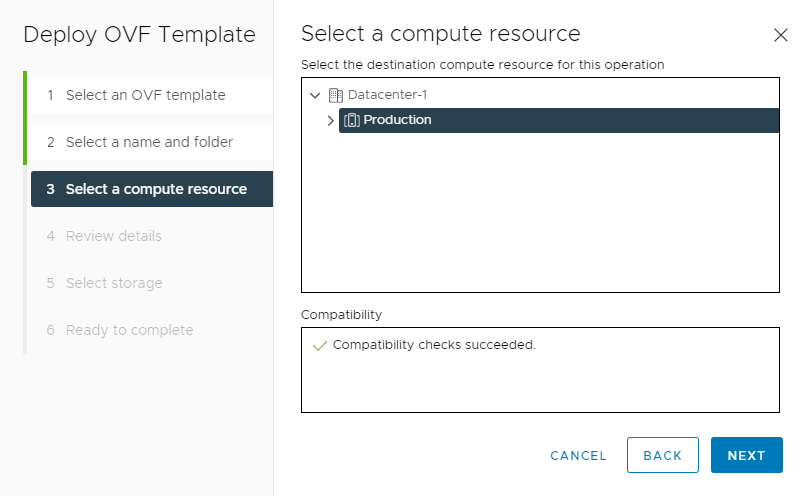
[Select a compute resource] (コンピューティング リソースの選択) で、vSphere クラスターを選び、[Next] (次へ) を選びます。
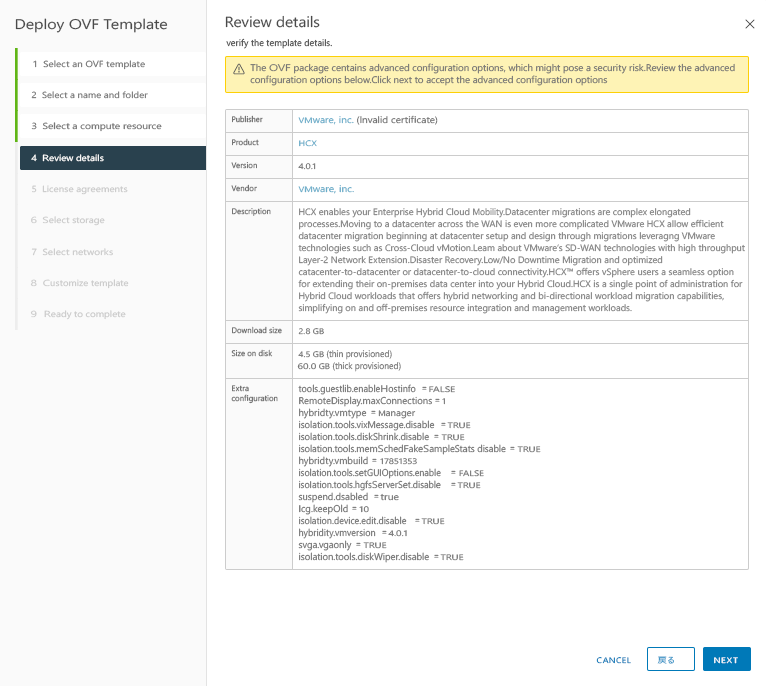
詳細な構成オプションを確認し、[Next] (次へ) を選びます。
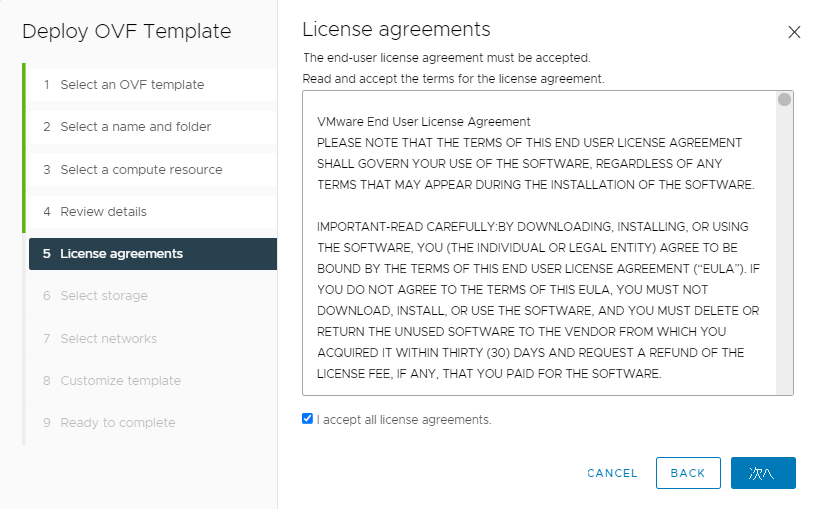
[License agreements] (使用許諾契約書) で、同意する場合は、[I accept all license agreements] (すべての使用許諾契約書に同意する) を選び、[Next] (次へ) を選びます。
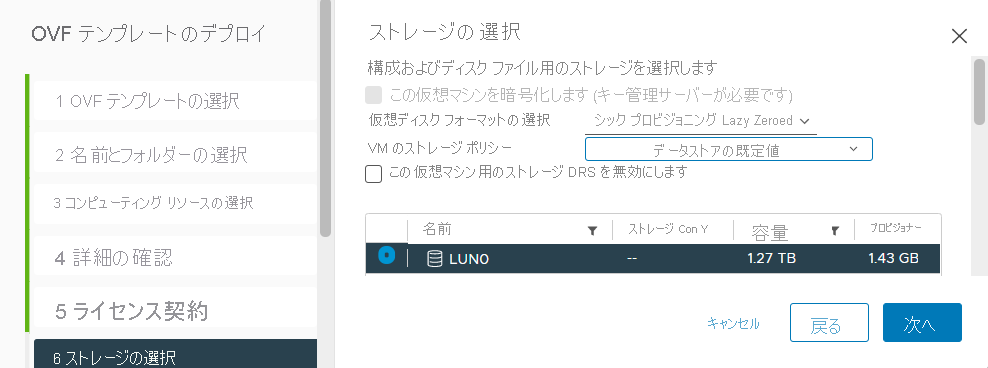
VMware HCX コネクタをデプロイする適切なストレージを選択し、[次へ] を選択します。
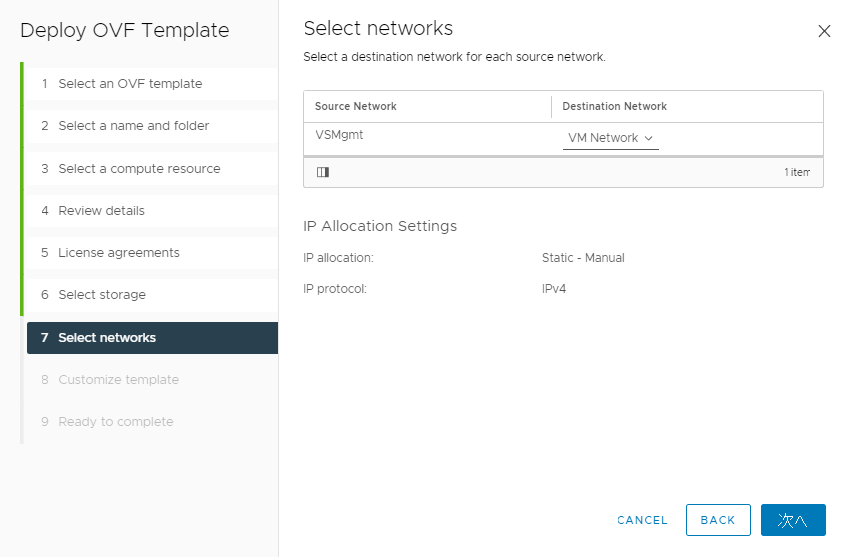
VMware HCX 管理ネットワーク セグメントを選び、[Next] (次へ) を選びます。
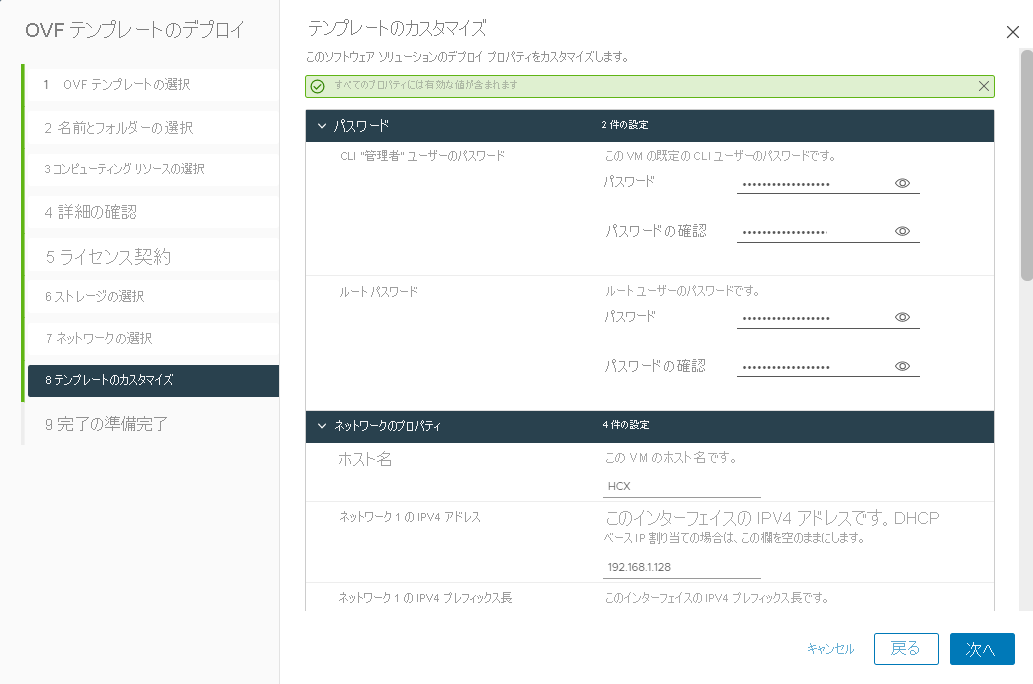
[テンプレートのカスタマイズ] で、VMware HCX コネクタの構成に使用するユーザー アカウントが [管理者] であることに注意してください。必要なすべての情報を入力し、[次へ] を選択します。
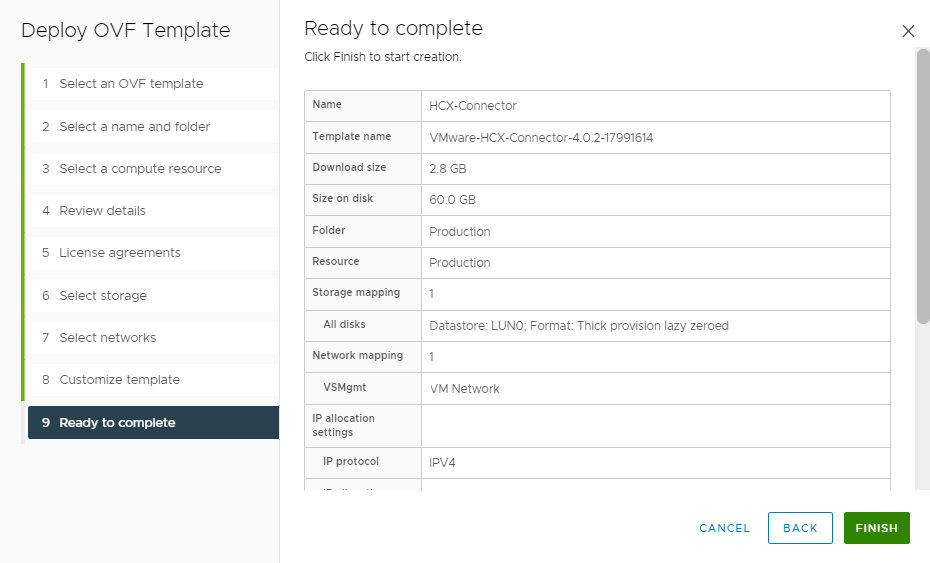
[Ready to complete](完了の準備完了) で、すべての構成を確認し、[Finish](完了) を選択します。
アプライアンスがデプロイされた後、vCenter で仮想アプライアンスの電源を手動でオンにする必要があります。 その後、構成を完了するまで 10 から 15 分待ちます。
VMware HCX をアクティブにする
オンプレミスの VMware HCX コネクタ アプライアンスをデプロイして電源をオンにした後、VMware HCX コネクタをアクティブにします。 Azure の Azure VMware Solution 環境からライセンス キーを取得する必要があります。
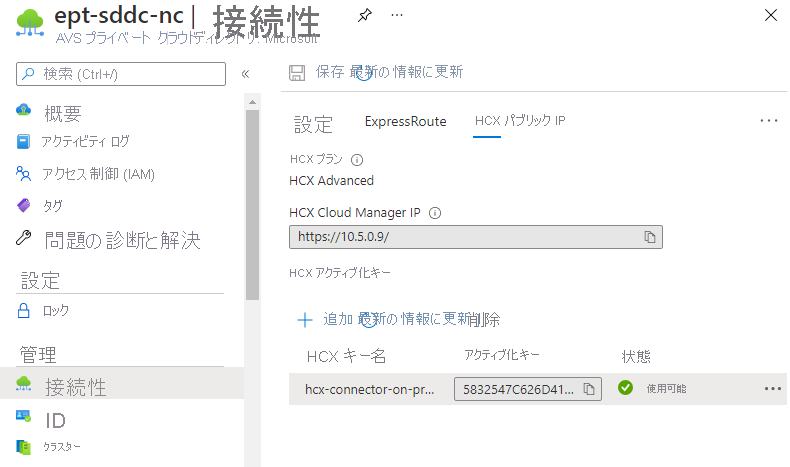
[管理]>[接続] で、[HCX] タブを選択し、[+ 追加] を選択します。
キーの名前を指定し、オンプレミスで使用する VMware HCX Advanced キーが Azure によって生成されるのを待ちます。
以前構成した管理者資格情報を使って、
https://x.x.x.x:9443でオンプレミスの VMware HCX Manager にサインインします。 x は、オンプレミス アプライアンス用に構成された IP アドレスに置き換えてください。ダイアログが表示されたら、[HCX License Key] (HCX ライセンス キー) のキーを入力し、[Add] (追加) を選びます。 アクティブ化中にエラーが発生した場合、オンプレミス環境にオープンなインターネット アクセスが存在しないか、アクティブ化用にプロキシが構成されていない可能性があります。 オンプレミスの VMware HCX コネクタがアクティブではない場合は、インターネット接続を確認してください。
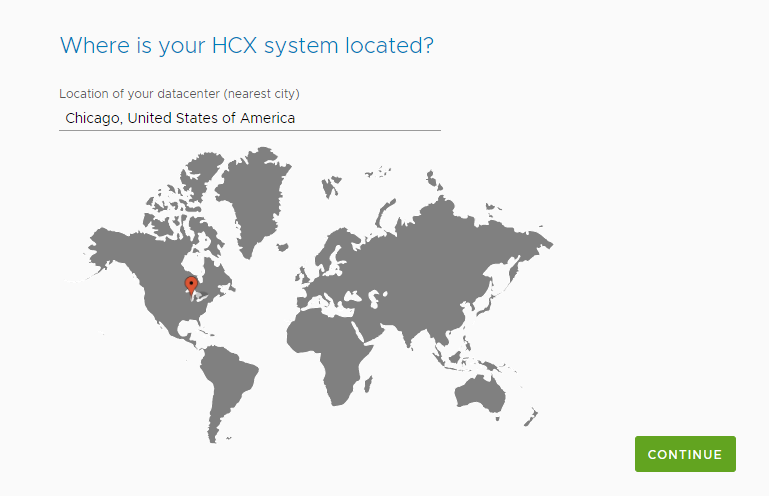
[Datacenter Location] (データセンターの場所) で、オンプレミスの VMware HCX コネクタをインストールする最も近い場所を指定し、[Continue] (続行) を選びます。
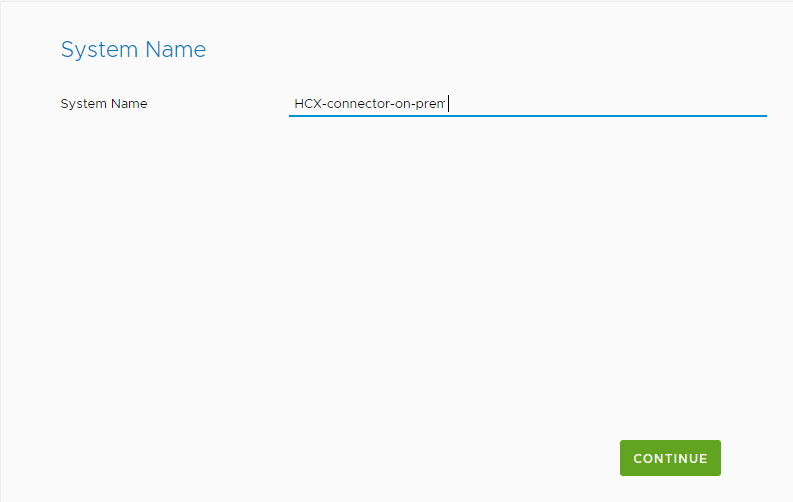
[システム名] で、VMware HCX コネクタ アプライアンス名を変更するか、既定の名前を受け入れて、[続行] を選択します。
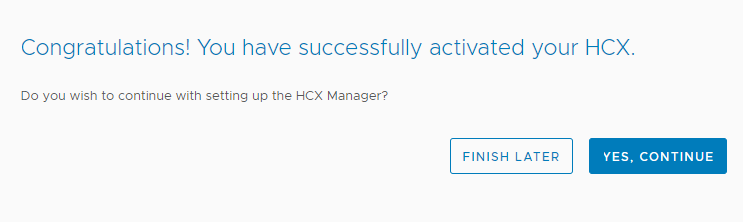
次の画面で、[はい、続行します] を選択して、オンプレミスの VMware HCX コネクタの設定を続行します。
[Connect your vCenter](vCenter の接続) で、オンプレミスの vCenter サーバーの FQDN または IP アドレスを指定します。
オンプレミスの vCenter にアクセスできるアカウントのユーザー名とパスワードを使い、[Continue] (続行) を選びます。

[Configure SSO/PSC] (SSO/PSC の構成) で、Platform Services Controller の FQDN または IP アドレスを入力し、[Continue] (続行) を選びます。

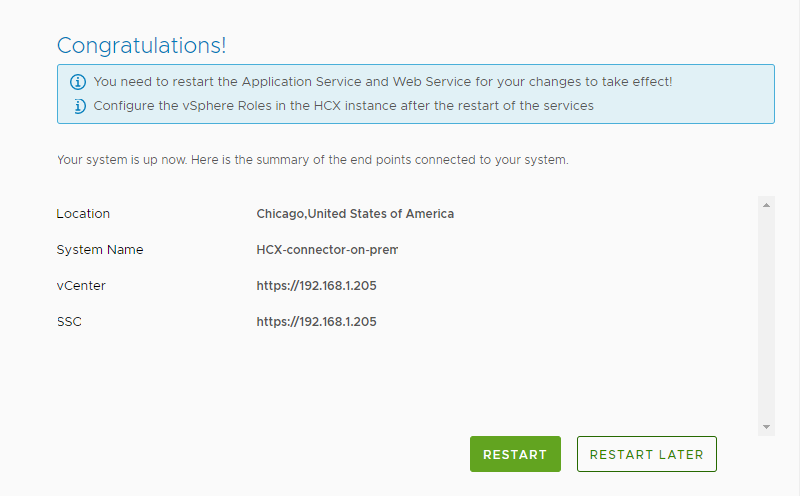
次の画面で、情報が正しいか確認し、[Restart] (再起動) を選びます。 再起動は完了するまでに時間がかかる場合があります。
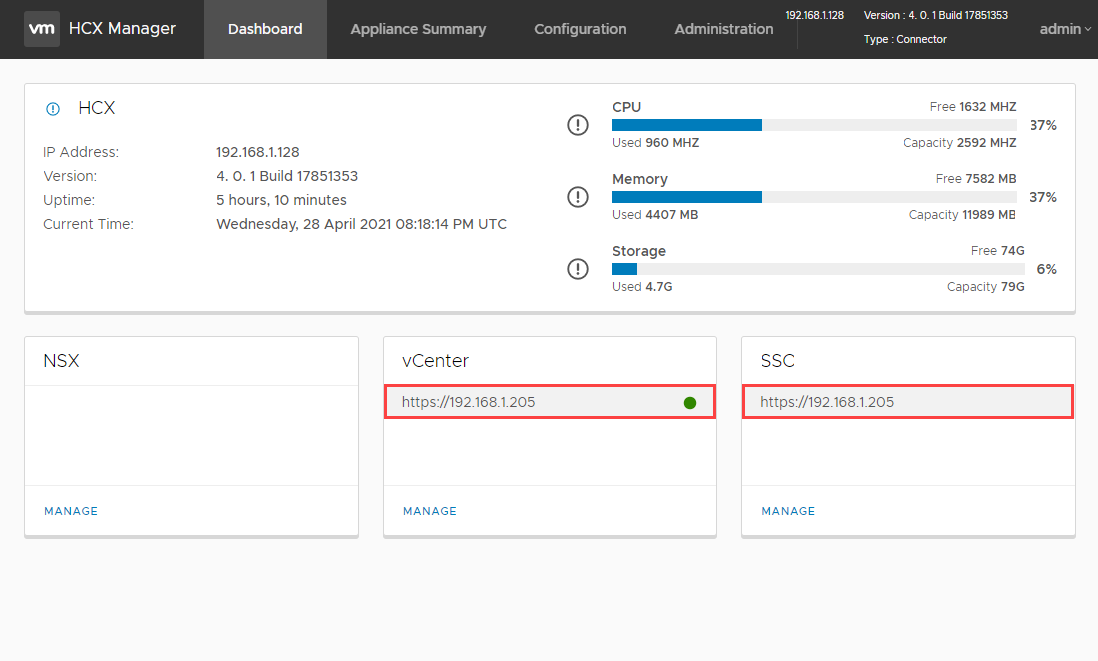
アプライアンスが再起動したら、オンプレミスの VMware HCX マネージャーにもう一度サインインします。
正しく構成されている場合は、サインインした後、vCenter に緑色の円が表示されます。
さらに、SSO は、VMware HCX コネクタが、オンプレミスの Platform Services Controller を使用するように構成されていることを示します。
次のユニットでは、サイト ペアの設定方法、ネットワーク プロファイルの追加方法、コンピューティング プロファイルの追加方法について説明します。